Nissan Rogue (T33) 2021-Present OwnerŌĆÖs Manual & User Guide: Forward-facing child restraint installation using LATCH
Basic information
For proper installation of a forward-facing child restraint in your Nissan Rogue, carefully review all Warnings and Cautions in the ŌĆ£Child safetyŌĆØ and ŌĆ£Child restraintsŌĆØ sections before beginning.
Do not use the lower anchors if the combined weight of the child and restraint exceeds 65 lbs (29.5 kg). If the combined weight is higher than 65 lbs (29.5 kg), install the restraint using the Nissan Rogue seat belt instead of the LATCH anchors. Always follow the child restraint manufacturerŌĆÖs installation instructions.
Follow these steps to install a forward-facing child restraint using the LATCH system:
1. Position the child restraint on the seat.
Always follow the instructions provided by the child restraint manufacturer.

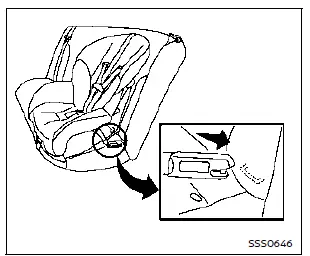
Forward-facing web-mounted - step 2
2. Secure the restraintŌĆÖs LATCH attachments to the lower anchors. Check carefully to ensure the attachment is fully seated and locked onto the anchor points of your Nissan Rogue.
If equipped with a top tether strap, route the strap and attach it to the appropriate tether anchor. See ŌĆ£Installing top tether strap.ŌĆØ Do not install child restraints requiring a top tether in seating positions without a tether anchor.
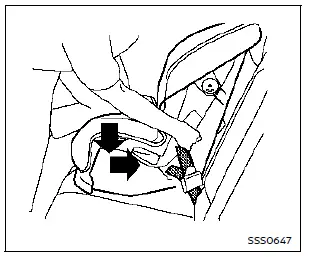
Forward-facing rigid-mounted - step 2
3. Ensure the back of the child restraint rests firmly against the vehicle seatback.
If needed, adjust or remove the head restraint/headrest to achieve proper fitment. If removed, store it securely and reinstall it once the child restraint is removed. See ŌĆ£Head restraints/headrestsŌĆØ for details.
If the seating position has a non-adjustable head restraint/headrest that interferes with correct installation, choose another seating position or a different restraint.
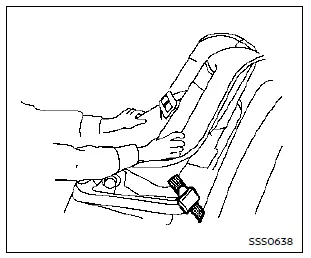
Forward-facing - step 4
4. If the restraint uses webbing-mounted attachments, remove extra slack by pressing downward and rearward firmly in the center of the restraint using your knee. This compresses the seat cushion and seatback of your Nissan Rogue for a tighter fit.
5. Tighten the top tether strap according to the manufacturerŌĆÖs instructions.
Forward-facing - step 6
6. Test the installation prior to placing the child in the restraint. Hold the child restraint near the LATCH attachment path and push it from side to side.
The restraint should not move more than 1 inch (25 mm) sideways. Pull it forward to ensure the LATCH anchors hold it securely. If it is loose, tighten the LATCH attachments or try another seating location. Some restraints may not fit all vehicles.
7. Confirm the restraint is properly secured before each use. If loose, repeat steps 1ŌĆō6.

Other materials:
Instruments et jauges
Mod├©les avec compteurs analogiques et
affichage couleur
Sur le Nissan Rogue, les instruments et jauges du combin├® vous donnent, en un coup dŌĆÖ┼ōil, les informations essentielles de conduite (r├®gime, vitesse, temp├®rature moteur et niveau de carburant). Pour une lecture fiable et une longue dur ...
Dtc/circuit Diagnosis. Communication Signal Circuit
Component Function Check
CHECK SUNSHADE FUNTION
Check sunshade open/close operations with sunshade switch.
Is the inspection result normal?
YES>>
Inspection End.
NO>>
Refer to Diagnosis Procedure.
Diagnosis Procedure
CHECK COMMUNICATION SIGNAL
Ignition switch OFF.
Di ...
C1201-4b Awd Control Unit
DTC Description
DTC DETECTION LOGIC DTC
CONSULT screen terms
(Trouble diagnosis content) DTC detecting condition
C1201-4B
CONTROLLER
(Controller)
Diagnosis condition
Ignition switch: ON
Signal
ŌĆö
Threshold
AWD control unit temperature value is too high.
Diagn ...