Nissan Rogue (T33) 2021-Present Service Manual: Periodic Maintenance :: Engine Maintenance (kr15ddt)
Drive Belts
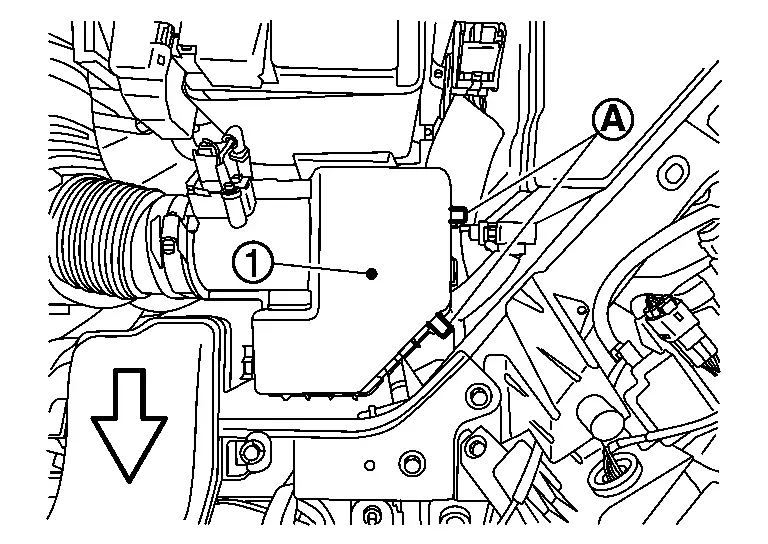
Exploded View
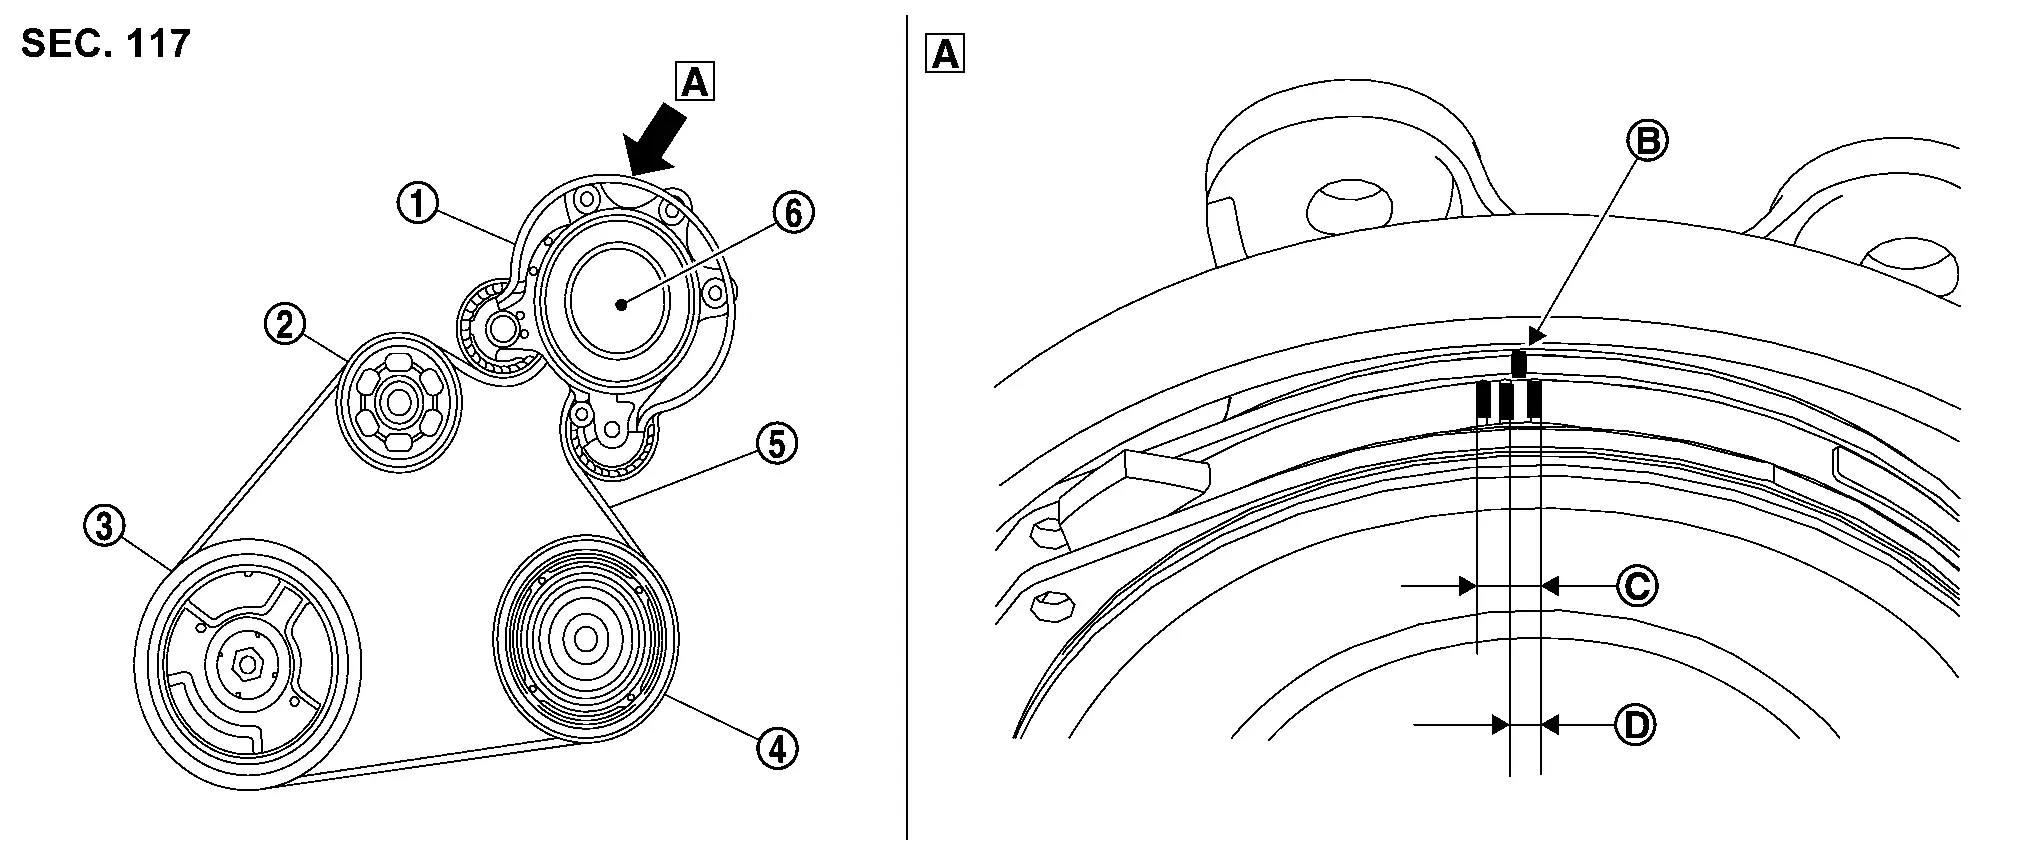
| 1. | Drive belt auto-tensioner | 2. | Water pump | 3. | Crankshaft pulley |
| 4. | A/C compressor | 5. | Drive belt | 6. | Sub starter & generator |
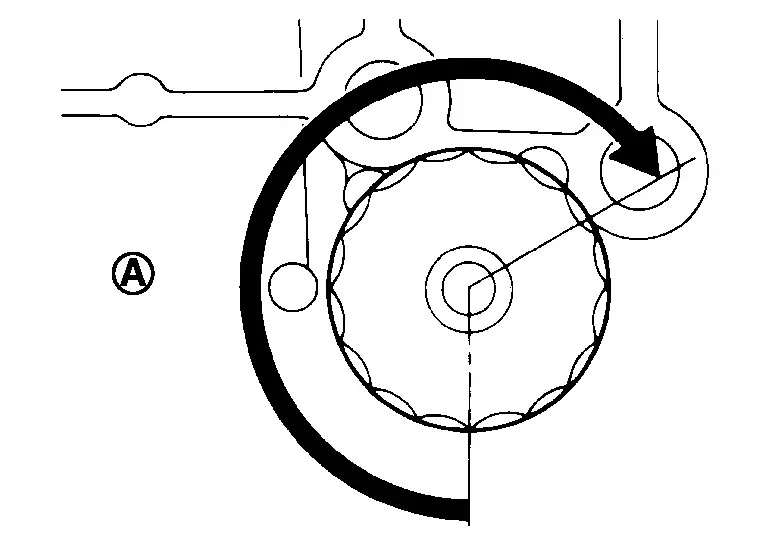
| A | View A | B | Indicator (notch on the fixed side) | C | Possible use range |
| D | Range when new drive belt is installed | â | â | â | â |
Inspection
 |
Drive belt auto-tensioner |  |
Water pump |  |
Crankshaft pulley |
 |
A/C compressor |  |
Drive belt |  |
Sub starter & generator |
 |
View A | B | Indicator (notch on the fixed side) | C | Possible use range |
 |
Range when new drive belt is installed |
WARNING:
Perform this step when engine is stopped.
-
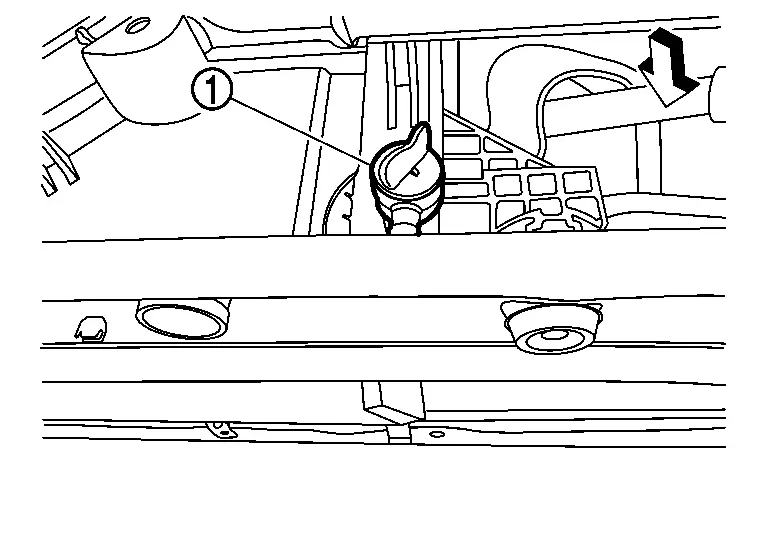
Check that the indicator [notch on fixed side
 ] of drive belt auto-tensioner is within the possible use range (C) shown.
 NOTE:
NOTE:
-
Check drive belt auto-tensioner indication when the engine is cold.
-
When new drive belt is installed, the indicator (notch on fixed side) should be within range in the figure.
-
-
Visually check entire drive belt for wear, damage or cracks.
-
If the indicator (notch on fixed side) is out of the possible use range or belt is damaged, replace drive belt.
Adjustment
Drive belt tension is not manually adjusted. It is automatically adjusted by the drive belt auto-tensioner.
Engine Coolant
Inspection
LEVEL
-
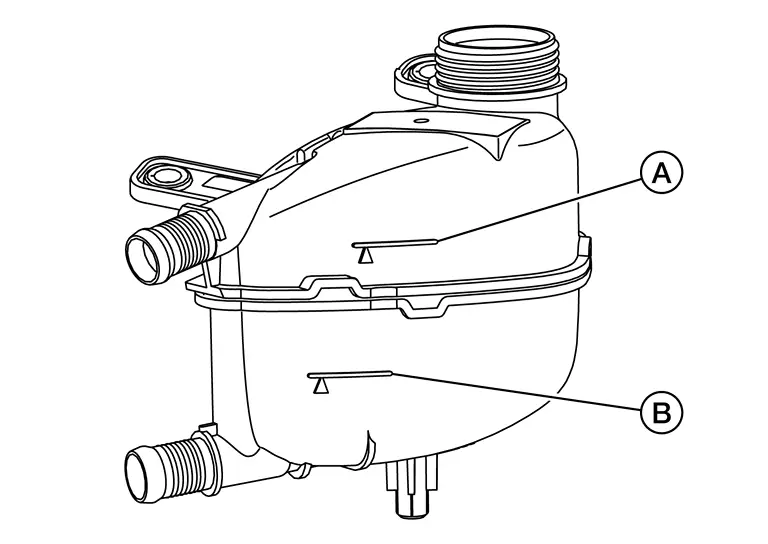
Check that the reservoir tank engine coolant level is within the âMINâ to âMAXâ when the engine is cool.
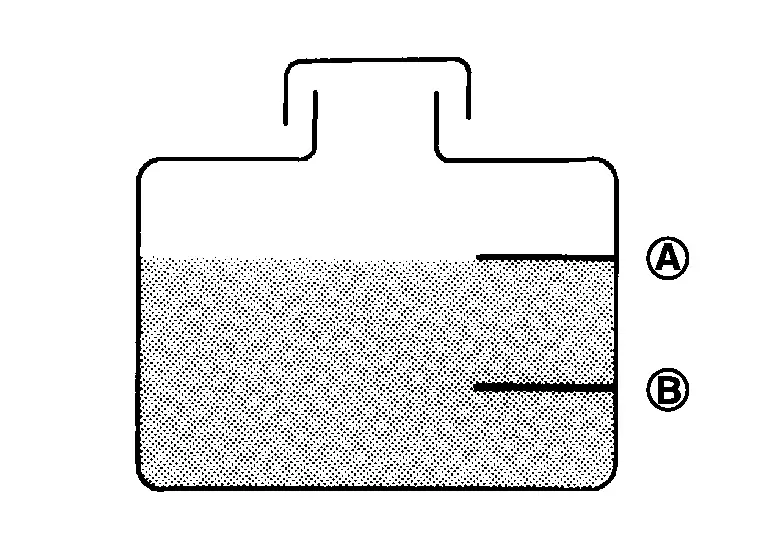
A : MAX B : MIN -
Adjust the engine coolant level if necessary.
CAUTION:
Refill Genuine NISSAN Long Life Antifreeze/Coolant (blue) or equivalent in its quality mixed with water (distilled or demineralized). Refer to Fluids and Lubricants.
LEAKAGE
-
Open the reservoir tank cap.

1. : Reservoir tank cap (for engine) 2. : Reservoir tank cap (for charge air cooler) 
: Nissan Ariya Vehicle front -
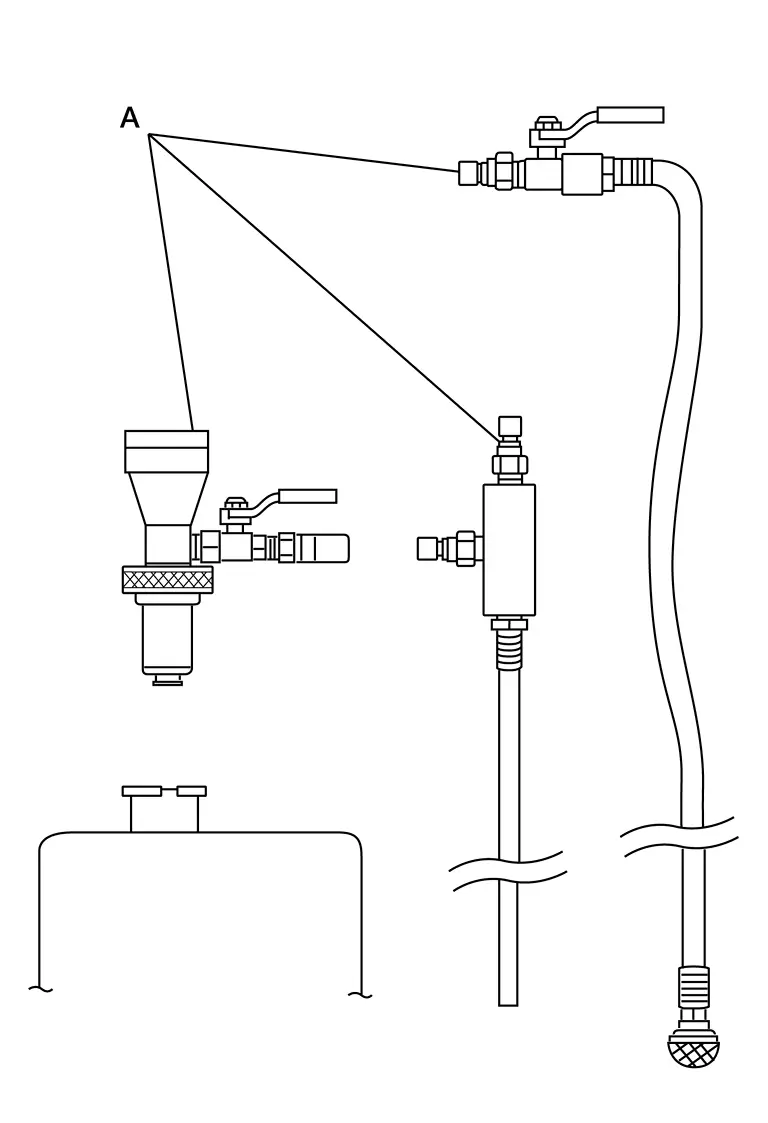
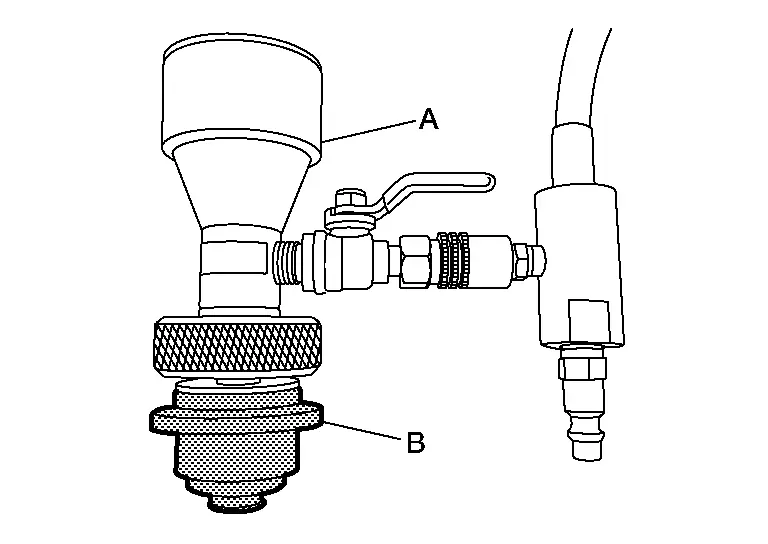
To check for leakage, apply pressure to the cooling system with the radiator cap tester (commercial service tool) (A) and the radiator cap tester adapter [SST:EG17651130] (B).
Testing pressure: Refer to Radiator. WARNING:
Never remove reservoir tank cap when engine is hot. Serious burns may occur from high-pressure engine coolant escaping from engine cooling system.
CAUTION:
-
Higher test pressure than specified may cause radiator damage.
-
Use radiator cap tester adapter [SST:EG17651130] (B) for connecting radiator cap tester (commercial service tool) (A) and filler neck to prevent deformation of reservoir tank filler neck.
NOTE:
In a case that engine coolant decreases, replenish radiator with engine coolant.
-
-
If anything is found, repair or replace damaged parts.
Draining
WHEN DRAIN ENGINE COOLANT USING DRAIN HOSE
WARNING:
-
Never remove reservoir tank cap when engine is hot. Serious burns may occur from high-pressure engine coolant escaping from radiator.
-
Wrap a thick cloth around the reservoir tank cap. Slowly turn it a quarter of a turn to release built-up pressure. Then turn it all the way.
NOTE:
This procedure is for engine cooling system. For procedures involving charge air cooler system, refer to Draining.
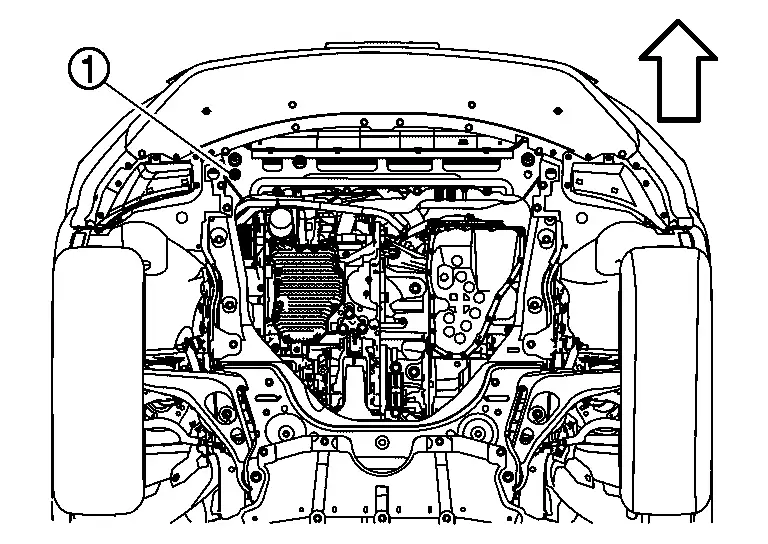
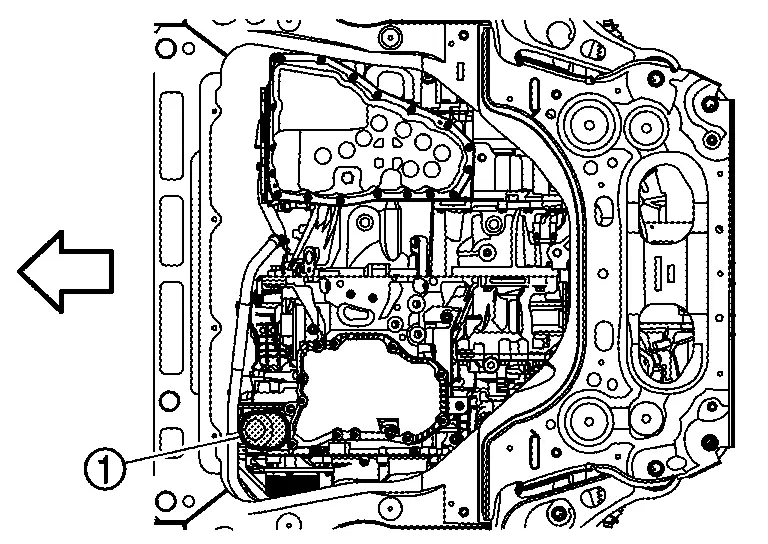
Remove engine under cover and engine under cover front. Refer to Removal and Installation.
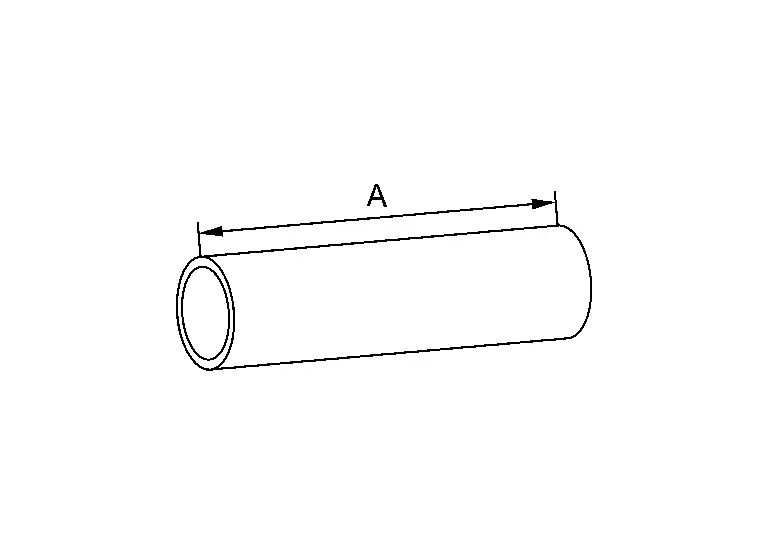
Connect drain hose.
-
Use a genera-purpose hose with the dimensions show in the figure.
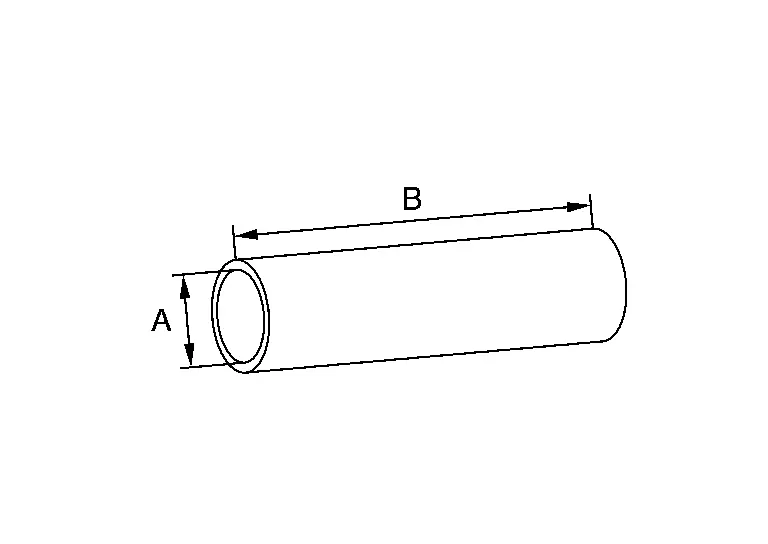
A : Ï 8.5 mm (0.335 in) B : 150 mm (5.91 in)
Open radiator drain cock  at the bottom of radiator, and then remove reservoir tank cap.
 |
: Nissan Ariya Vehicle front |
CAUTION:
-
Perform this step when engine is cold.
-
Draining coolant from the radiator, should make sure that the drain plug is pointed downwards.
-
When draining all of engine coolant in the system, open water drain plugs on cylinder block. Refer to Setting.
Remove reservoir tank if necessary, and drain engine coolant and clean reservoir tank before installing.
Check drained engine coolant for contaminants such as rust, corrosion or discoloration. If contaminated, flush the engine cooling system. Refer to Flushing.
Disconnect drain hose.
WHEN DRAIN ENGINE COOLANT USING TEMPORARY PIPE
NOTE:
This procedure is for engine cooling system. For procedures involving charge air cooler system, refer to Draining.
When draining coolant, follow the instructions below and create a temporary pipe to prevent from splashing.Prepare soft plastic board (e.g. plastic file folder) and roll up the plastic board.
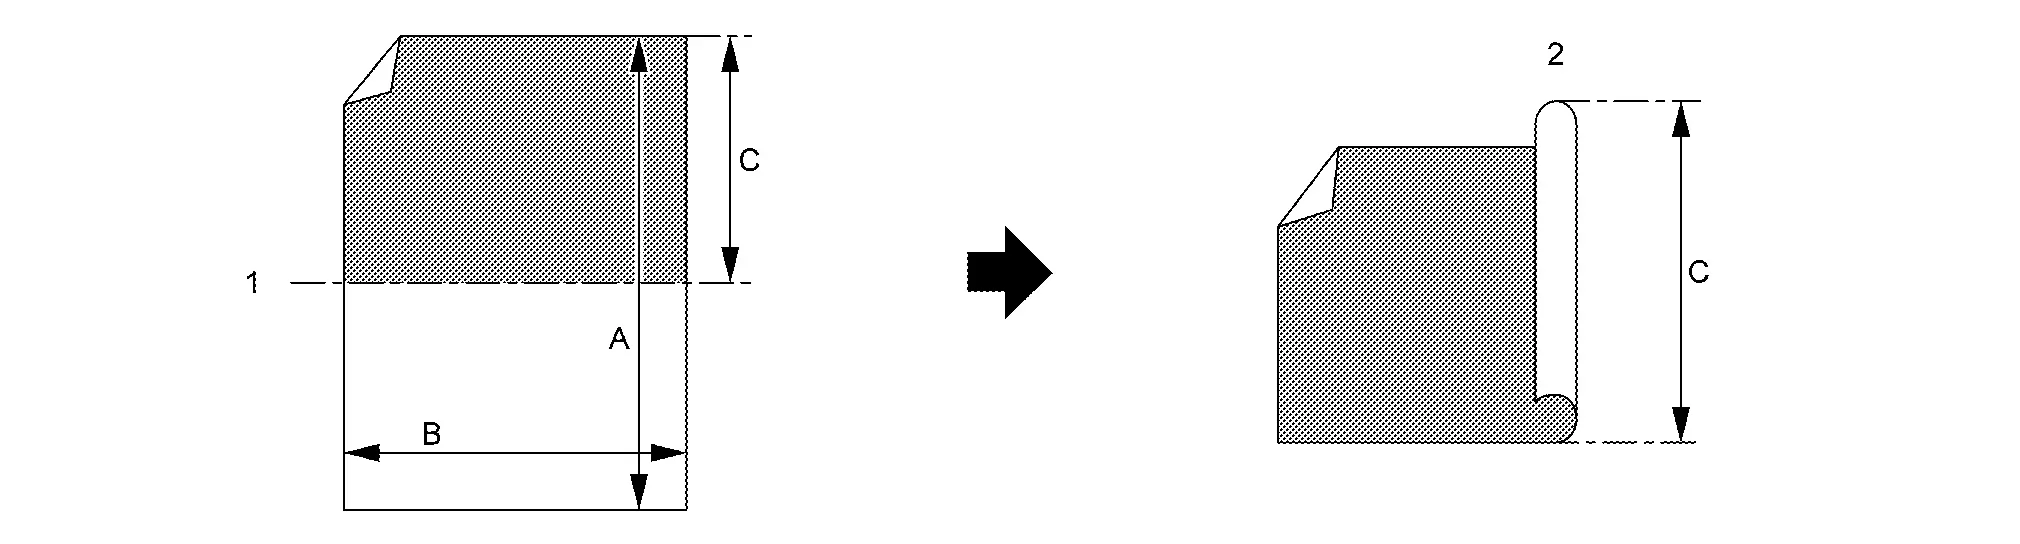
| A | Approx. 295 mm (11.61 in) | B | Approx. 210 mm (8.27 in) | C | Approx. 145 mm (5.71 in) |
Check that the length of temporary pipe (A) approx. 145 mm (5.71 in).
Remove engine under cover front. Refer to Removal and Installation.
Align the plastic board with the outside diameter of drain guide and fix with tape.
Install temporary pipe (A) to drain guide.
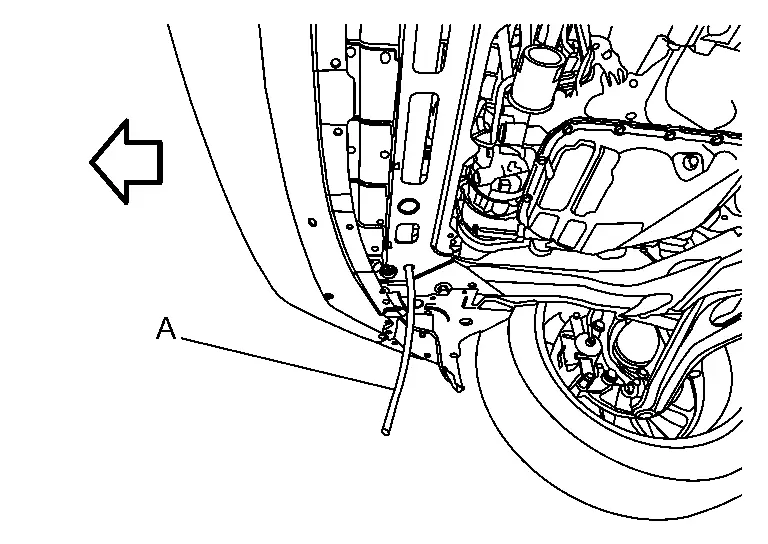
|
: Nissan Ariya Vehicle front |
Open radiator drain cock and reservoir tank cap, and then drain engine coolant.
|
: Nissan Ariya Vehicle front |
CAUTION:
Perform this step when engine is cold.
-
When draining all of engine coolant in the system, open water drain plugs on cylinder block. Refer to Setting.
Remove temporary pipe.
Refilling
CAUTION:
-
Do not put additive such as waterleak preventive, since it may cause cooling waterway clogging.
-
When refilling use Genuine NISSAN Long Life Antifreeze/Coolant (blue) or equivalent in its quality mixed with water (distilled or demineralized). Refer to Fluids and Lubricants.
Install reservoir tank if removed and radiator drain cock.
CAUTION:
Be sure to clean drain cock and install with new O-ring.
| Radiator drain cock | : Refer to Exploded View. |
-
If water drain plugs on cylinder block are removed, close and tighten them. Refer to Setting.
Check that each hose clamp has been firmly tightened.
Refill reservoir tank to âMAXâ level line with engine coolant.
| A | : MAX |
| B | : MIN |
|
Reservoir tank engine coolant capacity (At âMAXâ level) |
|
| Refer to Periodical Maintenance Specification. |
Install reservoir tank cap.
Warm up engine until opening thermostat. Standard for warming-up time is approximately 10 minutes at 3,000 rpm.
-
Without CONSULT, turn on cabin heater switch.
-
With CONSULT, open the ENGINE COOLANT BYPASS VALVE by using CONSULT WORK SUPPORT function. Refer to CONSULT Function.
-
Check thermostat opening condition by touching radiator hose (lower) to see a flow of warm water.
CAUTION:
Watch water temperature gauge so as not to overheat engine.
Stop the engine and cool down to less than approximately 50°C (122°F).
-
Cool down using fan to reduce the time.
-
CAUTION:
Never adhere the engine coolant to electronic equipments (alternator etc.).
Refill reservoir tank to âMAXâ level line with engine coolant.
Repeat steps 3 through 7 two or more times until engine coolant level no longer drops.
Check cooling system for leakage with engine running.
Warm up the engine, and check for sound of engine coolant flow while running engine from idle up to 3,000 rpm with heater temperature controller set at several position between âCOOLâ and âWARMâ.
-
Sound may be noticeable at heater unit.
Repeat step 10 three times.
If sound is heard, bleed air from cooling system by repeating step 3 through 7 until reservoir tank level no longer drops.
Flushing
Install reservoir tank if removed and radiator drain cock.
CAUTION:
-
Be sure to clean the drain plug.
-
Do not reuse O-ring.
| Radiator drain cock | : Refer to Exploded View. |
-
If water drain plugs on cylinder block are removed, close and tighten them. Refer to Setting.
Fill radiator and reservoir tank with water and reinstall reservoir tank cap.
Run the engine and warm it up to normal operating temperature.
Rev the engine two or three times under no-load.
Stop the engine and wait until it cools down.
Drain water from the system. Refer to Draining.
Repeat steps 1 through 6 until clear water begins to drain from radiator.
Sub Radiator Coolant
Inspection
LEVEL
-
Check that the reservoir tank engine coolant level is within the âMINâ to âMAXâ when the engine is cool.
: MAX : MIN -
Adjust the engine coolant level if necessary.
CAUTION:
Refill Genuine NISSAN Long Life Antifreeze/Coolant (blue) or equivalent in its quality mixed with water (distilled or demineralized). Refer to Fluids and Lubricants.
CHECKING COOLING SYSTEM FOR LEAKS
WARNING:
-
Do not remove the radiator cap or reservoir tank cap when the engine is hot. Serious burns could occur from high-pressure engine coolant escaping from the cooling system.
-
When removing the radiator cap or reservoir tank cap, wrap a thick cloth around the cap and slowly turn it a quarter turn to allow built-up pressure to escape. Then carefully remove the cap by turning it all the way.
-
Open the reservoir tank cap.
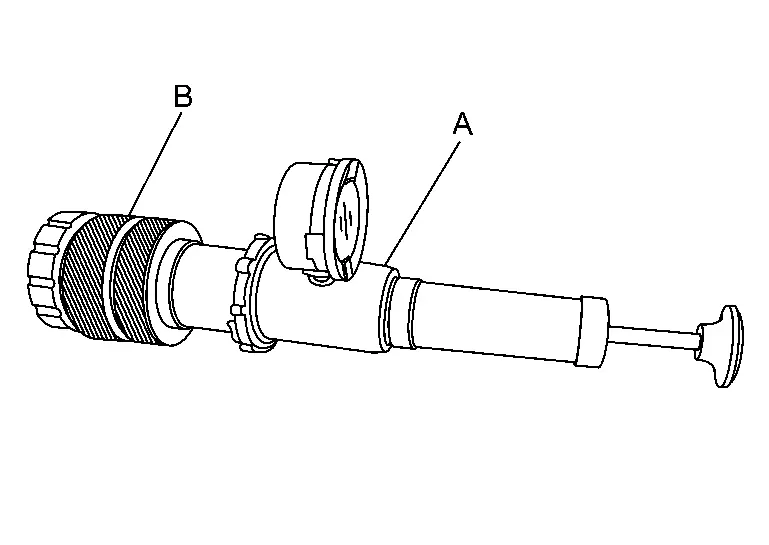
: Reservoir tank cap (for engine) : Reservoir tank cap (for charge air cooler) : Nissan Ariya Vehicle front - Install Tools (A), (B), (C) and (D) to reservoir tank and apply pressure to the cooling system.
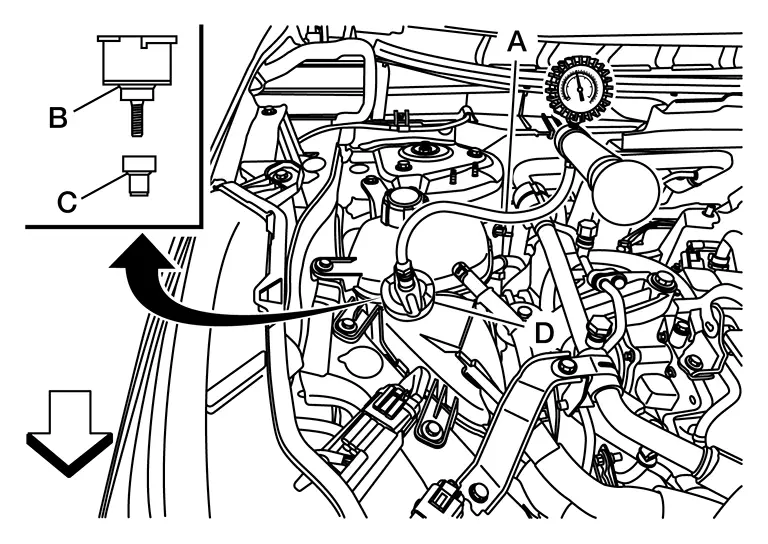
Tool number (A) : â (NI-51771-5) Tool number (B) : â (NI-51771-1) Tool number (C) : â (NI-51771-2) ) Tool number (D) : â (NI-51771-9) Leakage test pressure :Refer to Sub radiator CAUTION:
Higher test pressure than specified may cause radiator damage.
NOTE:
In a case that sub radiator coolant decreases, replenish radiator with engine coolant.
-
If anything is found, repair or replace damaged parts.
Draining
WHEN DRAIN ENGINE COOLANT USING DRAIN HOSE
WARNING:
-
Never remove reservoir tank cap when engine is hot. Serious burns may occur from high-pressure engine coolant escaping from radiator.
-
Wrap a thick cloth around the reservoir tank cap. Slowly turn it a quarter of a turn to release built-up pressure. Then turn it all the way.
Remove engine under cover and engine under cover front. Refer to Removal and Installation.
Connect drain hose.
-
Use a genera-purpose hose with the dimensions show in the figure.
A : Ï 8.5 mm (0.335 in) B : 150 mm (5.91 in)
Open radiator drain cock at the bottom of radiator, and then remove reservoir tank cap.
| : Nissan Ariya Vehicle front |
CAUTION:
-
Perform this step when engine is cold.
-
Draining coolant from the radiator, should make sure that the drain plug is pointed downwards.
-
When draining all of engine coolant in the system, open water drain plugs on cylinder block. Refer to Setting.
Remove reservoir tank if necessary, and drain engine coolant and clean reservoir tank before installing.
Check drained engine coolant for contaminants such as rust, corrosion or discoloration. If contaminated, flush the engine cooling system. Refer to Flushing.
Disconnect drain hose.
WHEN DRAIN ENGINE COOLANT USING TEMPORARY PIPE
When draining coolant, follow the instructions below and create a temporary pipe to prevent from splashing.Prepare soft plastic board (e.g. plastic file folder) and roll up the plastic board.
| A | Approx. 295 mm (11.61 in) | B | Approx. 210 mm (8.27 in) | C | Approx. 145 mm (5.71 in) |
Check that the length of temporary pipe (A) approx. 145 mm (5.71 in).
Remove engine under cover front. Refer to Removal and Installation.
Align the plastic board with the outside diameter of drain guide and fix with tape.
Install temporary pipe (A) to drain guide.
| : Nissan Ariya Vehicle front |
Open radiator drain cock and reservoir tank cap, and then drain engine coolant.
| : Nissan Ariya Vehicle front |
CAUTION:
Perform this step when engine is cold.
-
When draining all of engine coolant in the system, open water drain plugs on cylinder block. Refer to Setting.
Remove temporary pipe.
Refilling
CAUTION:
-
Do not put additive such as waterleak preventive, since it may cause cooling waterway clogging.
-
When refilling use Genuine NISSAN Long Life Antifreeze/Coolant (blue) or equivalent in its quality mixed with water (distilled or demineralized). Refer to Fluids and Lubricants.
Install reservoir tank if removed and sub radiator drain plug.
CAUTION:
Be sure to clean drain cock and install with new O-ring.
| Sub radiator drain plug | : Refer to Exploded View. |
Remove the reservoir tank cap.
Fill the sub radiator cooling system with engine coolant using Tool (A), following the manufacturer's instructions included with the tool.
| Tool number | : KV991J0070 (NI-45695-A) |
| Engine coolant | : Refer to Fluids and Lubricants |
NOTE:
When installing Tool (A) to reservoir tank filler neck, make sure to select the correct size expansion plug (B).
On the CONSULT screen, select "ENGINE" >>"Active Test">>"Charge air cooler cooling electric water pump">> and then "FULL drive".
Start engine and then let idle for three minutes.
-
Check "Electric water pump 1 duty" while engine is idling and verify value is between 68% - 83%.
NOTE:
If the value is between 84% - 92% for more than 5 seconds, engine OFF and skip to step 7.
Engine OFF.
Refill reservoir tank to âMAXâ level line with engine coolant.
| A. | : MAX |
| B. | : MIN |
Repeat steps 4-7 until "Electric water pump 1 duty" value is between 68% - 83% for more than three minutes.
Once step 8 has been completed, repeat steps 4-7 one additional time.
Install reservoir tank cap.
Check cooling system for leaks with engine running.
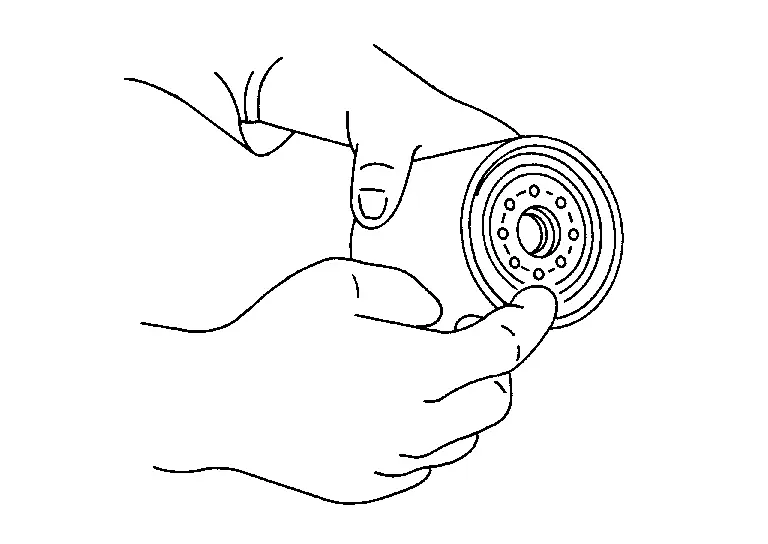
Reservoir Tank Cap
Inspection
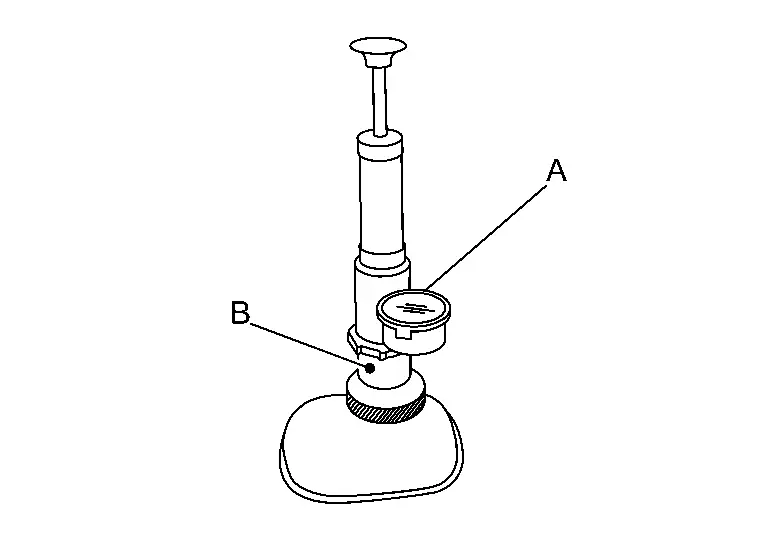
-
Connect radiator cap tester (commercial service tool) (A) with radiator cap tester adapter [SST: EG17651130] (B) and check injection-valve opening pressure of pressure adjusting valve by applying pressure.
Standard : Radiator -
When installing reservoir tank cap to radiator cap tester (commercial service tool), apply water or coolant to the seal of cap.
-
If negative pressure valve has a malfunction or injection-valve opening pressure is outside the reference value, replace reservoir tank cap.
Radiator
Inspection
Check radiator for mud or clogging. If necessary, clean radiator as follows.
CAUTION:
-
Be careful not to bend or damage radiator fins.
-
When radiator is cleaned without removal, remove all surrounding parts such as radiator cooling fan assembly and horns. Then tape harness and harness connectors to prevent water from entering.
Apply water by hose to the back side of the radiator core vertically downward.
Apply water again to all radiator core surfaces once per minute.
Stop washing if any stains no longer flow out from radiator.
Blow air into the back side of radiator core vertically downward.
-
Use compressed air lower than 490 kPa (4.9 bar, 5 kg/cm2, 71 psi) and keep distance more than 30 cm (11.81 in).
Blow air again into all the radiator core surfaces once per minute until no water sprays out.
Fuel System
Inspection
Inspect fuel lines, fuel filler cap, and fuel tank for improper attachment, leakage, cracks, damage, loose connections, chafing or deterioration.
|
: Engine |
|
: Fuel line |
 |
: Fuel tank |
If necessary, repair or replace damaged parts.
Air Cleaner Filter
Removal and Installation
REMOVAL
Remove the air duct from the air cleaner cover.
Release the clips (A) of air cleaner cover (1).
| : Nissan Ariya Vehicle front |
Remove air cleaner filter.
INSTALLATION
Install the air cleaner filter.
Install the air cleaner cover tabs (B) at approximately a 45 degree angle into air cleaner body hinge (A).

Press air cleaner cover onto air cleaner body and latch clips.
NOTE:
Verify the rubber seal is not visible in the area shown (A). If the rubber seal is visible, remove and reinstall air cleaner cover.

Attach the air duct to the air cleaner cover.
Inspection (Dry Paper Type)
INSPECTION AFTER REMOVAL
Examine with eyes that there is no stain, clogging, or damage on air cleaner element.
-
Remove dusts (such as dead leafs) on air cleaner element surface and inside cleaner case.
-
To clean air cleaner element, blow it from intake manifold side towards air intake side to remove trash or dust.
-
If clogging or damage is observed, replace the air cleaner element.
MAINTENANCE INTERVAL
Refer to Periodic Maintenance.
Engine Oil
Draining
WARNING:
-
Be careful not to get burned, as engine oil may be hot.
-
Prolonged and repeated contact with used engine oil may cause skin cancer. Try to avoid direct skin contact with used engine oil. If skin contact is made, wash thoroughly with soap or hand cleaner as soon as possible.
With metal drain plug
Warm up the engine, and check for engine oil leakage from engine components. Refer to Inspection.
Stop the engine and wait for 10 minutes.
Loosen oil filler cap.
Remove engine under cover. Refer to Removal and Installation.
Remove drain plug and then drain engine oil.
CAUTION:
If engine oil is replaced, perform "ENGINE OIL DATA RESET". Refer to Description.
With plastic drain plug
Warm up the engine, and check for engine oil leakage from engine components. Refer to Inspection.
Stop the engine and wait for 10 minutes.
Loosen oil filler cap.
Remove engine under cover. Refer to Removal and Installation.
Using suitable tool, remove drain plug and then drain engine oil.
CAUTION:
-
Do not reuse drain plug.
-
Use genuine drain plug.
-
If engine oil is replaced, perform "ENGINE OIL DATA RESET". Refer to Description.
Refilling
With metal drain plug
Install drain plug with new drain plug washer. Refer to Exploded View.
CAUTION:
-
Do not reuse drain plug washer.
-
Be sure to clean drain plug and install with new drain plug washer.
| Tightening torque | : Refer to Exploded View. | |
Refill with new engine oil.
Engine oil specification and viscosity: Refer to Fluids and Lubricants.
| Engine oil capacity | : Refer to Periodical Maintenance Specification. |
CAUTION:
-
The refill capacity depends on the engine oil temperature and drain time. Use these specifications for reference only.
-
Always use oil level gauge to determine the proper amount of engine oil in the engine.
Warm up engine and check area around drain plug and oil filter for engine oil leakage.
Stop engine and wait for 10 minutes.
Check the engine oil level. Refer to Inspection.
Install engine under cover. Refer to Removal and Installation.
CAUTION:
If engine oil replaced, perform "ENGINE OIL DATA RESET". Refer to Description.
With plastic drain plug
Using suitable tool, install new drain plug and tighten to the lock position in the direction shown.

CAUTION:
-
Do not reuse drain plug.
-
Use genuine drain plug.
| Tightening torque | 3 N·m (0.31 kg-m, 27 in-lb | |
Refill with new engine oil.
Engine oil specification and viscosity: Refer to Fluids and Lubricants.
| Engine oil capacity | : Refer to Periodical Maintenance Specification. |
CAUTION:
-
The refill capacity depends on the engine oil temperature and drain time. Use these specifications for reference only.
-
Always use oil level gauge to determine the proper amount of engine oil in the engine.
Warm up engine and check area around drain plug and oil filter for engine oil leakage.
Stop engine and wait for 10 minutes.
Check the engine oil level. Refer to Inspection.
Install engine under cover. Refer to Removal and Installation.
CAUTION:
If engine oil replaced, perform "ENGINE OIL DATA RESET". Refer to Description.
Oil Filter
Removal and Installation
REMOVAL
-
Remove engine under cover. Refer to Removal and Installation.
-
Using oil filter wrench [SST: KV10115801], remove oil filter
.
: Engine front CAUTION:
-
Oil filter is provided with relief valve.
-
Be careful not to get burned when engine and engine oil may be hot.
-
When removing, prepare a shop cloth to absorb any engine oil leakage or spillage.
-
Completely wipe off any engine oil that adheres to engine and Nissan Ariya vehicle.
NOTE:
It is recommended to use a Genuine NISSAN oil filter or equivalent. The use of parts that do not meet or exceed NISSAN specifications may cause damage to the Nissan Ariya vehicle, and have an effect on warranty coverage. Always check with the Parts Department for the latest parts information.
-
INSTALLATION
Remove foreign materials adhering to the oil filter installation surface.
Apply new engine oil to the oil seal contact surface of new oil filter.
Screw oil filter manually until it touches the installation surface, then tighten it by 2/3 turn . Or tighten to specification.
| Oil filter: | |
 : 17.7 N·m (1.8 kg-m, 13 ft-lb) : 17.7 N·m (1.8 kg-m, 13 ft-lb) |
|
Install engine under cover. Refer to Removal and Installation.
CAUTION:
If engine oil replaced, perform "ENGINE OIL DATA RESET". Refer to Work Procedure.
Inspection
INSPECTION AFTER INSTALLATION
Check the engine oil level. Refer to Inspection.
Start the engine, and check there is no leakage of engine oil.
Stop the engine and wait for 10 minutes.
Check the engine oil level, and adjust the level. Refer to Inspection.
Spark Plug
Removal and Installation
REMOVAL
Remove engine cover. Refer to Removal and Installation.
Disconnect air inlet hose. Refer to Removal and Installation.
Remove turbo hose.
Remove ignition coil. Refer to Removal and Installation.
Remove spark plug with spark plug wrench (commercial service tool).
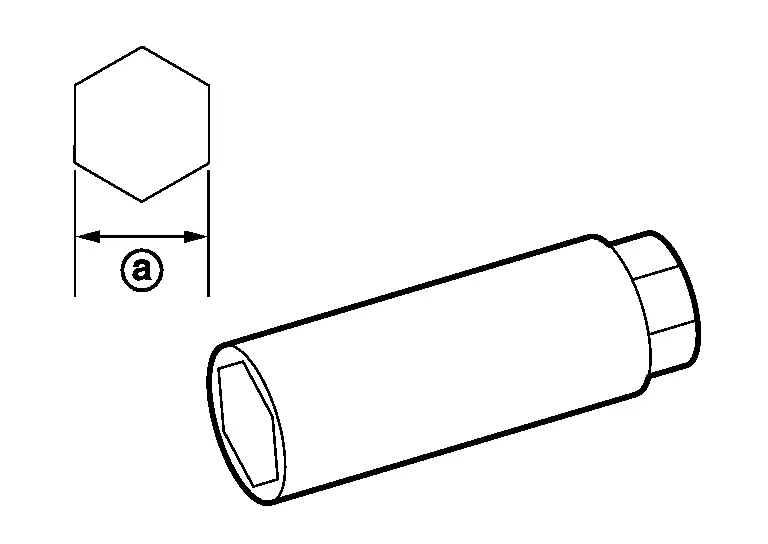
 |
: 14 mm (0.55 in) |
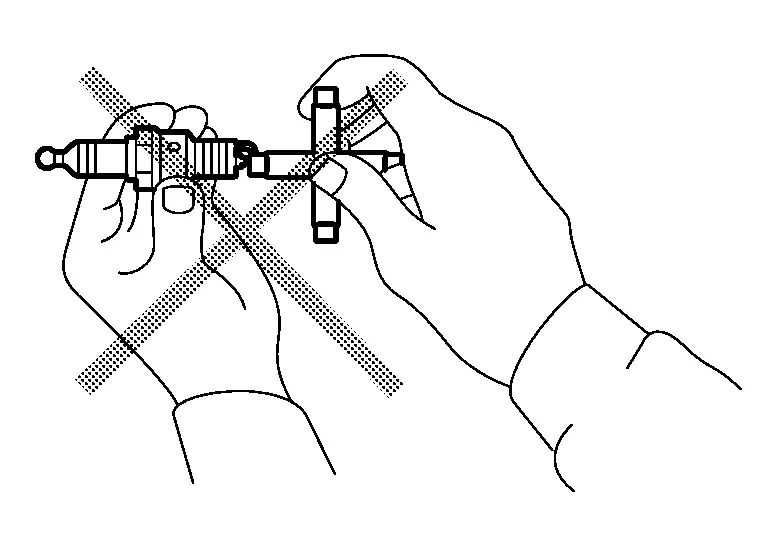
CAUTION:
-
Never drop or shock spark plug.
-
Never disassemble ignition coil.
After removal, inspect the spark plug. Refer to Inspection..
INSTALLATION
Note the following, and install in the reverse order of removal.
-
Install spark plug with spark plug wrench (commercial service tool).
Spark plug : 12.5 N·m (1.3 kg-m, 9 ft-lb) NOTE:
The position of the ground electrode on the genuine spark plugs is adjusted to be in the position with the most favorable ignitability when tightened to the specified torque. When replacing the spark plugs, the genuine spark plugs with the adjusted ground electrode position are recommended.
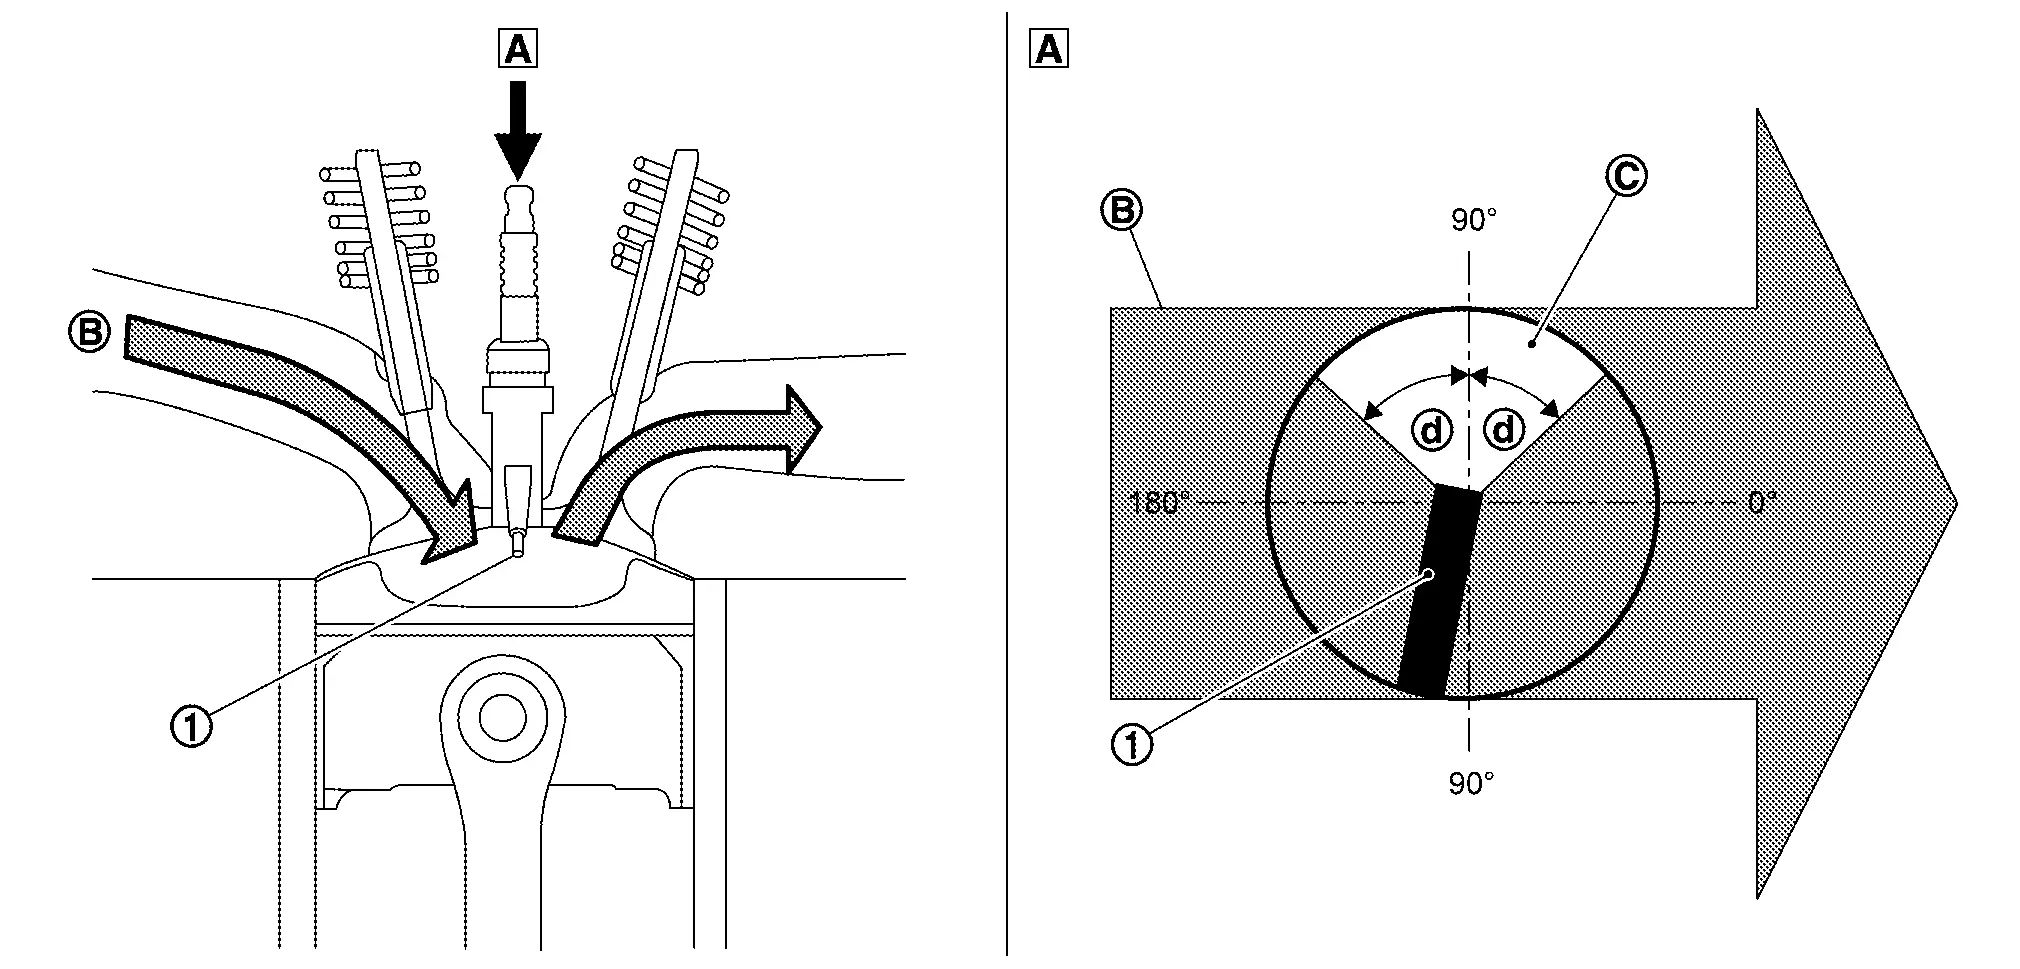
Ground electrode Air fuel mixture flow Fuel efficiency performance range 
45°
Inspection
Use the standard type spark plug for normal condition.
| Spark plug (Standard type) | : Refer to Spark Plug. |
CAUTION:
-
Do not drop or shock spark plug.
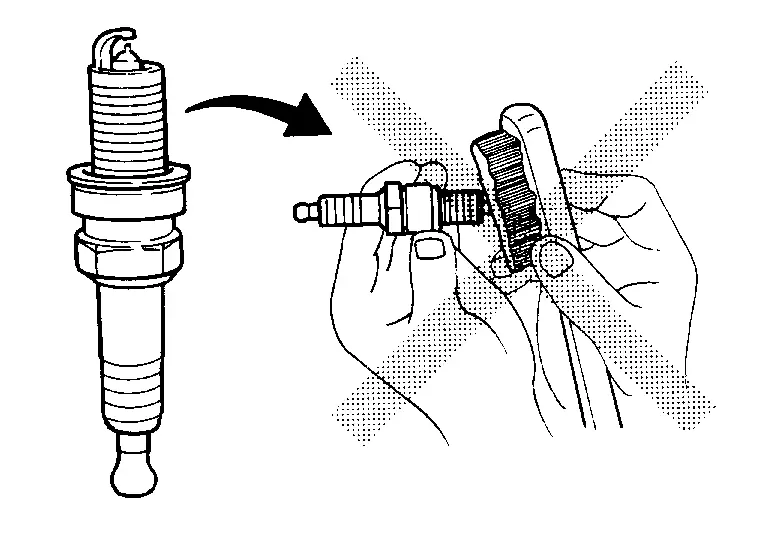
-
Do not use a wire brush for cleaning.
-
If spark plug tip is covered with carbon, spark plug cleaner may be used.
| Cleaner air pressure | : Less than 588 kPa (5.9 bar, 6 kg/cm2, 85 psi) |
| Cleaning time | : Less than 20 seconds |
-
Checking and adjusting spark plug gap is not required between replacement intervals.
Measure spark plug gap.
When it exceeds the limit, replace spark plug, even if it is within the specified replacement mileage. Refer to Spark Plug.
Evap Vapor Lines
Inspection
Visually inspect EVAP vapor lines for improper attachment and for cracks, damage, loose connections, chafing and deterioration.
Refer to EVAPORATIVE EMISSION SYSTEM : Inspection.
Other materials:
Installing top tether strap
WARNING
Child restraint anchorages are designed only for correctly installed restraints. Never attach adult seat belts or other equipment to these pointsâdoing so may damage the anchors and compromise safety.
Avoid hooking the tether strap on the seatback carpet. Always use the designated ...
Fonctionnement du systÃĻme d'intervention de changement de voie intelligent
TÃĐmoin d'activation du systÃĻme d'intervention de changement de voie intelligent (sur l'ÃĐcran d'informations du vÃĐhicule)
TÃĐmoin du systÃĻme d'intervention de changement de voie intelligent (sur l'ÃĐcran d'informations du vÃĐhicule)
Ãcran d'informations du vÃĐhicule et commande P ...
B2e08-01 Microphone
DTC Description
DTC DETECTION LOGIC DTC No.
CONSULT screen terms
(Trouble diagnosis content) DTC detection condition
B2E08â01
Microphone
(Microphone)
1
Diagnosis condition
When ignition switch is ON.
Signal (terminal)
Microphone signal
Threshold
7.2 V or more ...