Nissan Rogue (T33) 2021-Present Service Manual: Removal and Installation :: Rear Door
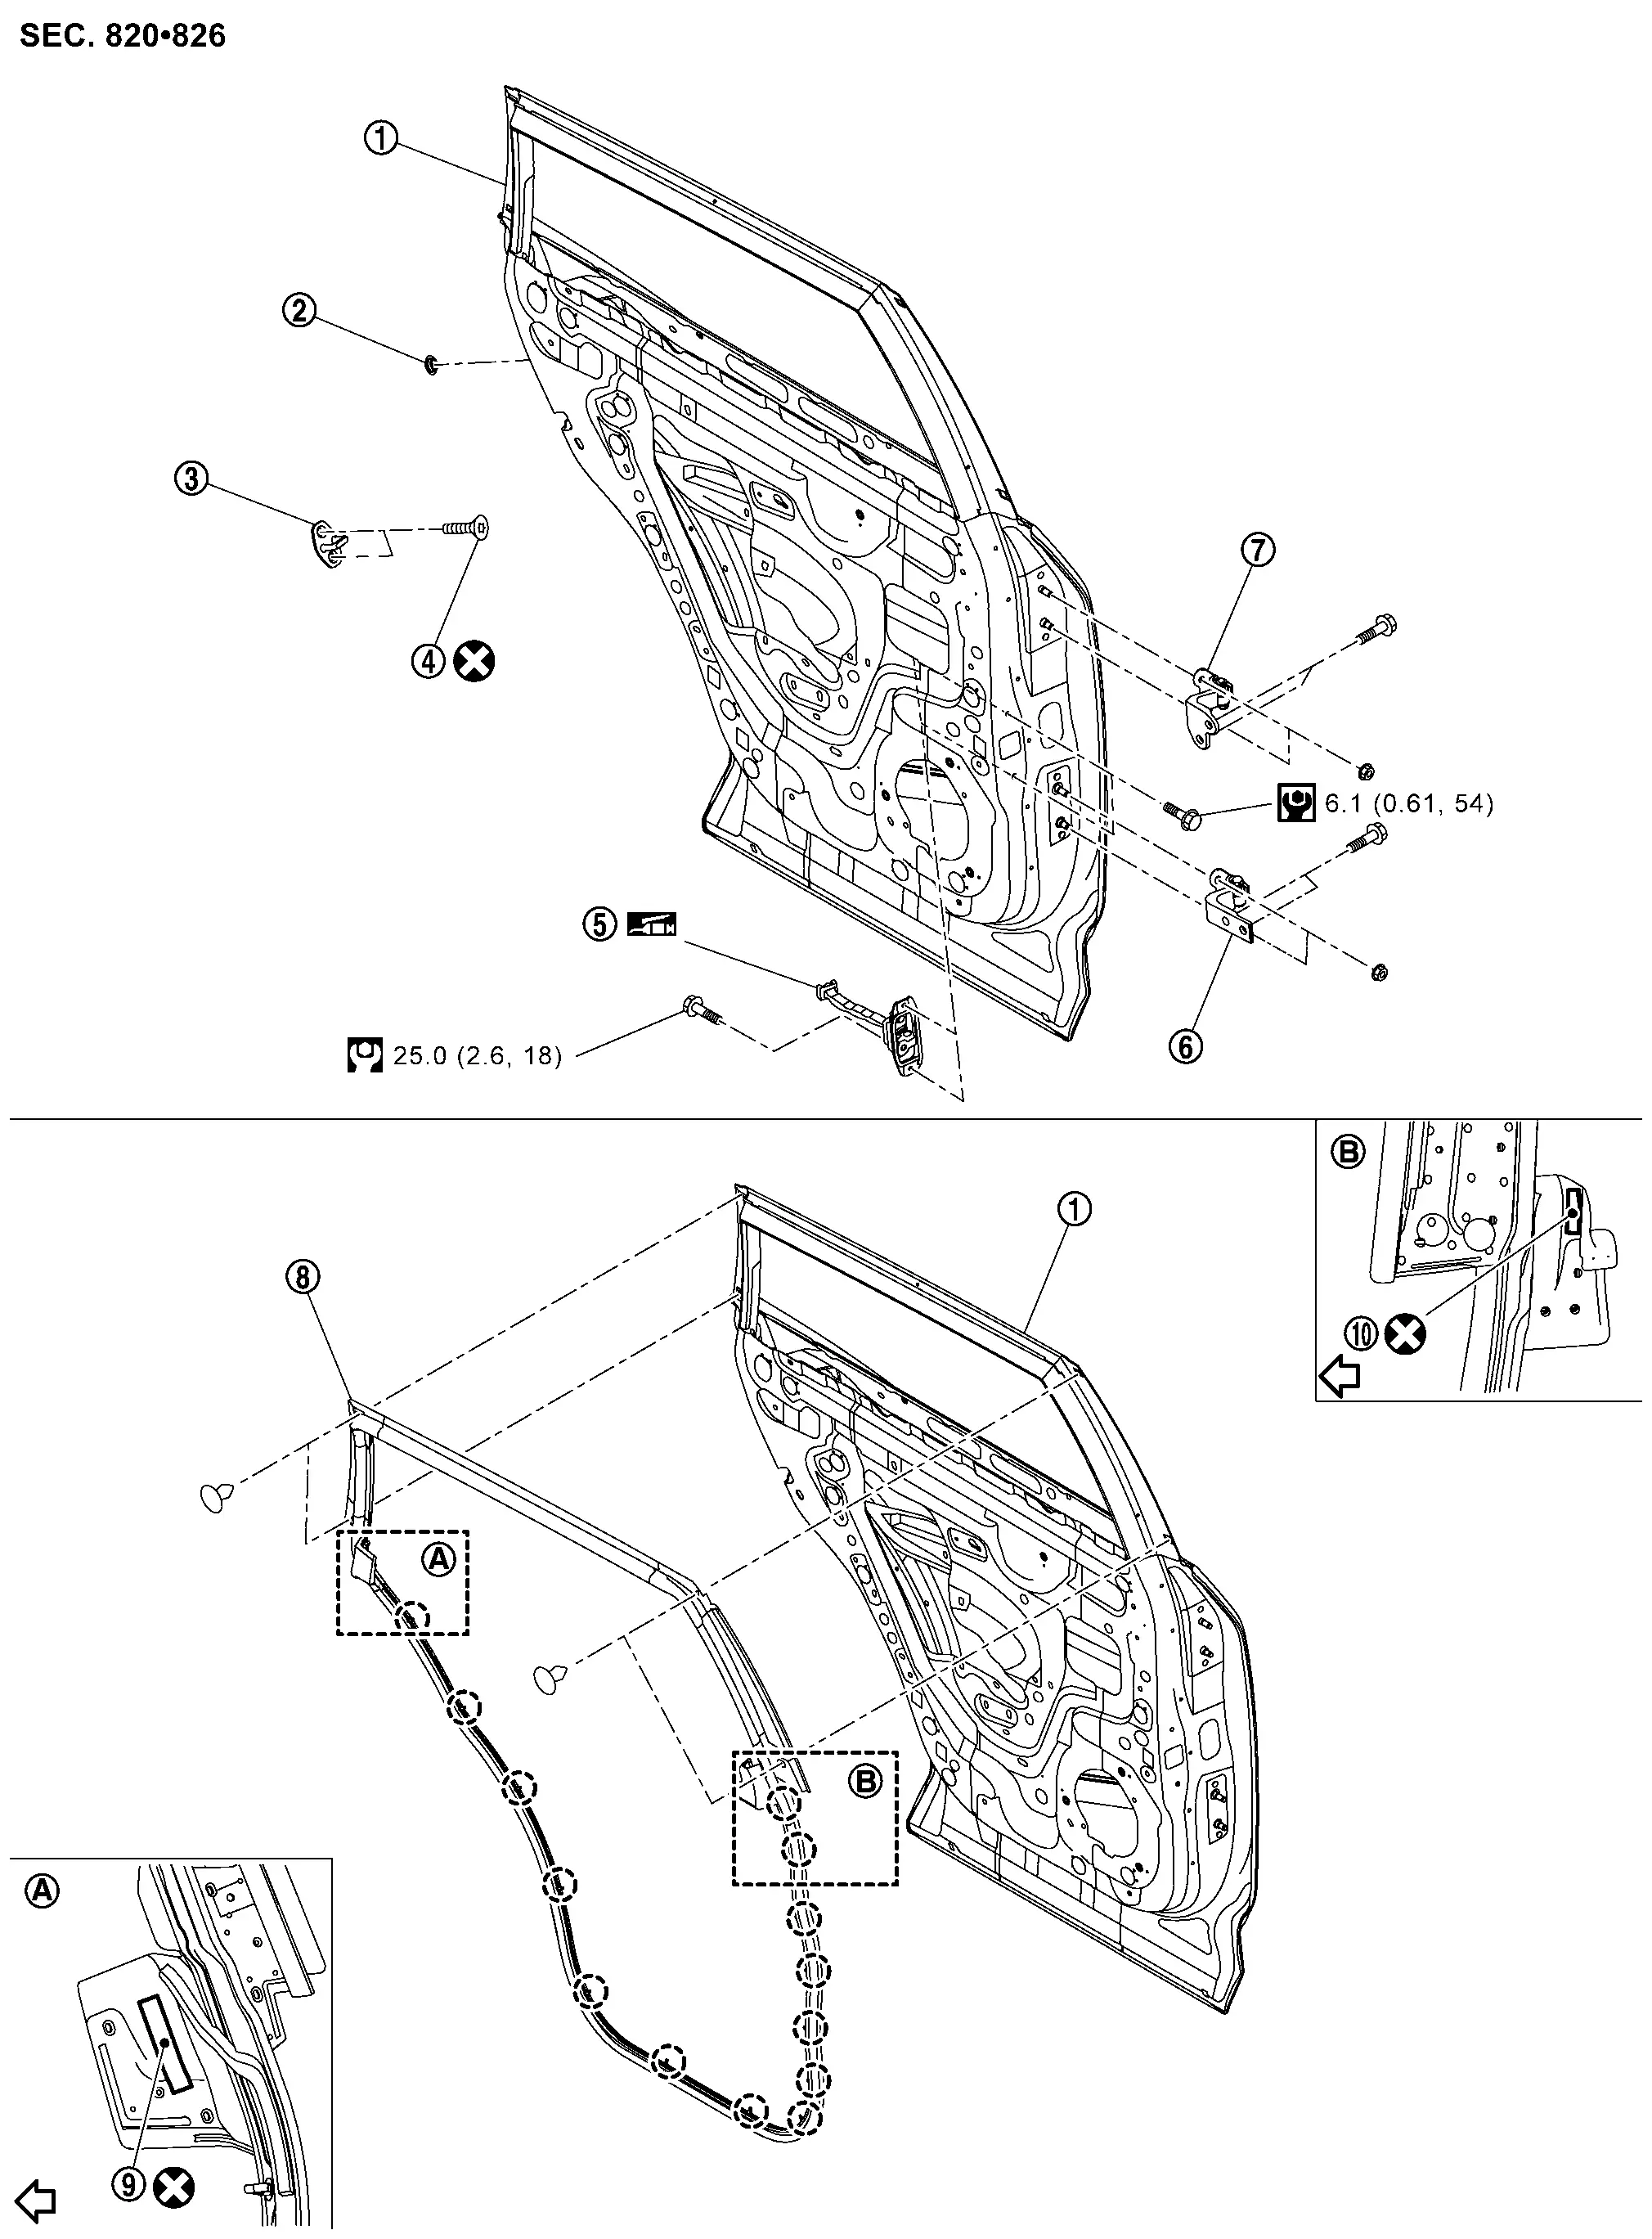
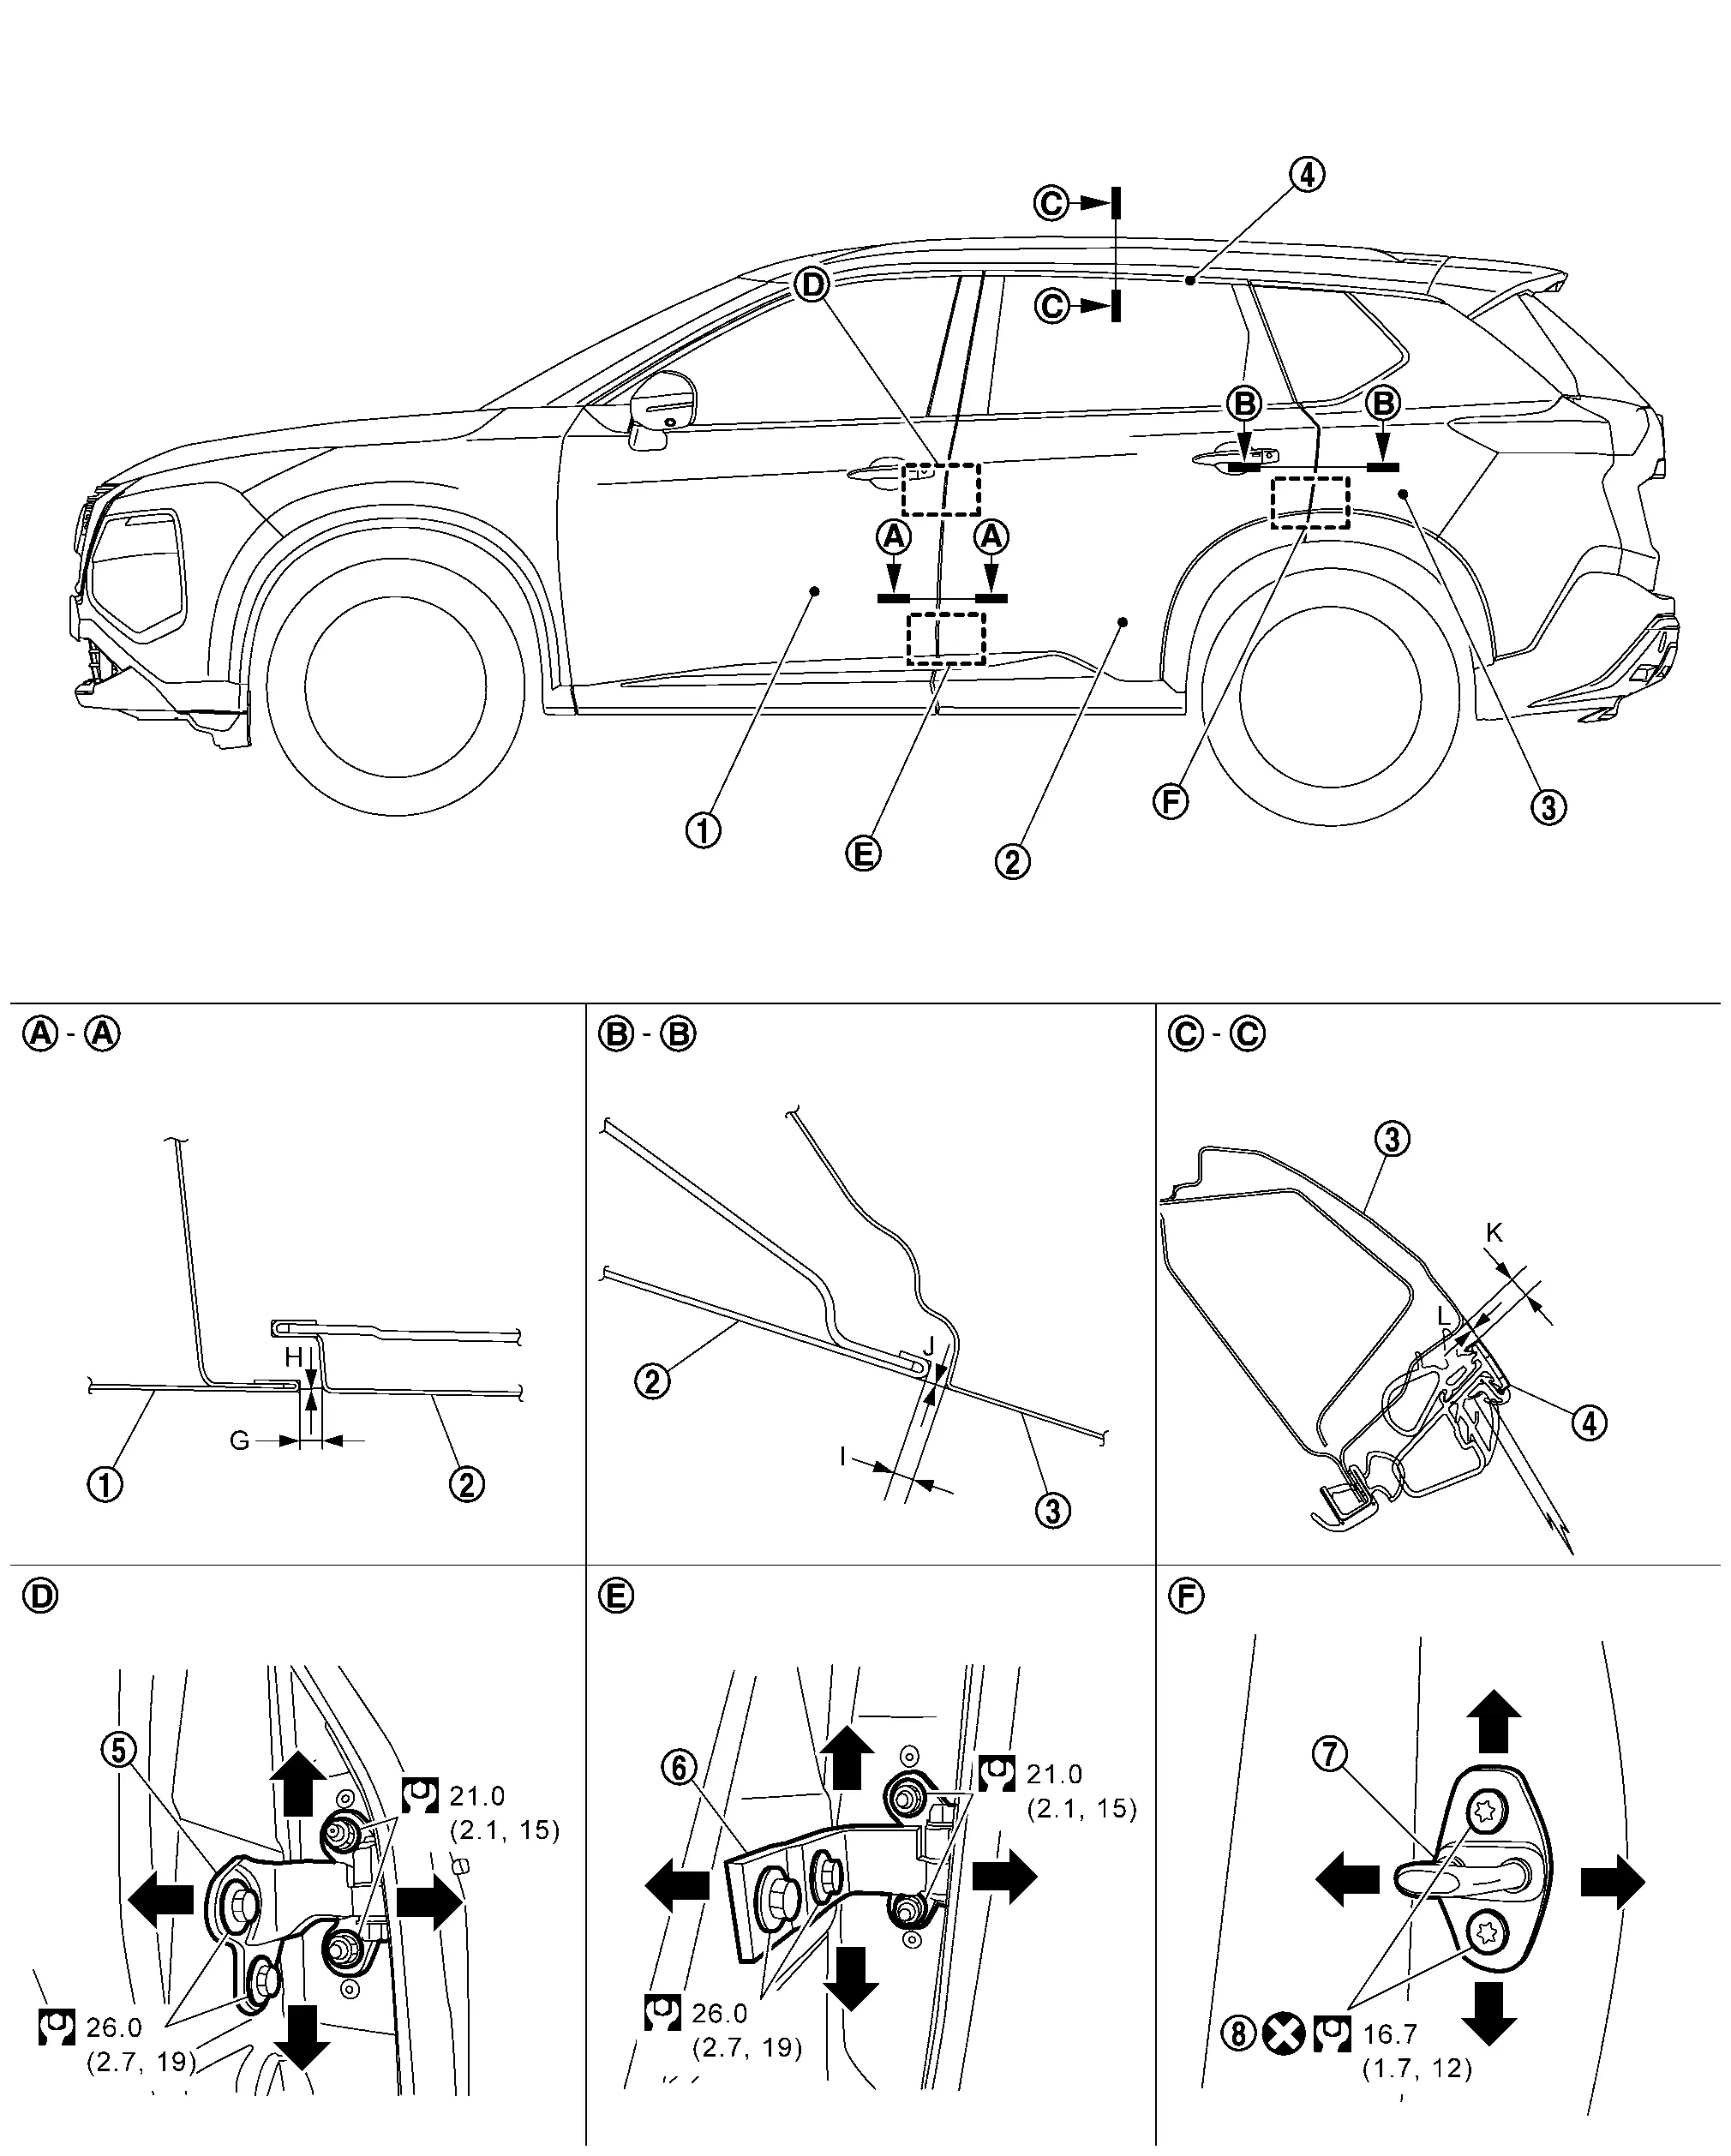
Exploded View
 |
Rear door panel |  |
Grommet |  |
Rear door striker |
 |
TORX bolt |  |
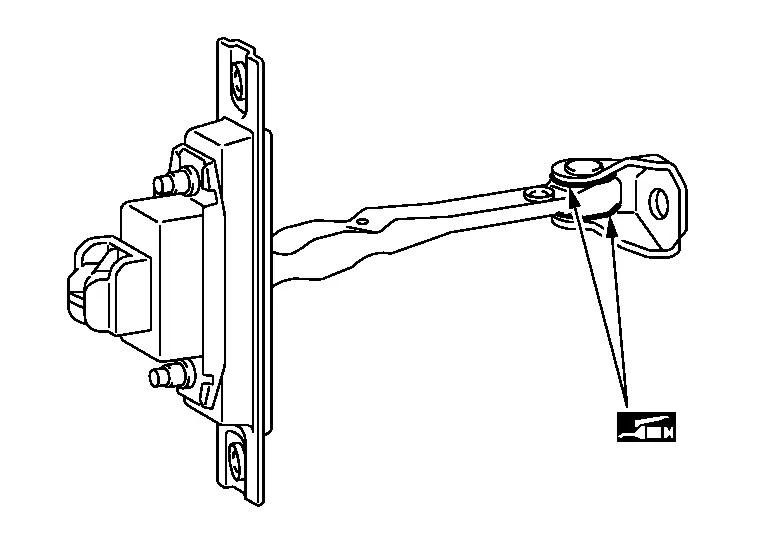
Rear door check link |  |
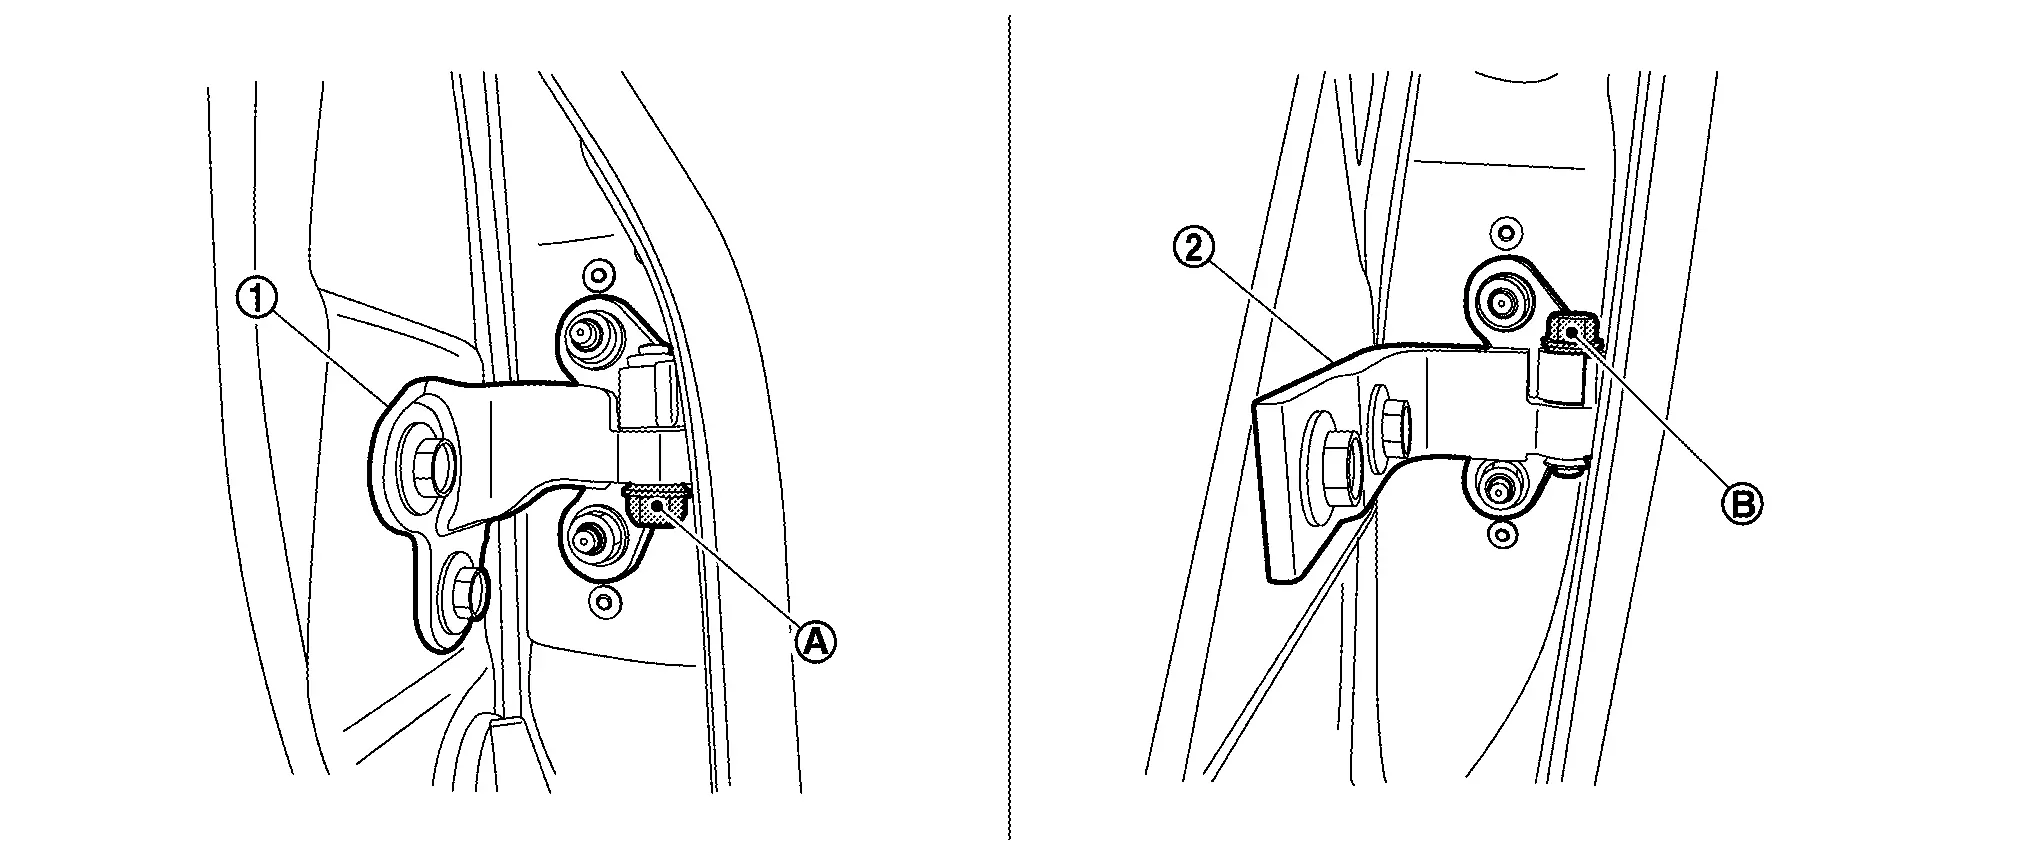
Rear door hinge (lower) |
 |
Rear door hinge (upper) |  |
Rear door weather-strip |  |
Double-sided tape [t: 1.2 mm (0.047 in)] |
 |
Double-sided tape [t: 0.8 mm (0.031 in)] | ||||
 |
: Clip | ||||
| : Nissan Ariya Vehicle front | |||||
 |
: Always replace after every disassembly. | ||||
 |
: N┬Ęm (kg-m, in-lb) | ||||
 |
: N┬Ęm (kg-m, ft-lb) | ||||
 |
: Body grease | ||||
Rear Door Assembly
Removal and Installation
CAUTION:
-
Perform work with 2 workers, because it is heavy weight.
-
Support door with a proper material and use protective tape or shop cloth to protect door and body from falling and damage when removing and installing door assembly.
REMOVAL
Remove rear door harness grommet from vehicle body, and then pull out rear door harness and disconnect rear door harness connector.
Remove rear door check link mounting bolt of Nissan Ariya vehicle body side.
Remove rear door hinge (upper) mounting nut  and rear door hinge (lower) mounting nut
  .
.
Support rear door assembly with a proper material to prevent it from falling.
WARNING:
Injury may occur if door assembly is not supported with a proper material when removing door assembly.
Remove rear door assembly.
CAUTION:
2 workers are required to support door.
Remove rear door hinge mounting nuts, and then remove rear door hinge from rear door panel (if necessary).
INSTALLATION
Note the following items, and then install in the reverse order of removal.
CAUTION:
-
Before installation, apply anticorrosive agent onto the mounting surface.
-
Tighten rear door hinge (upper)
mounting nut and rear door hinge (lower) mounting nut to the specified torque.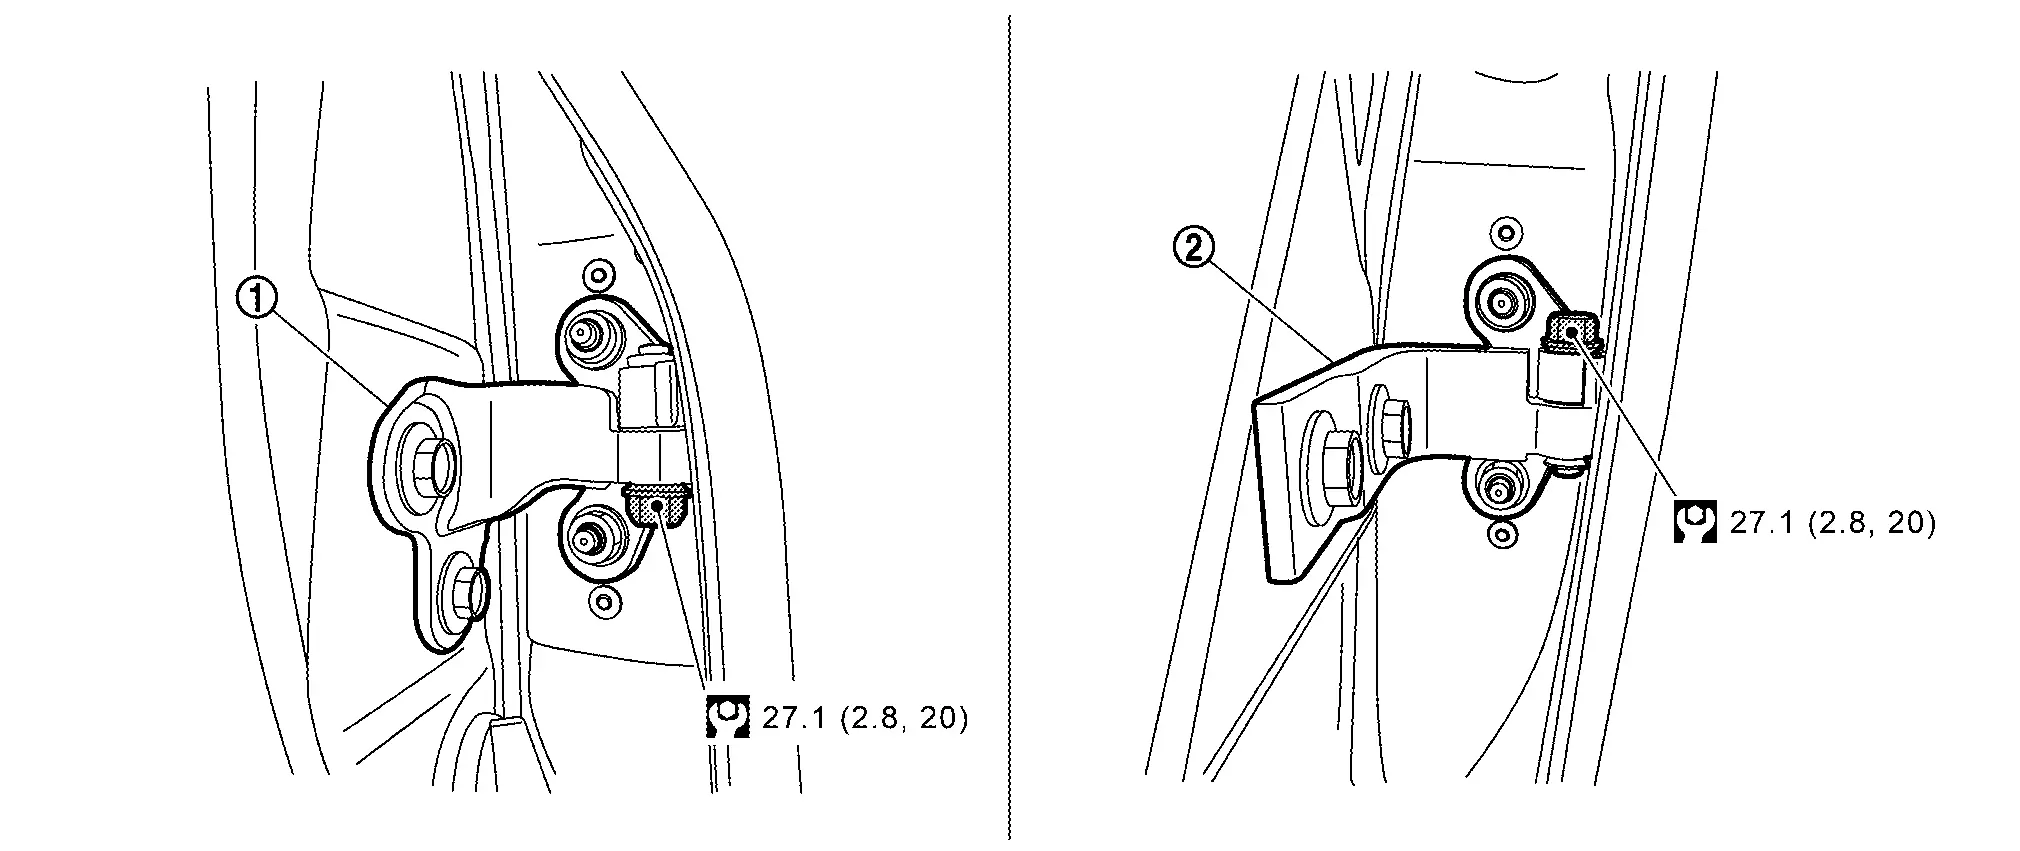
: N┬Ęm (kg-m, ft-lb) -
If remove rear door hinge from rear door panel, perform the fitting adjustment. Refer to Adjustment.
-
After installation, apply touch-up paint (the body color) onto the head of rear door hinge mounting nuts.
-
After installation, check the open/close operation. Refer to Inspection.
Inspection
Open and close door. Check that rear door hinge and rear door check link rotation portion moves smoothly.
Check door hinge rotating parts for poor lubrication apply body grease if necessary.
Check rear door check link rotating part for poor lubrication. Apply body grease if necessary.
|
: Body grease |
Adjustment
FITTING ADJUSTMENT
Fitting Adjustment Standard Dimension
|
Front door panel | |
Rear door panel | |
Body side outer |
|
Rear door sash molding | |
Rear door hinge (upper) | |
Rear door hinge (lower) |
|
Rear door striker | |
TORX bolt | ||
|
: Always replace after every disassembly. | ||||
|
: N┬Ęm (kg-m, ft-lb) | ||||
|
: Body grease | ||||
Unit: mm [in]
| Portion | Standard | |||
|---|---|---|---|---|
| Front door panel ŌĆō Rear door panel | ŌĆō |
G | Clearance |
3.4 ŌĆō 5.4 [0.134 ŌĆō 0.213] |
| H | Surface height |
(ŌłÆ1.0) ŌĆō (+1.0) [(ŌłÆ0.039) ŌĆō (+0.039)] |
||
| Rear door panel ŌĆō Body side outer | ŌĆō |
I | Clearance |
2.9 ŌĆō 4.9 [0.114 ŌĆō 0.193] |
| J | Surface height |
(ŌłÆ1.0) ŌĆō (+1.0) [(ŌłÆ0.039) ŌĆō (+0.039)] |
||
| Rear door sash molding ŌĆō Body side outer |  ŌĆō ŌĆō |
K | Clearance |
5.0 ŌĆō 8.0 [0.197 ŌĆō 0.315] |
| L | Surface height |
(ŌłÆ1.2) ŌĆō (+1.8) [(ŌłÆ0.047) ŌĆō (+0.071)] |
||
Check the clearance and surface height between rear door and each part by visually and touching.
If the clearance and the surface height are out of specification, adjust them according to the procedures shown below.
Fitting Adjustment Procedure
Loosen rear door hinge mounting nuts.
Adjust the surface height of rear door according to the fitting adjustment standard dimension by moving rear door panel.
Tighten rear door hinge mounting nuts.
CAUTION:
After installation, apply touch-up paint (the body color) onto the head of hinge mounting nuts.
Loosen rear door hinge mounting bolts.
Adjust the clearance of rear door according to the fitting adjustment standard dimension by moving rear door panel.
Tighten rear door hinge mounting bolts to the specified torque.
CAUTION:
After installation, apply touch-up paint (the body color) onto the head of hinge mounting bolts.
DOOR STRIKER ADJUSTMENT
Adjust door striker so that it becomes parallel with door lock insertion direction.
Rear Door Striker
Removal and Installation
REMOVAL
Remove TORX bolt, and then remove rear door striker.
INSTALLATION
Note the following items, and then install in the reverse order of removal.
CAUTION:
-
Never reuse TORX bolt. Always replace it with a new one when it is removed.
-
After installation, perform the fitting adjustment. Refer to Adjustment.
Rear Door Hinge
Removal and Installation
REMOVAL
Remove rear door assembly. Refer to Removal and Installation.
Remove rear door hinge mounting bolts, and then remove rear door hinge from Nissan Ariya vehicle body.
INSTALLATION
Note the following items, and then install in the reverse order of removal.
CAUTION:
-
Before installation, check the rear door hinge rotating part for poor lubrication. Refer to Inspection.
-
Before installation, apply anticorrosive agent onto the mounting surface.
-
After installation, perform the fitting adjustment. Refer to Adjustment.
-
After installation, apply touch-up paint (the body color) onto the head of rear door hinge mounting bolts and nuts.
-
After installation, check the open/close operation. Refer to Inspection.
Rear Door Check Link
Removal and Installation
REMOVAL
Fully close rear door glass.
Remove rear door speaker. Refer to Removal and Installation (without BOSE) or Removal and Installation (with BOSE).
Remove rear door check link mounting bolt of Nissan Ariya vehicle body side.
Remove rear door check link mounting bolts of rear door panel, and then take rear door check link out from the hole of rear door panel.
INSTALLATION
Note the following item, and then install in the reverse order of removal.
CAUTION:
After installation, check the open/close operation. Refer to Inspection.
Rear Door Weather-Strip
Removal and Installation
REMOVAL
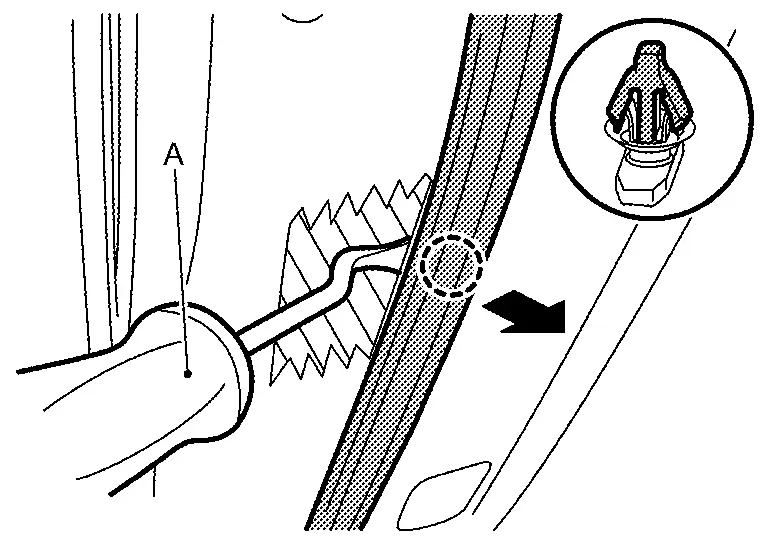
Remove rear door weather-strip fixing clips .

Apply protective tape (A) to rear door panel around rear door weather-strip fixing clips for preventing damage.

Disengage fixing clips on the reverse side of rear door weather-strip using a remover tool (A).
|
: Clip |
CAUTION:
-
Never damage rear door panel.
-
When removing, never confuse the 2 types of rear door weather-strip
fixing clips and .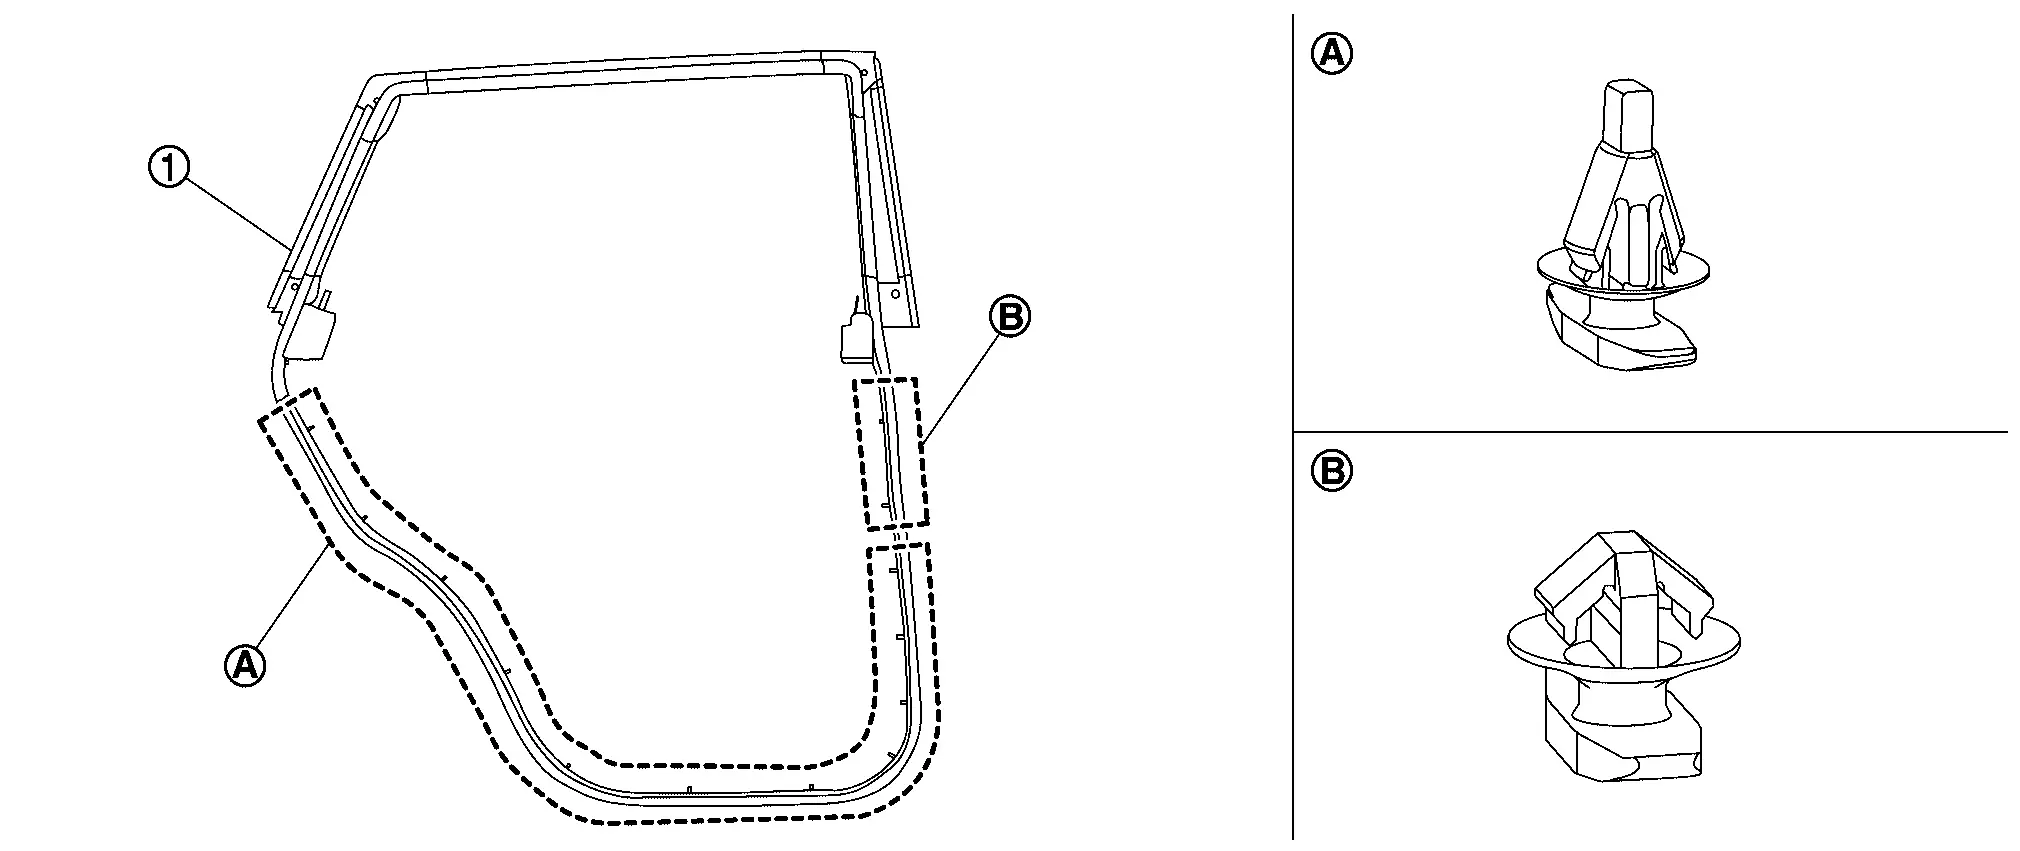
Remove rear door check link mounting bolt of Nissan Ariya vehicle body side.
Remove rear door weather-strip from rear door panel.
INSTALLATION
Note the following item, and then install in the reverse order of removal.
CAUTION:
-
Install
part of rear door weather-strip to ditch of rear door panel surely.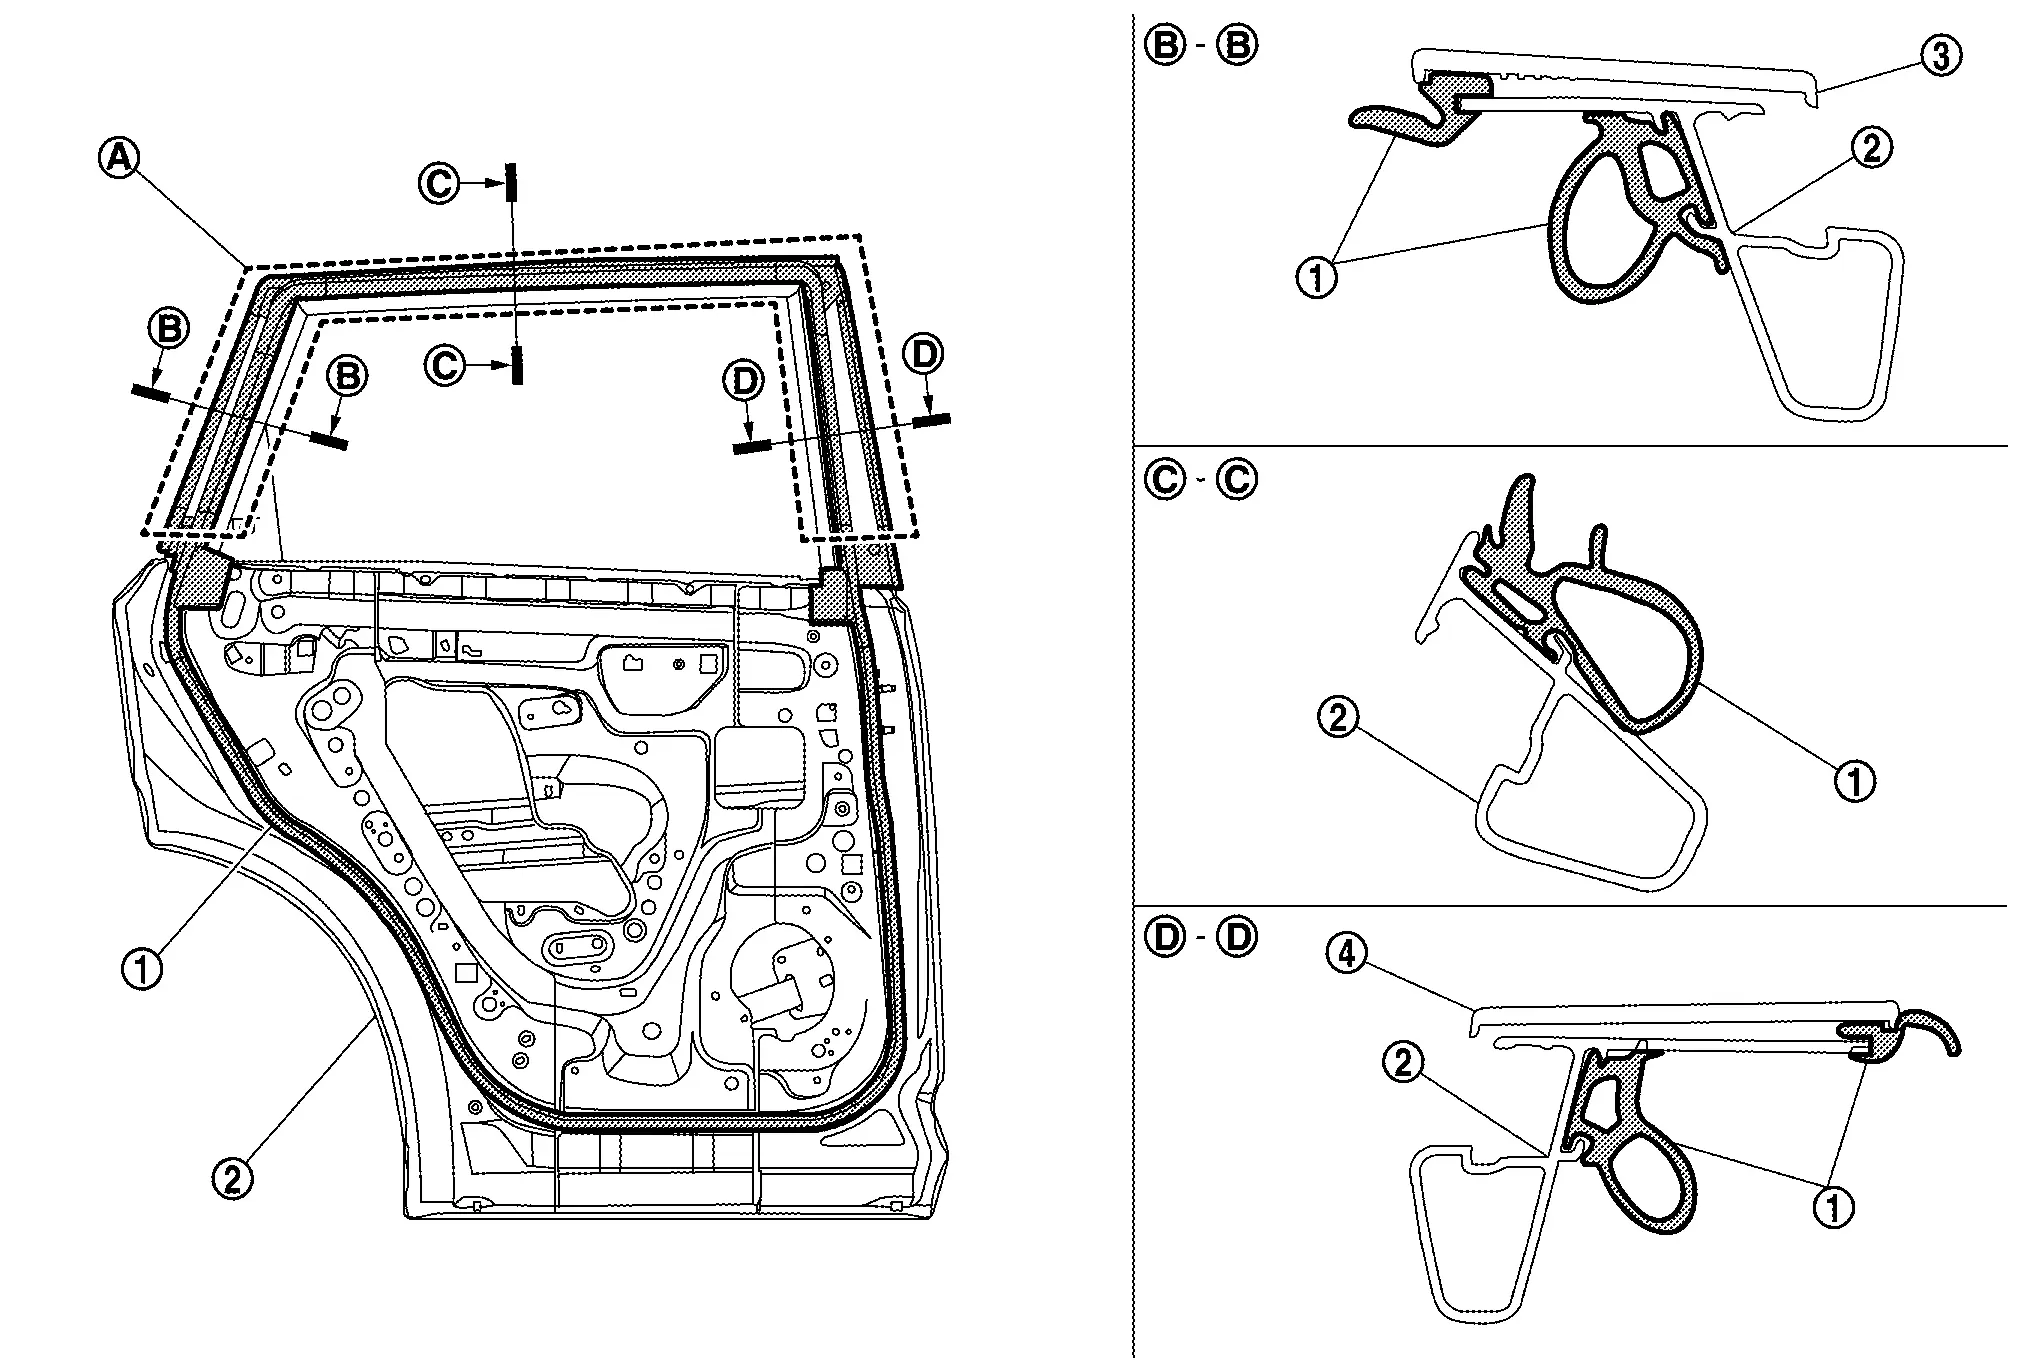
Rear door sash cover rear Rear door sash cover front -
When reuse rear door weather-strip, always replace double-sided tape with new one.
-
Degrease rear door panel mounting surface of double-sided tape.
Other materials:
Its Can Communication 4 Circuit
Diagnosis Procedure
CHECK NETWORK DIAGNOSIS
Check the "Network diagnosis" results from CONSULT to see that the diagnostic CAN communication circuit have no malfunction.
Are the diagnostic CAN communication circuit normal?
YES>>
GO TO 2.
NO>>
Check and repair diagnostic CAN commu ...
Sheet Metal Work
Sheet Metal Work Tools
Sheet Metal Work Tools
This section explains various tools used in body repair work.
Hammers
A hammer is used to correct dents, projections or other deformations.
Various shapes have been designed according to their purposes.(1) TYPES AND FEATURES OF HAMMERS(2) SELECTI ...
C1220-54 Incomplete Air Bleeding
DTC Description
DTC DETECTION LOGIC DTC
CONSULT screen terms
(Trouble diagnosis content) DTC detecting condition
C1220-54
INCOMP AIR BLEEDING
(Incomplete air bleeding)
Diagnosis condition
Ignition switch: ON
Signal
ŌĆö
Threshold
Air bleeding of electro-hydraulic co ...