Nissan Rogue (T33) 2021-Present Service Manual: Removal and Installation :: Luggage Trim
Exploded View
With ProPILOT Assist 2.1
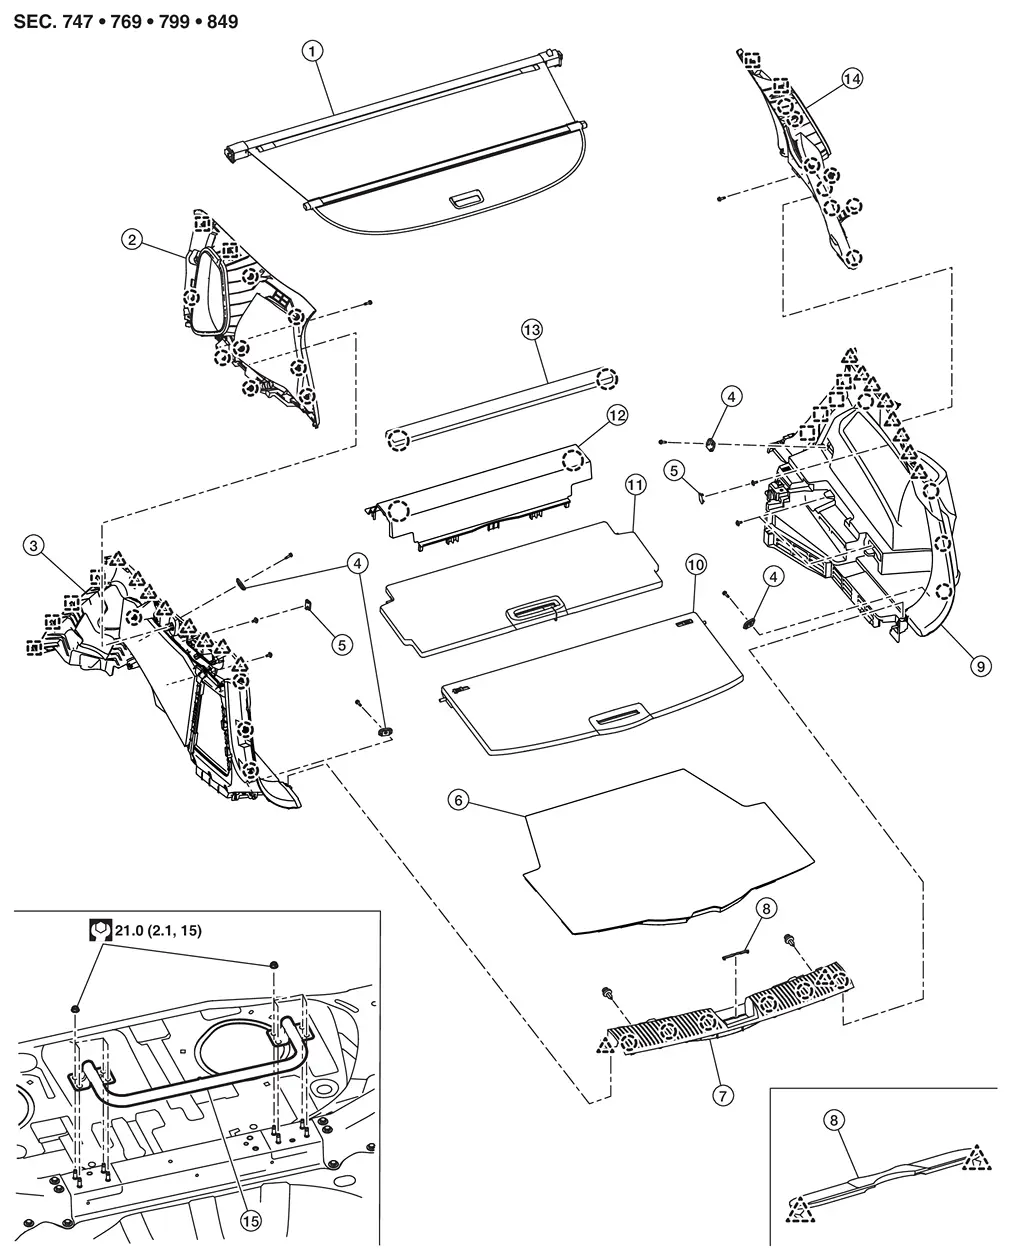
| 1. | Tonneau cover assembly | 2. | Luggage side upper finisher LH | 3. | Luggage side lower finisher LH |
| 4. | Luggage hook | 5. | Seatback release lever cap (if so equipped) | 6. | Luggage floor carpet |
| 7. | Luggage rear plate | 8. | Luggage rear plate mask | 9. | Luggage side lower finisher RH |
| 10. | Rear center luggage floor board | 11. | Front center luggage floor board | 12. | Front luggage floor cover |
| 13. | Front luggage floor board | 14. | Luggage side upper finisher RH | 15. | Rear cross bar assembly |
 |
: Clip | ||||
 |
: Pawl | ||||
 |
: Metal clip | ||||
 |
: N·m (kg-m, ft-lb) | ||||
Without ProPILOT Assist 2.1, with seatback release lever assembly, and with triple board models
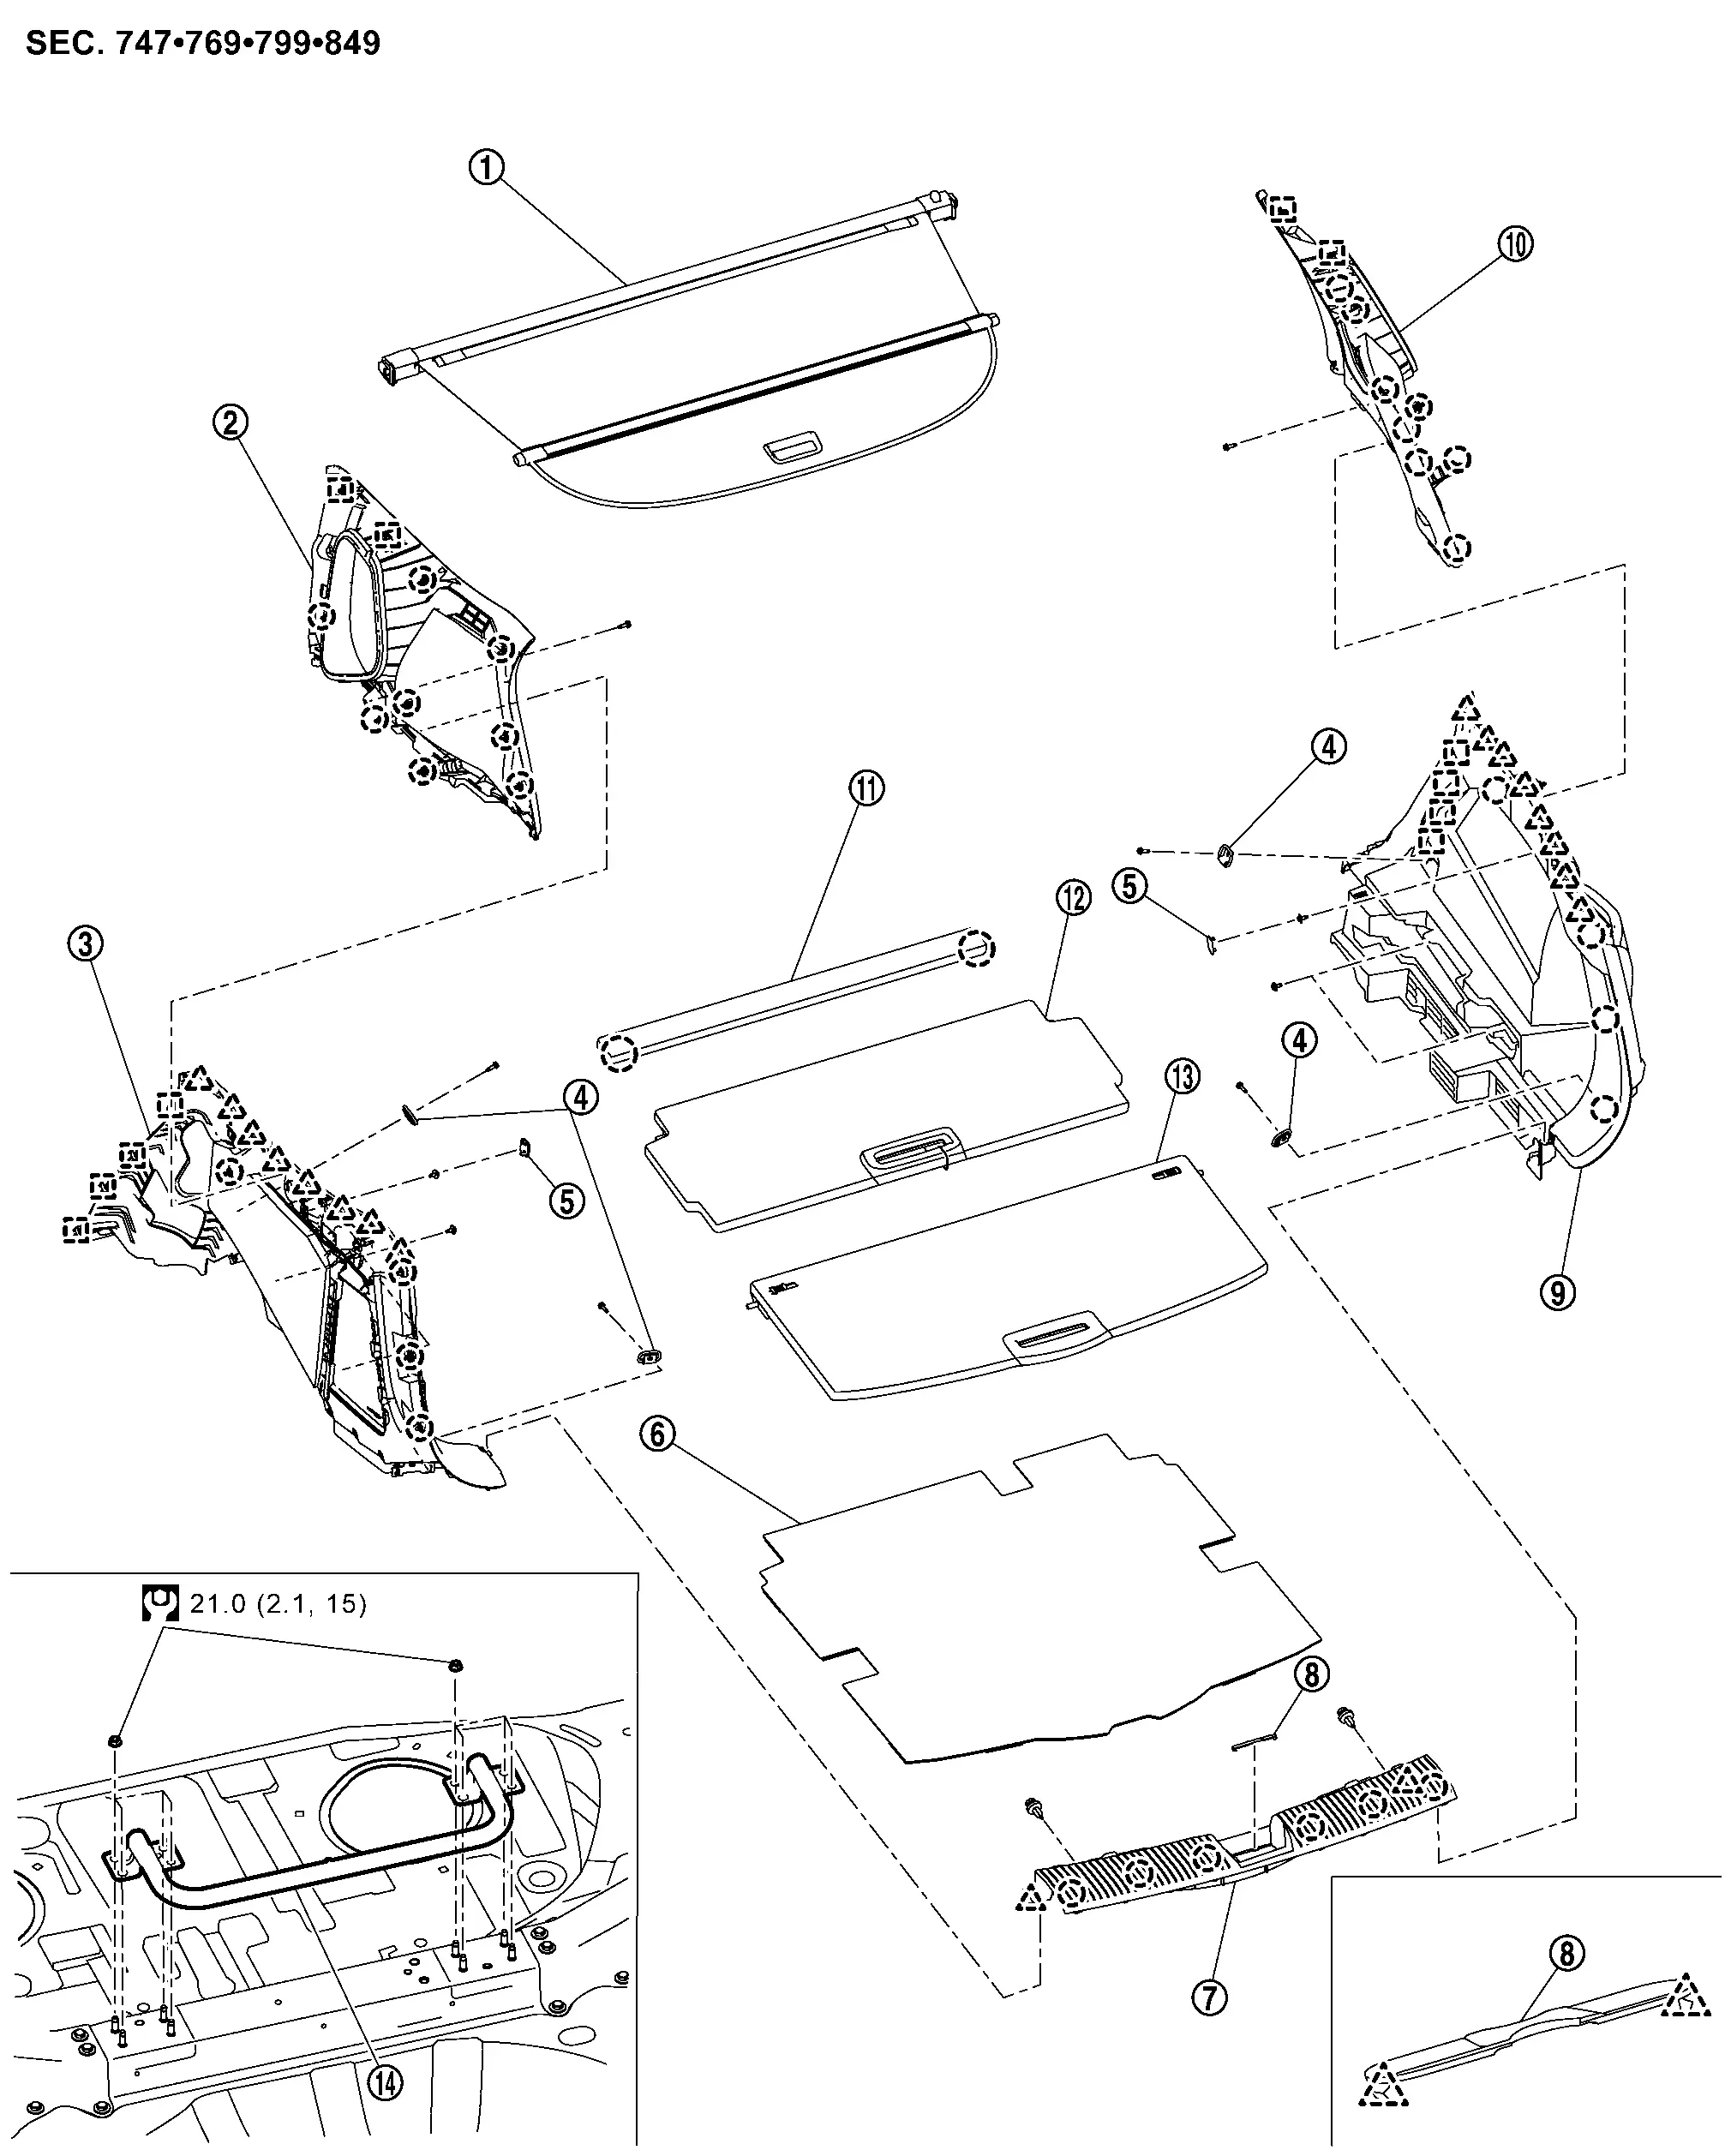
| 1. | Tonneau cover assembly | 2. | Luggage side upper finisher LH | 3. | Luggage side lower finisher LH |
| 4. | Luggage hook | 5. | Seatback release lever cap | 6. | Luggage floor carpet |
| 7. | Luggage rear plate | 8. | Luggage rear plate mask | 9. | Luggage side lower finisher RH |
| 10. | Luggage side upper finisher RH | 11. | Front luggage floor board | 12. | Front center luggage floor board |
| 13. | Rear center luggage floor board | 14. | Rear cross bar assembly | ||
|
: Clip | ||||
|
: Pawl | ||||
|
: Metal clip | ||||
|
: N·m (kg-m, ft-lb) | ||||
Without ProPILOT Assist 2.1, without seatback release lever assembly, and with single board models
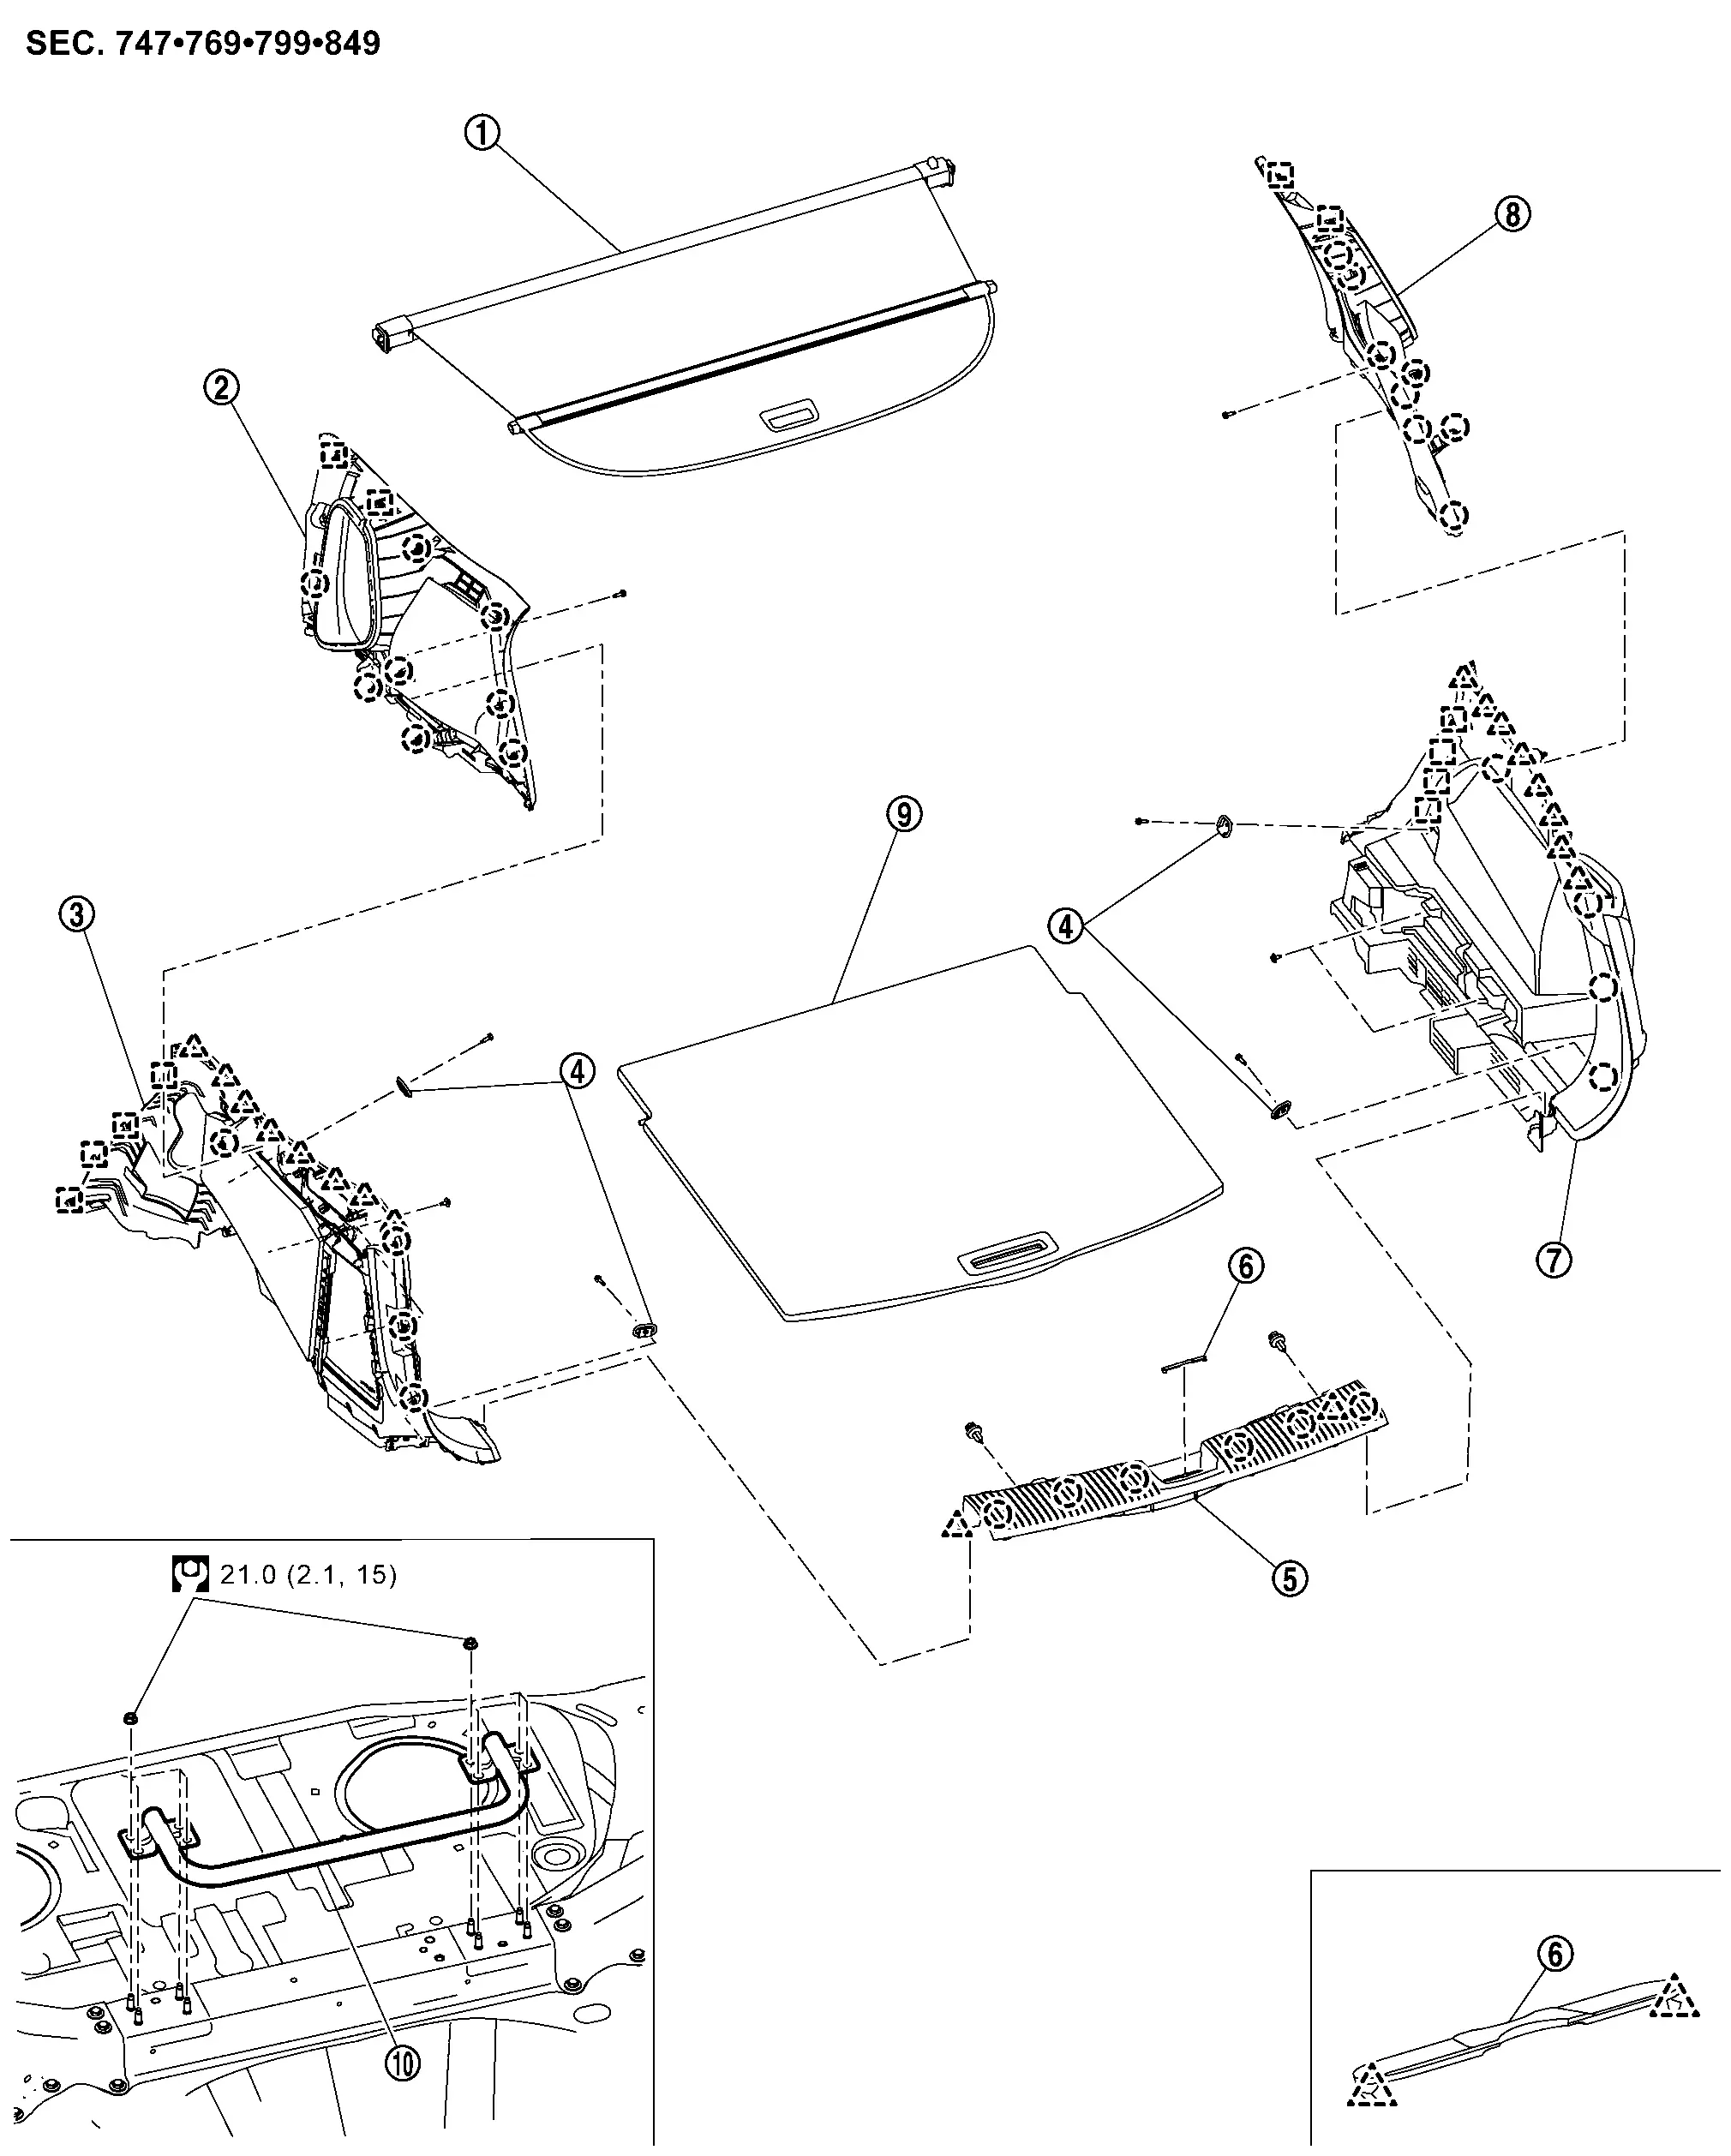
| 1. | Tonneau cover assembly | 2. | Luggage side upper finisher LH | 3. | Luggage side lower finisher LH |
| 4. | Luggage hook | 5. | Luggage rear plate | 6. | Luggage rear plate mask |
| 7. | Luggage side lower finisher RH | 8. | Luggage side upper finisher RH | 9. | Luggage floor board |
| 10. | Rear cross bar assembly | ||||
|
: Clip | ||||
|
: Pawl | ||||
|
: Metal clip | ||||
|
: N·m (kg-m, ft-lb) | ||||
Without ProPILOT Assist 2.1, without seatback release lever assembly, and with triple board models
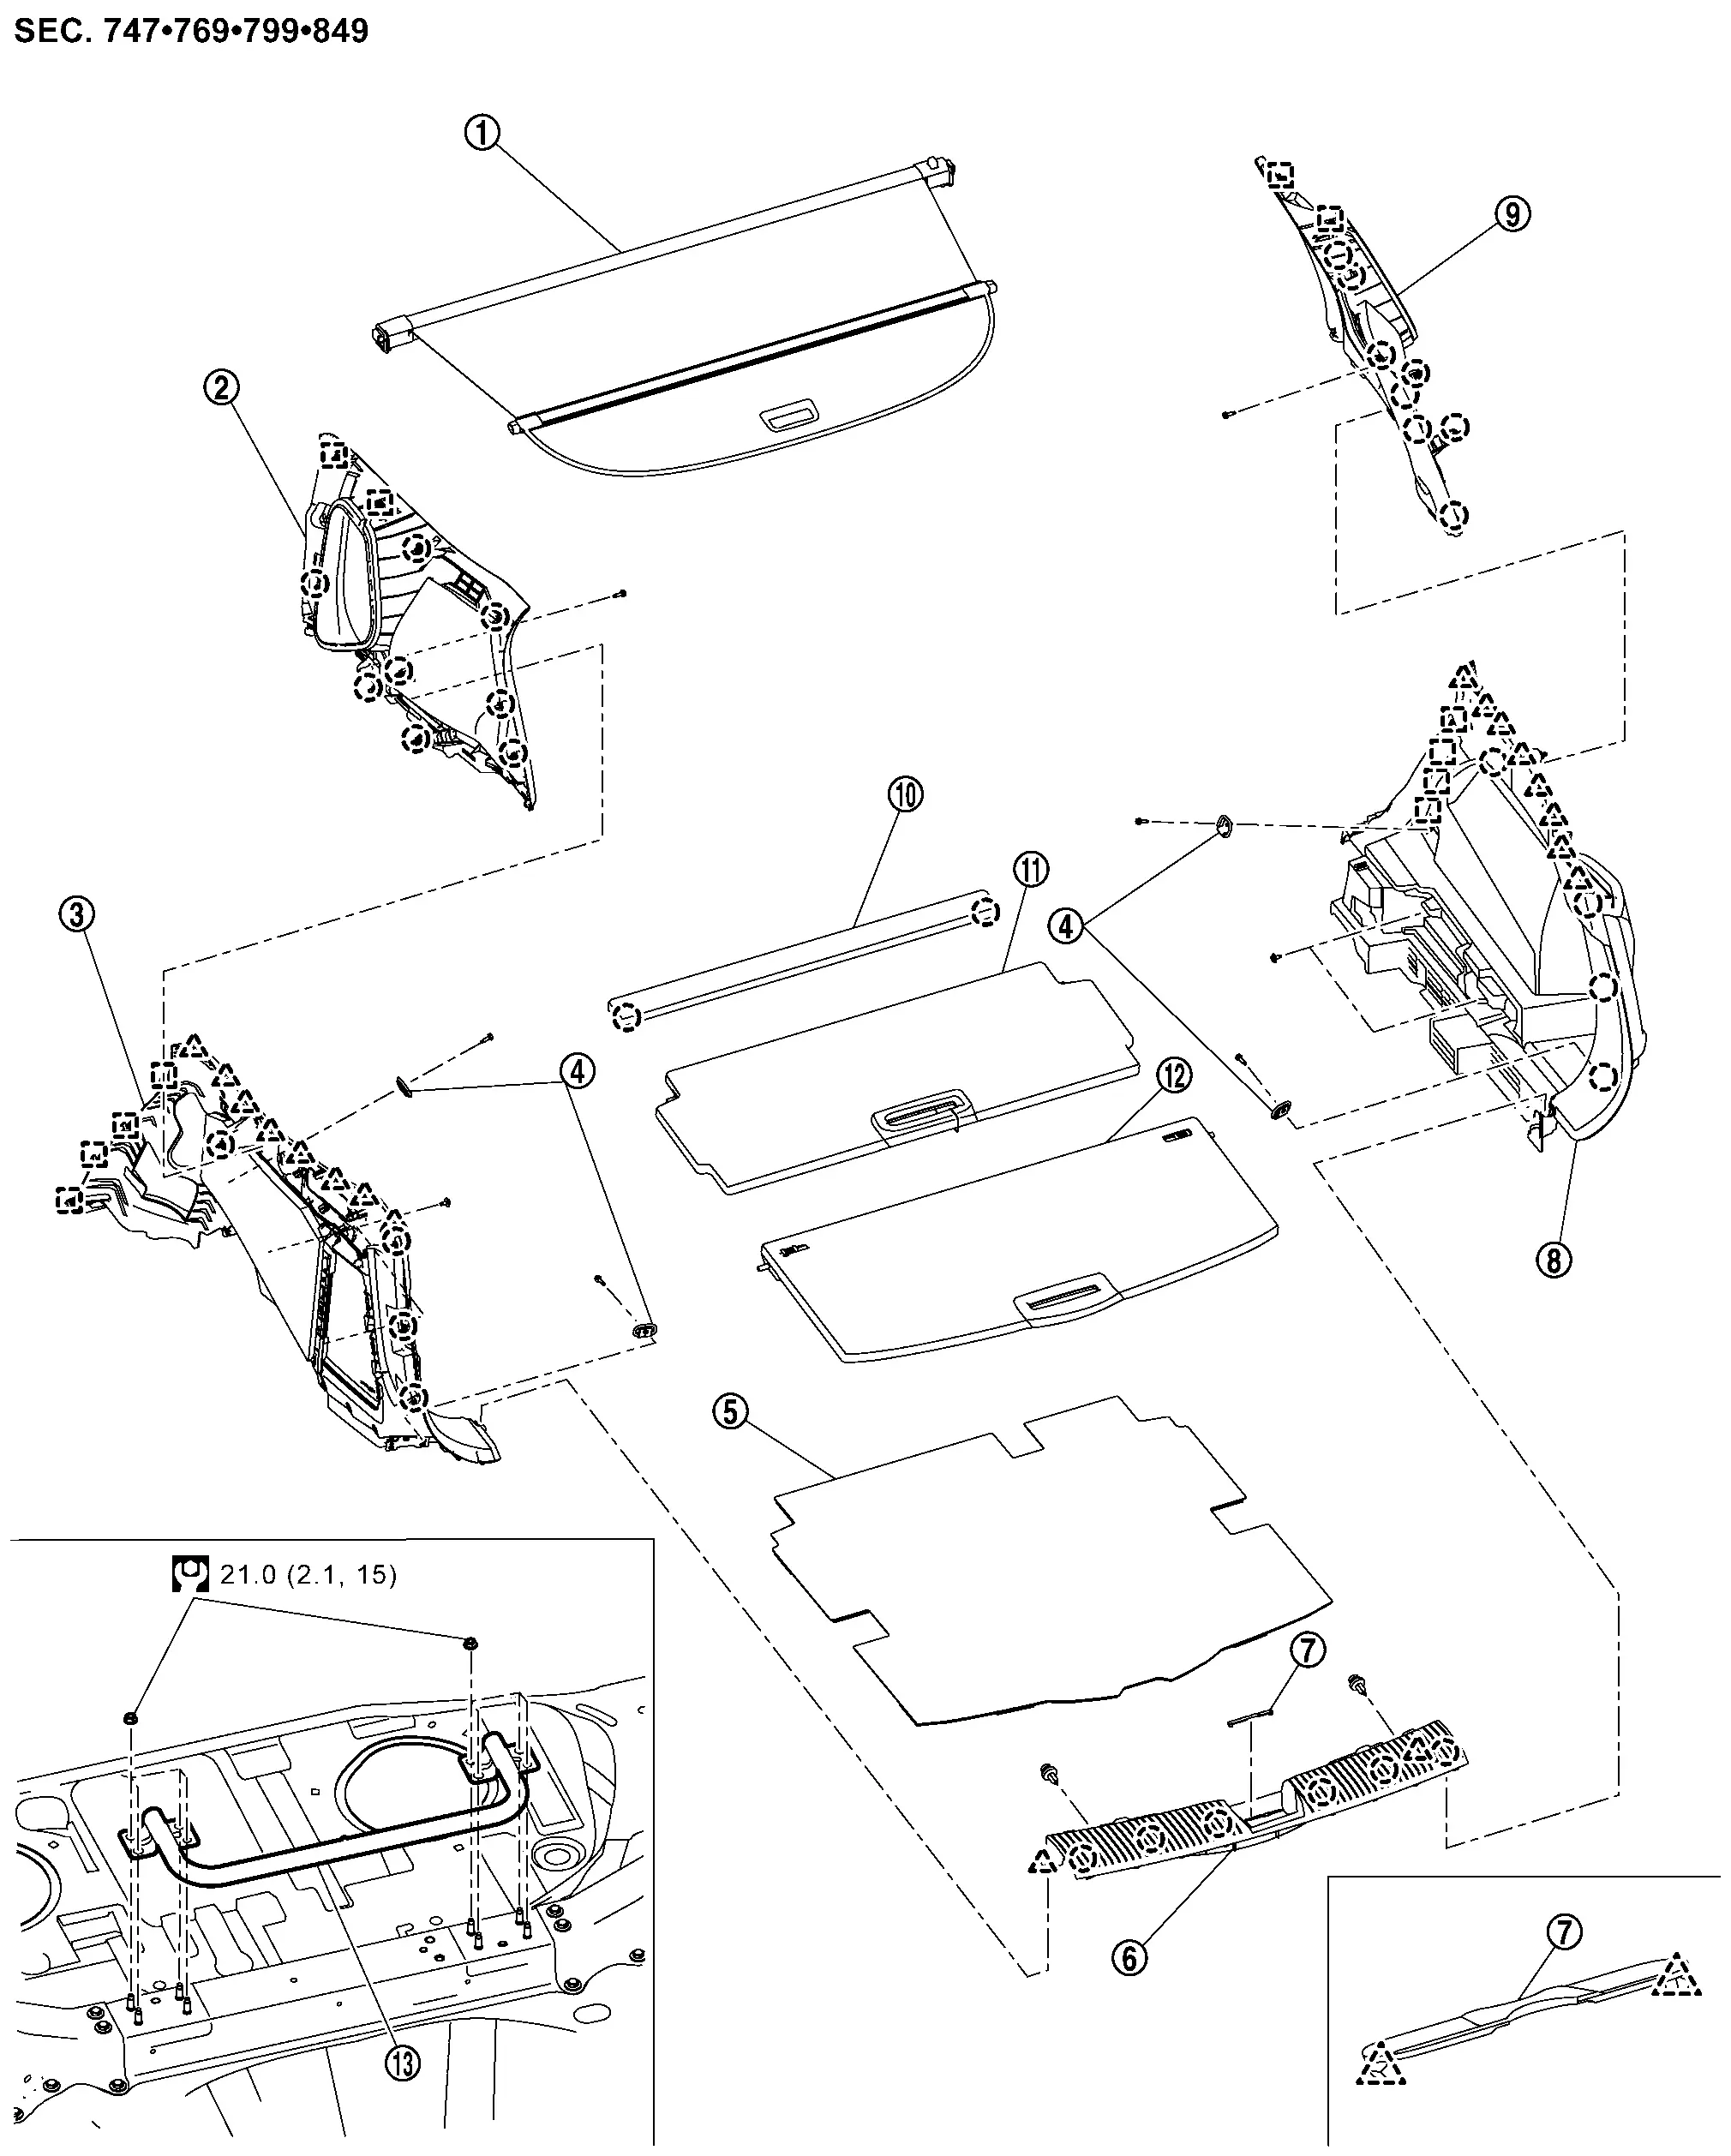
| 1. | Tonneau cover assembly | 2. | Luggage side upper finisher LH | 3. | Luggage side lower finisher LH |
| 4. | Luggage hook | 5. | Luggage floor carpet | 6. | Luggage rear plate |
| 7. | Luggage rear plate mask | 8. | Luggage side lower finisher RH | 9. | Luggage side upper finisher RH |
| 10. | Front luggage floor board | 11. | Front center luggage floor board | 12. | Rear center luggage floor board |
| 13. | Rear cross bar assembly | ||||
|
: Clip | ||||
|
: Pawl | ||||
|
: Metal clip | ||||
|
: N·m (kg-m, ft-lb) | ||||
Luggage Rear Plate
Removal and Installation
CAUTION:
Never damage the body panel.
REMOVAL
Fully open back door.
Remove rear center luggage floor board (with triple board models) or luggage floor board (with single board models).
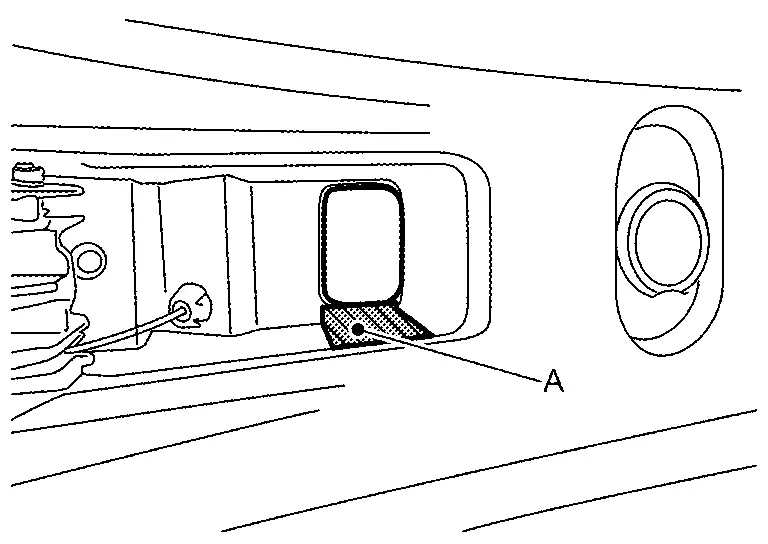
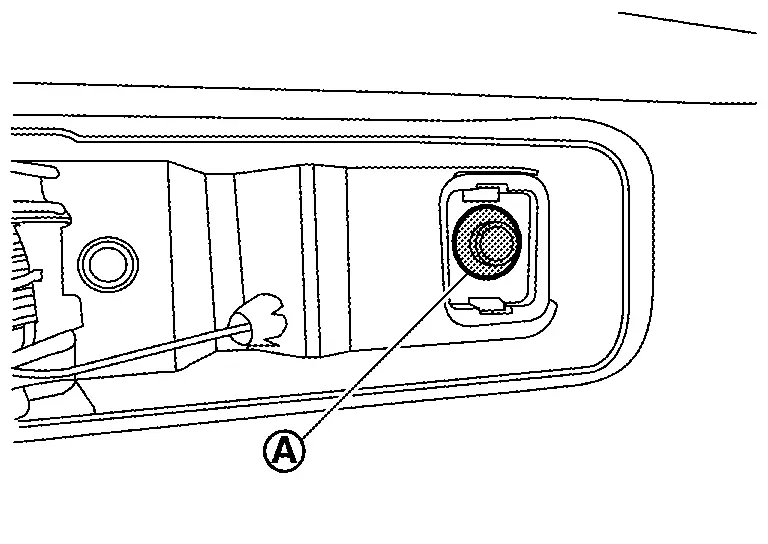
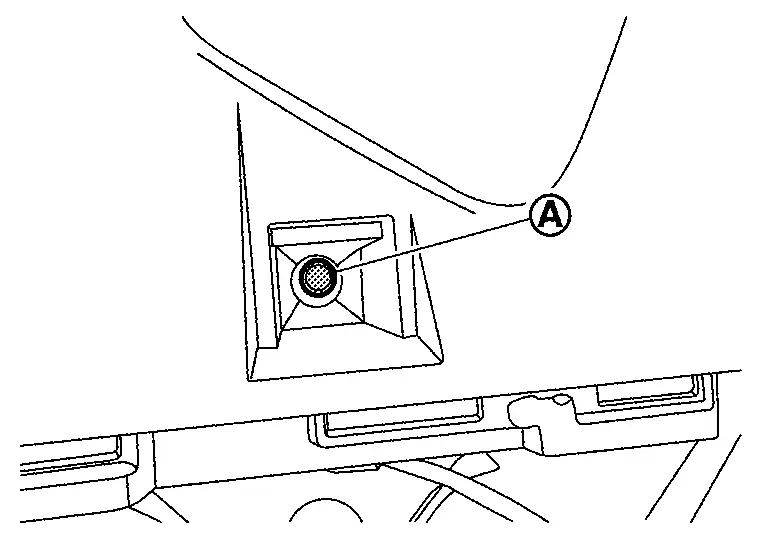
Remove luggage rear plate mask.Apply protective tape (A) on luggage rear plate to protect it from damage.
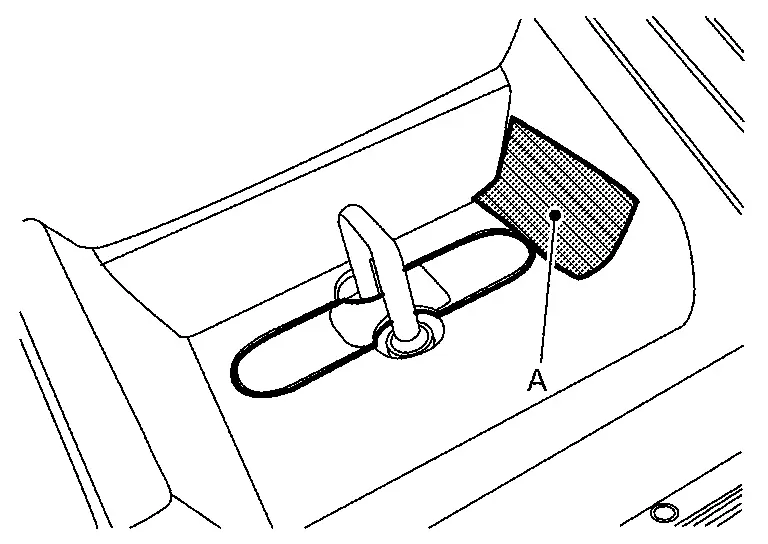
|
: Pawl |
Remove back door weather-strip. Refer to Removal and Installation.
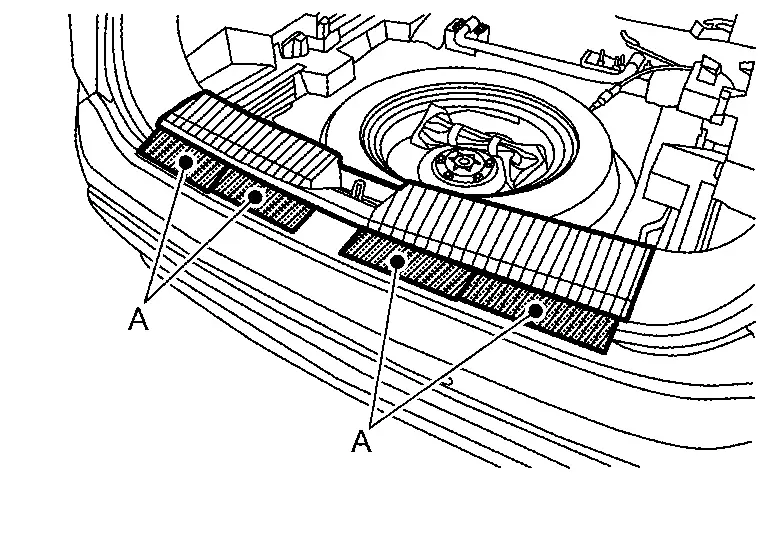
Remove luggage rear plate fixing clips  .
.
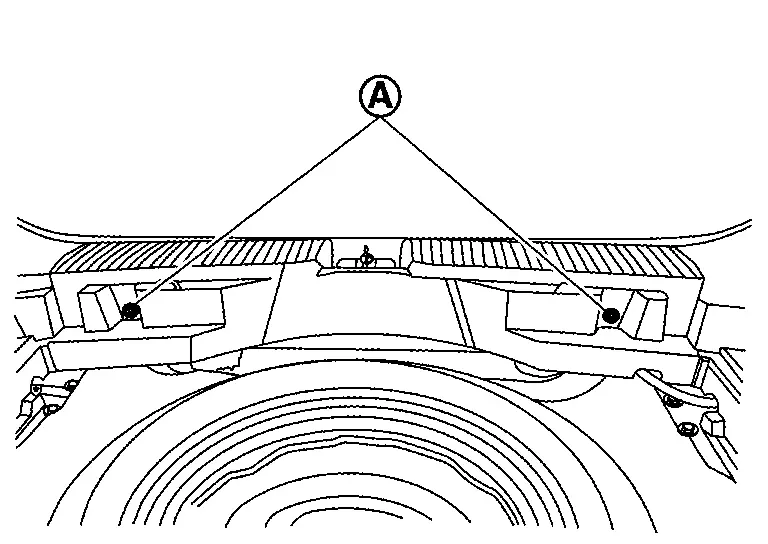
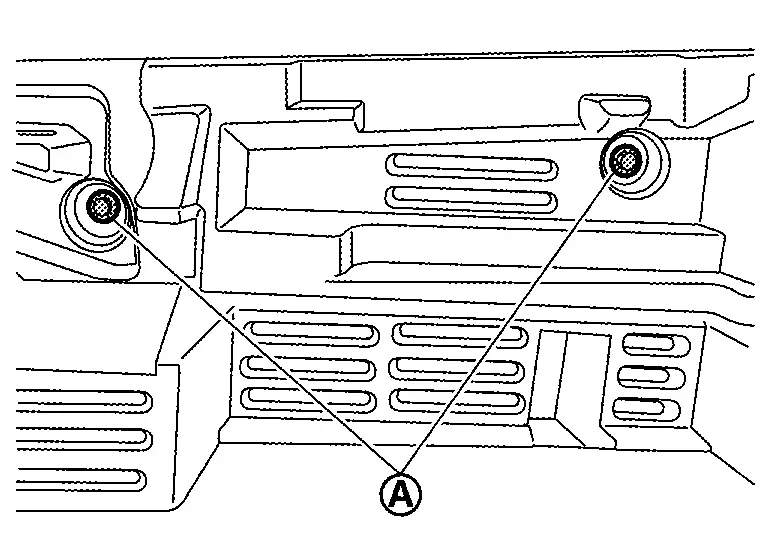
Apply protective tapes (A) on the body panel to protect it from damage.
Remove luggage rear plate fixing clips using a remover tool (A).
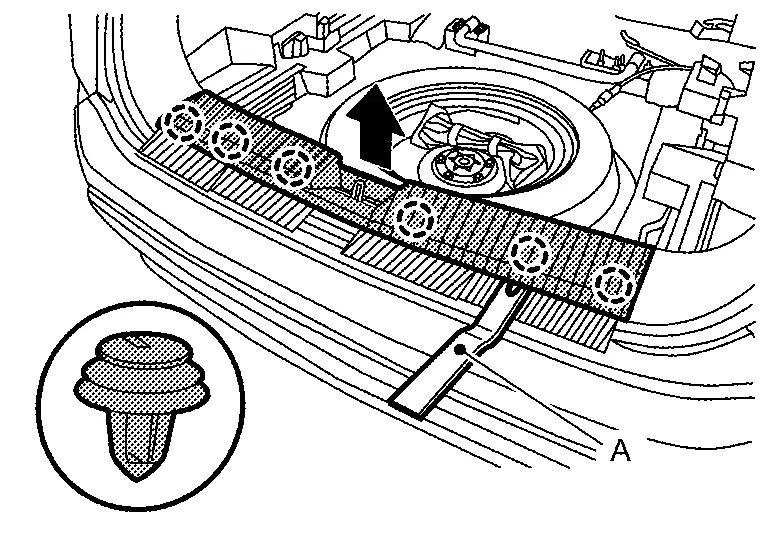
|
: Clip |
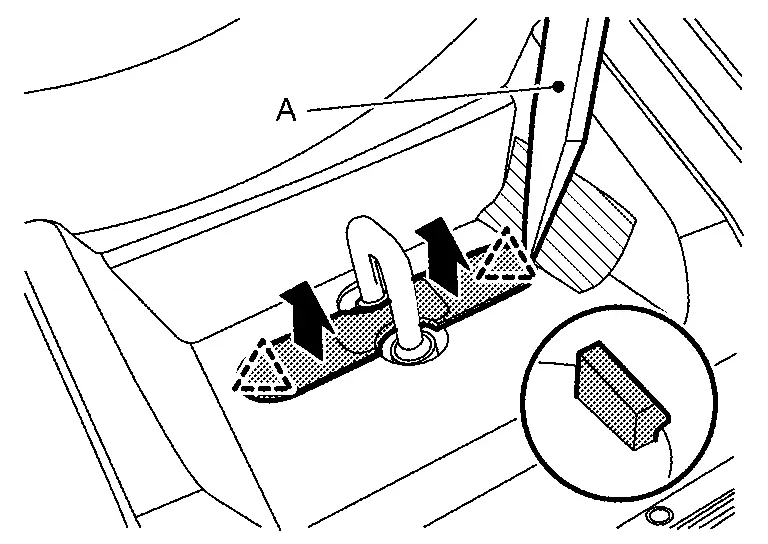
Remove luggage rear plate fixing pawls according to numerical order 1→2 indicated by arrows as shown in the figure, and then remove luggage rear plate.
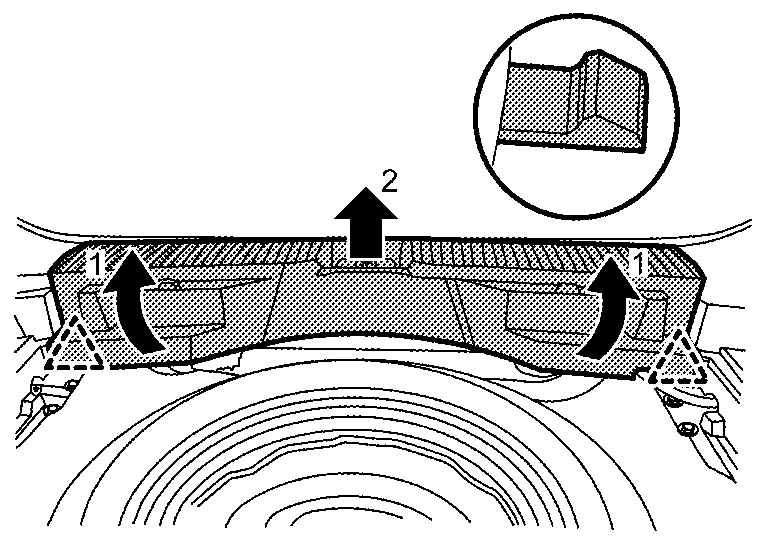
|
: Pawl |
INSTALLATION
Note the following items, and then install in the reverse order of removal.
CAUTION:
-
Visually check the clips for deformation and damage during installation. Replace with new ones if necessary.
-
Check in advance that clips and pawls are accurately aligned with the portions on body panel, and then install by pressing in.
Luggage Side Lower Finisher
Removal and Installation
CAUTION:
Never damage the body panel.
REMOVAL
With Seatback Release Lever Assembly
Remove tonneau cover assembly.
Remove front luggage floor cover (with ProPILOT Assist 2.1). Refer to Exploded View.
Remove rear body side welt. Refer to Removal and Installation.
Remove rear seat. Refer to Removal and Installation.
Remove rear seat belt anchor plate mounting anchor bolts. Refer to Removal and Installation.
Remove luggage rear plate. Refer to Removal and Installation.
Apply protective tape (A) on the seatback release lever assembly to protect it from damage.
Disengage seatback release lever cap fixing pawls using a remover tool (A) and then remote control lever cap.
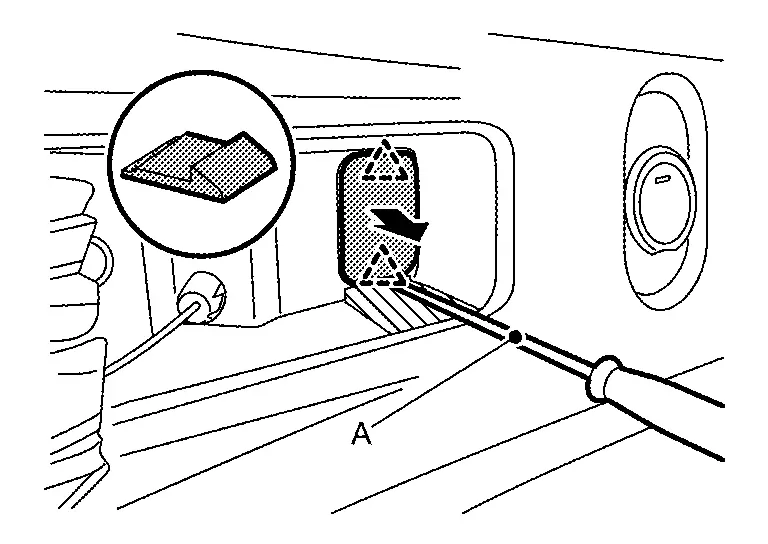
|
: Pawl |
Remove seatback release lever assembly mounting bolt (A).
Remove luggage side lower finisher mounting bolts .
 NOTE:
NOTE:
Without ProPILOT Assist 2.1 shown, with ProPILOT Assist 2.1 similar.
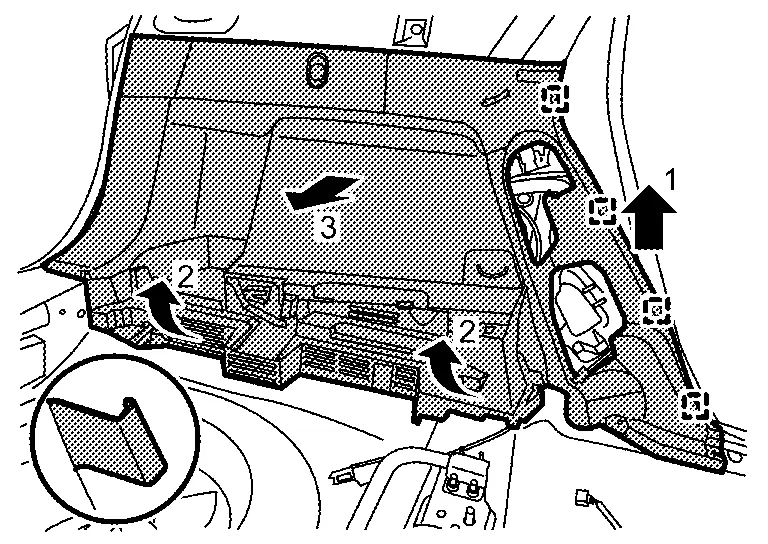
Disengage luggage side lower finisher fixing pawls and clips according to numerical order 1→4 indicated by arrows as shown in the figure.
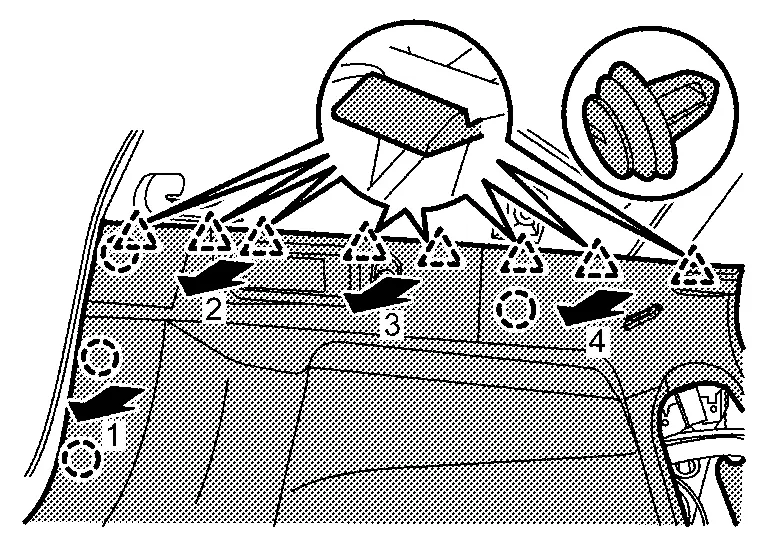
|
: Clip |
|
: Pawl |
Disengage seatback release lever assembly fixing pawls according to numerical order 1→3 indicated by arrows as shown in the figure, and then remove seatback release lever assembly.
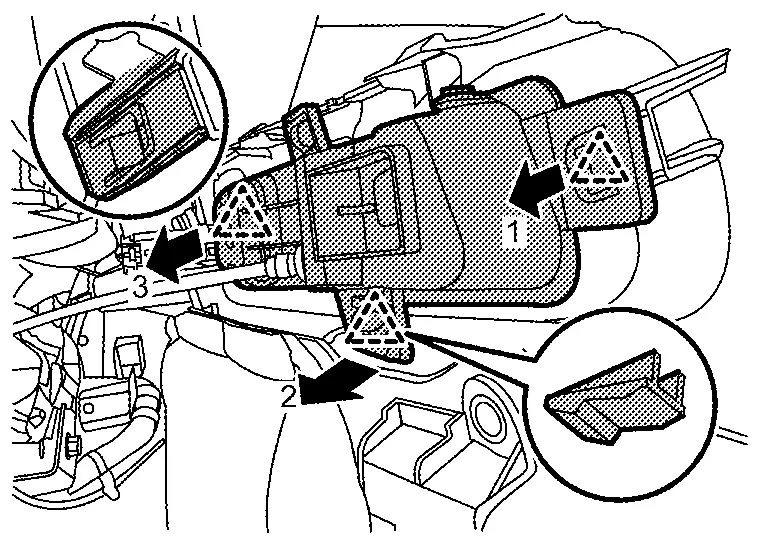
|
: Pawl |
Disengage luggage side lower finisher fixing metal clips according to numerical order 1→3 indicated by arrows as shown in the figure.

NOTE:
Without ProPILOT Assist 2.1 shown, with ProPILOT Assist 2.1 similar.
|
: Metal Clip |
Disconnect power socket harness connector, and then remove luggage side lower finisher.
Without Seatback Release Lever Assembly
Remove tonneau cover assembly.
Remove front luggage floor cover (with ProPILOT Assist 2.1). Refer to Exploded View.
Remove rear body side welt. Refer to Removal and Installation .
Remove rear seat. Refer to Removal and Installation.
Remove rear seat belt anchor plate mounting anchor bolts. Refer to Removal and Installation.
Remove luggage side lower finisher mounting bolts .
NOTE:
Without ProPILOT Assist 2.1 shown, with ProPILOT Assist 2.1 similar.
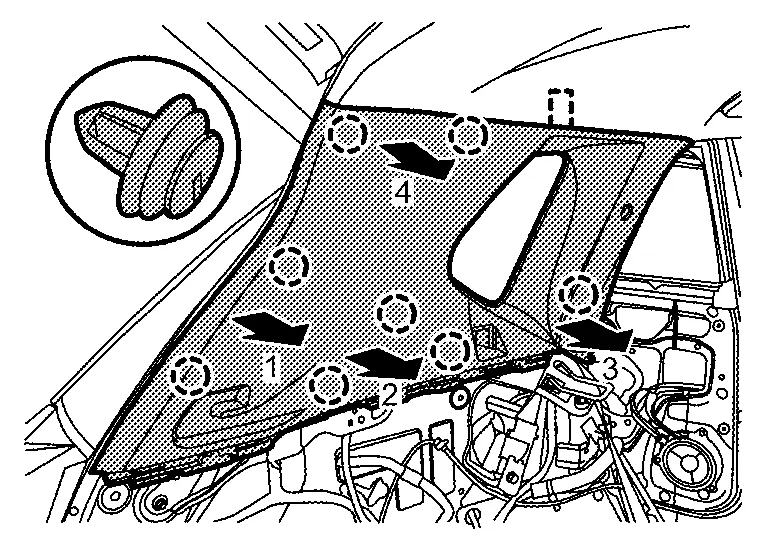
Disengage luggage side lower finisher fixing pawls and clips according to numerical order 1→4 indicated by arrows as shown in the figure.

|
: Clip |
|
: Pawl |
Disengage luggage side lower finisher fixing metal clips according to numerical order 1→3 indicated by arrows as shown in the figure.
NOTE:
Without ProPILOT Assist 2.1 shown, with ProPILOT Assist 2.1 similar.
|
: Metal Pawl |
Disconnect power socket harness connector, and then remove luggage side lower finisher.
INSTALLATION
Note the following items, and then install in the reverse order of removal.
CAUTION:
-
Visually check clips for deformation and damage during installation. Replace with new ones if necessary.
-
Check in advance that clips and pawls are accurately aligned with the portions on body panel, and then install by pressing in.
Luggage Side Upper Finisher
Removal and Installation
CAUTION:
Never damage the body panel.
REMOVAL
Remove luggage side lower finisher. Refer to Removal and Installation.
Remove rear seat belt shoulder anchor bolt. Refer to Removal and Installation.
Remove luggage side upper finisher mounting bolt .
Disengage luggage side upper finisher fixing clips according to numerical order 1→4 indicated by arrows as shown in the figure.
|
: Clip |
Disengage fixing metal clips according to numerical order 1→2 indicated by arrows as shown in the figure, and then remove luggage side upper finisher.
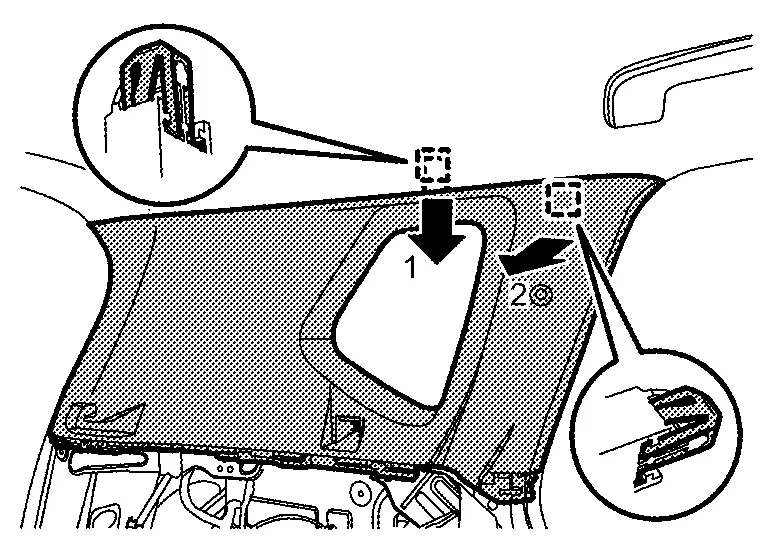
|
: Metal clip |
INSTALLATION
Note the following items, and then install in the reverse order of removal.
CAUTION:
-
Visually check clips and metal clips for deformation and damage during installation. Replace with new ones if necessary.
-
Check in advance that clips and metal clips are accurately aligned with the portions on body panel, and then install by pressing in.
Other materials:
Meters and gauges
MODELS WITH ANALOG METER AND
COLOR DISPLAY
Tachometer
Warning and indicator lights
Vehicle information display
Odometer
Speedometer
Engine coolant temperature gauge
Fuel gauge
CAUTION
For cleaning, use a soft cloth dampened with water. Never use a rough cloth, alcohol, benzine, thi ...
System Description. Component Parts
Component Parts Location
A.
Steering gear assembly (Without ProPILOT Assist 2.1)
B.
Steering gear assembly (With ProPILOT Assist 2.1)
No.Component
1.
ABS actuator and electric unit (control unit)
Refer to Component Parts Location for detailed installation location.
2.
ECM
Refer t ...
Brake Warning Lamp
Component Function Check
CHECK BRAKE WARNING LAMP FUNCTION (1)
Check that brake warning lamp in combination meter turns ON for
approximately 1 second after ignition switch is ON (before engine
start).
Is the inspection result normal?
YES>>
GO TO 2.
NO>>
Refer to Diagnosis Pr ...