Nissan Rogue (T33) 2021-Present Service Manual: Removal and Installation :: Headlining
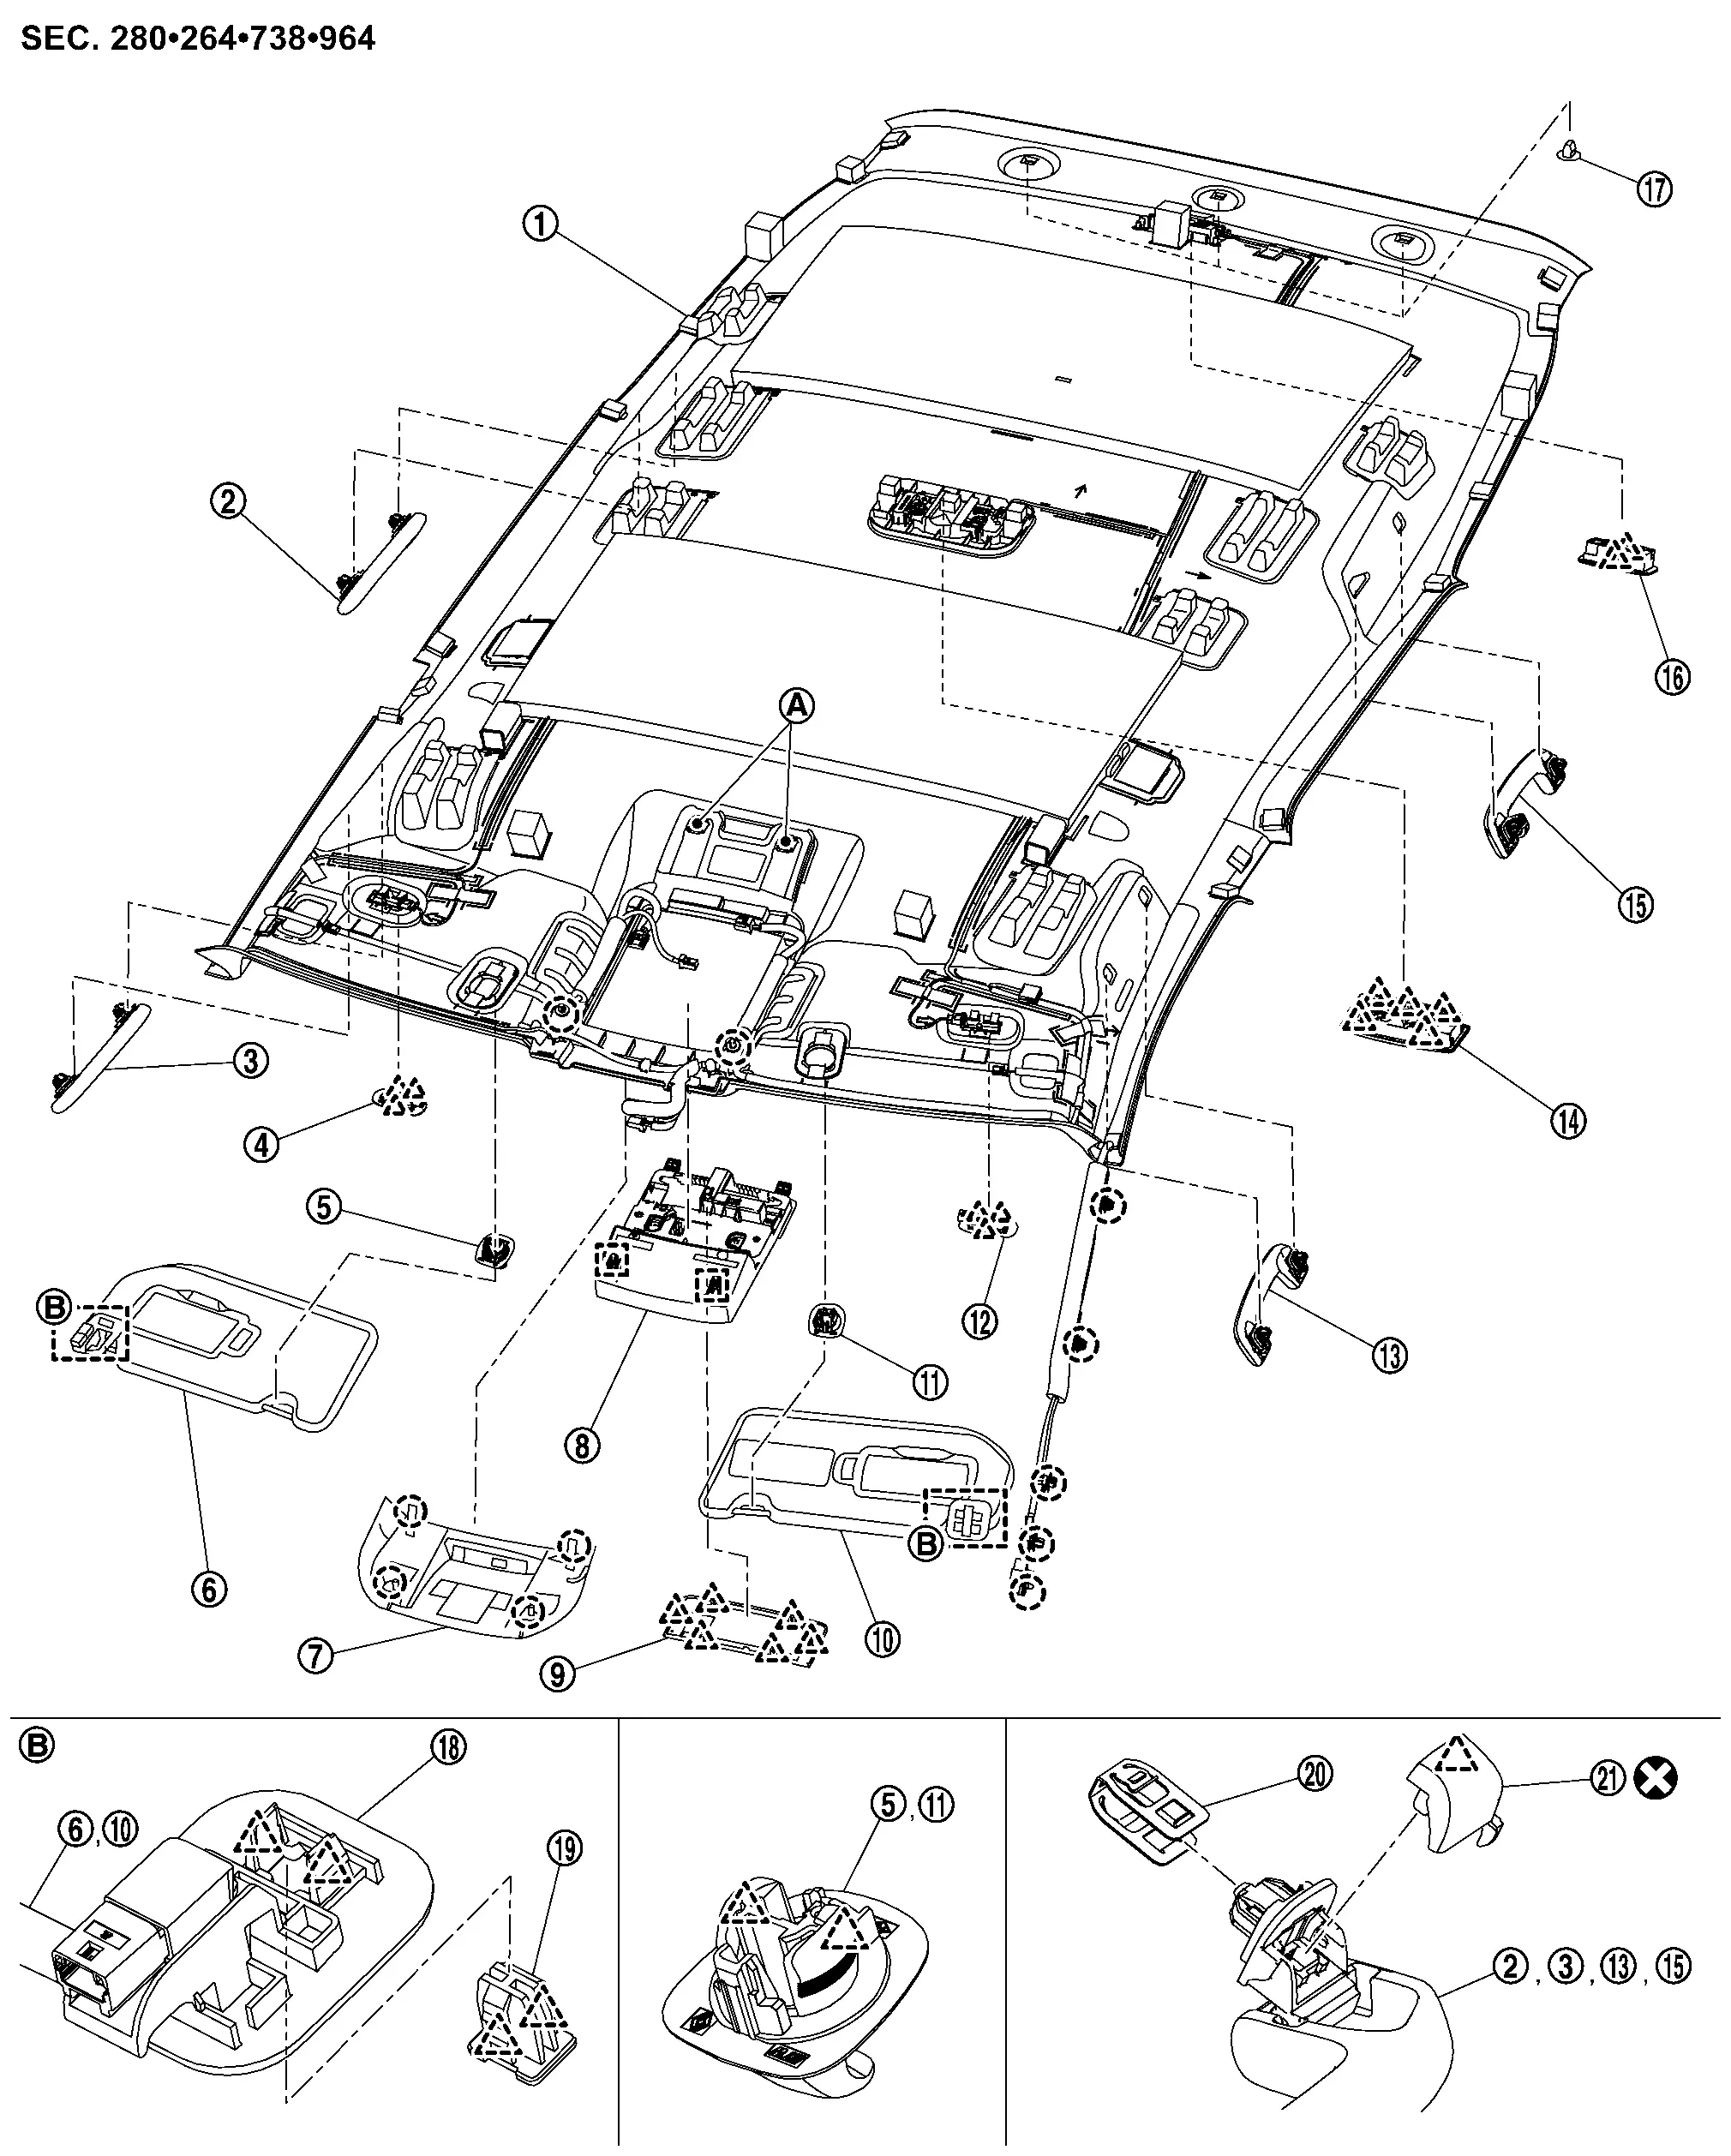
Exploded View
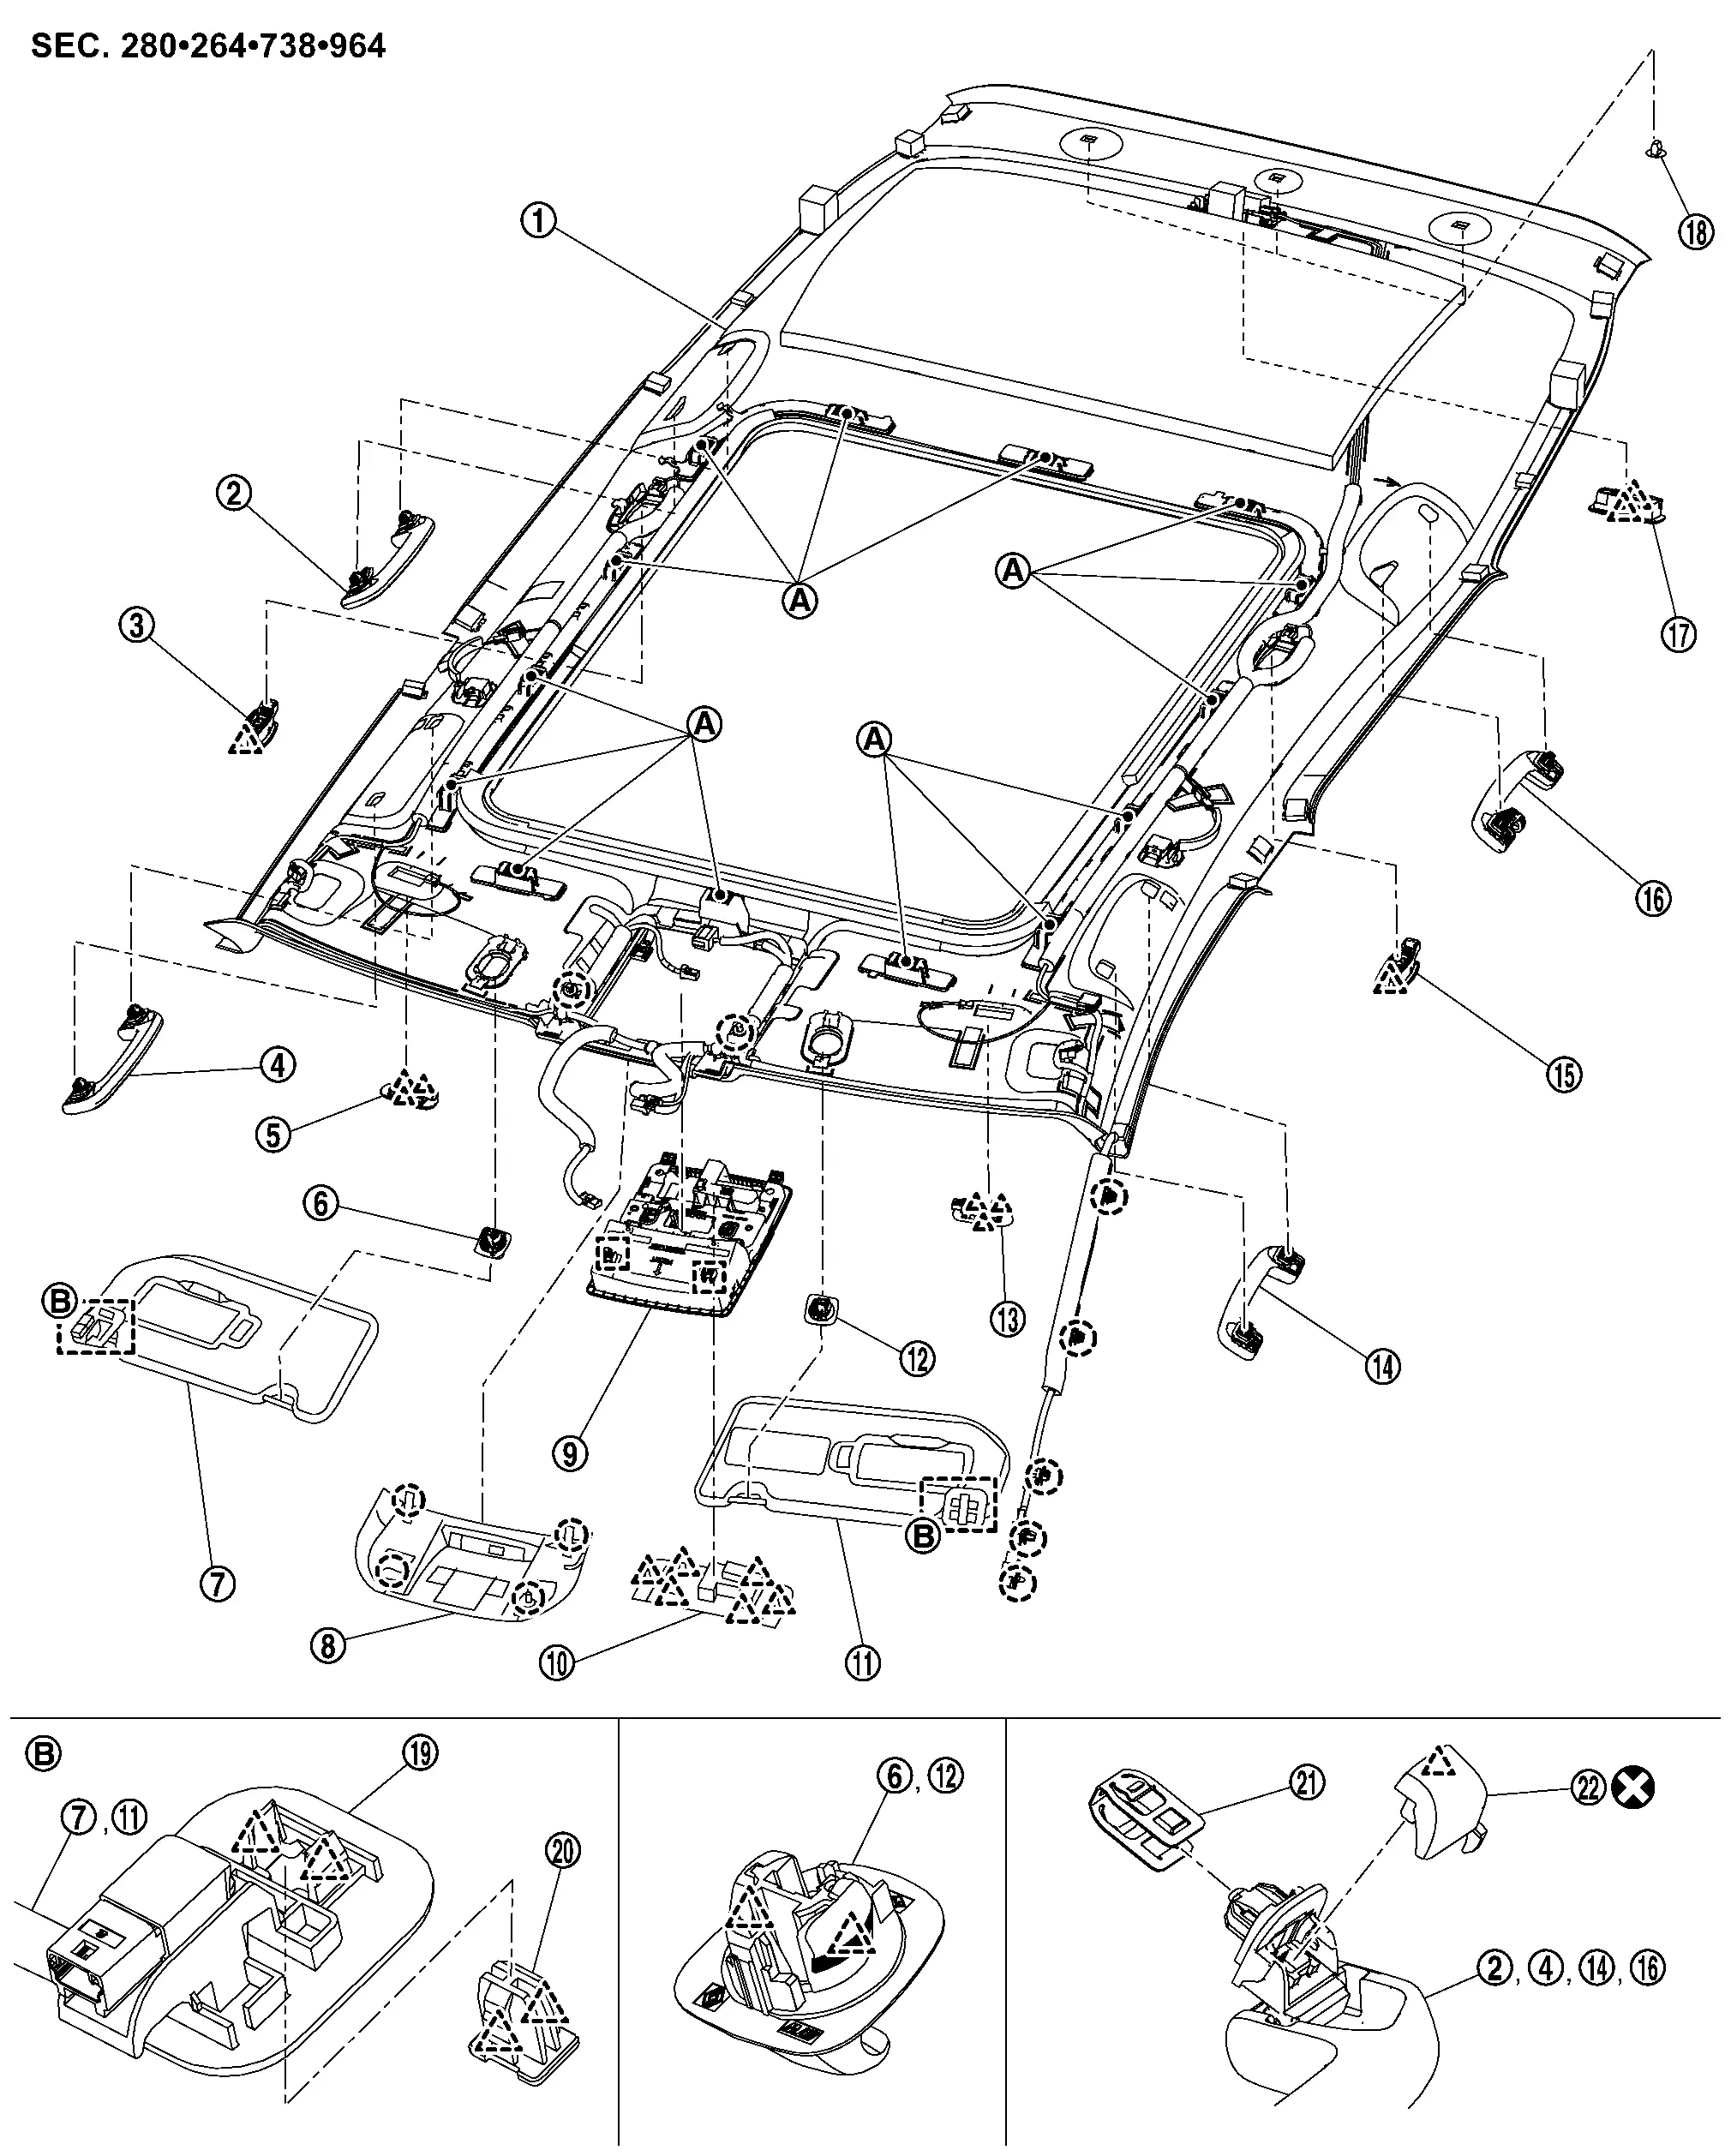
JAPAN PRODUCTION MODELS
With moonroof models (headlining)
 |
Headlining assembly |  |
Rear assist grip RH |  |
Personal lamp assembly RH |
 |
Front assist grip RH |  |
Vanity mirror lamp assembly RH |  |
Sun visor holder RH |
 |
Sun visor assembly RH |  |
Front camera unit cover |  |
Map lamp assembly |
 |
Map lamp finisher |  |
Sun visor assembly LH |  |
Sun visor holder LH |
 |
Vanity mirror lamp assembly LH |  |
Front assist grip LH |  |
Personal lamp assembly LH |
 |
Rear assist grip LH |  |
Luggage room lamp assembly |  |
Clip |
 |
Sun visor bracket |  |
Bracket locker* |  |
Metal clip |
 |
Assist grip cap | ||||
 |
Dual-lock fastener | ||||
 |
: Clip | ||||
 |
: Pawl | ||||
 |
: Metal clip | ||||
 |
: Always replace after every disassembly. | ||||
| * | : Bracket locker are integrated in sun visor bracket. | ||||
With moonroof models (assist grip bracket)
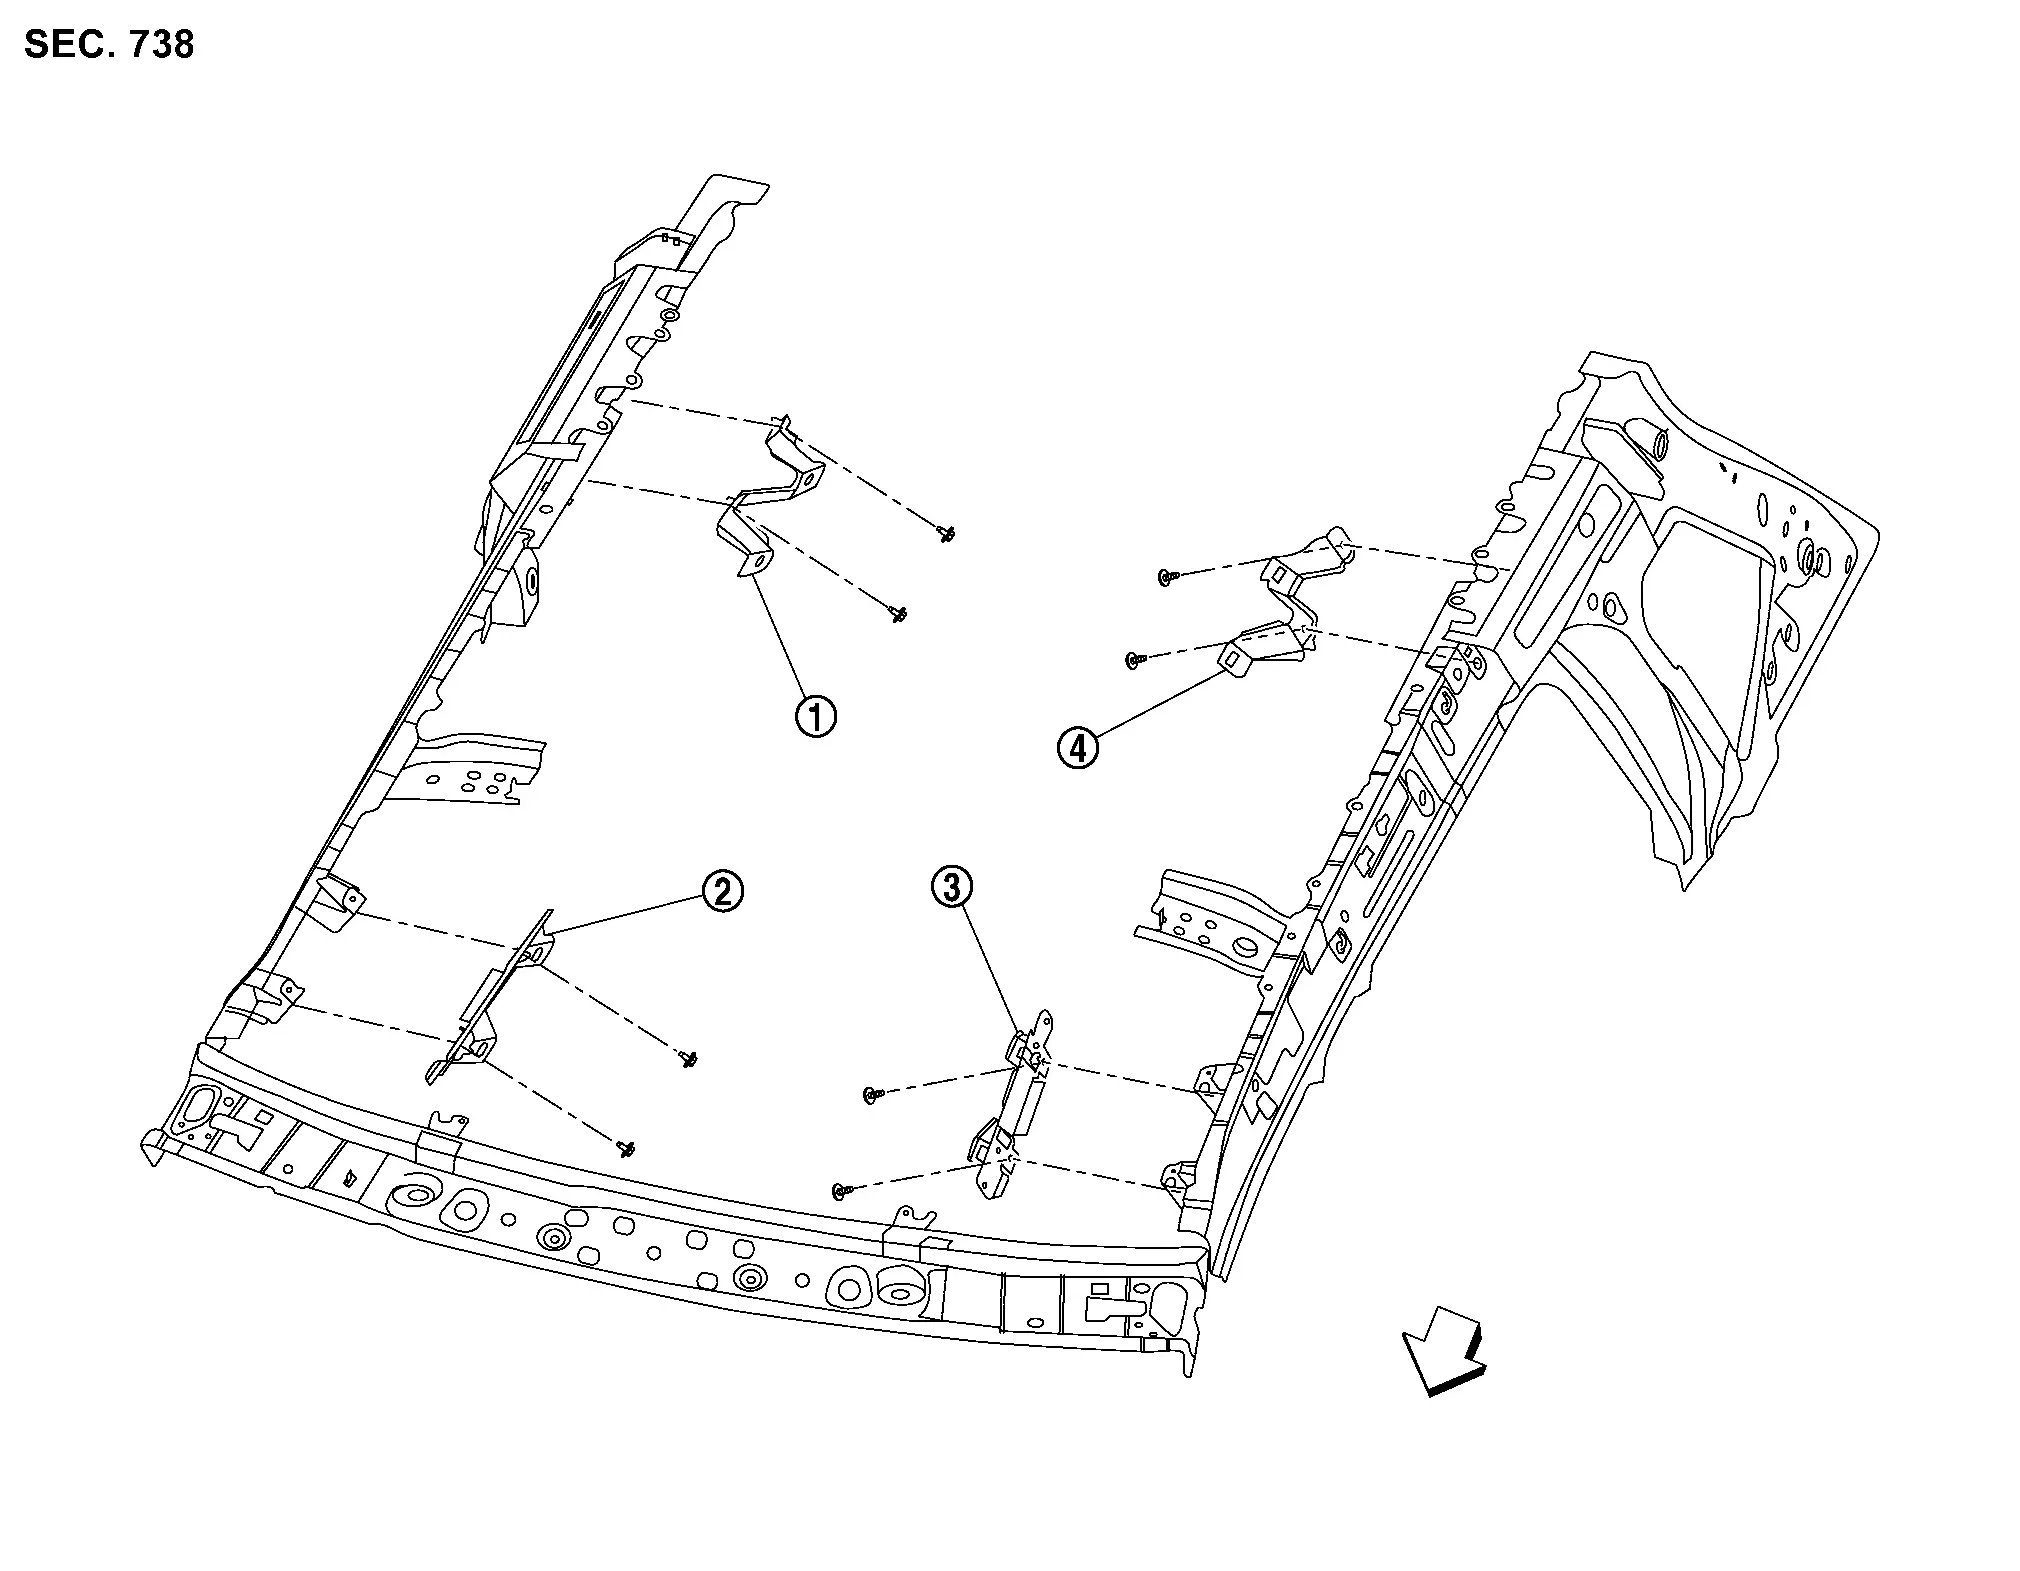
|
Rear assist grip bracket RH | |
Front assist grip bracket RH | |
Front assist grip bracket LH |
|
Rear assist grip bracket LH | ||||
| : Nissan Ariya Vehicle front | |||||
Without moonroof models
|
Headlining assembly | |
Rear assist grip RH | |
Front assist grip RH |
|
Vanity mirror lamp assembly RH | |
Sun visor holder RH | |
Sun visor assembly RH |
|
Front camera unit cover | |
Map lamp assembly | |
Map lamp finisher |
|
Sun visor assembly LH | |
Sun visor holder LH | |
Vanity mirror lamp assembly LH |
|
Front assist grip LH | |
Map lamp assembly | |
Rear assist grip LH |
|
Luggage room lamp assembly | |
Clip | |
Sun visor bracket |
|
Bracket locker* | |
Metal clip | |
Assist grip cap |
|
Dual-lock fastener | ||||
|
: Clip | ||||
|
: Pawl | ||||
|
: Metal clip | ||||
|
: Always replace after every disassembly. | ||||
| * | : Bracket locker are integrated in sun visor bracket. | ||||
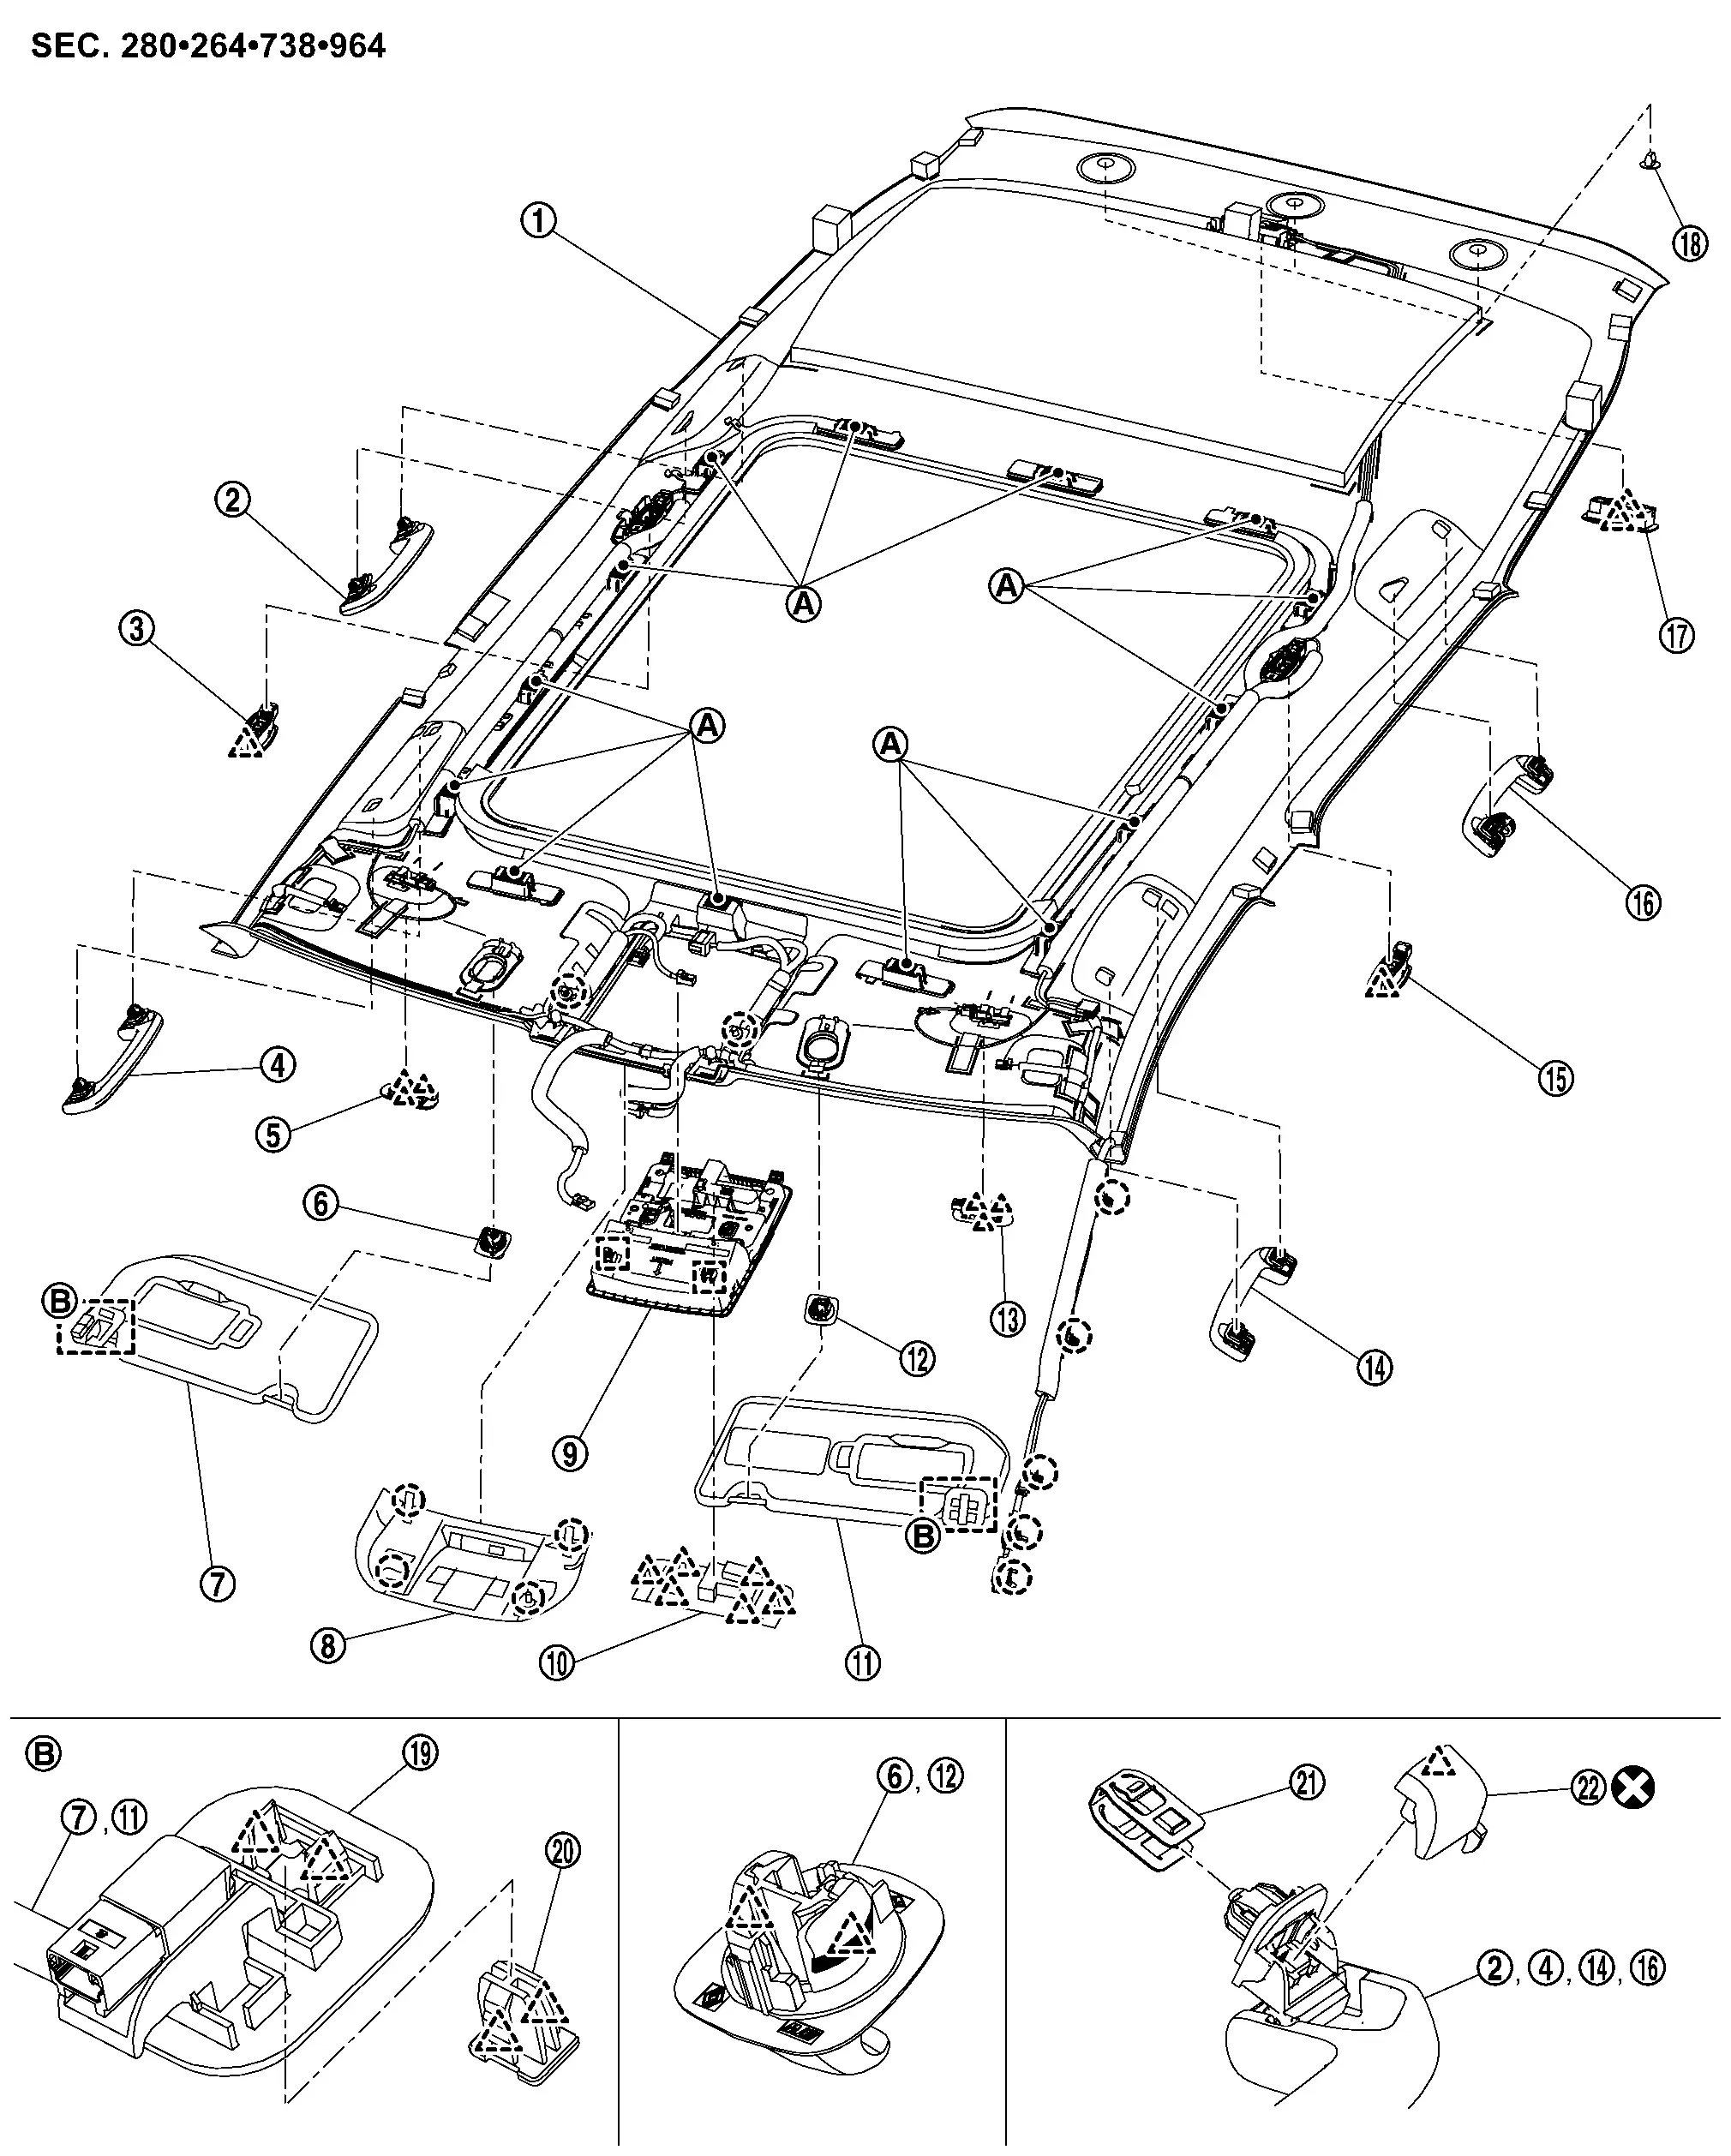
USA PRODUCTION MODELS
With moonroof models (headlining)
|
Headlining assembly | |
Rear assist grip RH | |
Personal lamp assembly RH |
|
Front assist grip RH | |
Vanity mirror lamp assembly RH | |
Sun visor holder RH |
|
Sun visor assembly RH | |
Front camera unit cover | |
Map lamp assembly |
|
Map lamp finisher | |
Sun visor assembly LH | |
Sun visor holder LH |
|
Vanity mirror lamp assembly LH | |
Front assist grip LH | |
Personal lamp assembly LH |
|
Rear assist grip LH | |
Luggage room lamp assembly | |
Clip |
|
Sun visor bracket | |
Bracket locker* | |
Metal clip |
|
Assist grip cap | ||||
|
Dual-lock fastener | ||||
|
: Clip | ||||
|
: Pawl | ||||
|
: Metal clip | ||||
|
: Always replace after every disassembly. | ||||
| * | : Bracket locker are integrated in sun visor bracket. | ||||
With moonroof models (assist grip bracket)
|
Rear assist grip bracket RH | |
Front assist grip bracket RH | |
Front assist grip bracket LH |
|
Rear assist grip bracket LH | ||||
| : Nissan Ariya Vehicle front | |||||
Without moonroof models
|
Headlining assembly | |
Rear assist grip RH | |
Front assist grip RH |
|
Vanity mirror lamp assembly RH | |
Sun visor holder RH | |
Sun visor assembly RH |
|
Front camera unit cover | |
Map lamp assembly | |
Map lamp finisher |
|
Sun visor assembly LH | |
Sun visor holder LH | |
Vanity mirror lamp assembly LH |
|
Front assist grip LH | |
Map lamp assembly | |
Rear assist grip LH |
|
Luggage room lamp assembly | |
Clip | |
Sun visor bracket |
|
Bracket locker* | |
Metal clip | |
Assist grip cap |
|
Dual-lock fastener | ||||
|
: Clip | ||||
|
: Pawl | ||||
|
: Metal clip | ||||
|
: Always replace after every disassembly. | ||||
| * | : Bracket locker are integrated in sun visor bracket. | ||||
Removal and Installation
CAUTION:
Never damage the roof panel.
REMOVAL
With Moonroof Models
Remove front pillar garnish (LH and RH). Refer to Removal and Installation.
Remove following parts of front pillar LH.Disconnect harness connectors . Disengage harness fixing clips.
|
: Clip |
Remove center pillar upper garnish (LH and RH). Refer to Removal and Installation.
Remove luggage side upper finisher (LH and RH). Refer to Removal and Installation.
Remove map lamp assembly. Refer to Removal and Installation.
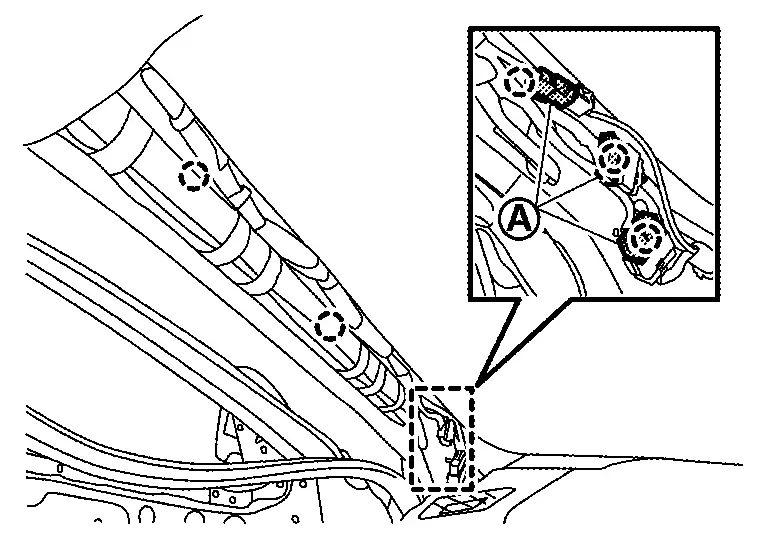
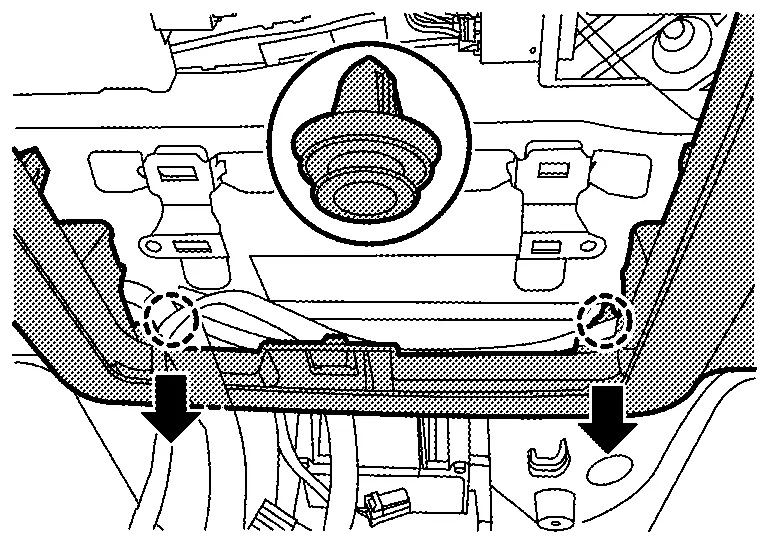
Remove front camera unit cover.Disengage front camera unit cover fixing clips of rear end position indicated by arrows as shown in the figure.
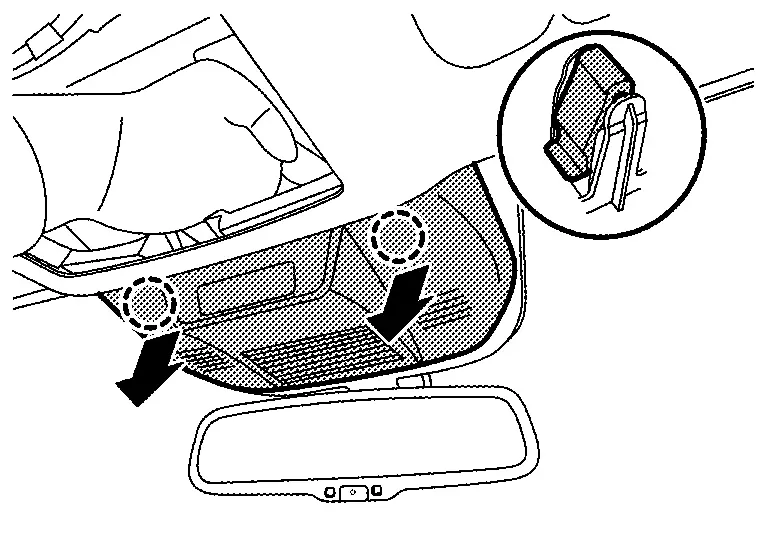
|
: Clip |
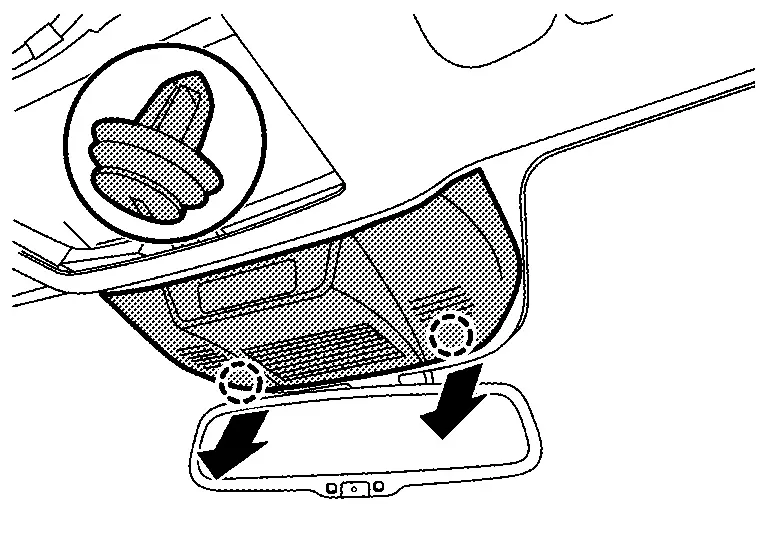
|
: Clip |
Disconnect following harness connectors.
-
Auto anti-dazzling inside mirror (if equipped)
-
Front camera unit
-
Moonroof motor
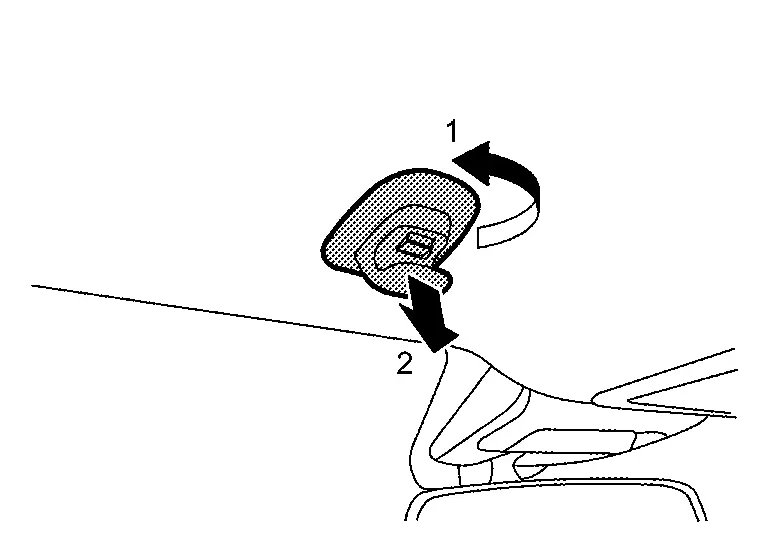
Remove all assist grips.Disengage assist grip cap fixing pawl using a remover tool (A), and then remove assist grip cap.
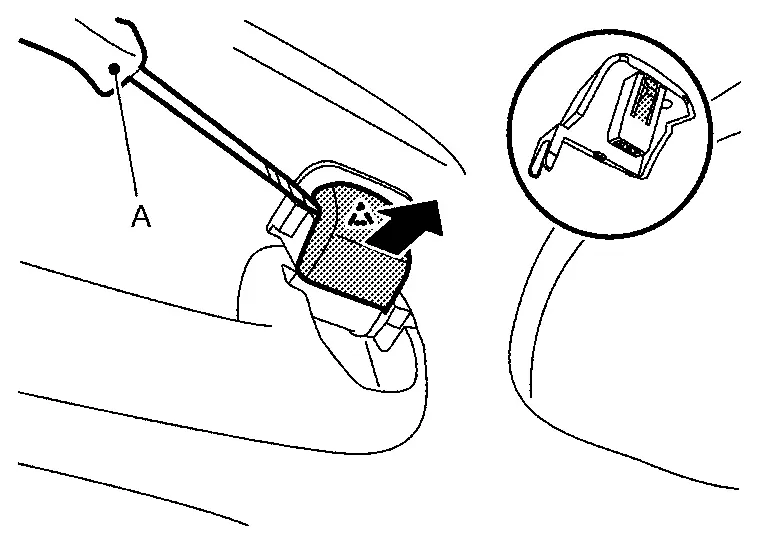
|
: Pawl |
Remove sun visor assembly (LH and RH).Disengage bracket locker fixing pawls using a remover tool (A).
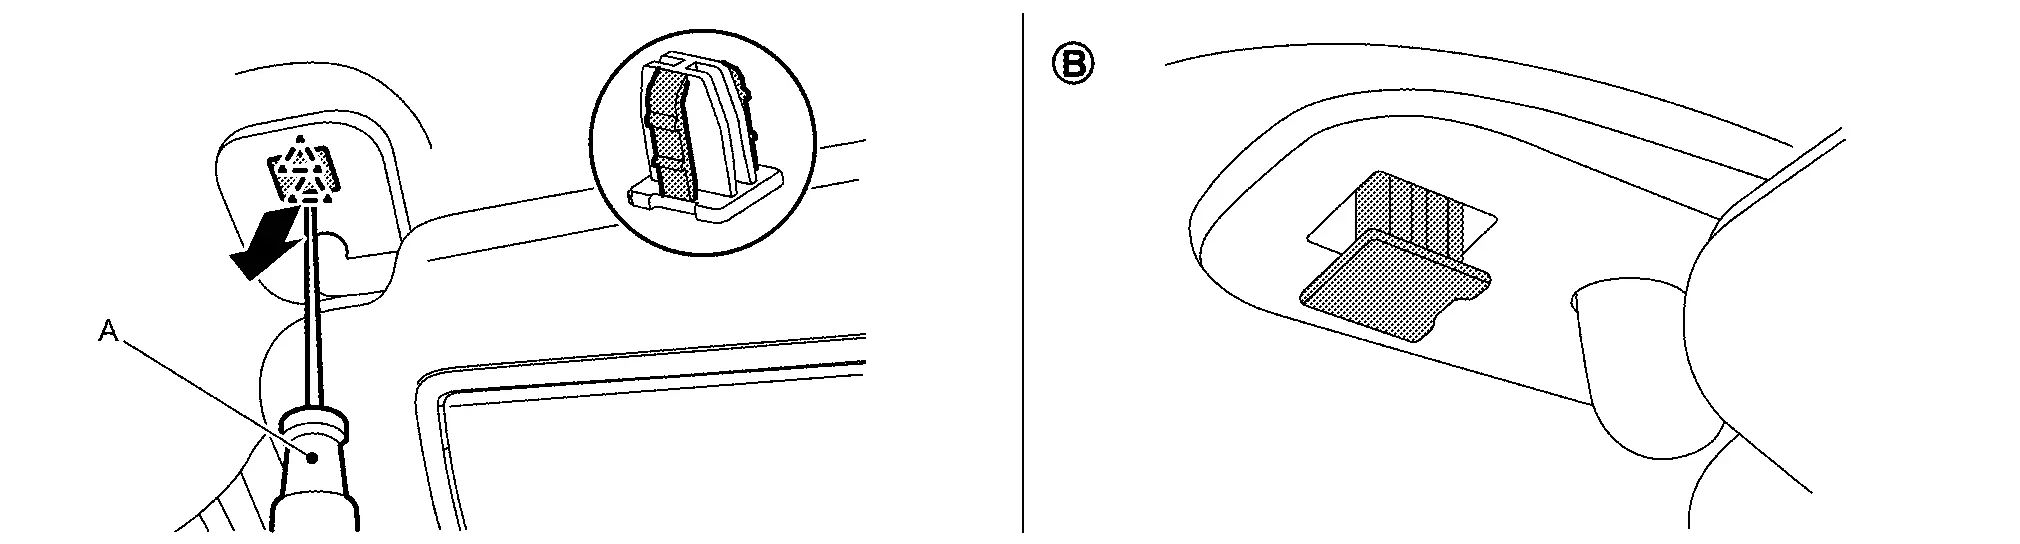
|
: Pawl |
CAUTION:
Because the bracket locker has a stopper, never pull out the bracket locker from (B) position.
Rotate the sun visor body (A) to the direction of the arrow as shown in the figure, and then remove sun visor bracket (1) fixing pawls.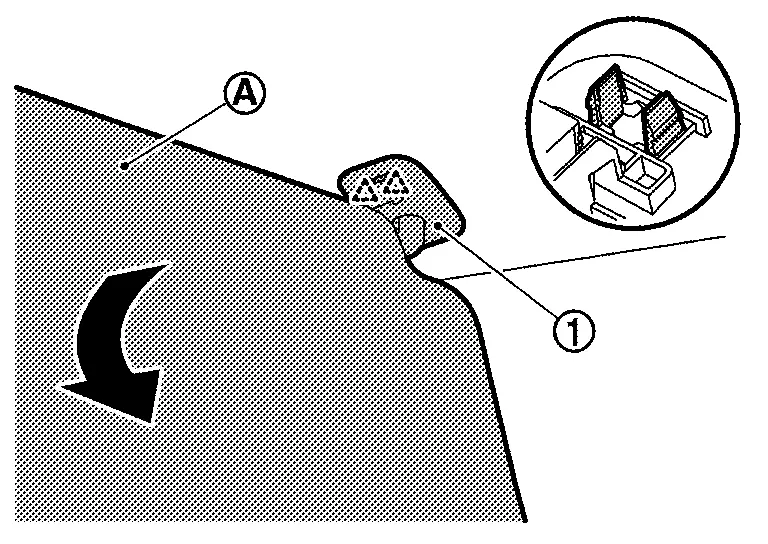
|
: Pawl |
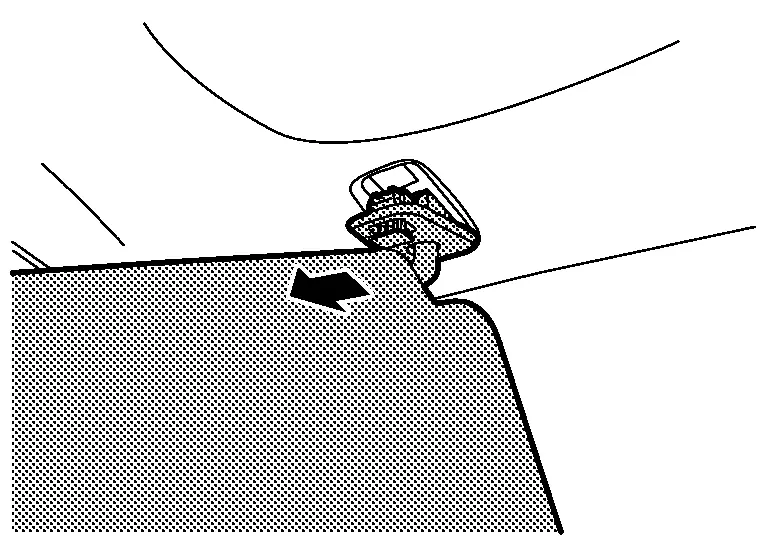
Remove sun visor holder (LH and RH) according to numerical order 1→2 indicated by arrows as shown in the figure.
Disengage map lamp bracket fixing clips.
|
: Clip |
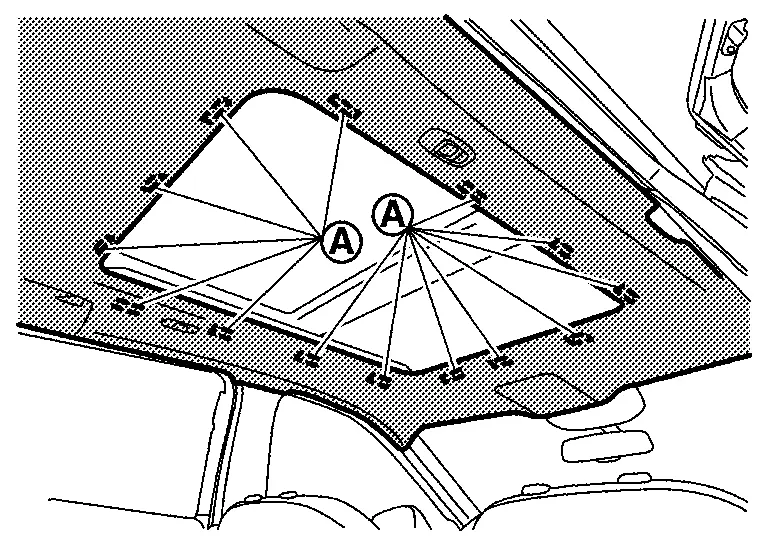
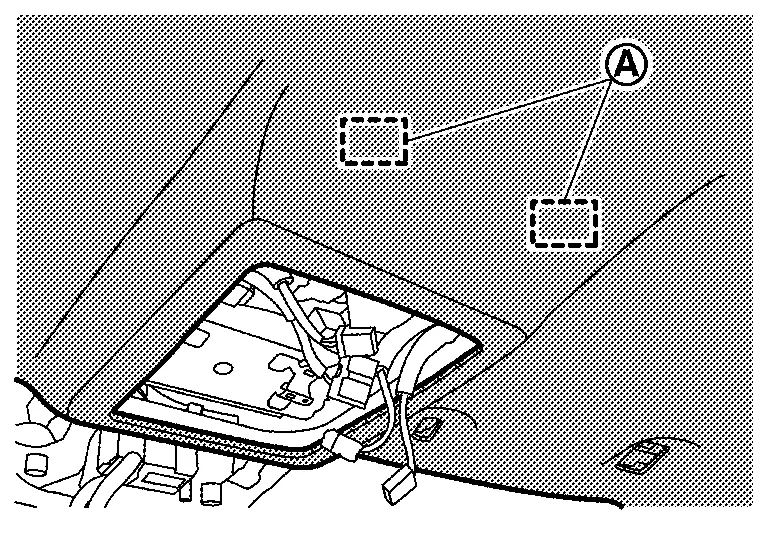
Detach dual lock fasteners (A) between headlining assembly and roof panel.
CAUTION:
-
Apply protective tape to the portion where contact may occur during work.
-
Never bend headlining assembly when removing.
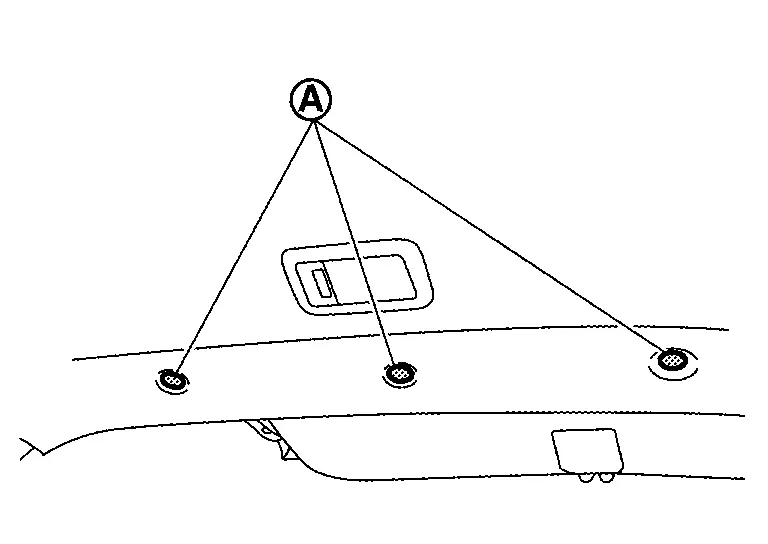
Remove fixing clips (A) at the rear end of headlining assembly.
CAUTION:
-
Two workers are required for removal in order to prevent damage.
-
Apply protective tape to the portion where contact may occur during work.
-
Never bend headlining assembly when removing.
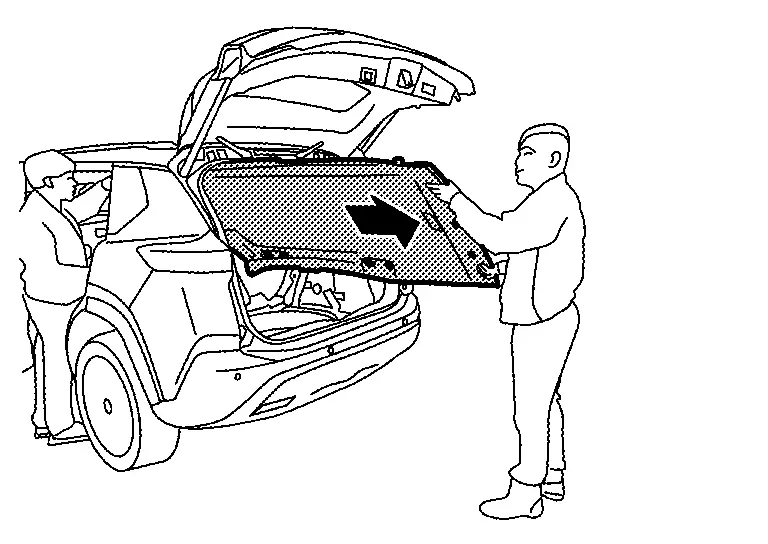
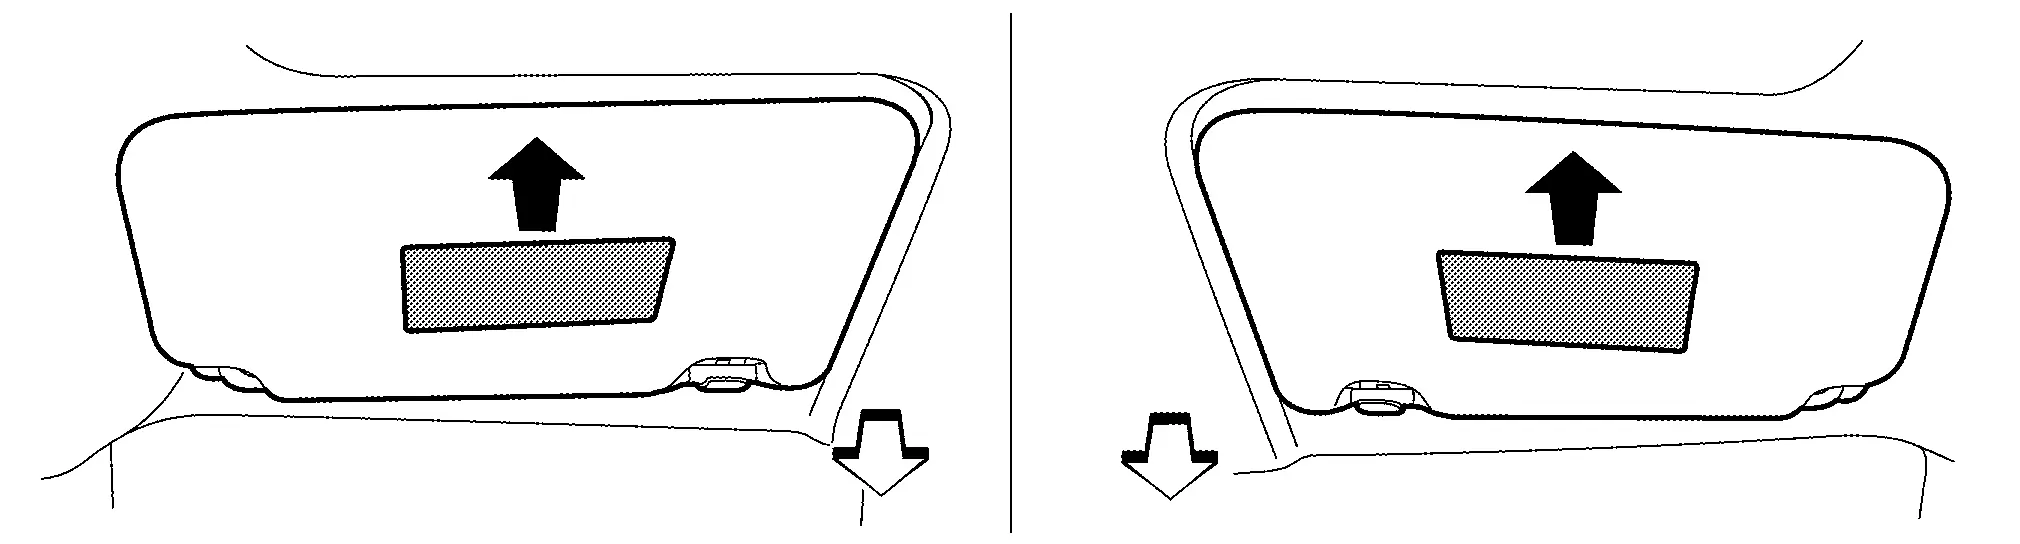
Remove headlining assembly according to direction indicated by arrow as shown in the figure.
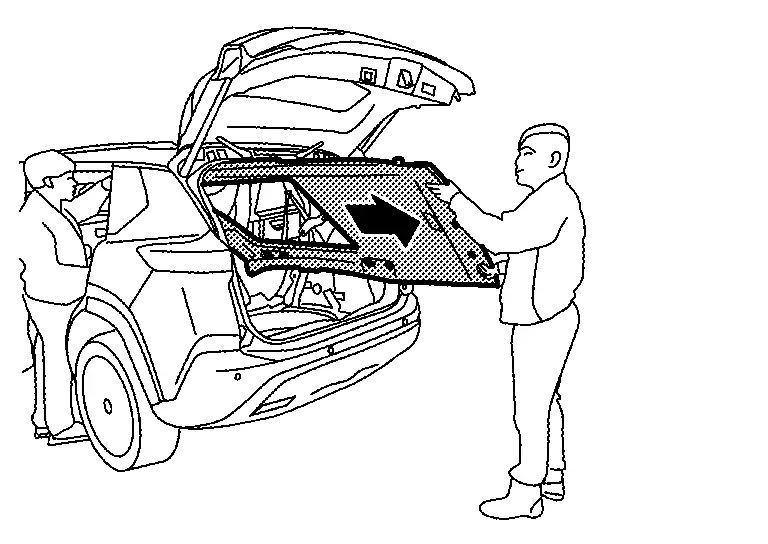
CAUTION:
-
Two workers are required for removal in order to prevent damage.
-
Apply protective tape to the portion where contact may occur during work.
-
Never bend headlining assembly when removing.
Remove assist grip bracket mounting bolts, and then remove assist grip brackets.
Without Moonroof Models
Remove front pillar garnish (LH and RH). Refer to Removal and Installation.
Remove following parts of front pillar LH.Disconnect harness connectors . Disengage harness fixing clips.
|
: Clip |
Remove center pillar upper garnish (LH and RH). Refer to Removal and Installation.
Remove luggage side upper finisher (LH and RH). Refer to Removal and Installation.
Remove map lamp assembly. Refer to Removal and Installation.
Remove front camera unit cover.Disengage front camera unit cover fixing clips of rear end position indicated by arrows as shown in the figure.
|
: Clip |
|
: Clip |
Disconnect front camera unit harness connectors.
-
Auto anti-dazzling inside mirror (if equipped)
-
Front camera unit
Remove all assist grips.Disengage assist grip cap fixing pawl using a remover tool (A), and then remove assist grip cap.
|
: Pawl |
Remove sun visor assembly (LH and RH).Disengage bracket locker fixing pawls using a remover tool (A).
|
: Pawl |
CAUTION:
Because the bracket locker has a stopper, never pull out the bracket locker from (B) position.
Rotate the sun visor body (A) to the direction of the arrow as shown in the figure, and then remove sun visor bracket (1) fixing pawls.
|
: Pawl |
Remove sun visor holder (LH and RH) according to numerical order 1→2 indicated by arrows as shown in the figure.
Disengage map lamp bracket fixing clips.
|
: Clip |
Detach dual lock fasteners between headlining (A) assembly and roof panel.
CAUTION:
-
Apply protective tape to the portion where contact may occur during work.
-
Never bend headlining assembly when removing.
Remove fixing clips (A) at the rear end of headlining assembly.
CAUTION:
-
Two workers are required for removal in order to prevent damage.
-
Apply protective tape to the portion where contact may occur during work.
-
Never bend headlining assembly when removing.
Remove headlining assembly according to direction indicated by arrow as shown in the figure.
CAUTION:
-
Two workers are required for removal in order to prevent damage.
-
Apply protective tape to the portion where contact may occur during work.
-
Never bend headlining assembly when removing.
INSTALLATION
Note the following items, and then install in the reverse order of removal.
CAUTION:
-
When installing headlining, start by installing both sun visor holders and headlining fixing clips in order to keep the headlining in position.
-
Visually check the clips for deformation and damage during installation. Replace with new ones if necessary.
-
Never bend headlining when installing.
-
Be careful that the surface is not wrinkled when installing.
-
When installing assist grip, install metal clip
to assist grip cap , and then install to the body panel.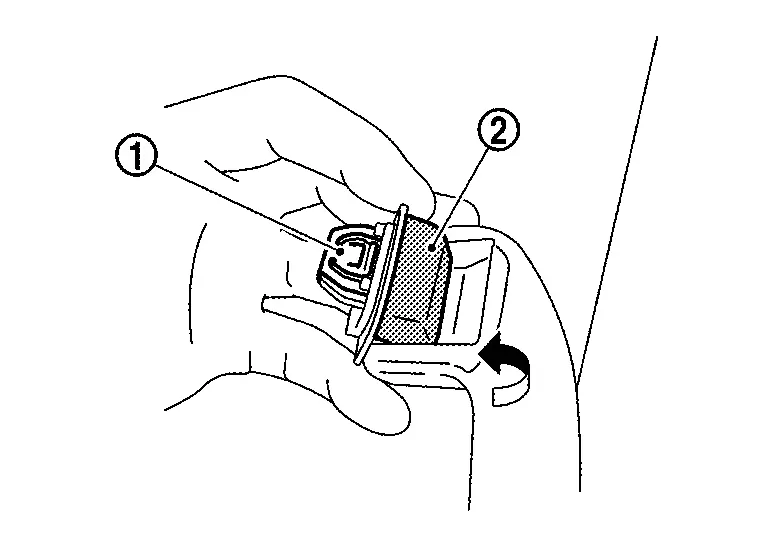
-
Replace assist grip cap with a new part after removal. Never reuse assist grip cap.
-
After installing the sun visor, make sure that the caution label is in the orientation shown when the sun visor is retracted. (For the caution label of driver's seat, when it is equipped.)

: Caution label upward 
: Nissan Ariya Vehicle front
Other materials:
Can Fundamental. Trouble Diagnosis
Component Description
System Description
Component Description
Main line
CAN communication line between splices
Branch line
CAN communication line between splice and a control unit
Splice
A point connecting a branch line with a main line
Termination circuit
Circuit ...
Symptom Diagnosis. Noise, Vibration and Harshness (nvh) Troubleshooting
NVH Troubleshooting Chart
Use chart below to find the cause of the symptom. If necessary, repair or replace these parts. Possible cause and SUSPECTED PARTS Symptom Reference
FRONT SUSPENSION
Noise Shake Vibration Shimmy Judder Poor quality ride or
Improper installation, looseness
...
Comment utiliser le HUD (Affichage TĂŞte Haute) de votre Nissan Rogue
Informations de base et activation
L’utilisation du système d’affichage tête haute (HUD) sur le Nissan Rogue est conçue pour être aussi simple qu'efficace. Pour activer cette technologie de projection laser, il vous suffit d'appuyer sur la commande dédiée "HUD" située sur le pannea ...