Nissan Rogue (T33) 2021-Present Service Manual: Removal and Installation :: Front Washer Nozzle and Tube
Exploded View
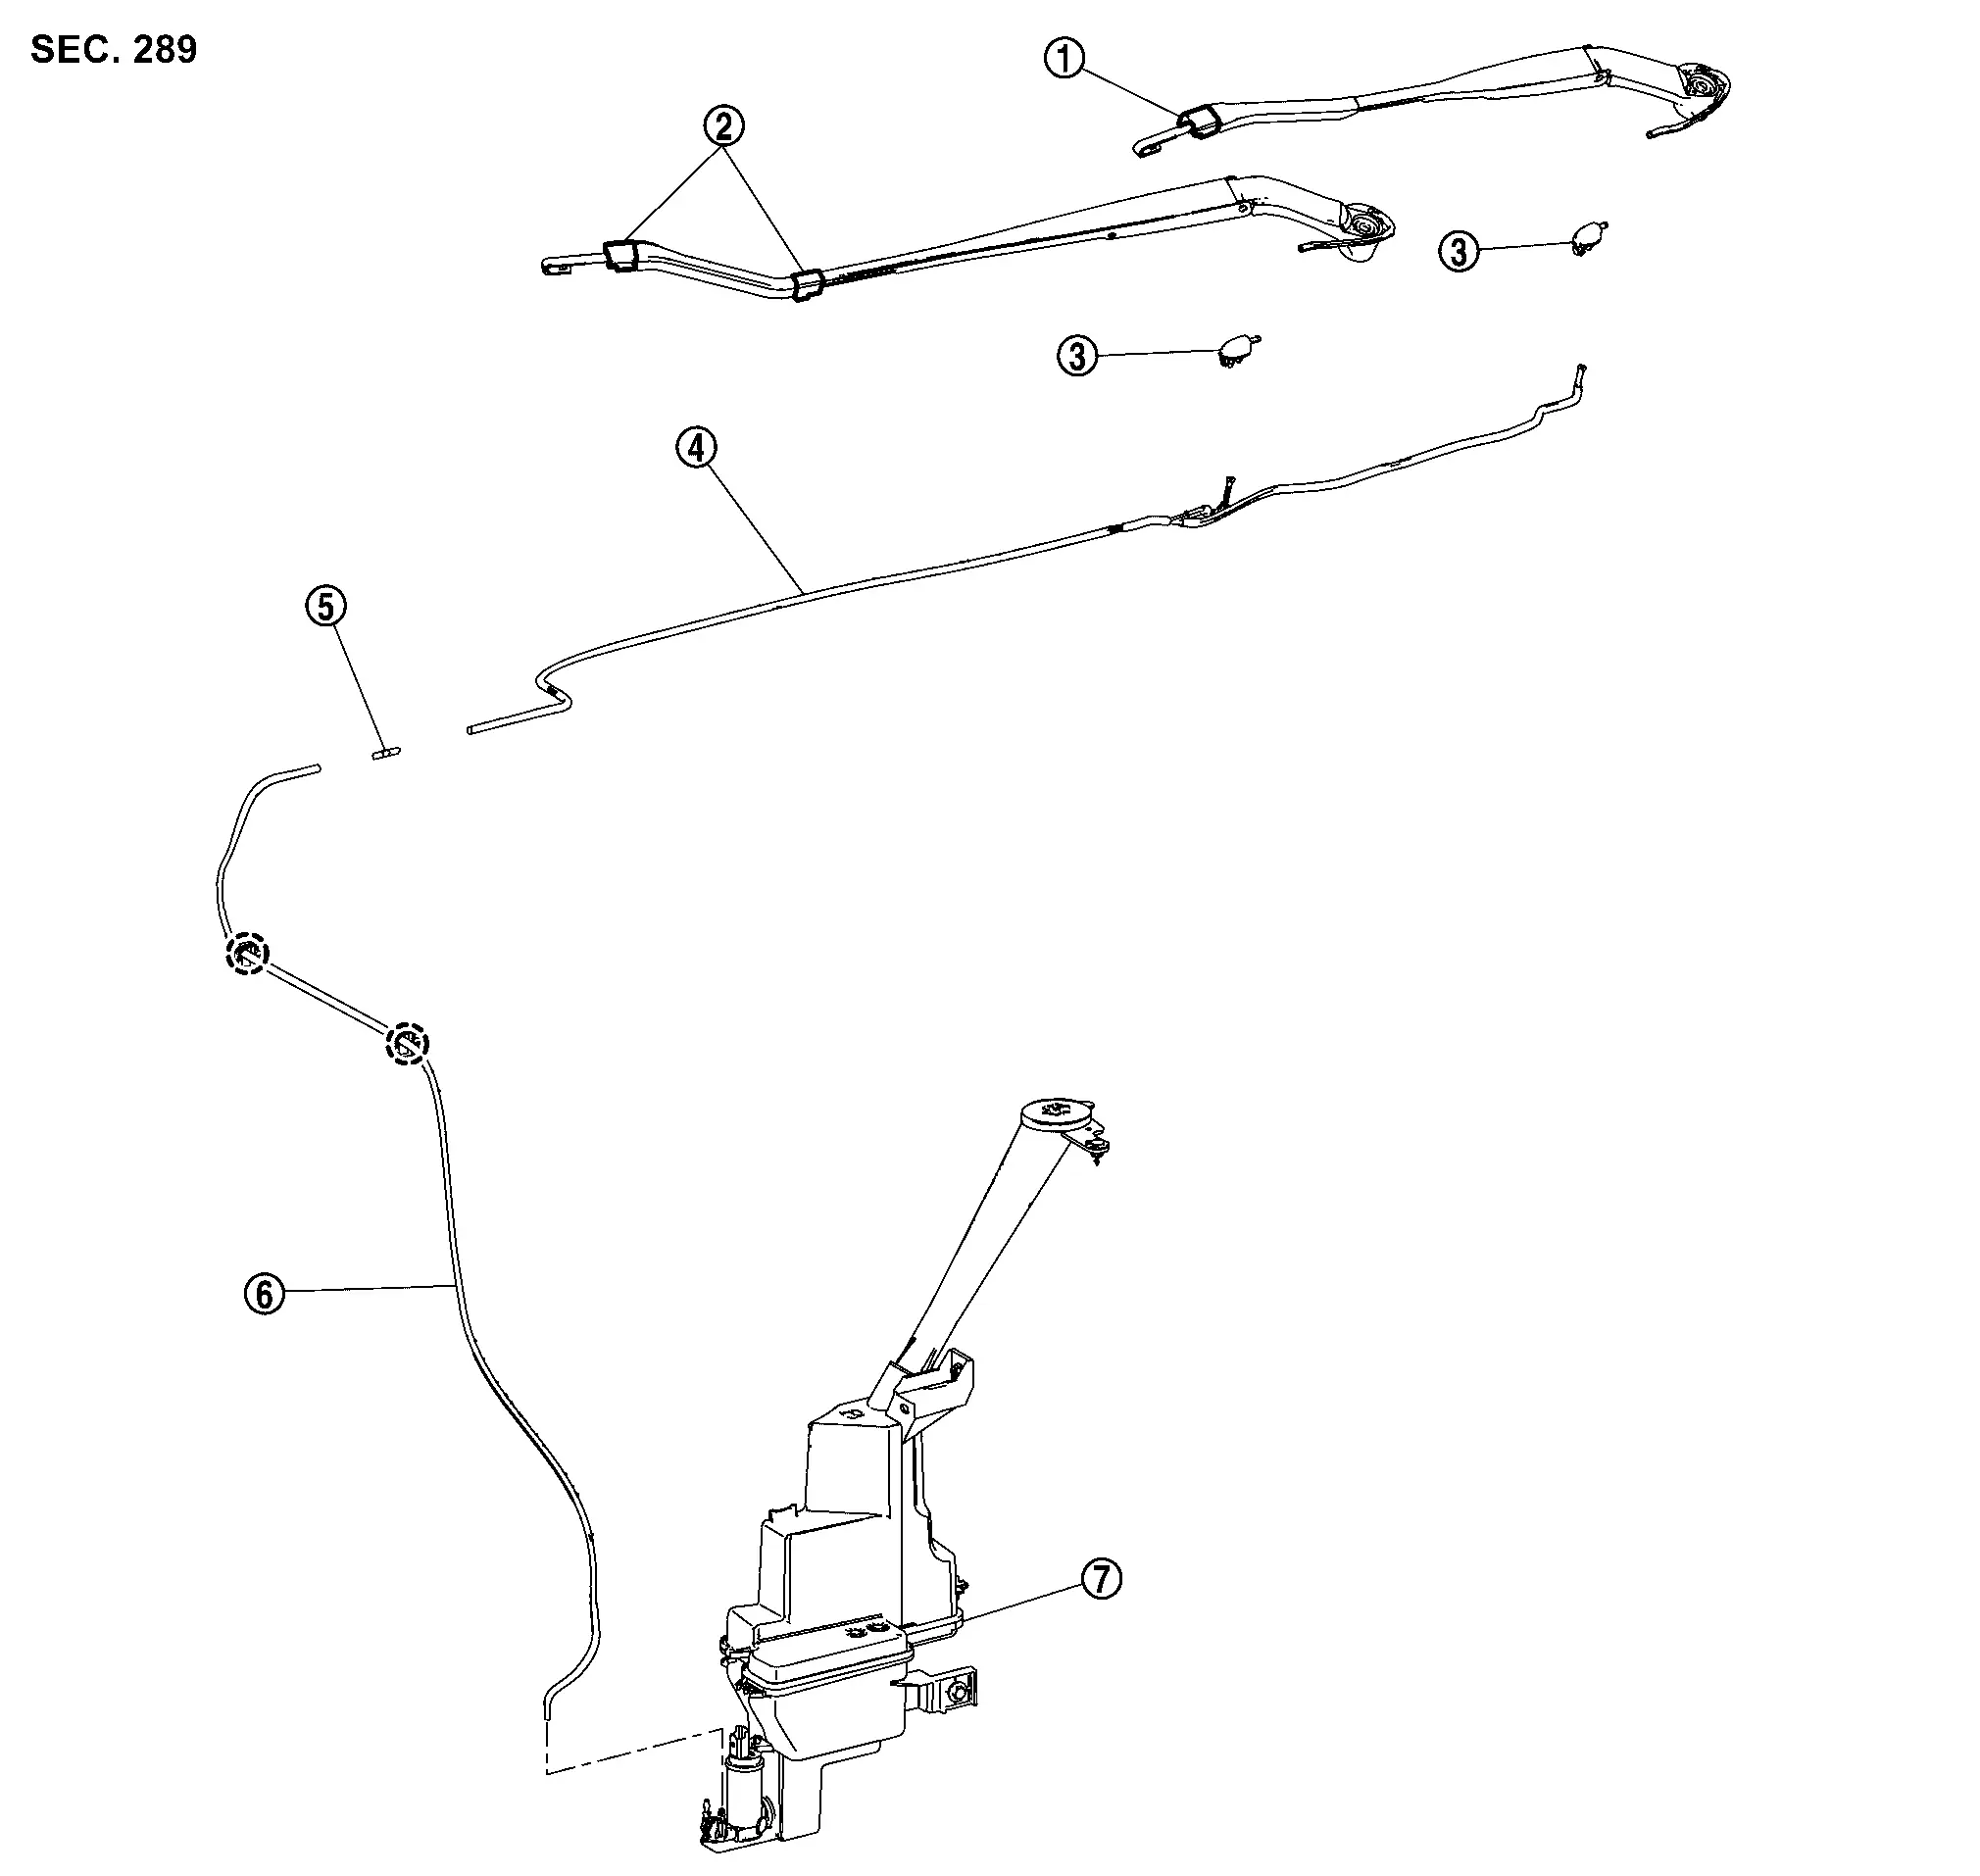
 |
Front washer nozzle LH (integrated with front wiper arm LH) |  |
Front washer nozzle RH (integrated with front wiper arm RH) |  |
Tube connector |
 |
Front washer tube B |  |
Joint |  |
Front washer tube A |
 |
Washer tank | ||||
 |
: Clip | ||||
Hydraulic Layout
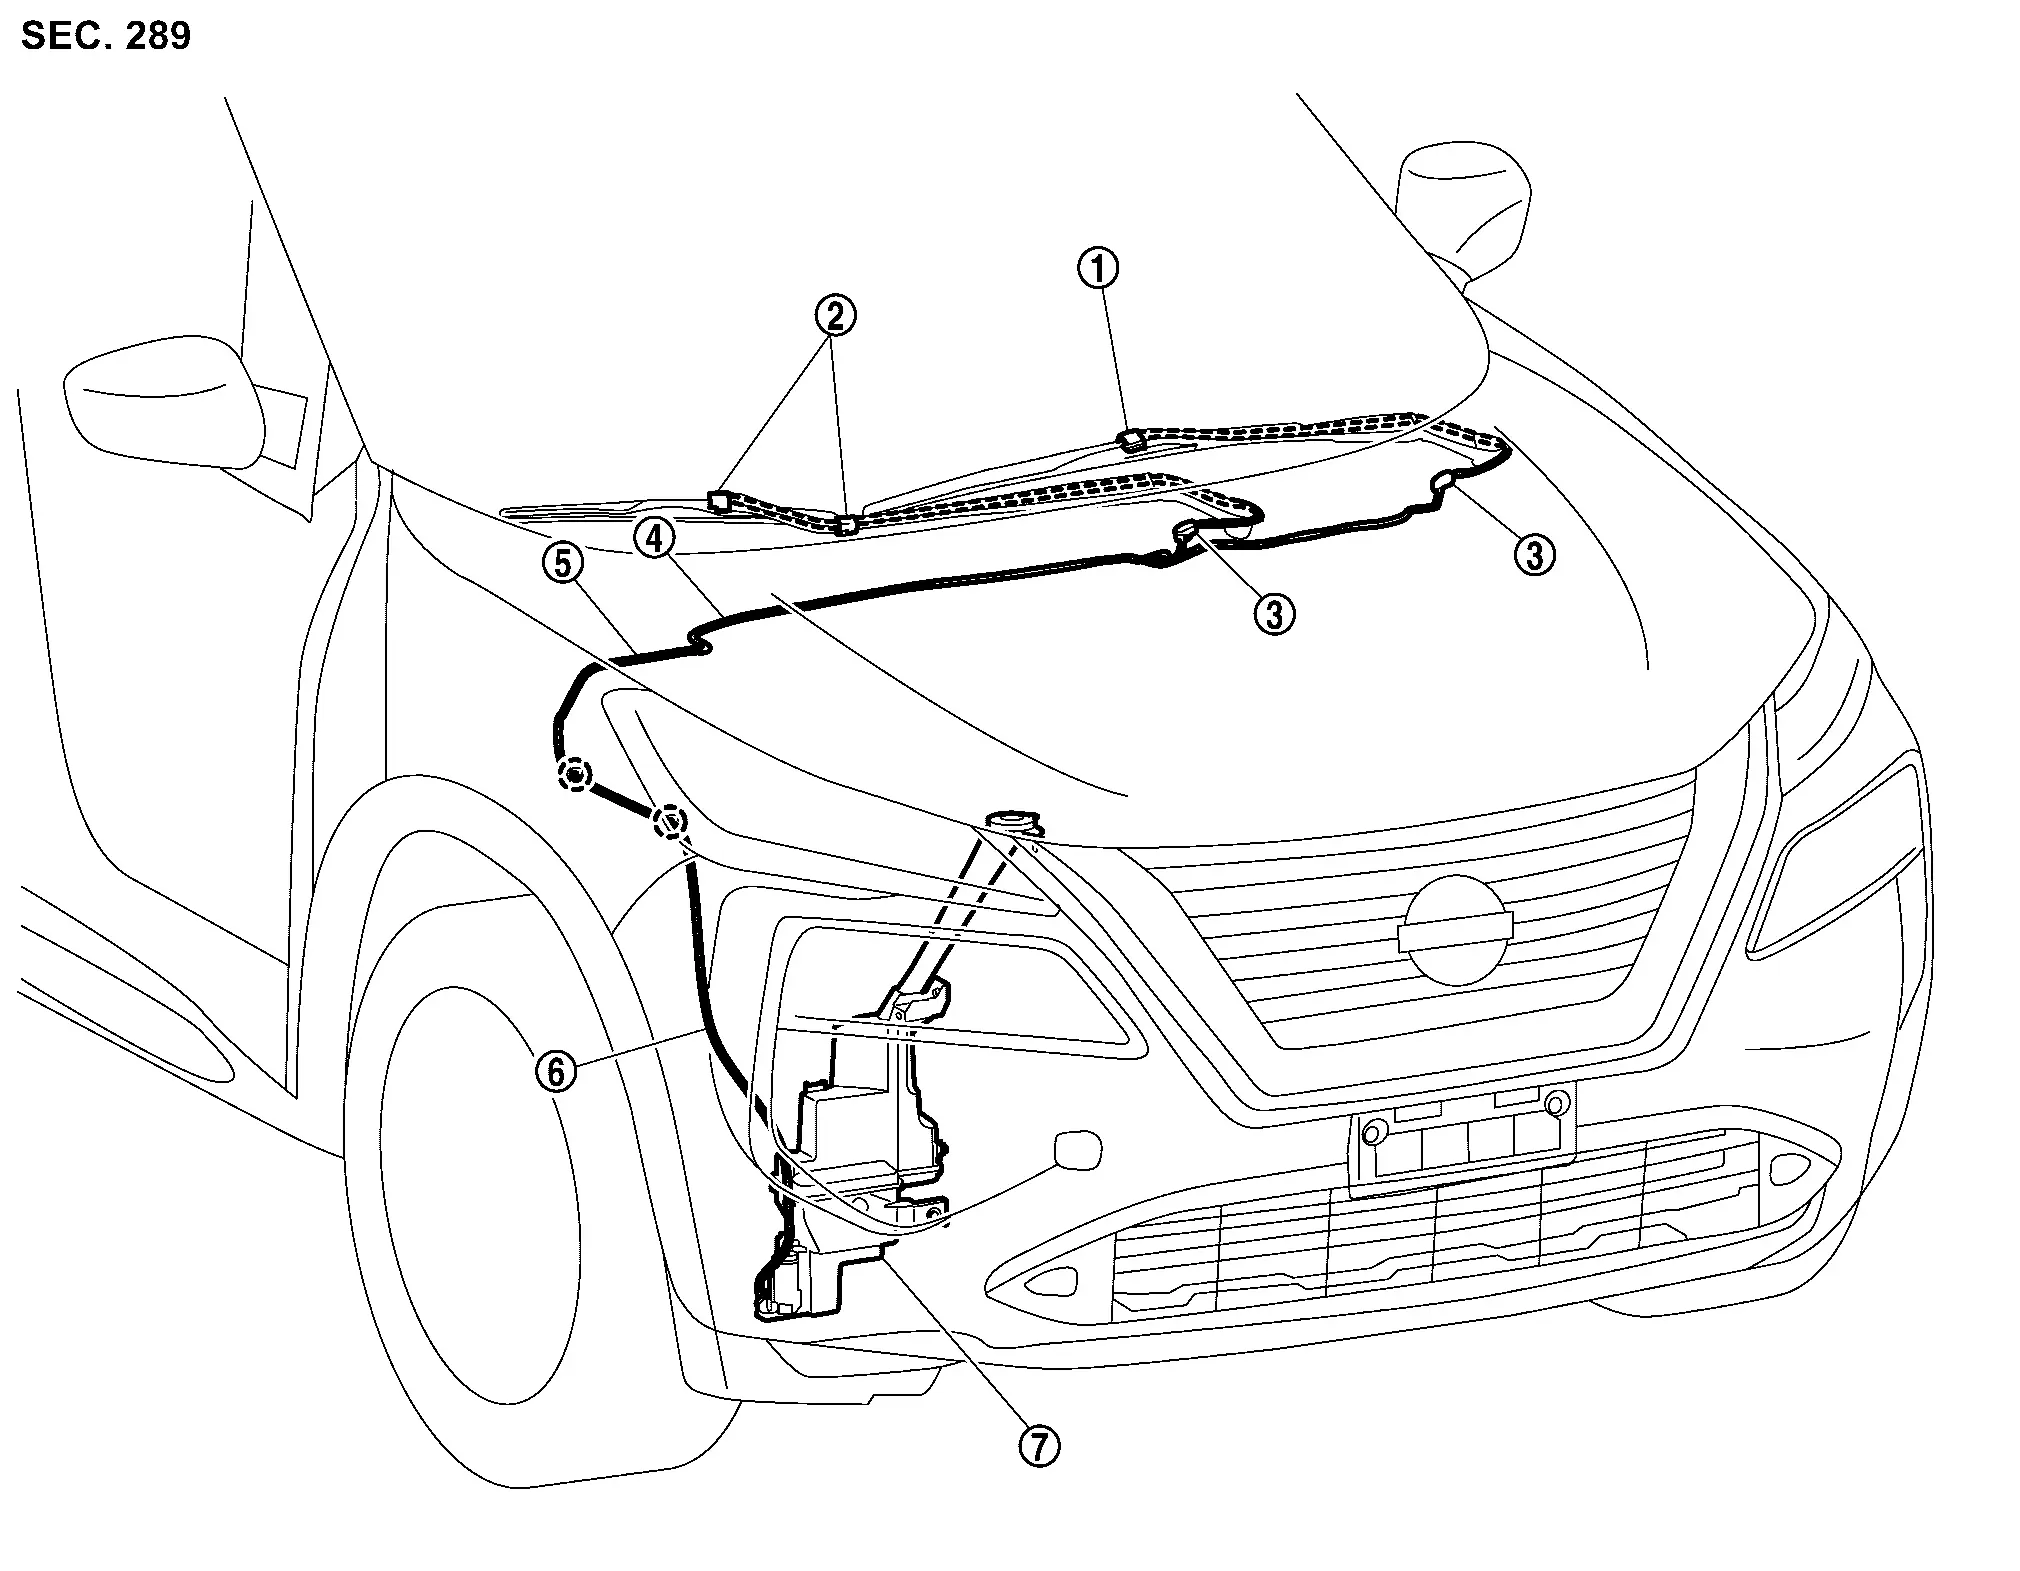
|
Front washer nozzle LH (integrated with front wiper arm LH) | |
Front washer nozzle RH (integrated with front wiper arm RH) | |
Tube connector |
|
Front washer tube B | |
Joint | |
Front washer tube A |
|
Washer tank | ||||
|
: Clip | ||||
Front Washer Nozzle
Removal and Installation
CAUTION:
When washer nozzle and washer tube are disconnected/removed, washer fluid may come out so prepare a container to receive the fluid and never allow fluid to be sprinkled.
Front washer nozzle is integrated in the front wiper arm. Refer to Removal and Installation.
Inspection and Cleaning
INSPECTION
Front Washer Nozzle Spray Position Inspection
Inspect the spray positions and compare to the positions shown in the figure.
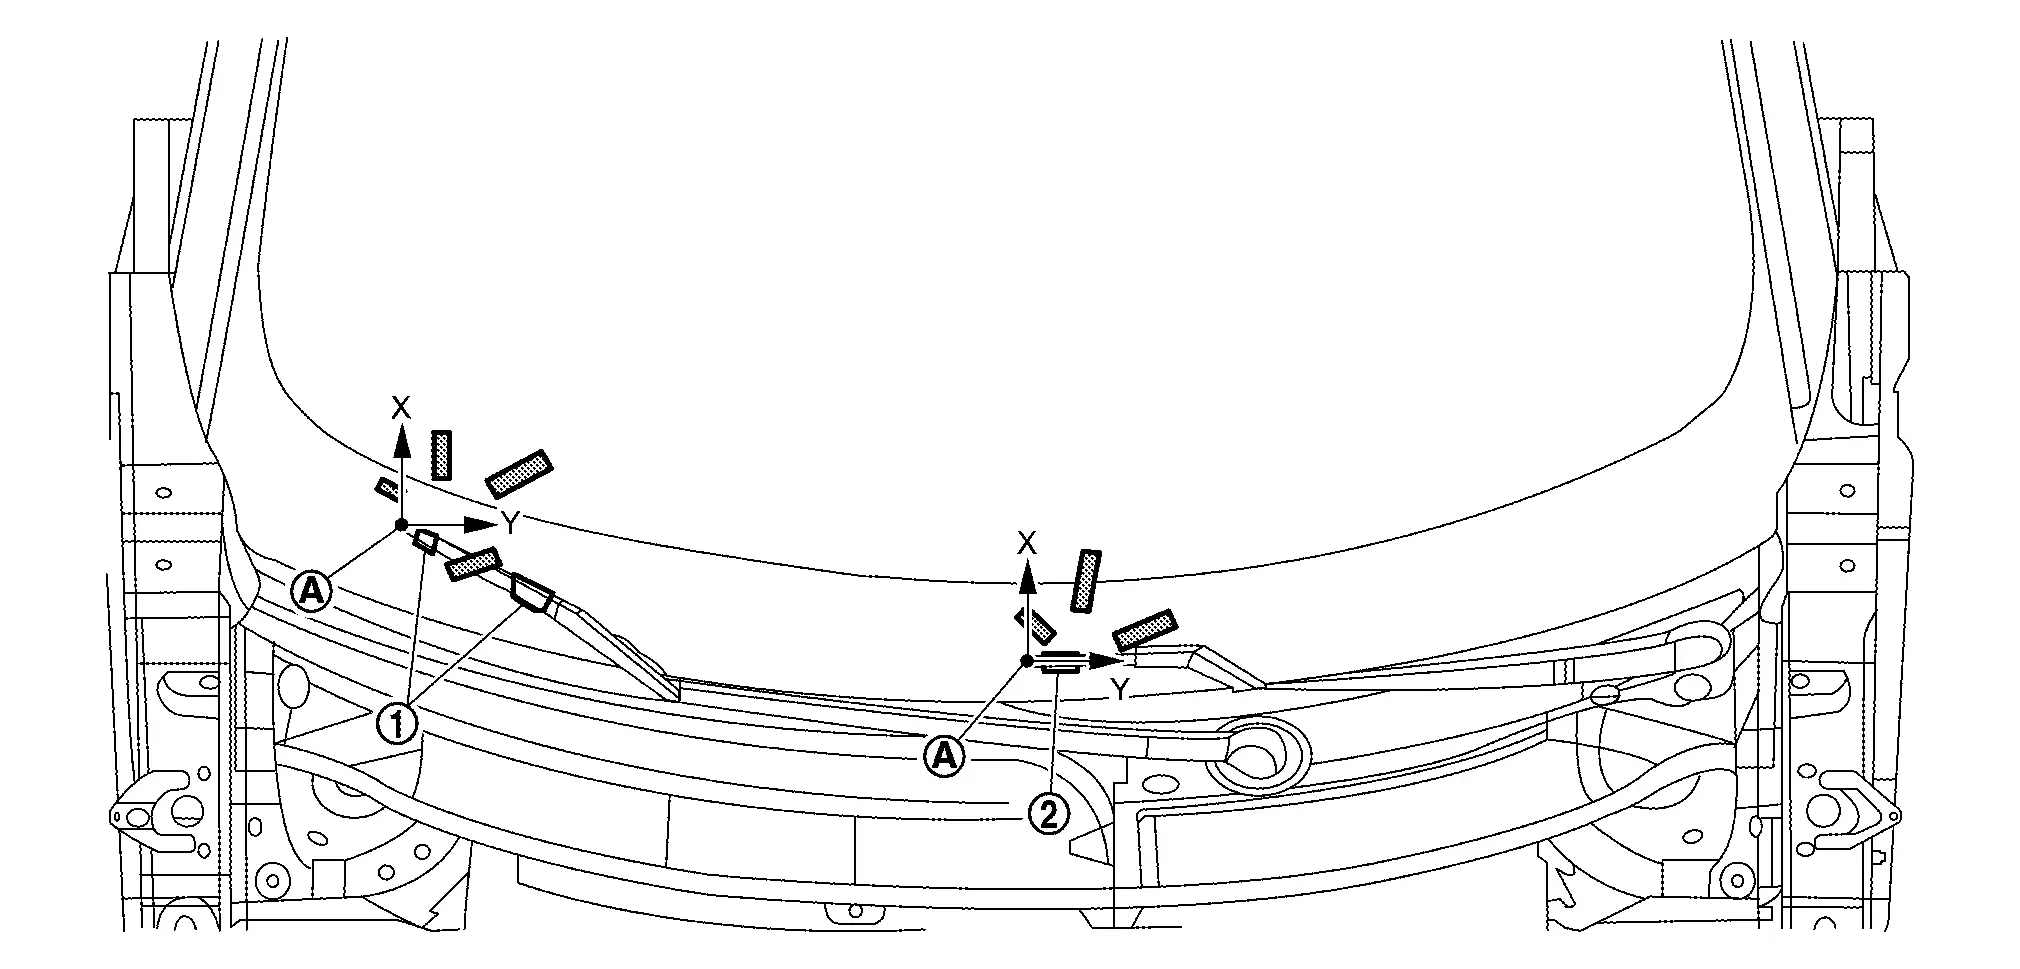
|
Front washer nozzle RH (integrated with front wiper arm RH) | |
Front washer nozzle LH (integrated with front wiper arm LH) | ||
 |
Reference point | ||||
| X | : Longitudinal direction of the Nissan Ariya vehicle | ||||
| Y | : Left and right direction of the vehicle | ||||
 |
: Spray area | ||||
Front washer nozzle LH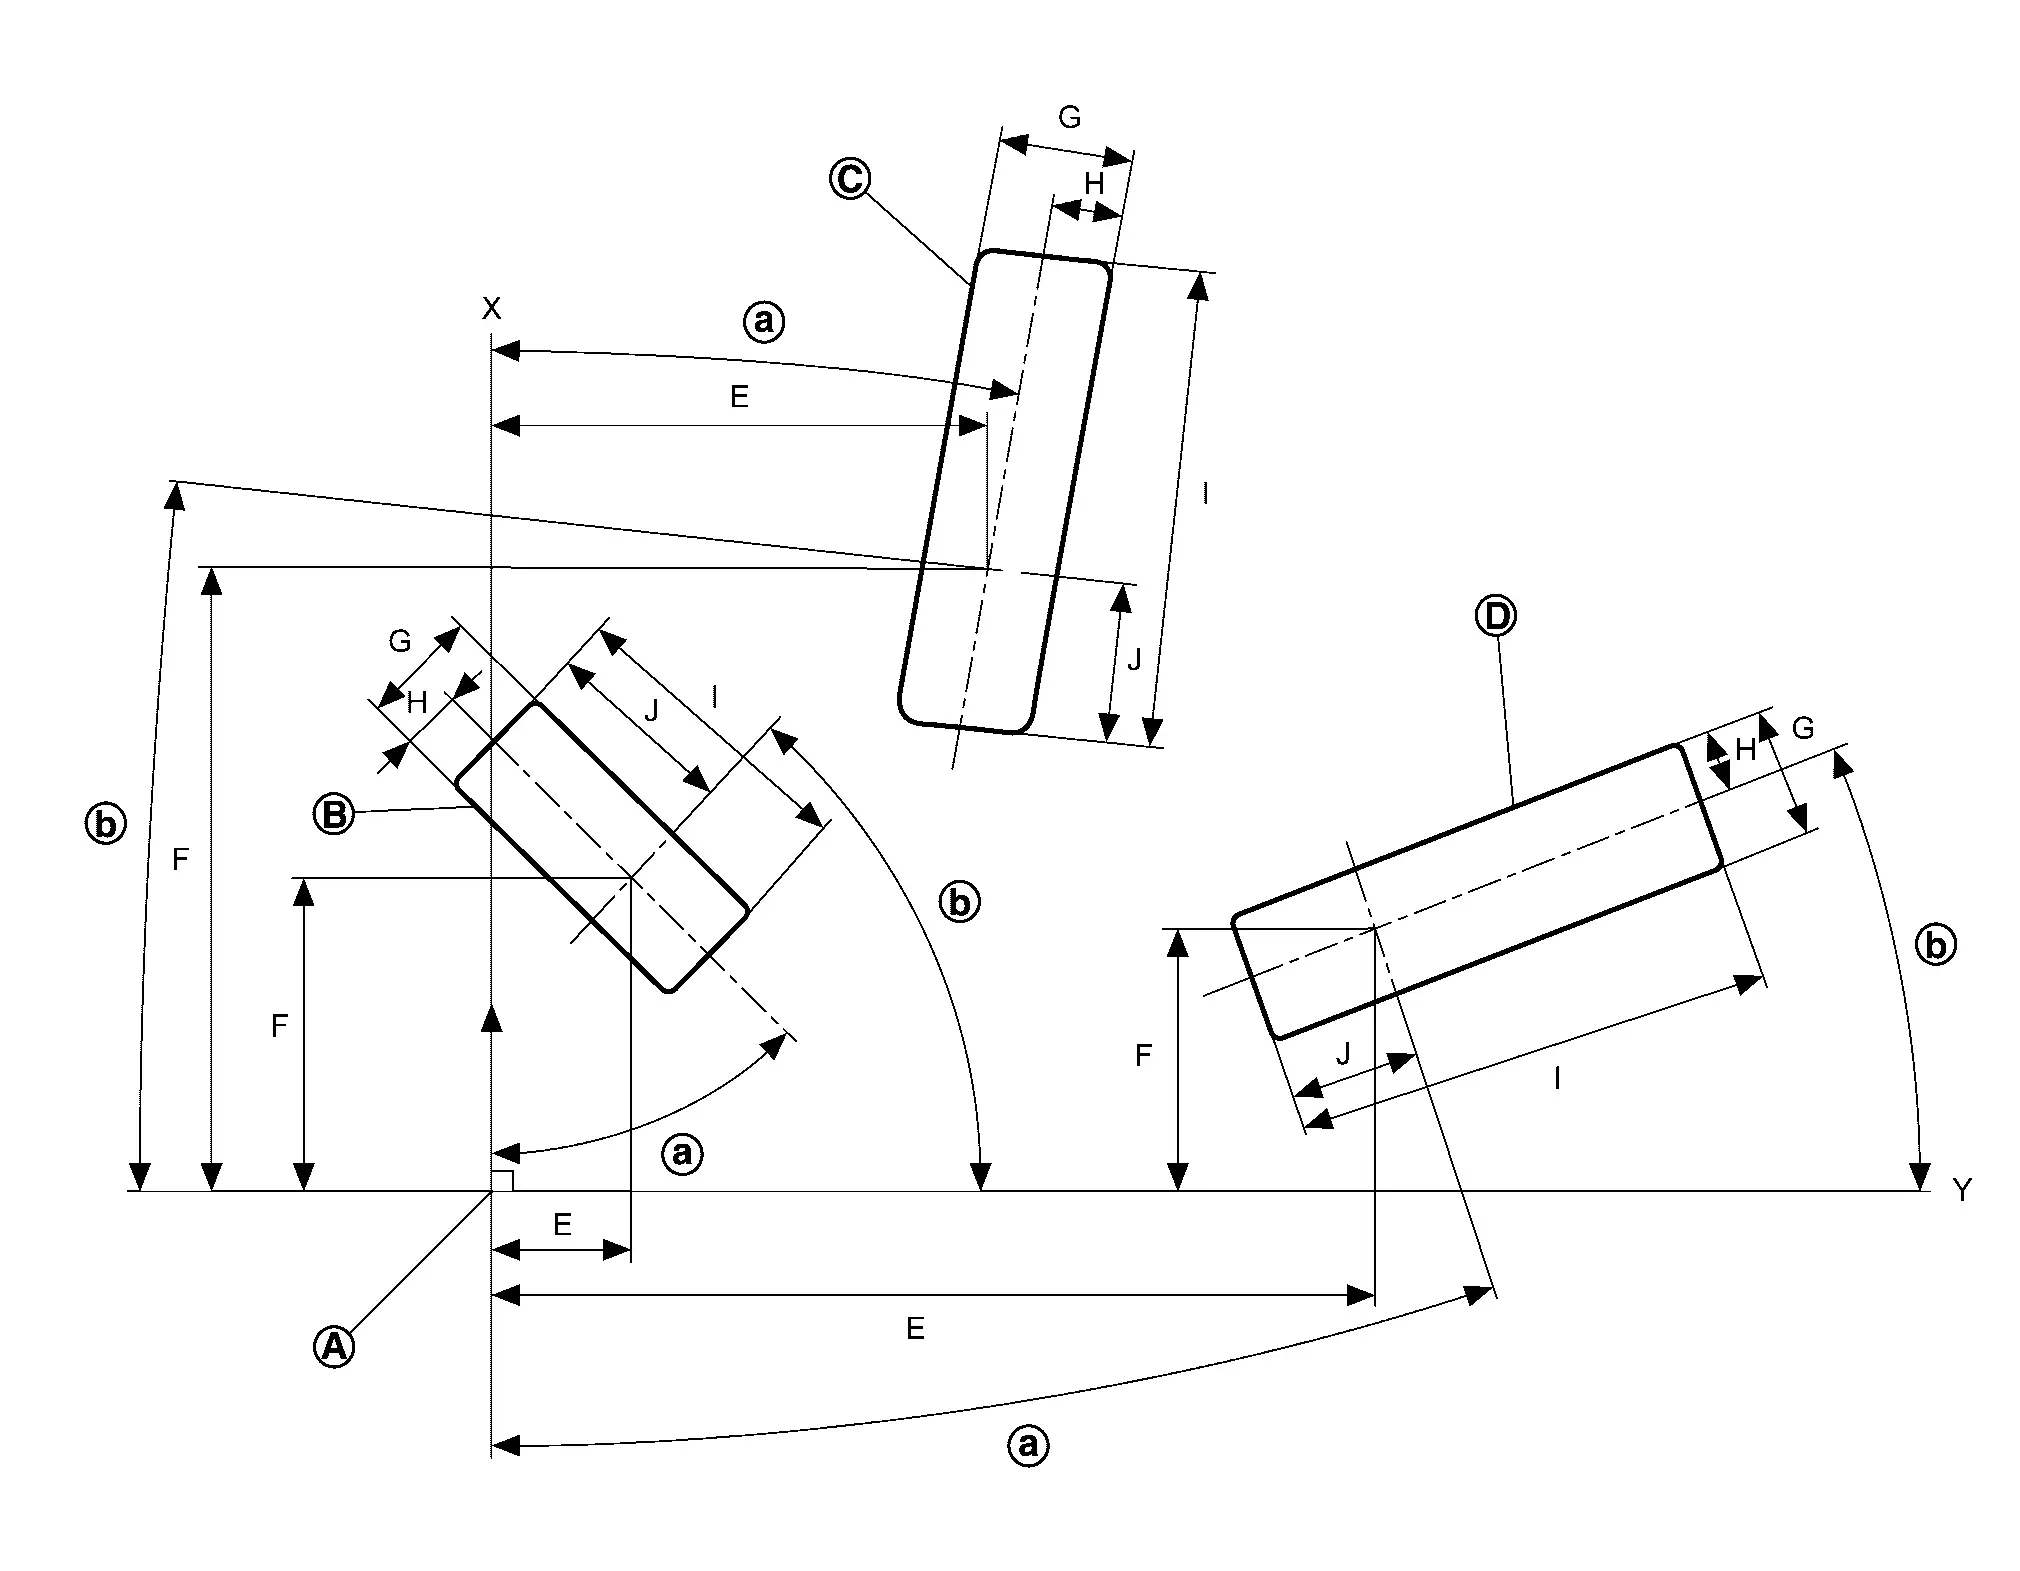
|
Reference point | ||||
| X | : Longitudinal direction of the Nissan Ariya vehicle | ||||
| Y | : Left and right direction of the vehicle | ||||
| Front washer nozzle LH | ||||||||
|---|---|---|---|---|---|---|---|---|
 |  | E | F | G | H | I | J | |
 |
44.8° | 48.1° |
24.0 mm (0.945 in) |
54.3 mm (2.138 in) |
20.3 mm (0.799 in) |
10.0 mm (0.394 in) |
52.0 mm (2.047 in) |
33.4 mm (1.315 in) |
 |
9.9° | 6.2° |
85.1 mm (3.350 in) |
108.2 mm (4.260 in) |
23.0 mm (0.906 in) |
12.1 mm (0.476 in) |
83.2 mm (3.276 in) |
27.7 mm (1.091 in) |
 |
18.2° | 21.6° |
151.2 mm (5.953 in) |
45.7 mm (1.799 in) |
22.8 mm (0.898 in) |
11.0 mm (0.433 in) |
82.8 mm (3.260 in) |
22.4 mm (0.882 in) |
Front washer nozzle RH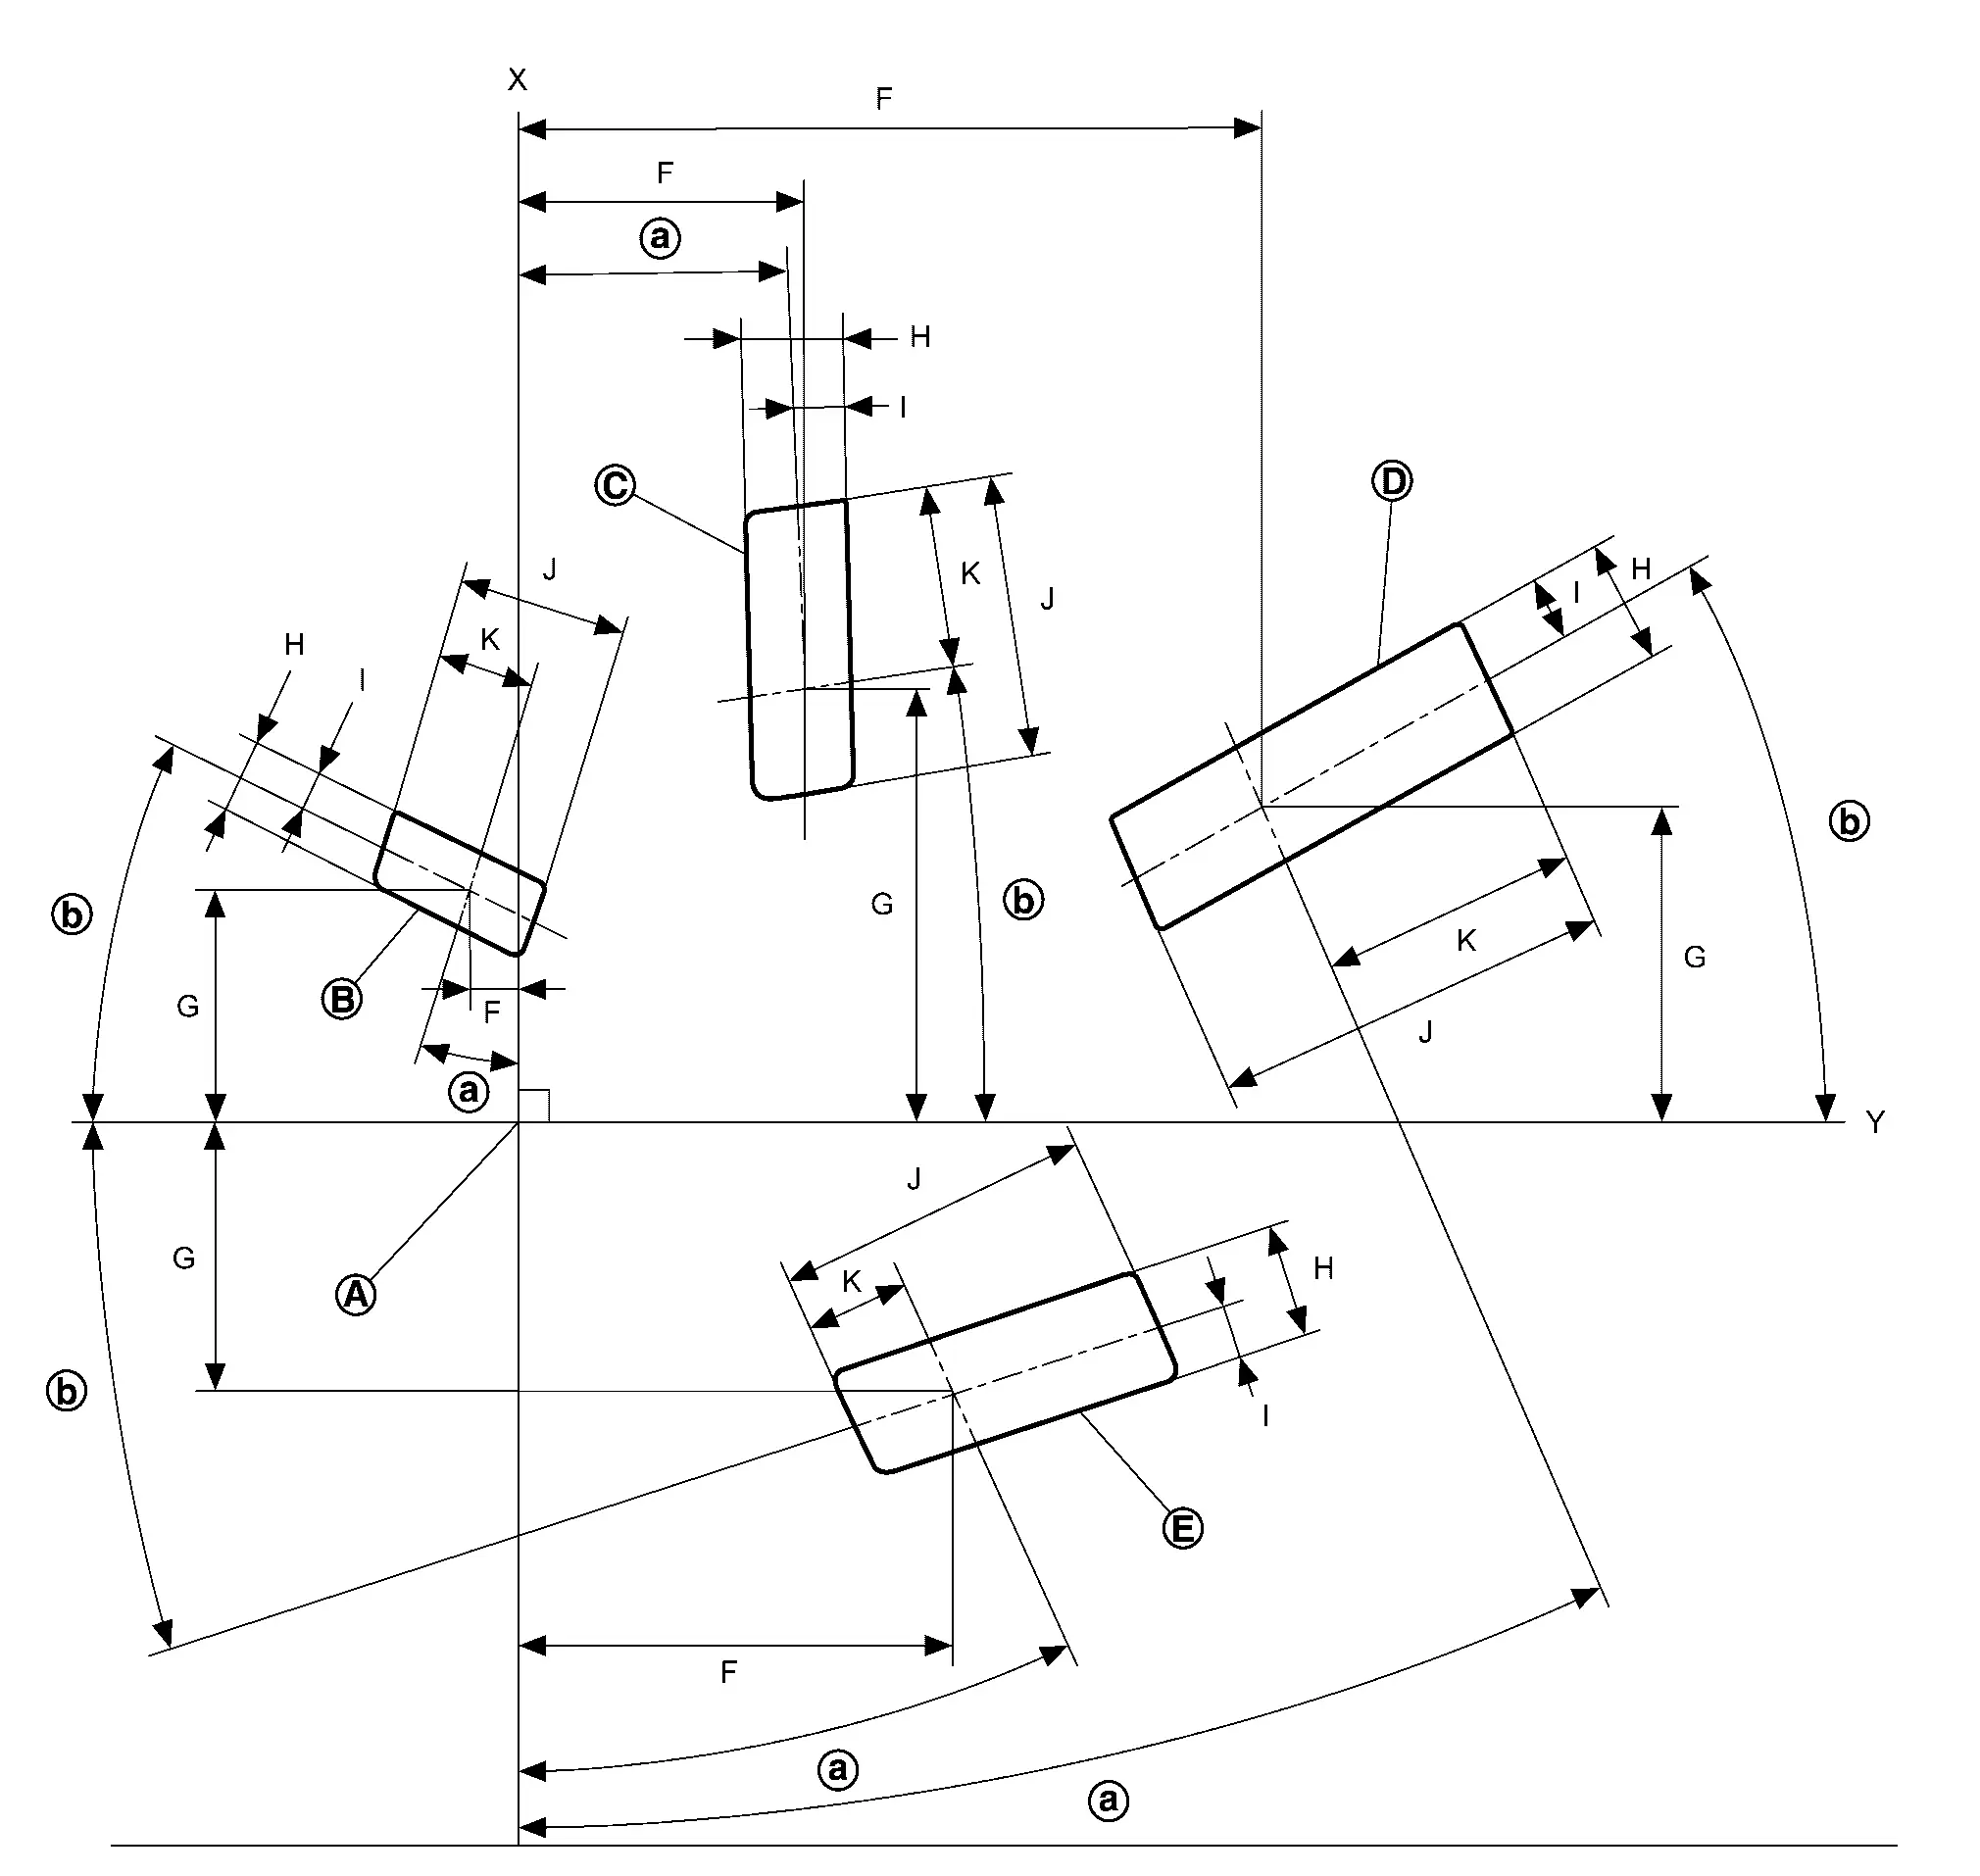
|
Reference point | ||||
| X | : Longitudinal direction of the Nissan Ariya vehicle | ||||
| Y | : Left and right direction of the vehicle | ||||
| Front washer nozzle RH | ||||||||
|---|---|---|---|---|---|---|---|---|
| | F | G | H | I | J | K | |
|
16.7° | 25.6° |
11.1 mm (0.437 in) |
52.9 mm (2.083 in) |
17.0 mm (0.669 in) |
9.0 mm (0.354 in) |
39.1 mm (1.539 in) |
22.2 mm (0.874 in) |
|
2.0° | 8.5° |
66.2 mm (2.606 in) |
98.1 mm (3.862 in) |
24.0 mm (0.945 in) |
11.7 mm (0.461 in) |
64.2 mm (2.528 in) |
41.2 mm (1.622 in) |
|
24.1° | 28.6° |
172.6 mm (6.795 in) |
71.2 mm (2.803 in) |
28.0 mm (1.102 in) |
15.4 mm (0.606 in) |
93.4 mm (3.677 in) |
60.1 mm (2.366 in) |
 |
25.0° | 17.5° |
101.0 mm (3.976 in) |
60.4 mm (2.378 in) |
25.6 mm (1.008 in) |
11.9 mm (0.469 in) |
73.2 mm (2.882 in) |
23.7 mm (0.933 in) |
 NOTE:
NOTE:
If the washer spray range is out of standard or the nozzle is clogged, clean the washer nozzle. If the spray range does not change after cleaning, replace the nozzle together with the front wiper arm without adjusting the direction of the holes. Refer to Removal and Installation.
CLEANING METHODS AND PRECAUTIONS
Insert a 0.5 mm (0.02 in) metal pin (no particular specifications, but you can use a pin gauge or a suitable tool) into the washer nozzle hole for about 3-5 mm (0.12-0.20 in), and move it straight back and forth in the hole to remove any foreign objects.
Check the direction of the washer spray.
Do not try to change the spray direction by forcing it to change direction, as this may cause damage to the nozzle.
Front Washer Tube
Removal and Installation
REMOVAL
Remove cowl top cover. Refer to Removal and Installation.
Disconnect front washer tube B from tube connector, and then remove tube connector.
Remove washer tube B from cowl top cover.
Remove fender protector RH. Refer to Removal and Installation.
Disconnect front washer tube A from fixing clips , and then disconnect front washer tube A from front and rear washer pump.
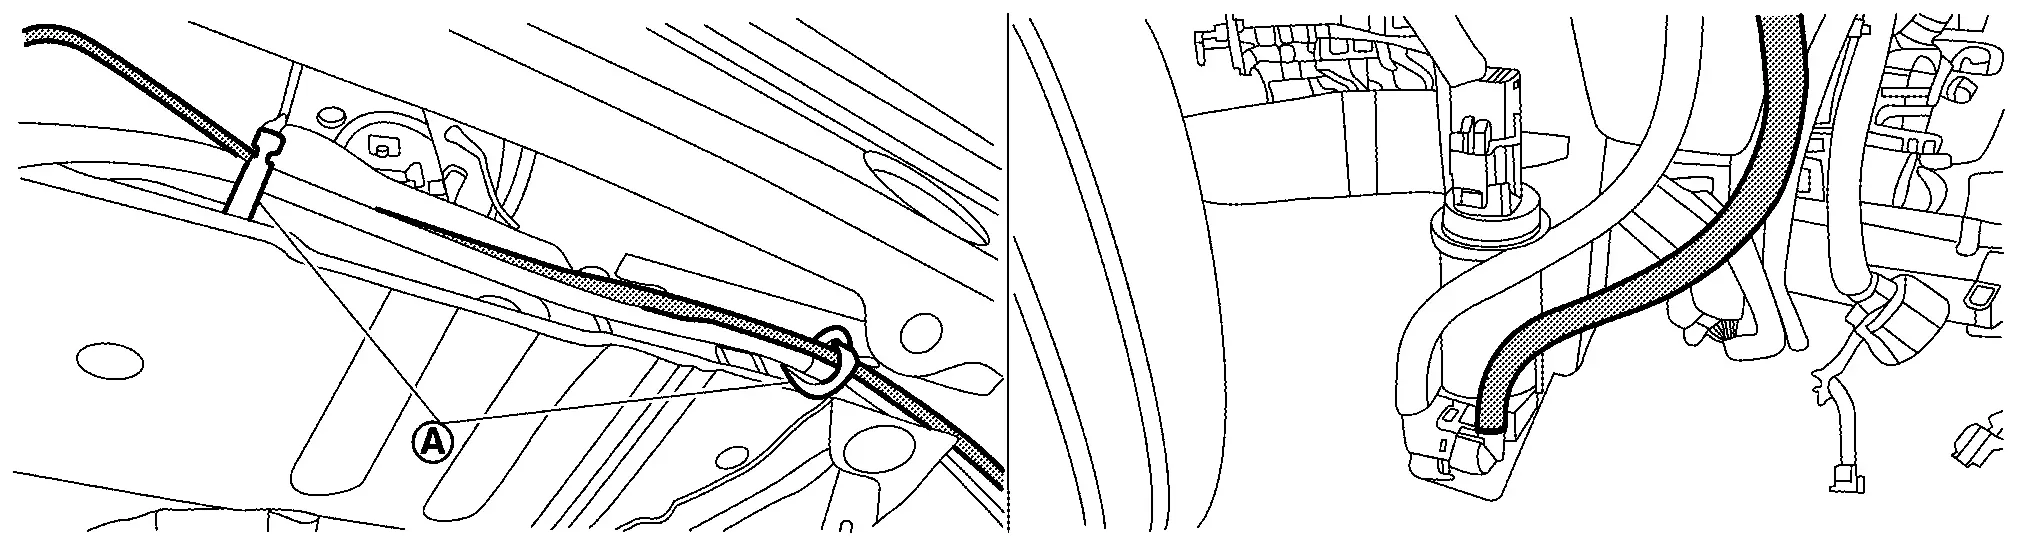
Remove front washer tube A.
INSTALLATION
Note the following item, and then install in the reverse order of removal.
CAUTION:
Align washer tube marking to the vehicle installation position.
Other materials:
P2122 App Sensor
DTC Description
DTC DETECTION LOGIC DTC
CONSULT screen terms
(Trouble diagnosis content)
DTC detection condition
P2122
00
APP SEN 1/CIRC
(Throttle/Pedal position sensor/switch D circuit low)
Diagnosis condition
Engine running at idle
Signal (terminal)
Accelerator ...
Diagnosis System (av Control Unit)
Nissanconnect with 8" Color Display
On Board Diagnosis Function
The AV control unit on board diagnosis performs the functions listed in the table below:DESCRIPTION Mode Description
Self Diagnosis
Audio system diagnosis.
Diagnoses the connections across system components.
...
Removal and Installation. Intelligent Key Unit
Removal and Installation
REMOVALCAUTION:
When replacing the Intelligent Key unit, always replace it
with a new one. The functions controlled by the Intelligent Key unit
does not operate properly in case of reuse of the Intelligent Key unit
from another Nissan Ariya vehicle.
Remove the instr ...