Nissan Rogue (T33) 2021-Present Service Manual: Removal and Installation :: Door Sash Cover
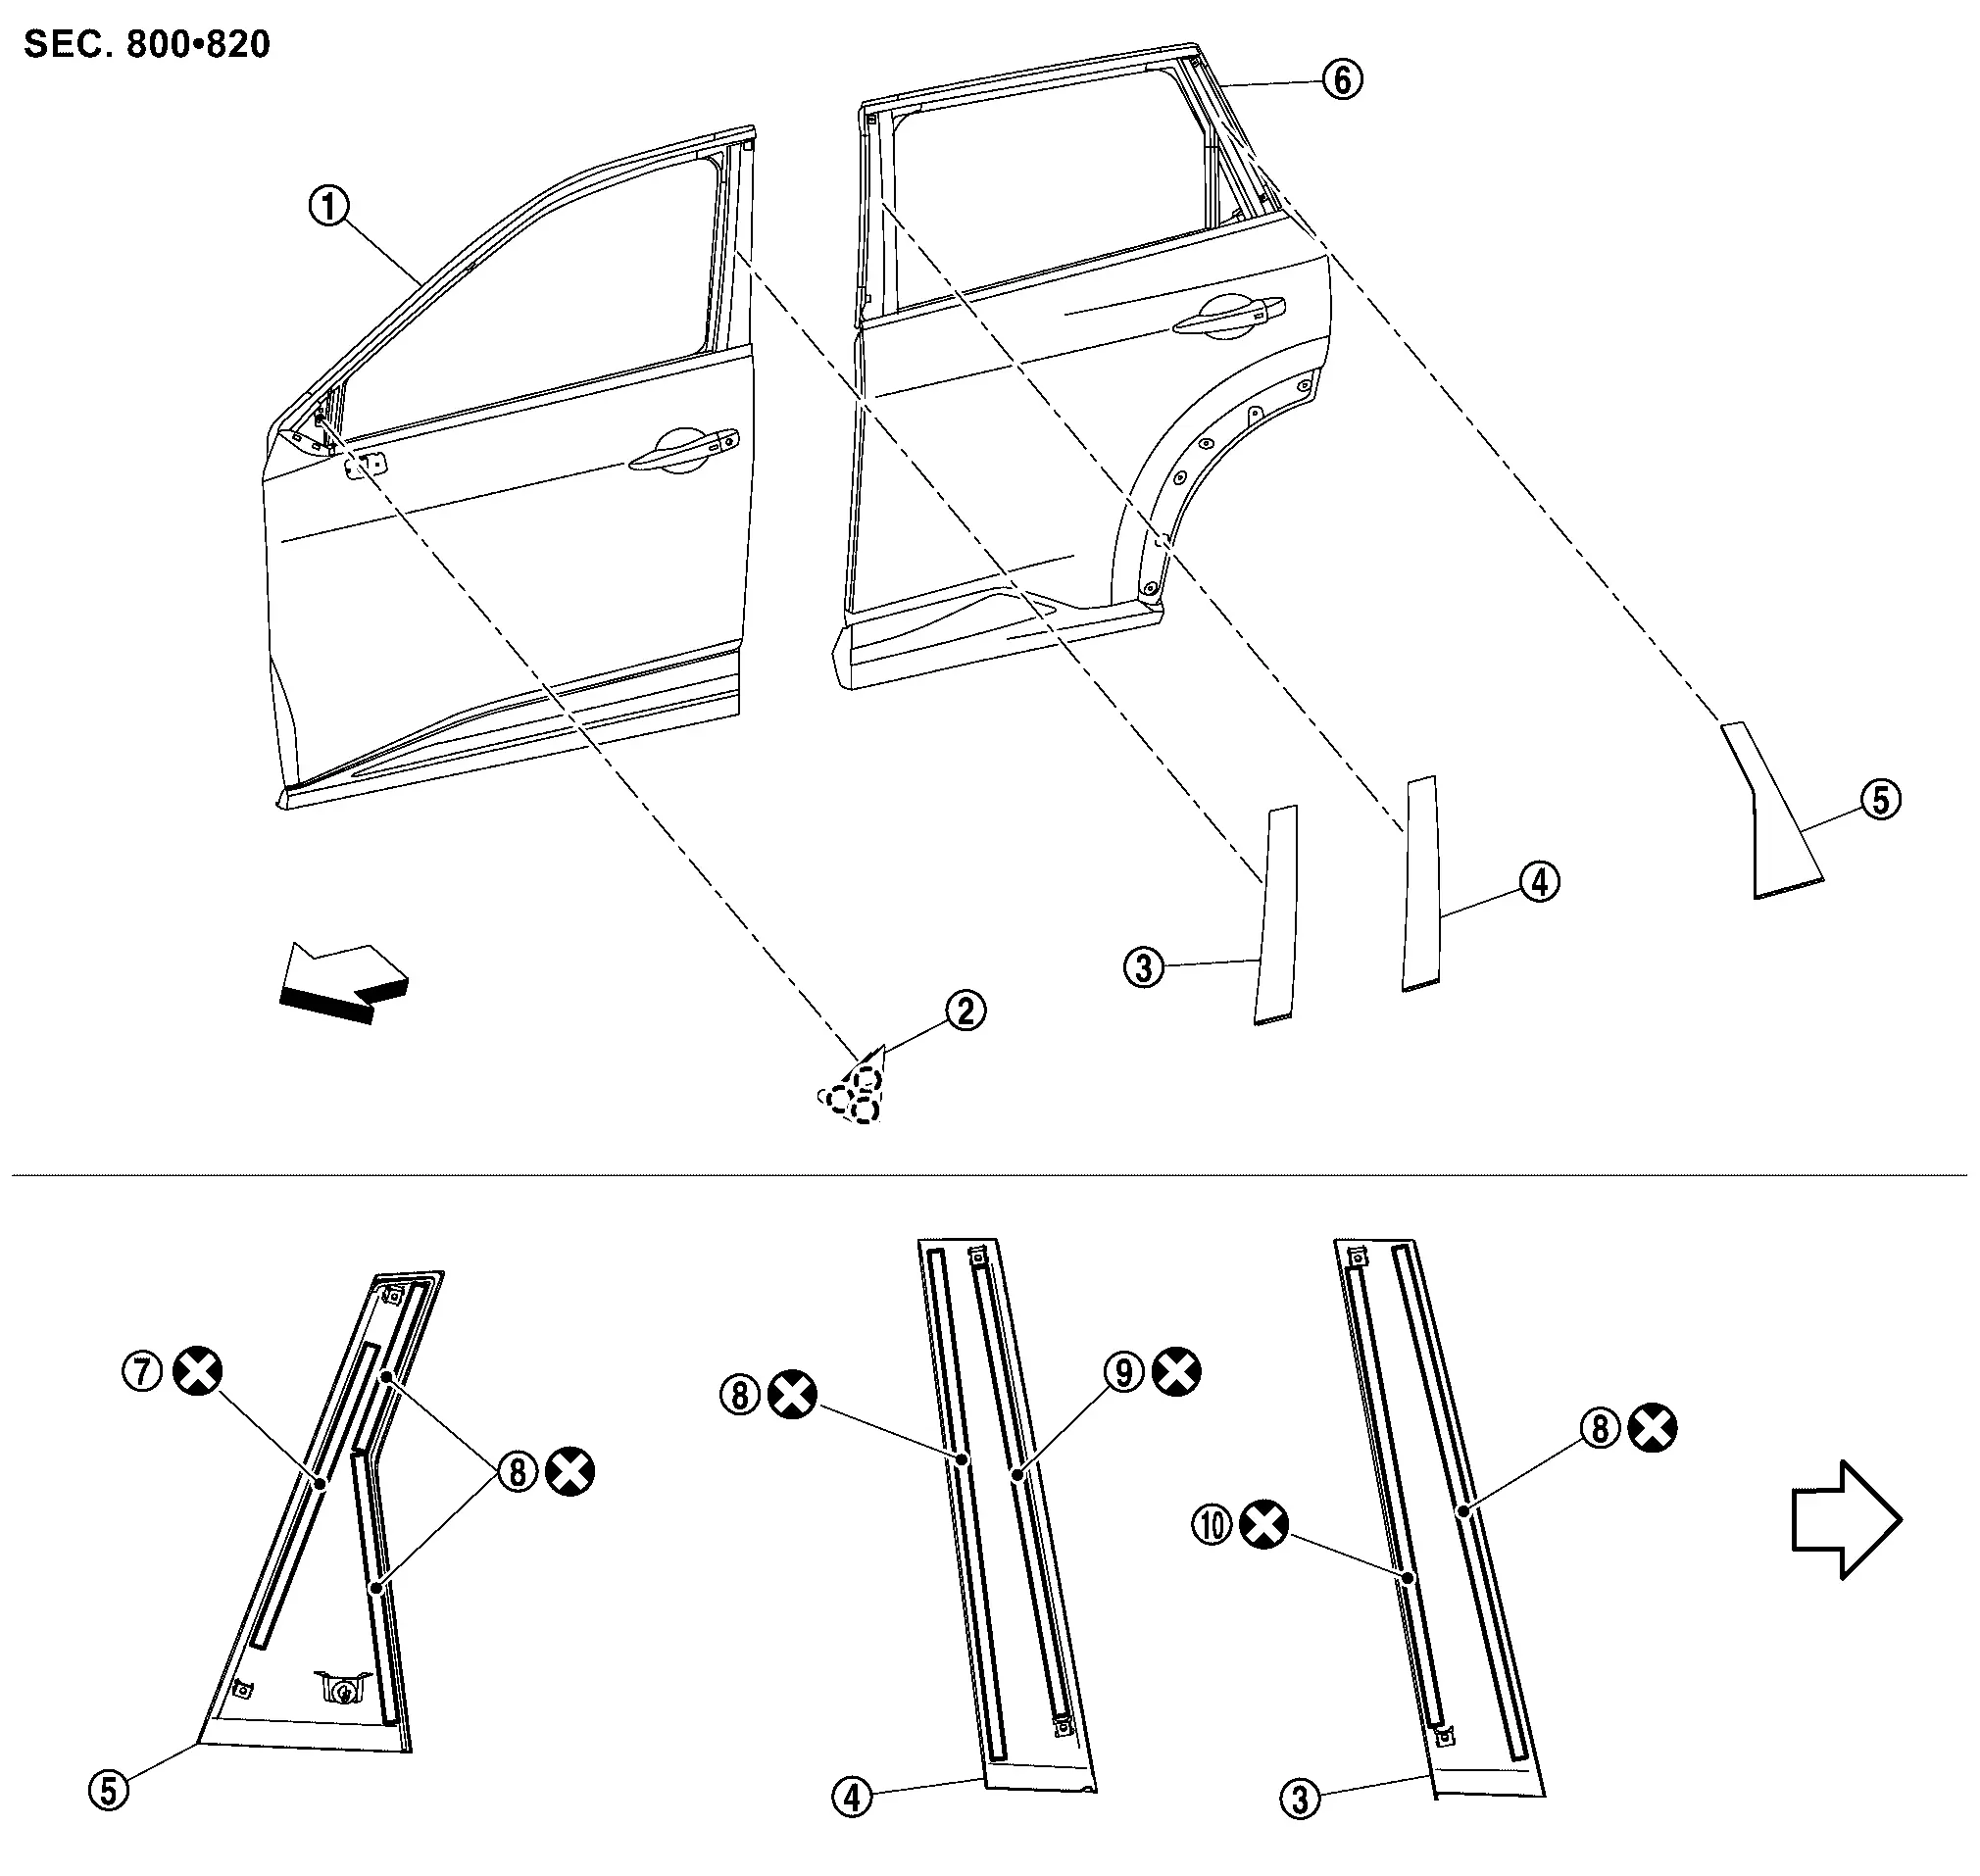
Exploded View
 |
Front door panel |  |
Front door sash cover front |  |
Front door sash cover rear |
 |
Rear door sash cover front |  |
Rear door sash cover rear |  |
Rear door panel |
 |
Double-sided tape [t: 1.2 mm (0.047 in)] |
 |
Double-sided tape [t: 0.8 mm (0.031 in)] |
 |
Double-sided tape [t: 2.0 mm (0.079 in)] |
 |
Double-sided tape [t: 1.6 mm (0.063 in)] |
||||
 |
: Clip | ||||
| : Nissan Ariya Vehicle front | |||||
 |
: Always replace after every disassembly. | ||||
Front Door Sash Cover
Removal and Installation
REMOVAL
Front Door Sash Cover Front
Remove door corner cover. Refer to Removal and Installation.
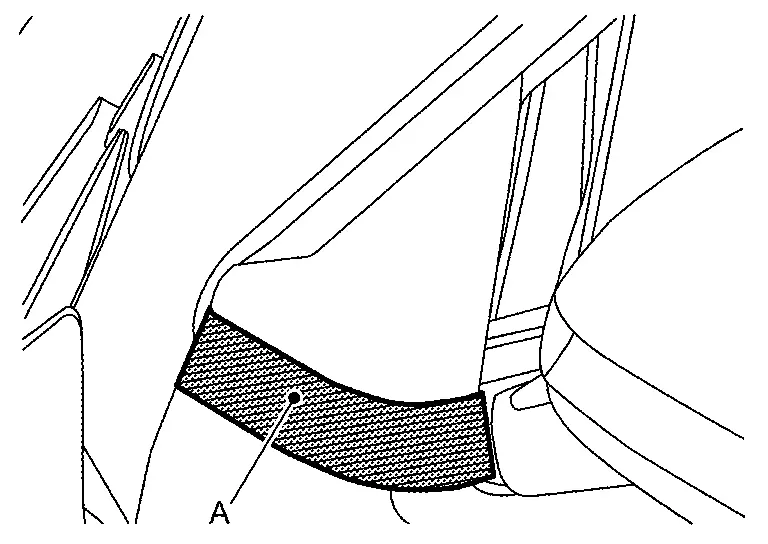
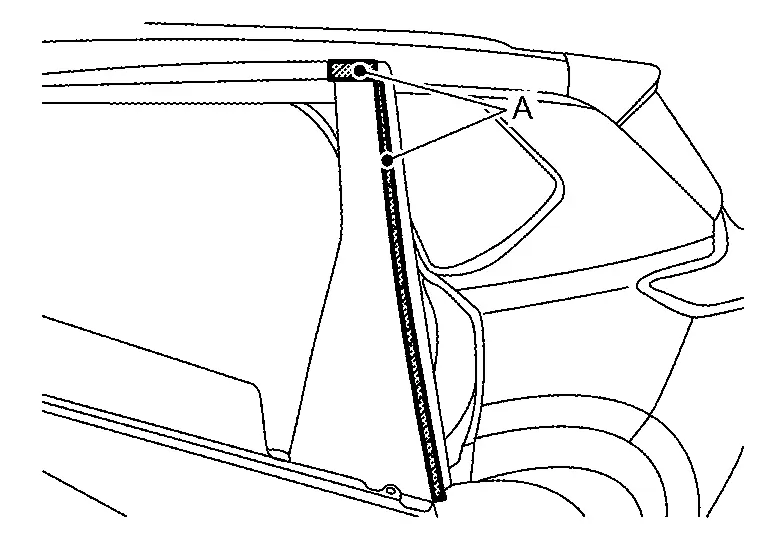
Apply protective tape (A) on the part to protect it from damage.
Remove front door sash cover front fixing clips using a remover tool (A).
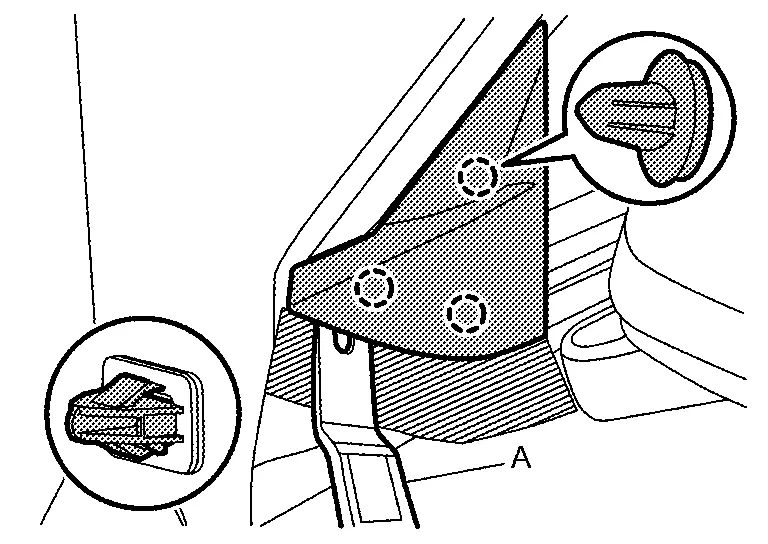
Remove front door sash cover front.
Front Door Sash Cover Rear
Remove front door outside molding. Refer to Removal and Installation.
Remove front door glass run of upper side. Refer to Removal and Installation.
Remove front door weather-strip of upper side. Refer to Removal and Installation.
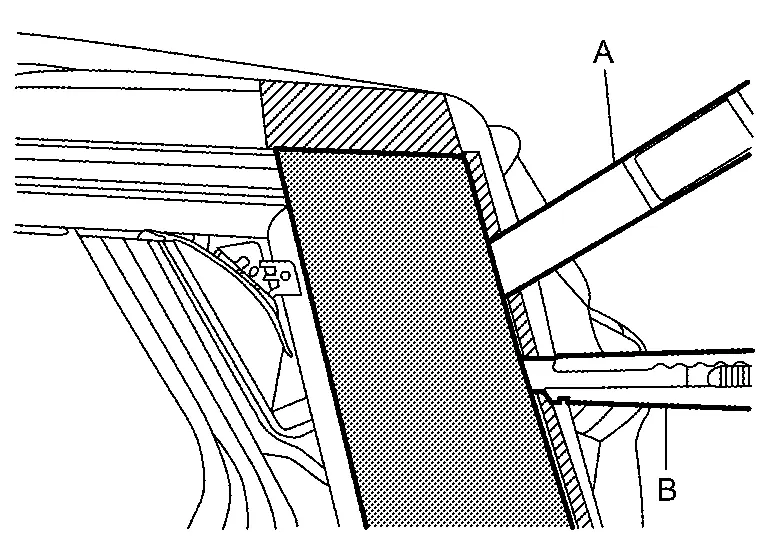
Apply protective tapes (A) on the part to protect it from damage.
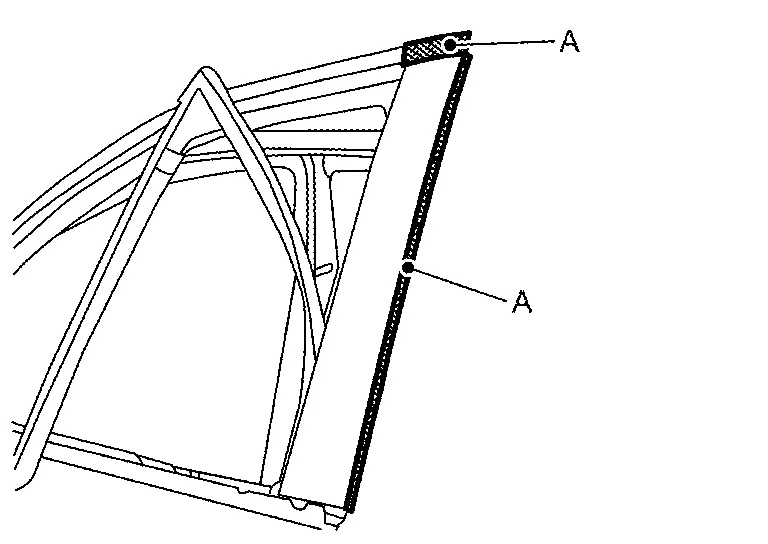
Insert a remover tool (A) between front door panel and front door sash cover rear, cut double-sided tape using a cutter (B) while lifting front door sash cover rear.
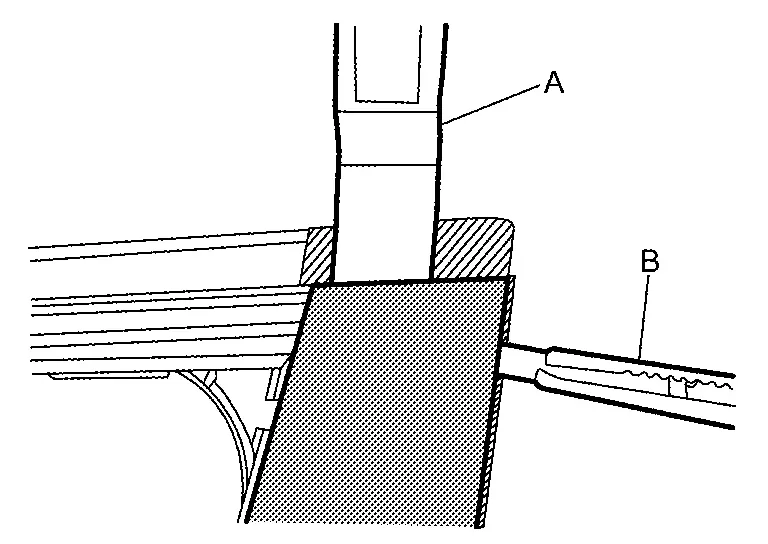
Remove front door sash cover rear.
INSTALLATION
Installation is in the reverse order of removal.
CAUTION:
-
Always replace double-sided tape with a new one, it front door sash cover rear is reused.
-
Remove double-sided tape remaining on front door panel and back of front door sash cover rear with a double-sided tape remover, after removing front door sash cover rear.
-
Degrease front door panel mounting surface for front door sash cover rear.
-
Paint grain or dust on mounting surface of front door sash cover rear may spoil exterior appearance if it remains. Clean the mounting surface and check that no paint grain or dust remains, before starting the operation.
-
Never wash the Nissan Ariya vehicle within 24 hours after installing so as to keep adhesive.
 NOTE:
NOTE:
-
The following table shows the specified values for checking normal installation status.
-
Fitting adjustment cannot be performed.
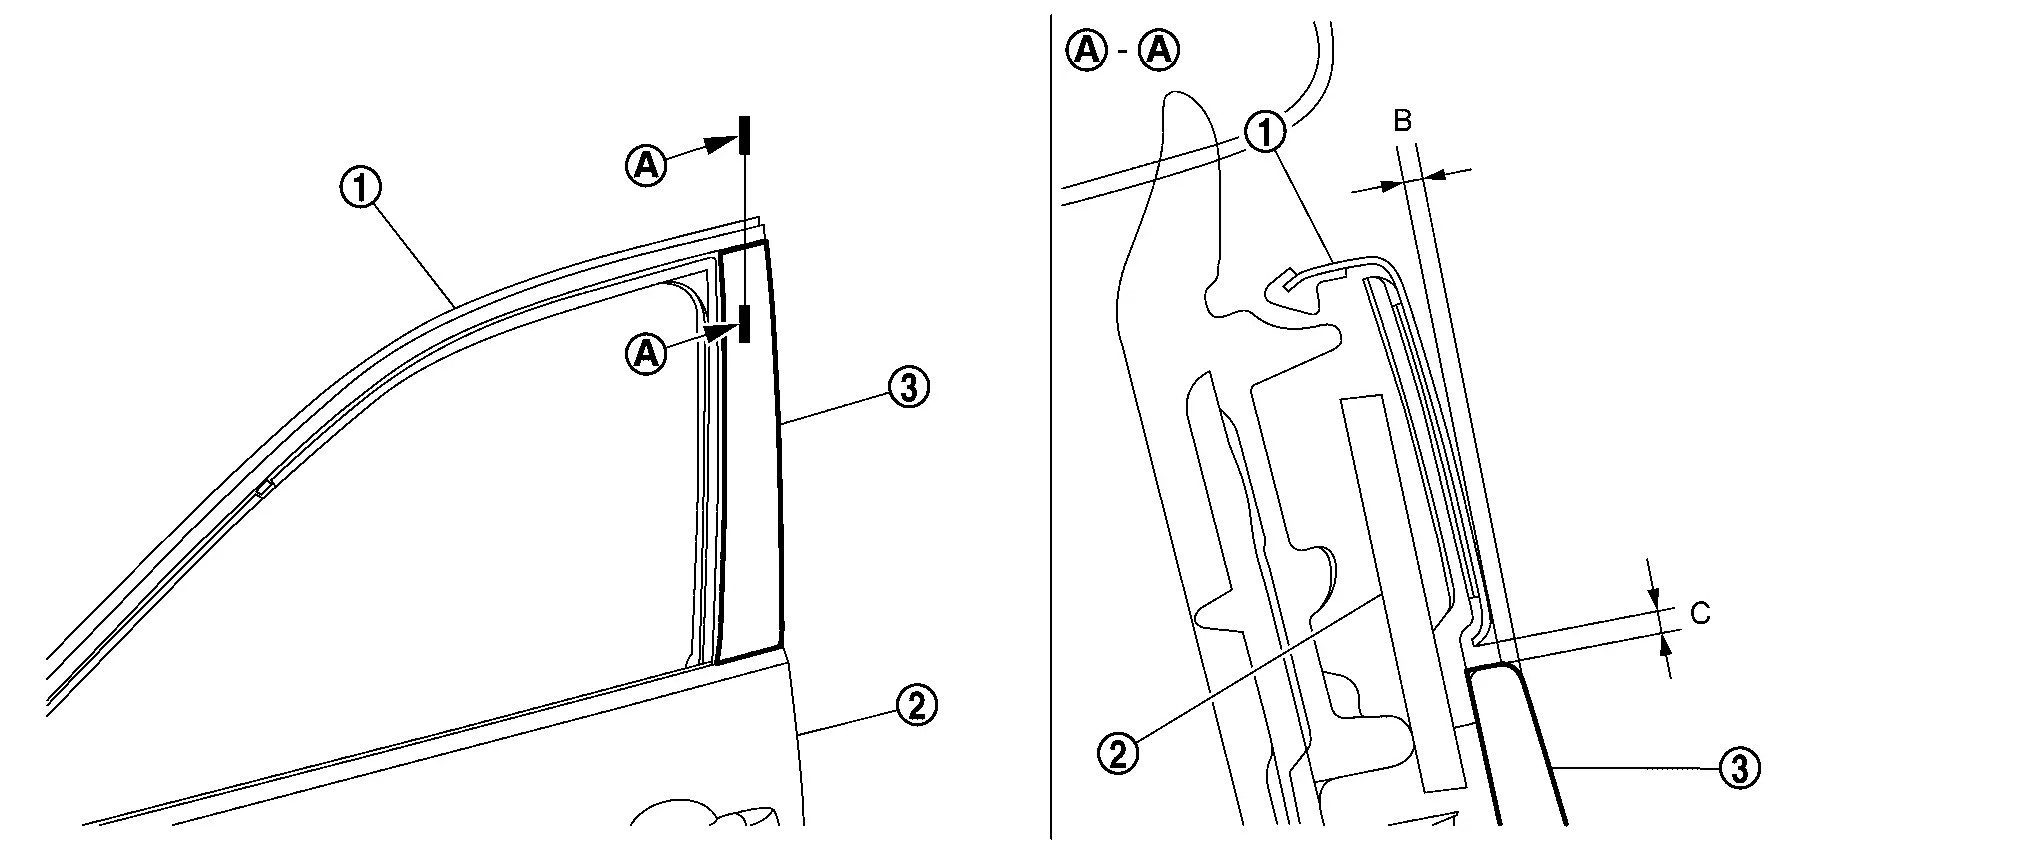
Front door sash molding Front door panel Front door sash cover rear B : (-0.1) — (+1.9) mm [(-0.004 ) — (+0.075) in] C : 0.0 — 2.0 mm (0.000 — 0.079 in)
Rear Door Sash Cover
Removal and Installation
REMOVAL
Rear Door Sash Cover Front
Remove rear door outside molding. Refer to Removal and Installation.
Remove rear door glass run of upper side. Refer to Removal and Installation.
Remove rear door weather-strip of upper side. Refer to Removal and Installation.
Apply protective tapes (A) on the part to protect it from damage.

Insert a remover tool (A) between rear door panel and rear door sash cover front, cut double-sided tape using a cutter (B) while lifting rear door sash cover front.
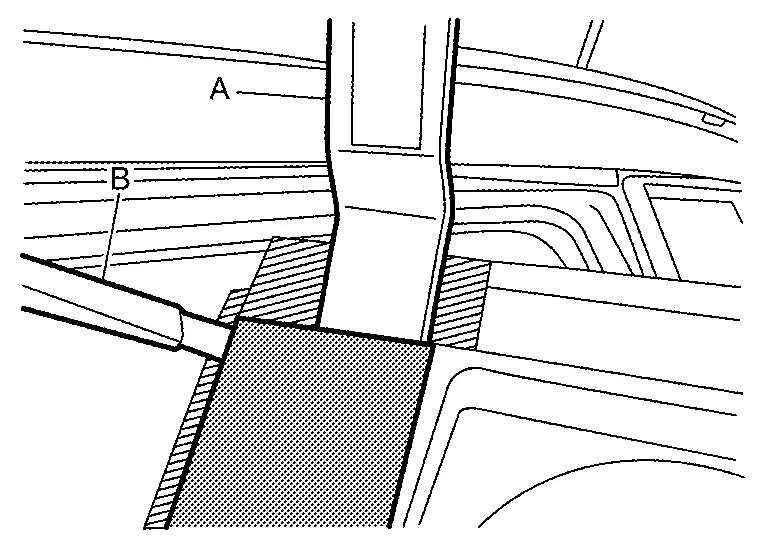
Remove rear door sash cover front.
Rear Door Sash Cover Rear
Remove rear door outside molding. Refer to Removal and Installation.
Remove rear door glass run of upper side. Refer to Removal and Installation.
Remove rear door weather-strip of upper side. Refer to Removal and Installation.
Apply protective tapes (A) on the part to protect it from damage.
Insert a remover tool (A) between rear door panel and rear door sash cover rear, cut double-sided tape using a cutter (B) while lifting rear door sash cover rear.
Remove rear door sash cover rear.
INSTALLATION
Installation is in the reverse order of removal.
CAUTION:
-
Always replace double-sided tape with a new one, it rear door sash cover front and rear door sash cover rear is reused.
-
Remove double-sided tape remaining on rear door panel and back of rear door sash cover front and rear door sash cover rear with a double-sided tape remover, after removing front door sash cover rear.
-
Degrease rear door panel mounting surface for rear door sash cover front and rear door sash cover rear.
-
Paint grain or dust on mounting surface of rear door sash cover front and rear door sash cover rear may spoil exterior appearance if it remains. Clean the mounting surface and check that no paint grain or dust remains, before starting the operation.
-
Never wash the Nissan Ariya vehicle within 24 hours after installing so as to keep adhesive.
NOTE:
-
The following table shows the specified values for checking normal installation status.
-
Fitting adjustment cannot be performed.
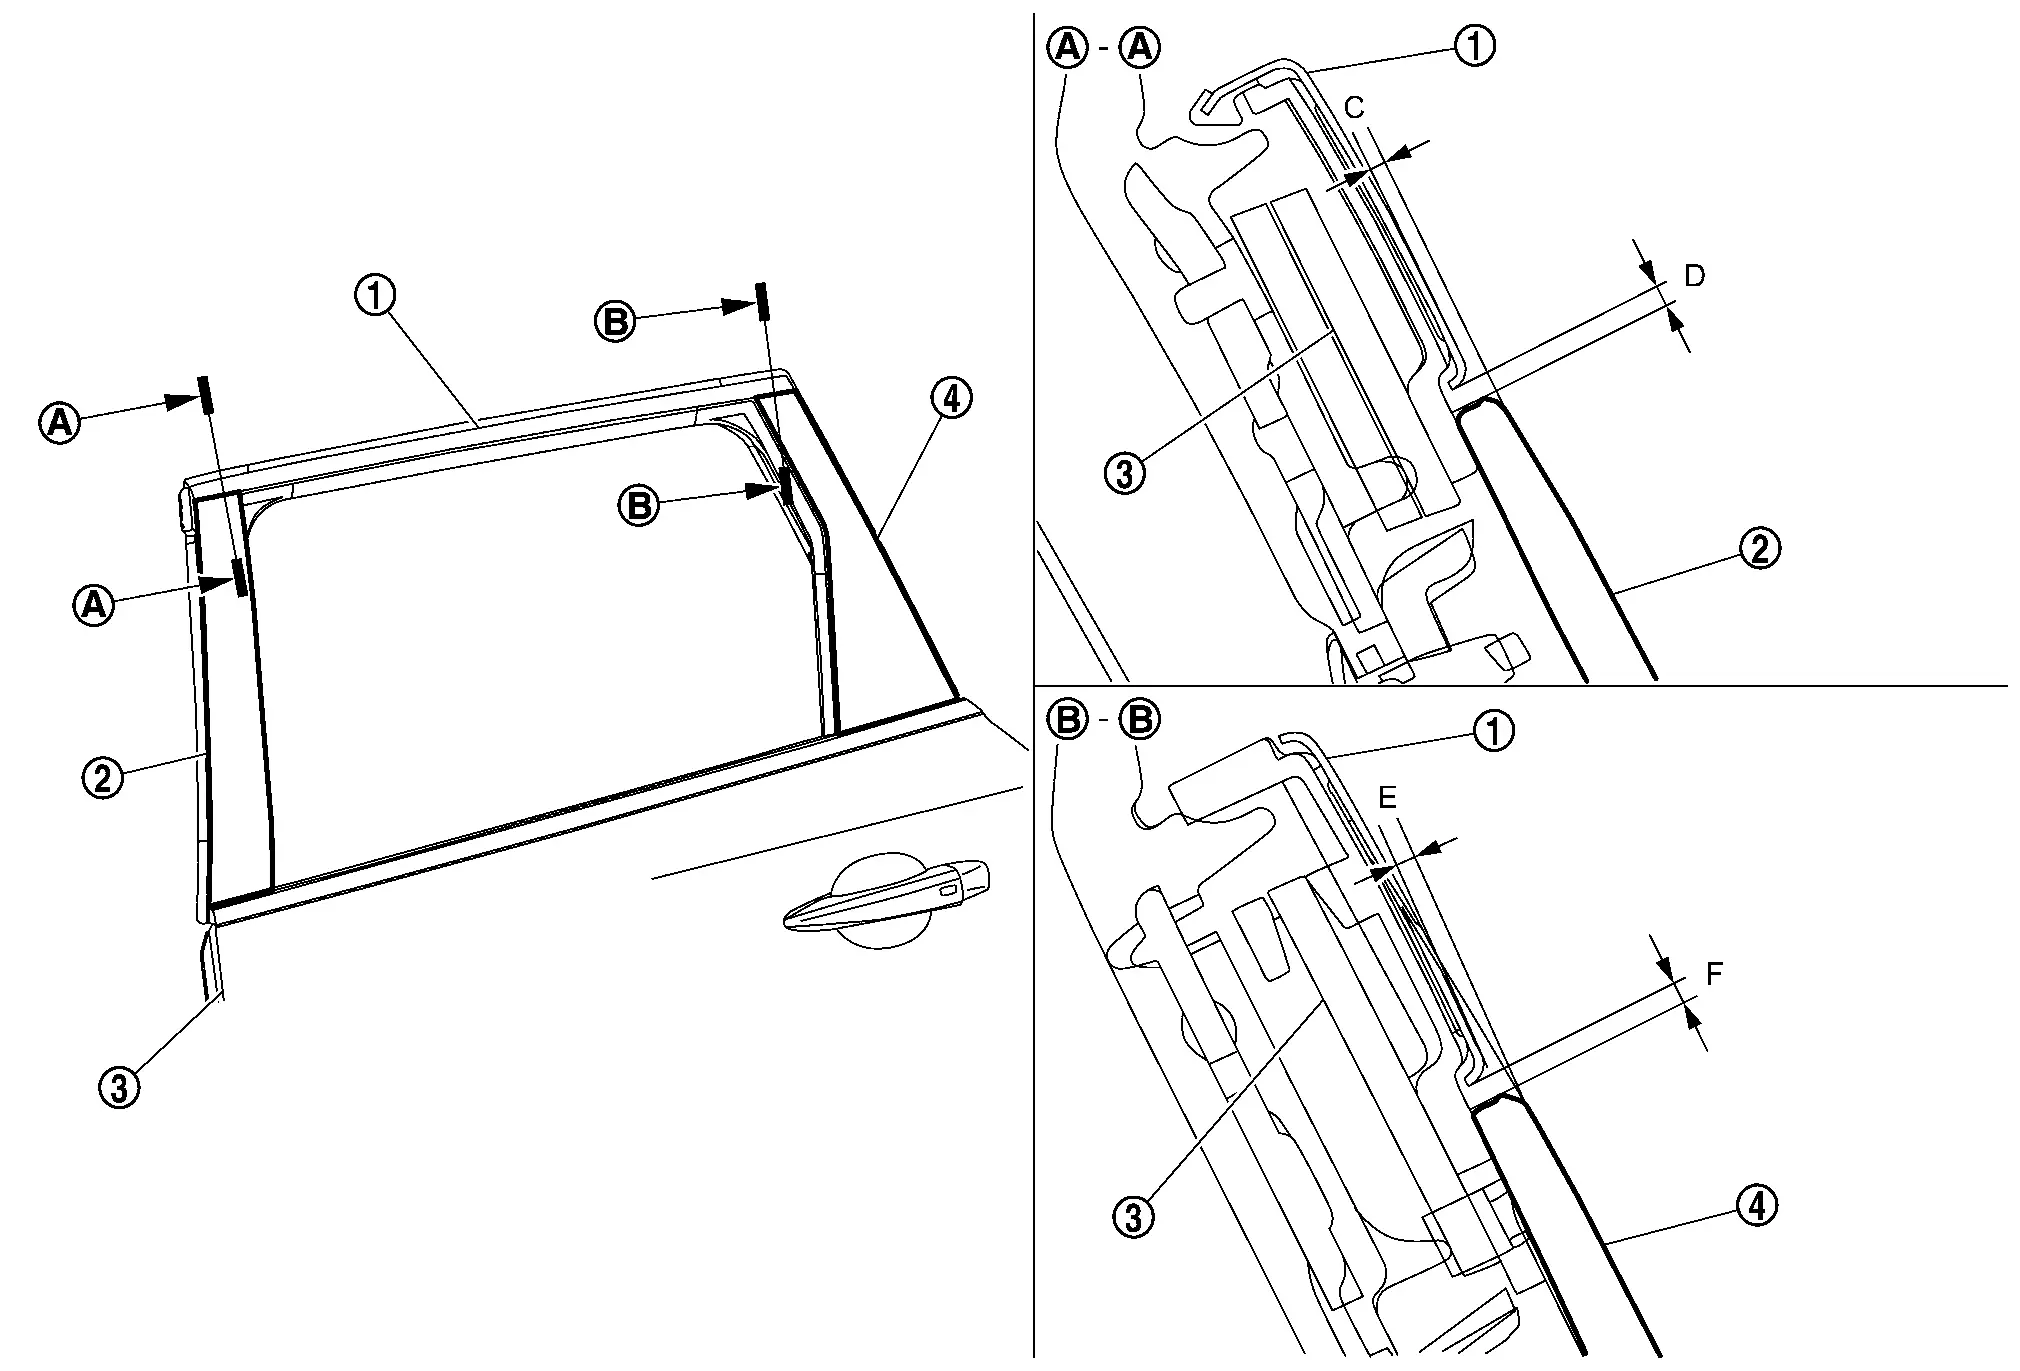
Rear door sash molding Rear door sash cover front Rear door panel Rear door sash cover rear
C : (-0.1) — (+1.9) mm [(-0.004 ) — (+0.075) in] D : 0.0 — 2.0 mm (0.000 — 0.079 in) E : (-0.1) — (+1.9) mm [(-0.004 ) — (+0.075) in] F : 0.0 — 2.0 mm (0.000 — 0.079 in)
Other materials:
U1caa-02 Mode Door Motor
DTC Description
DTC DETECTION LOGIC DTC No.
CONSULT screen terms
(Trouble diagnosis content) DTC detection condition
U1CAA-02
Mode door motor
(Mode door motor)
Diagnosis condition
Ignition switch ON
Signal (Terminal)
LIN (door motor) signal
Threshold
A/C amp. is no ...
Sheet Metal Work
Sheet Metal Work Tools
Sheet Metal Work Tools
This section explains various tools used in body repair work.
Hammers
A hammer is used to correct dents, projections or other deformations.
Various shapes have been designed according to their purposes.(1) TYPES AND FEATURES OF HAMMERS(2) SELECTI ...
Abs Warning Lamp
Component Function Check
CHECK ABS WARNING LAMP FUNCTION
Check that ABS warning lamp in combination meter turns ON for approximately 1 second after ignition switch is ON.
CAUTION:
Never start engine.
Is the inspection result normal?
YES>>
Inspection End
NO>>
Refer to Diagnos ...