Nissan Rogue (T33) 2021-Present Service Manual: Removal and Installation :: Back Door Window Glass
Exploded View
FOR USA PRODUCTION
 |
Back door outer panel |  |
Spacer (upper) |  |
Clip |
 |
Back door window glass |  |
Spacer (lower) |  |
Glass primer |
 |
Adhesive |  |
Painted surface primer |  |
Rear spoiler |
 |
: Always replace after every disassembly. | ||||
Unit: mm (in)
| Portion | Primer range | Adhesive range | |||
|---|---|---|---|---|---|
| J | K | ||||
| Back door window glass – Back door outer panel |  – – |
D |
15.0 (0.59) |
8.0 (0.31) |
12.0 (0.47) |
| E |
15.0 (0.59) |
||||
 – – |
F |
15.0 (0.59) |
8.0 (0.31) |
12.0 (0.47) |
|
| G |
15.0 (0.59) |
||||
 – – |
H |
15.0 (0.59) |
8.0 (0.31) |
12.0 (0.47) |
|
| I |
15.0 (0.59) |
||||
EXCEPT FOR USA PRODUCTION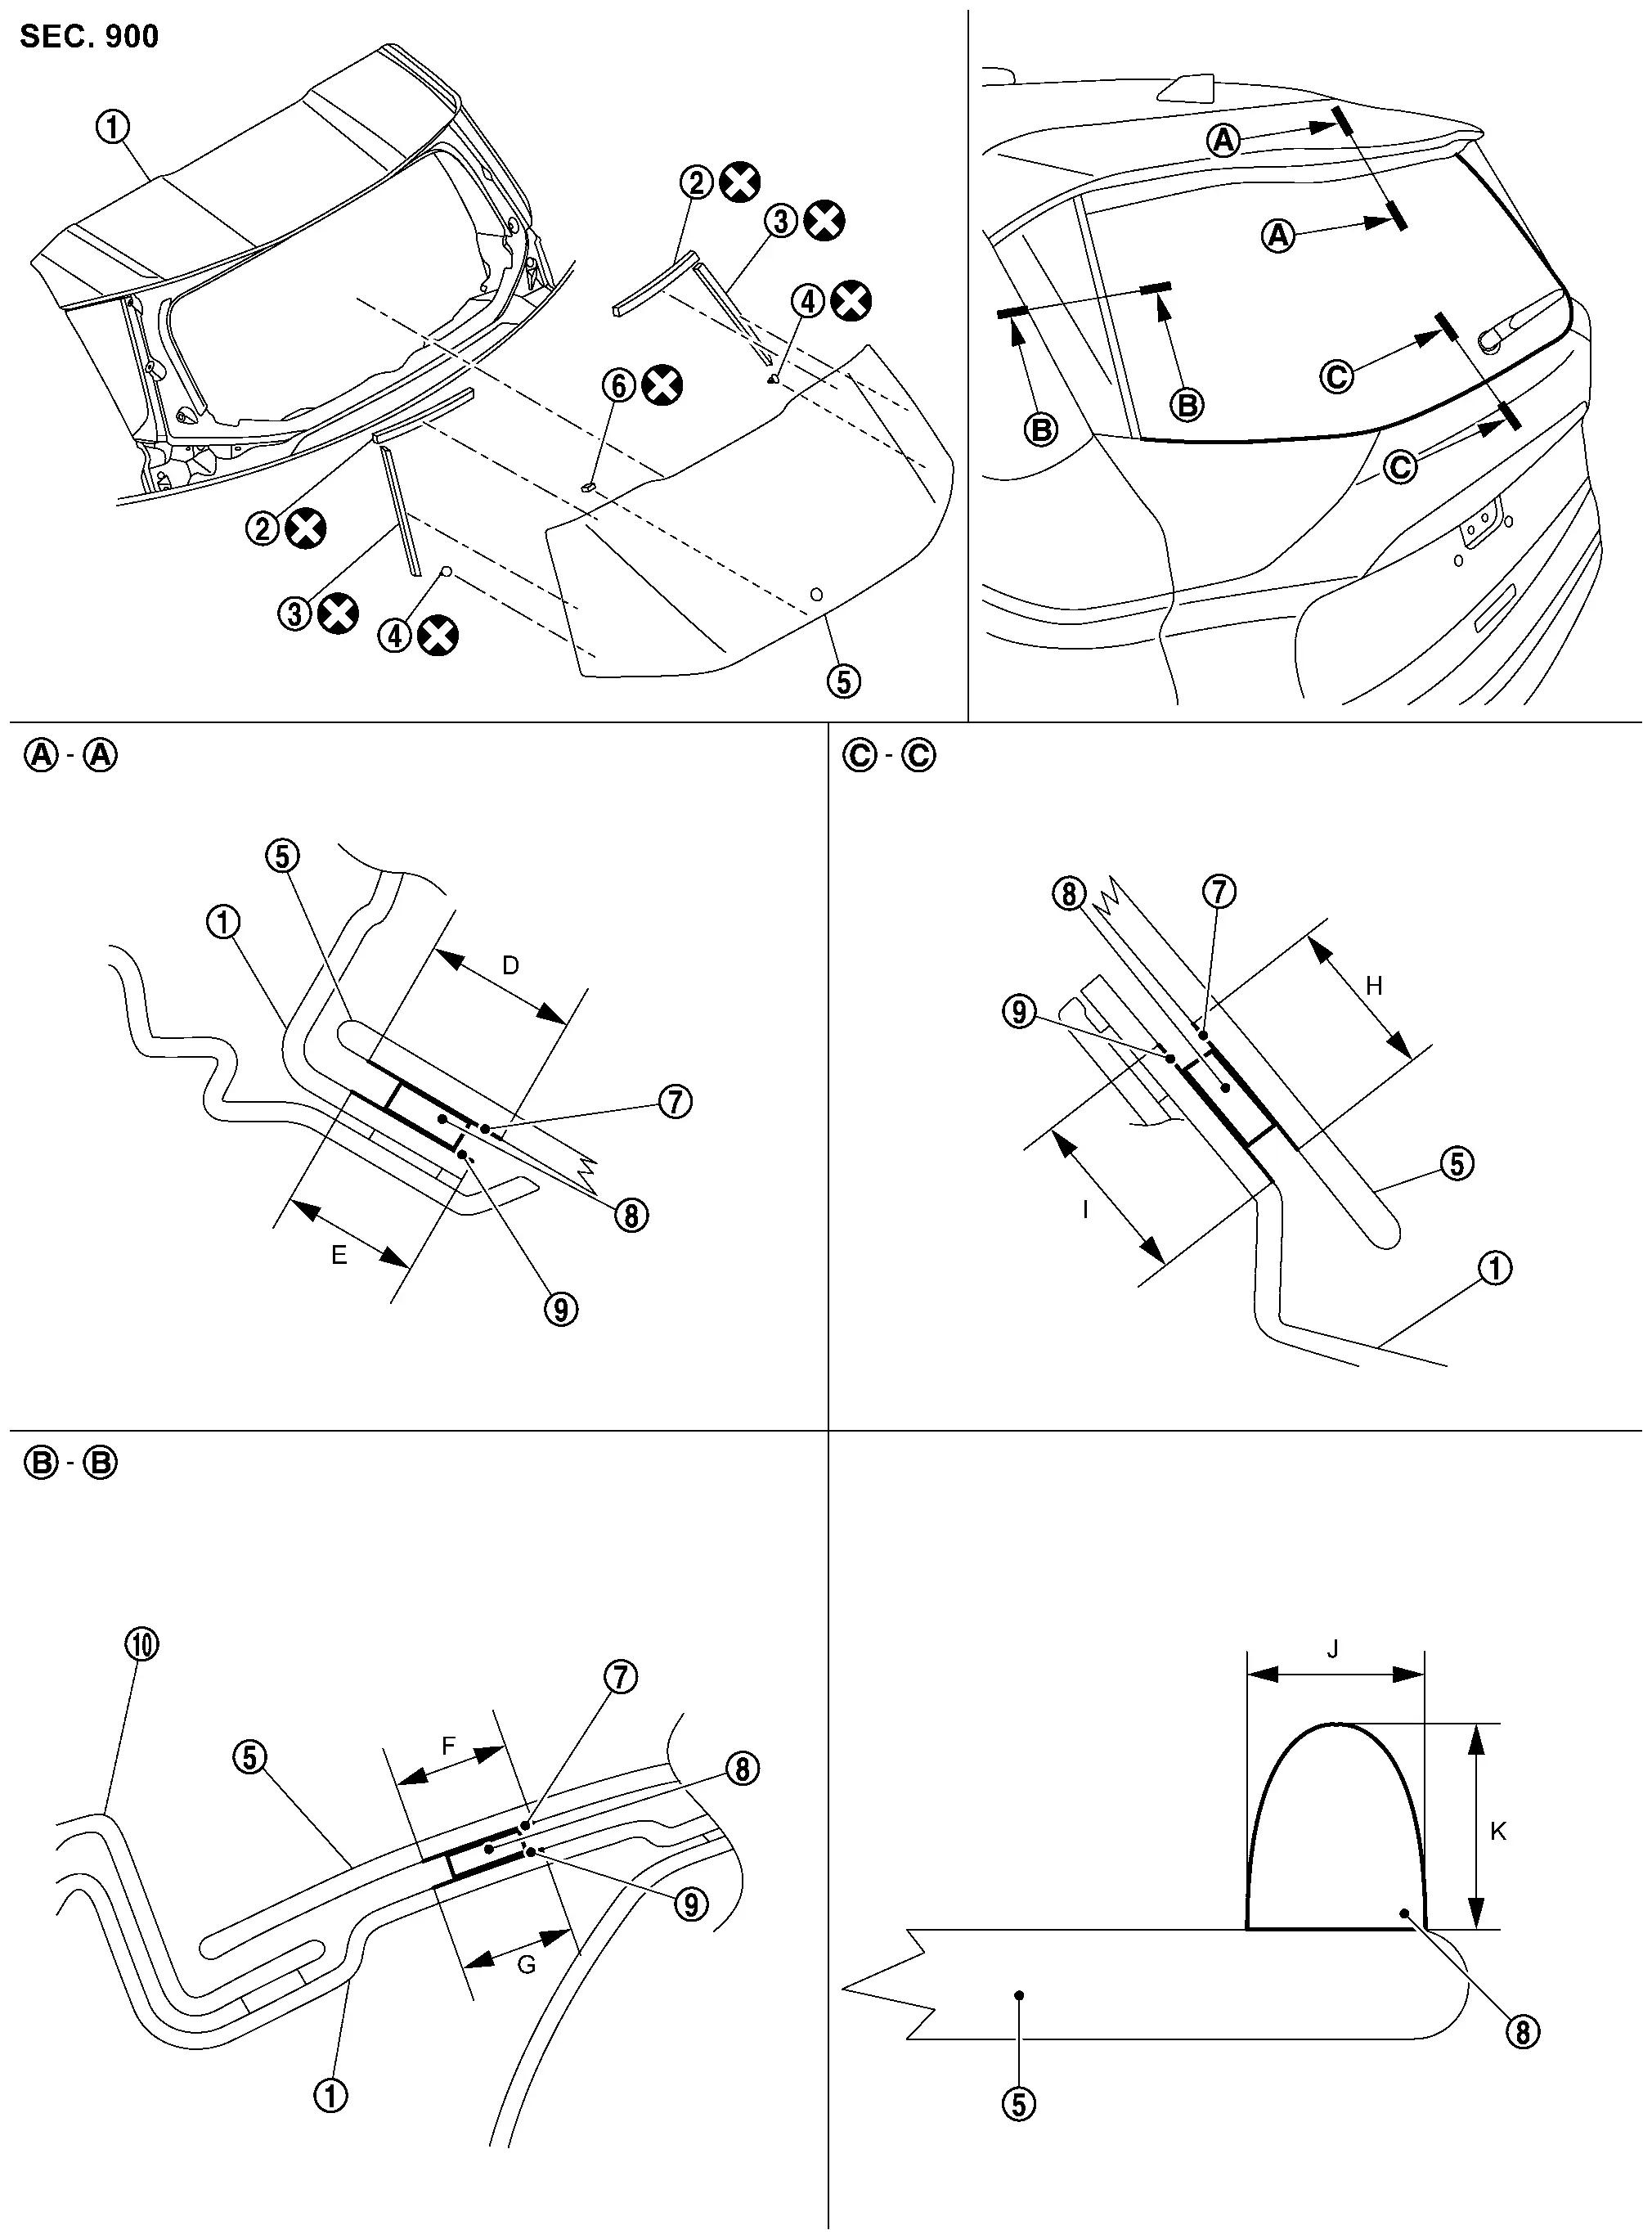
|
Back door outer panel | |
Spacer (upper) | |
Spacer (middle) |
|
Clip | |
Back door window glass | |
Spacer (lower) |
|
Glass primer | |
Adhesive | |
Painted surface primer |
 |
Rear spoiler | ||||
|
: Always replace after every disassembly. | ||||
Unit: mm (in)
| Portion | Primer range | Adhesive range | |||
|---|---|---|---|---|---|
| J | K | ||||
| Back door window glass – Back door outer panel | – |
D |
15.0 (0.59) |
8.0 (0.31) |
12.0 (0.47) |
| E |
15.0 (0.59) |
||||
| – |
F |
15.0 (0.59) |
8.0 (0.31) |
12.0 (0.47) |
|
| G |
15.0 (0.59) |
||||
| – |
H |
15.0 (0.59) |
8.0 (0.31) |
12.0 (0.47) |
|
| I |
15.0 (0.59) |
||||
Removal and Installation
REMOVAL
Replacement Back Door Window Glass
CAUTION:
Never damage resinous back door outer panel (and painted surface).
Remove rear wiper motor. Refer to Removal and Installation.
Remove rear combination lamp (LH and RH). Refer to Removal and Installation.
Disconnect window defogger connectors LH side and RH side.
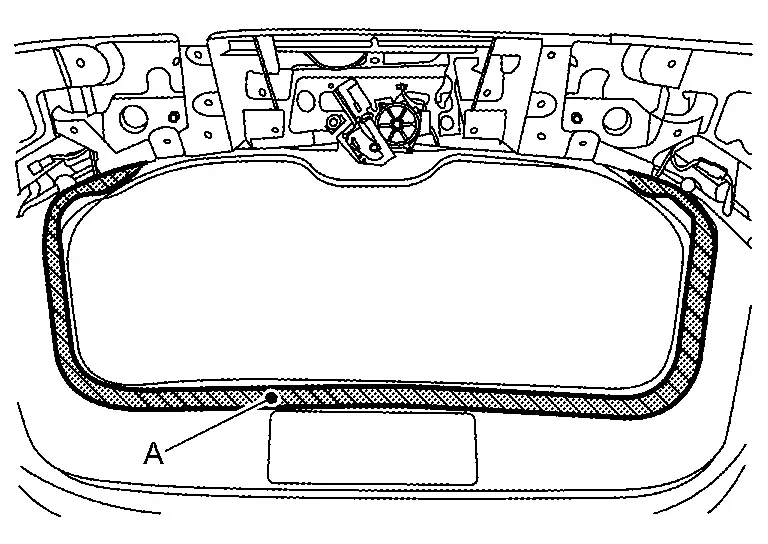
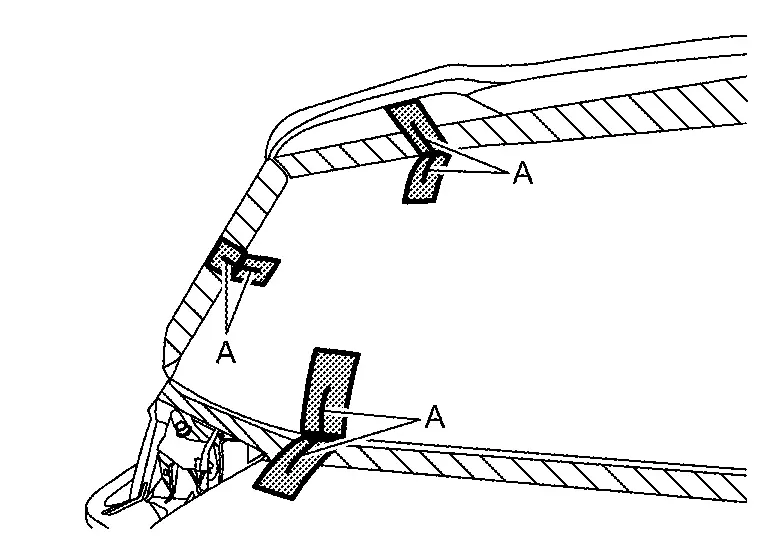
Apply protective tape (A) on back door inner panel around back door window glass to protect painted surface from damage.
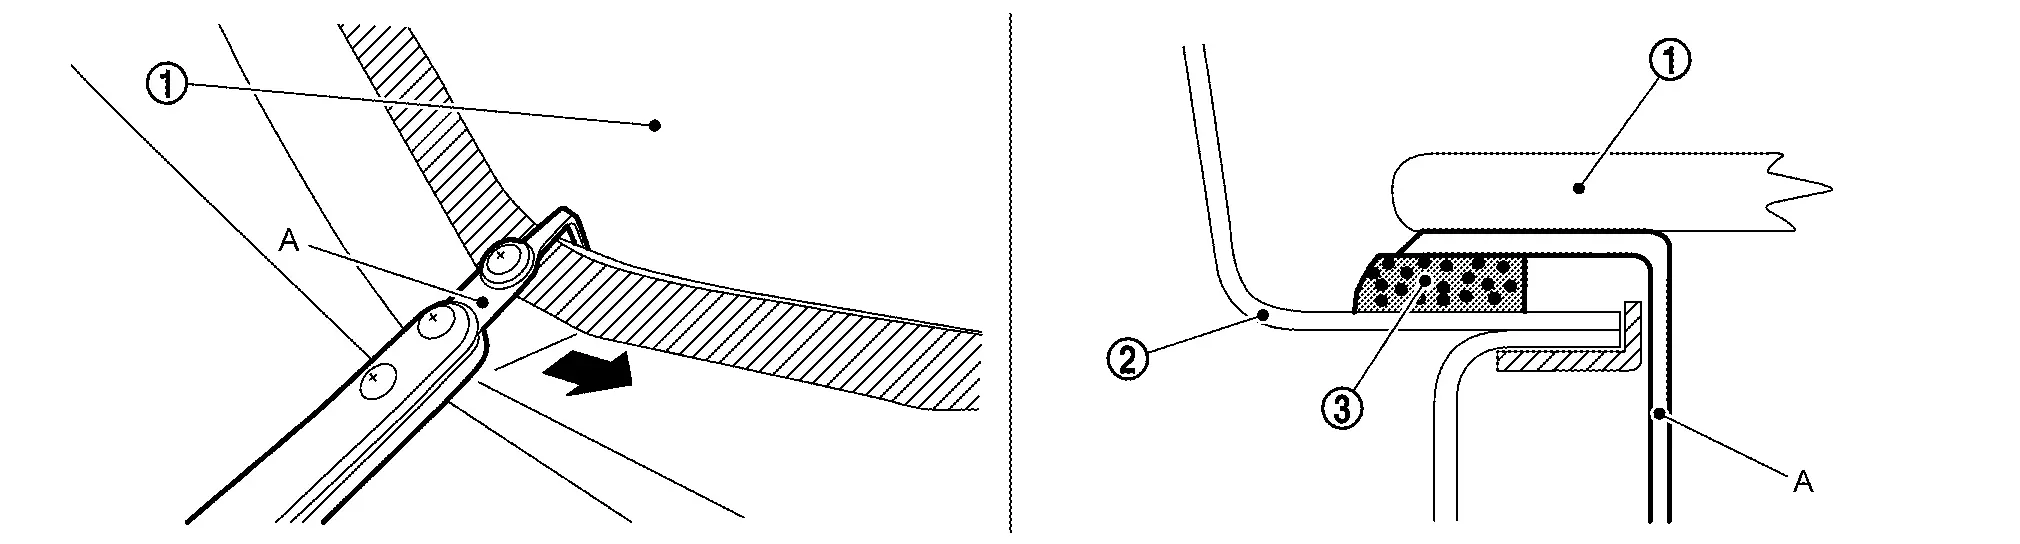
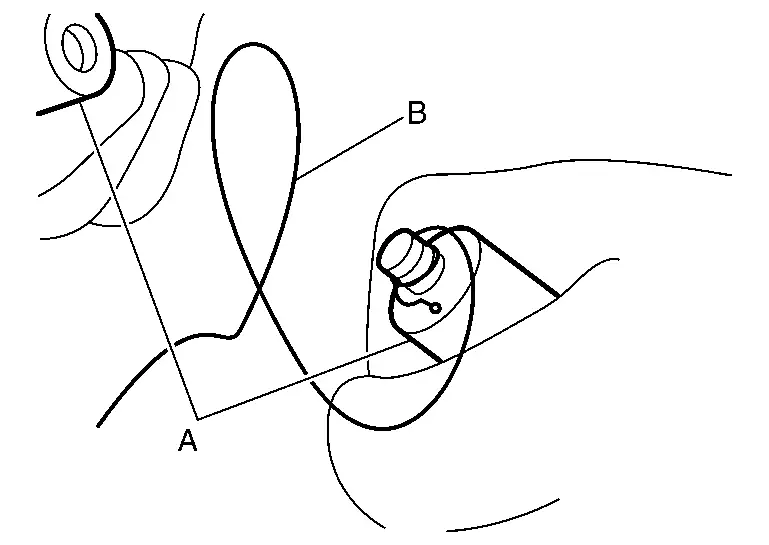
Insert a windshield cutter (A) between back door window glass and back door outer panel . Cut the adhesive by pulling the windshield cutter, keeping the tip parallel to the edge of back door window glass.
CAUTION:
Use piano wire to cut sealant if its difficult to use windshield cutter.
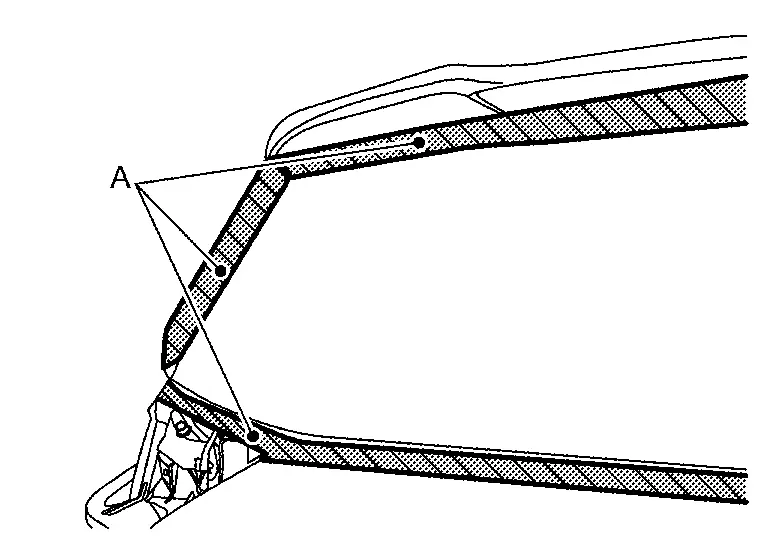
Cut the adhesive using a piano wire.Apply protective tapes (A) on back door outer panel around back door window glass to protect painted surface from damage.
CAUTION:
-
Never use plane surface of wire pierce tip vertically.
-
Never damage resinous back door outer panel and surrounding parts.
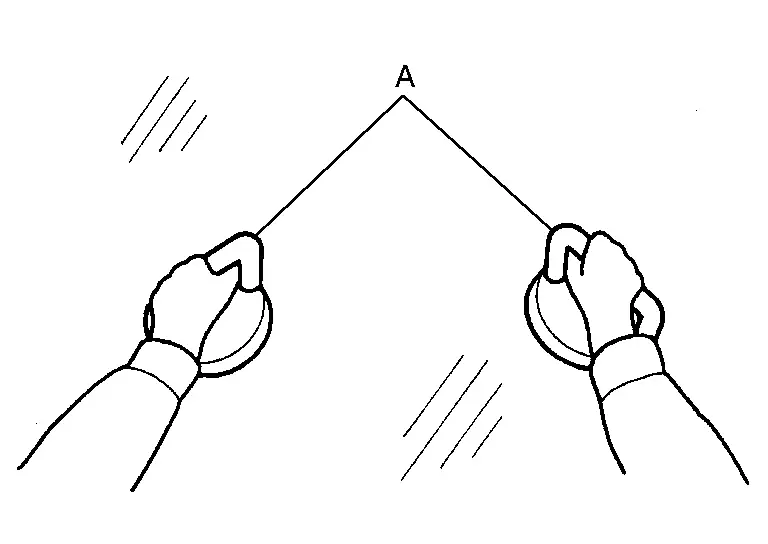
To cut adhesive, back door window glass clips spacers by using piano wire alongside of back door window glass.
CAUTION:
-
To cut adhesive, 2 workers are required by all means.
-
Never damage resinous back door outer panel and surrounding parts.
Use suction lifter (A) to remove back door window glass from the Nissan Ariya vehicle.
CAUTION:
Due to weight of back door window glass, 2 workers are required by all means.
Remove back door window glass clips and spacers from back door outer panel.
Reuse Back Door Window Glass
CAUTION:
-
Never damage back door window glass and resinous back door outer panel.
-
Never use a windshield cutter if the back door window glass is reused. (It may scratch the glass surface).
Remove rear wiper motor. Refer to Removal and Installation.
Remove rear combination lamp (LH and RH). Refer to Removal and Installation.
Disconnect window defogger connectors LH side and RH side.
Apply protective tapes (A) on back door outer panel around back door window glass to protect painted surface from damage.
Apply matching marks (A) to back door window glass and back door outer panel.
CAUTION:
To prevent the gap when install windshield glass put on matching marks by all means.
Cut the adhesive using a piano wire.Pass the piano wire passenger room to bonded area of back door window glass using a wire pierce.
CAUTION:
-
Never use plane surface of wire pierce tip vertically.
-
Never damage resinous back door outer panel and surrounding parts.
To cut adhesive, back door window glass clips and spacers by using piano wire alongside of back door window glass.
CAUTION:
-
To cut adhesive, 2 workers are required by all means.
-
Never damage resinous back door outer panel and surrounding parts.
Use suction lifter (A) to remove back door window glass from the Nissan Ariya vehicle.
CAUTION:
Due to weight of back door window glass, 2 workers are required by all means.
Remove back door window glass clips and spacers from back door outer panel.
INSTALLATION
Replacement Back Door Window Glass
CAUTION:
-
Never damage back door window glass and resinous back door outer panel.
-
If the back door outer panel painted surface has damage, scratch or clack, its should be replace as a new one because it will be remove the paint.
Use a cutter knife or scraper, and leave the of adhesive on the back door side approximately 2 mm (0.079 in) (A) to make adhesive surface smooth.
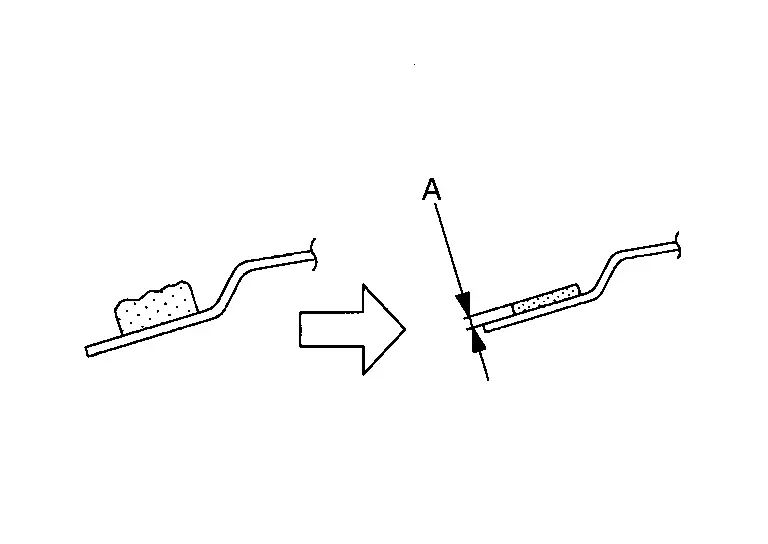
CAUTION:
-
If the bonded area on the body is scratched, repair it using a 2 liquid types urethane paint. Never use lacquer type paint.
-
Smooth out adhesive surface.
Place back door window glass on the Nissan Ariya vehicle temporarily, put on matching marks (A) on back door window glass and back door outer panel.
CAUTION:
To prevent the gap when install new back door window glass put on matching marks by all means.
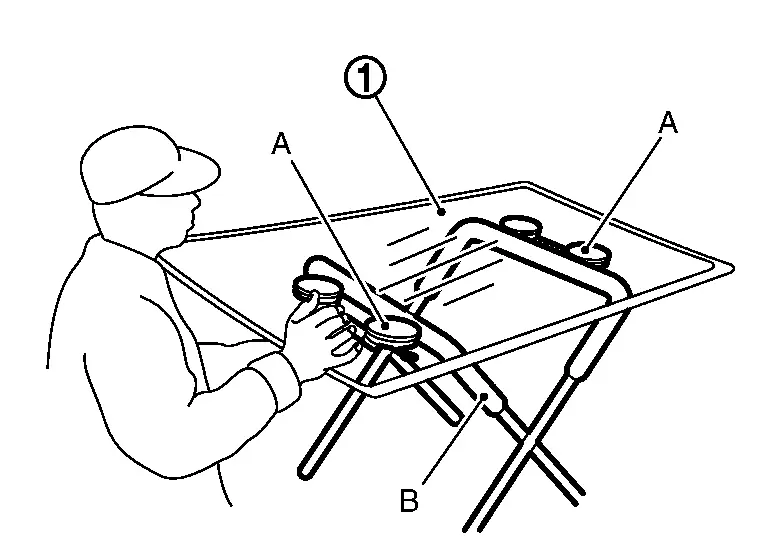
Use suction lifter (A) to set back door window glass on glass stand (B).
Clean the bonded area on back door window glass and back door outer panel using a white gasoline or degreasing agent.
Apply glass primer along the entire circumference of back door window glass. The range of glass primer, refer to Exploded View.
Apply painted surface primer to the back door outer panel bonding surface. The range of painted surface primer, refer to Exploded View.
Apply adhesive to back door window glass.
-
The start position
of apply adhesive is behind from matching mark as shown in figure.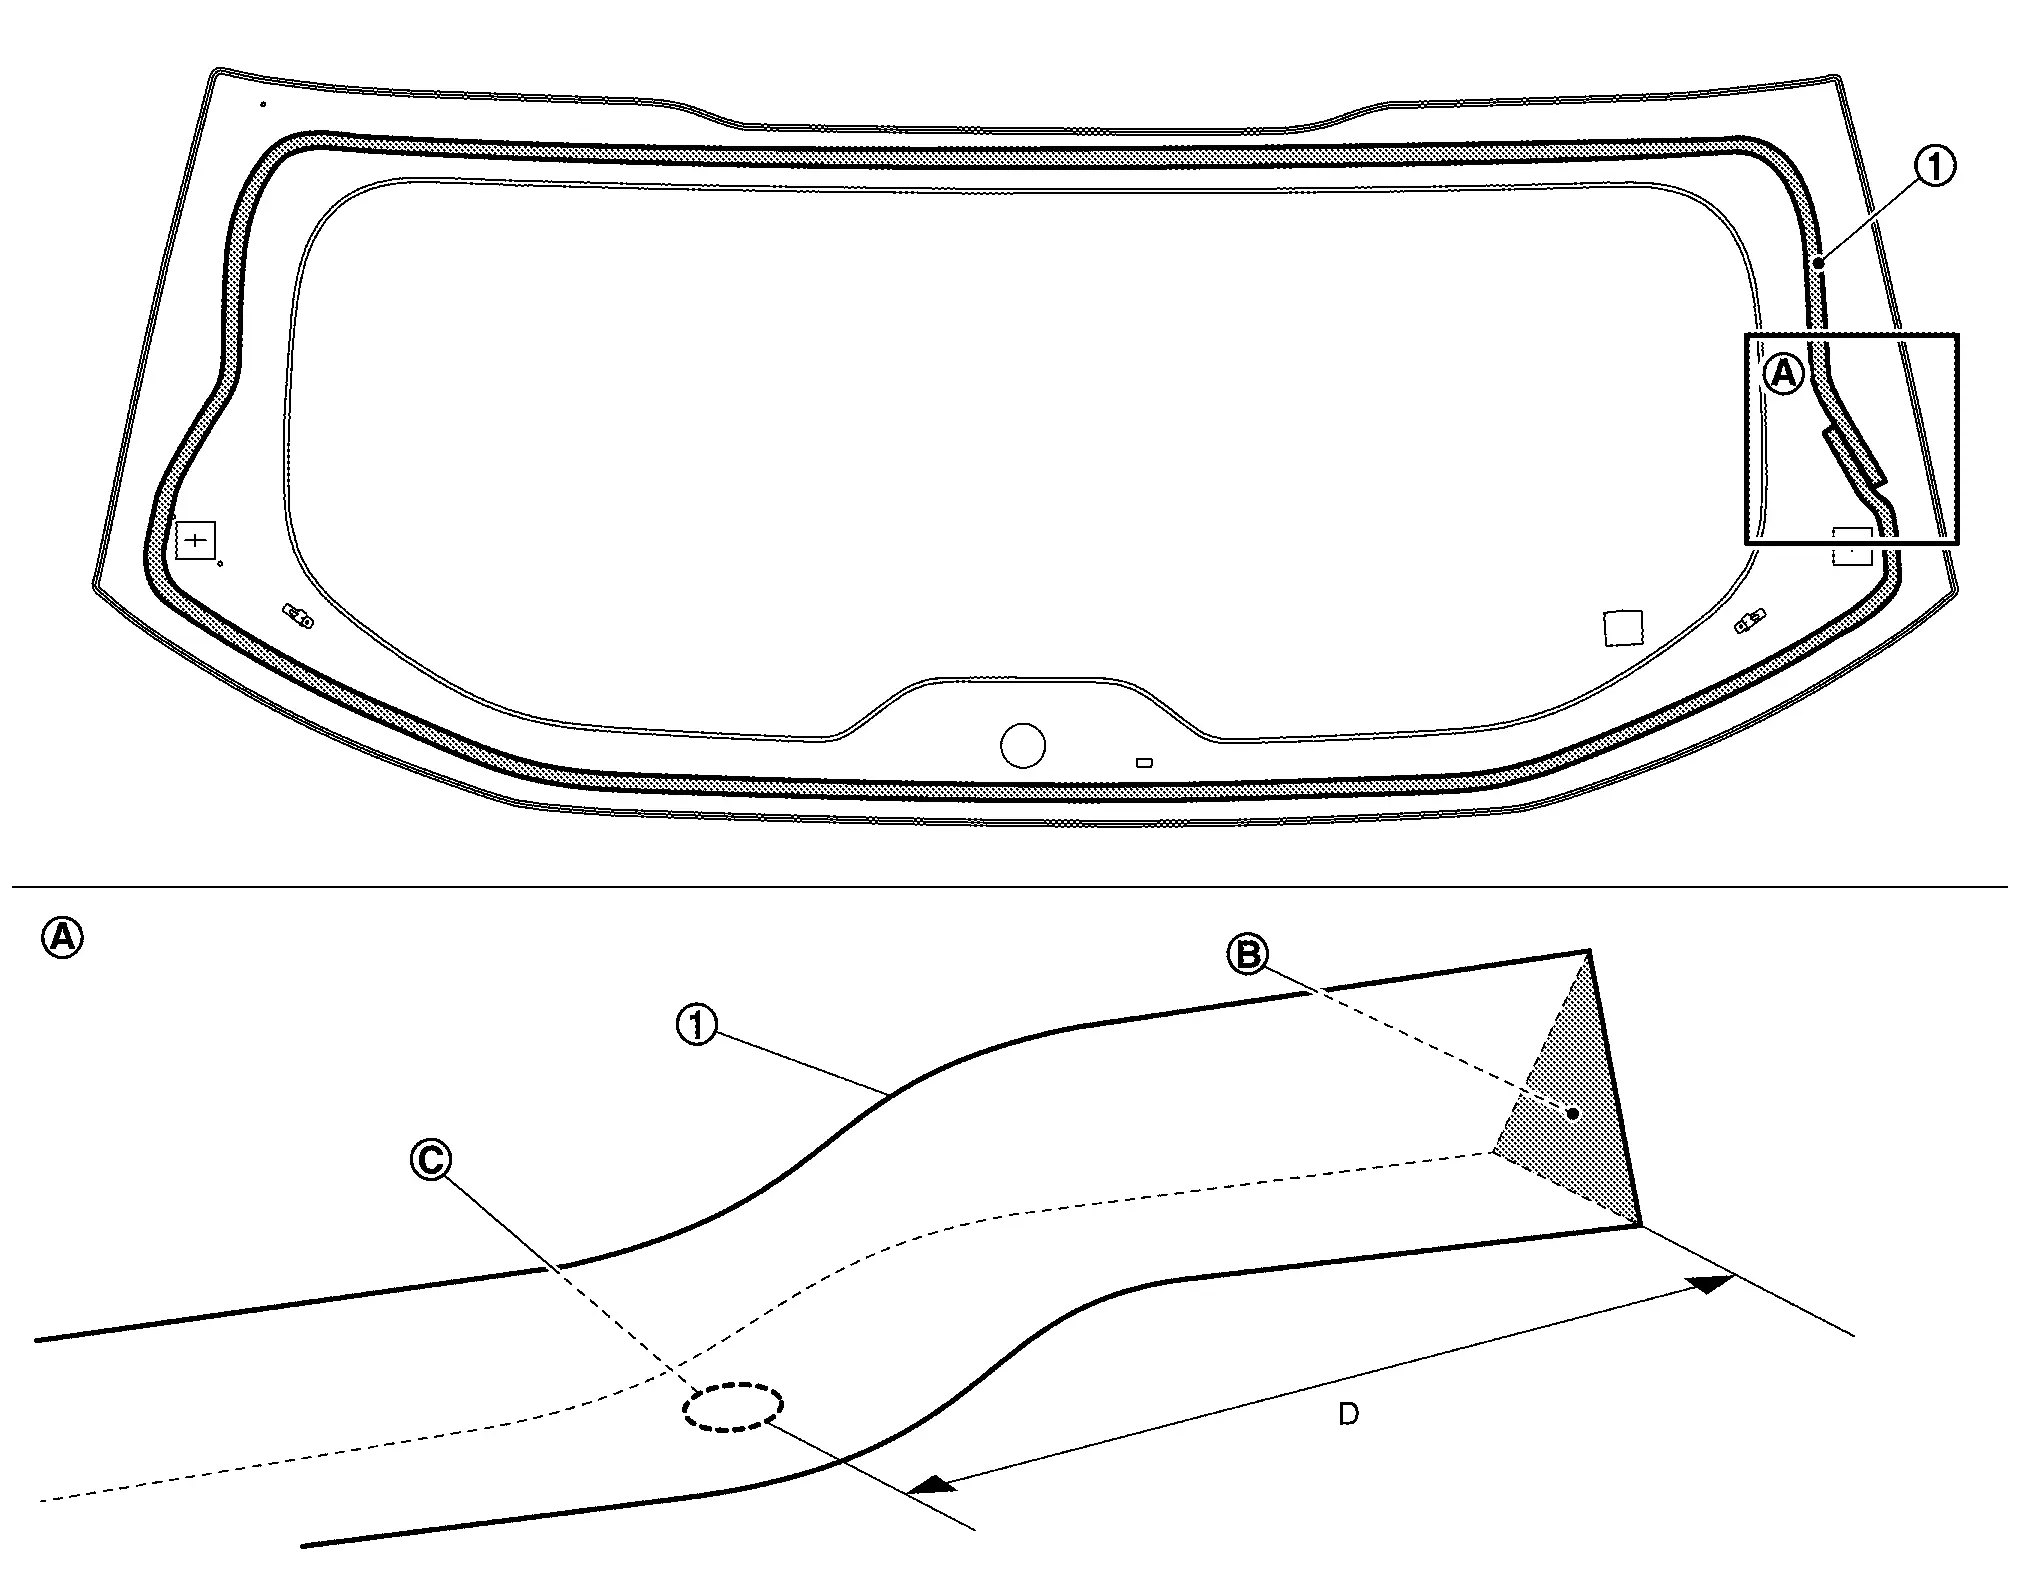
D : 57.2 mm (2.252 in) -
When apply adhesive, the adhesive
center on the connected line of matching marks as shown in figure.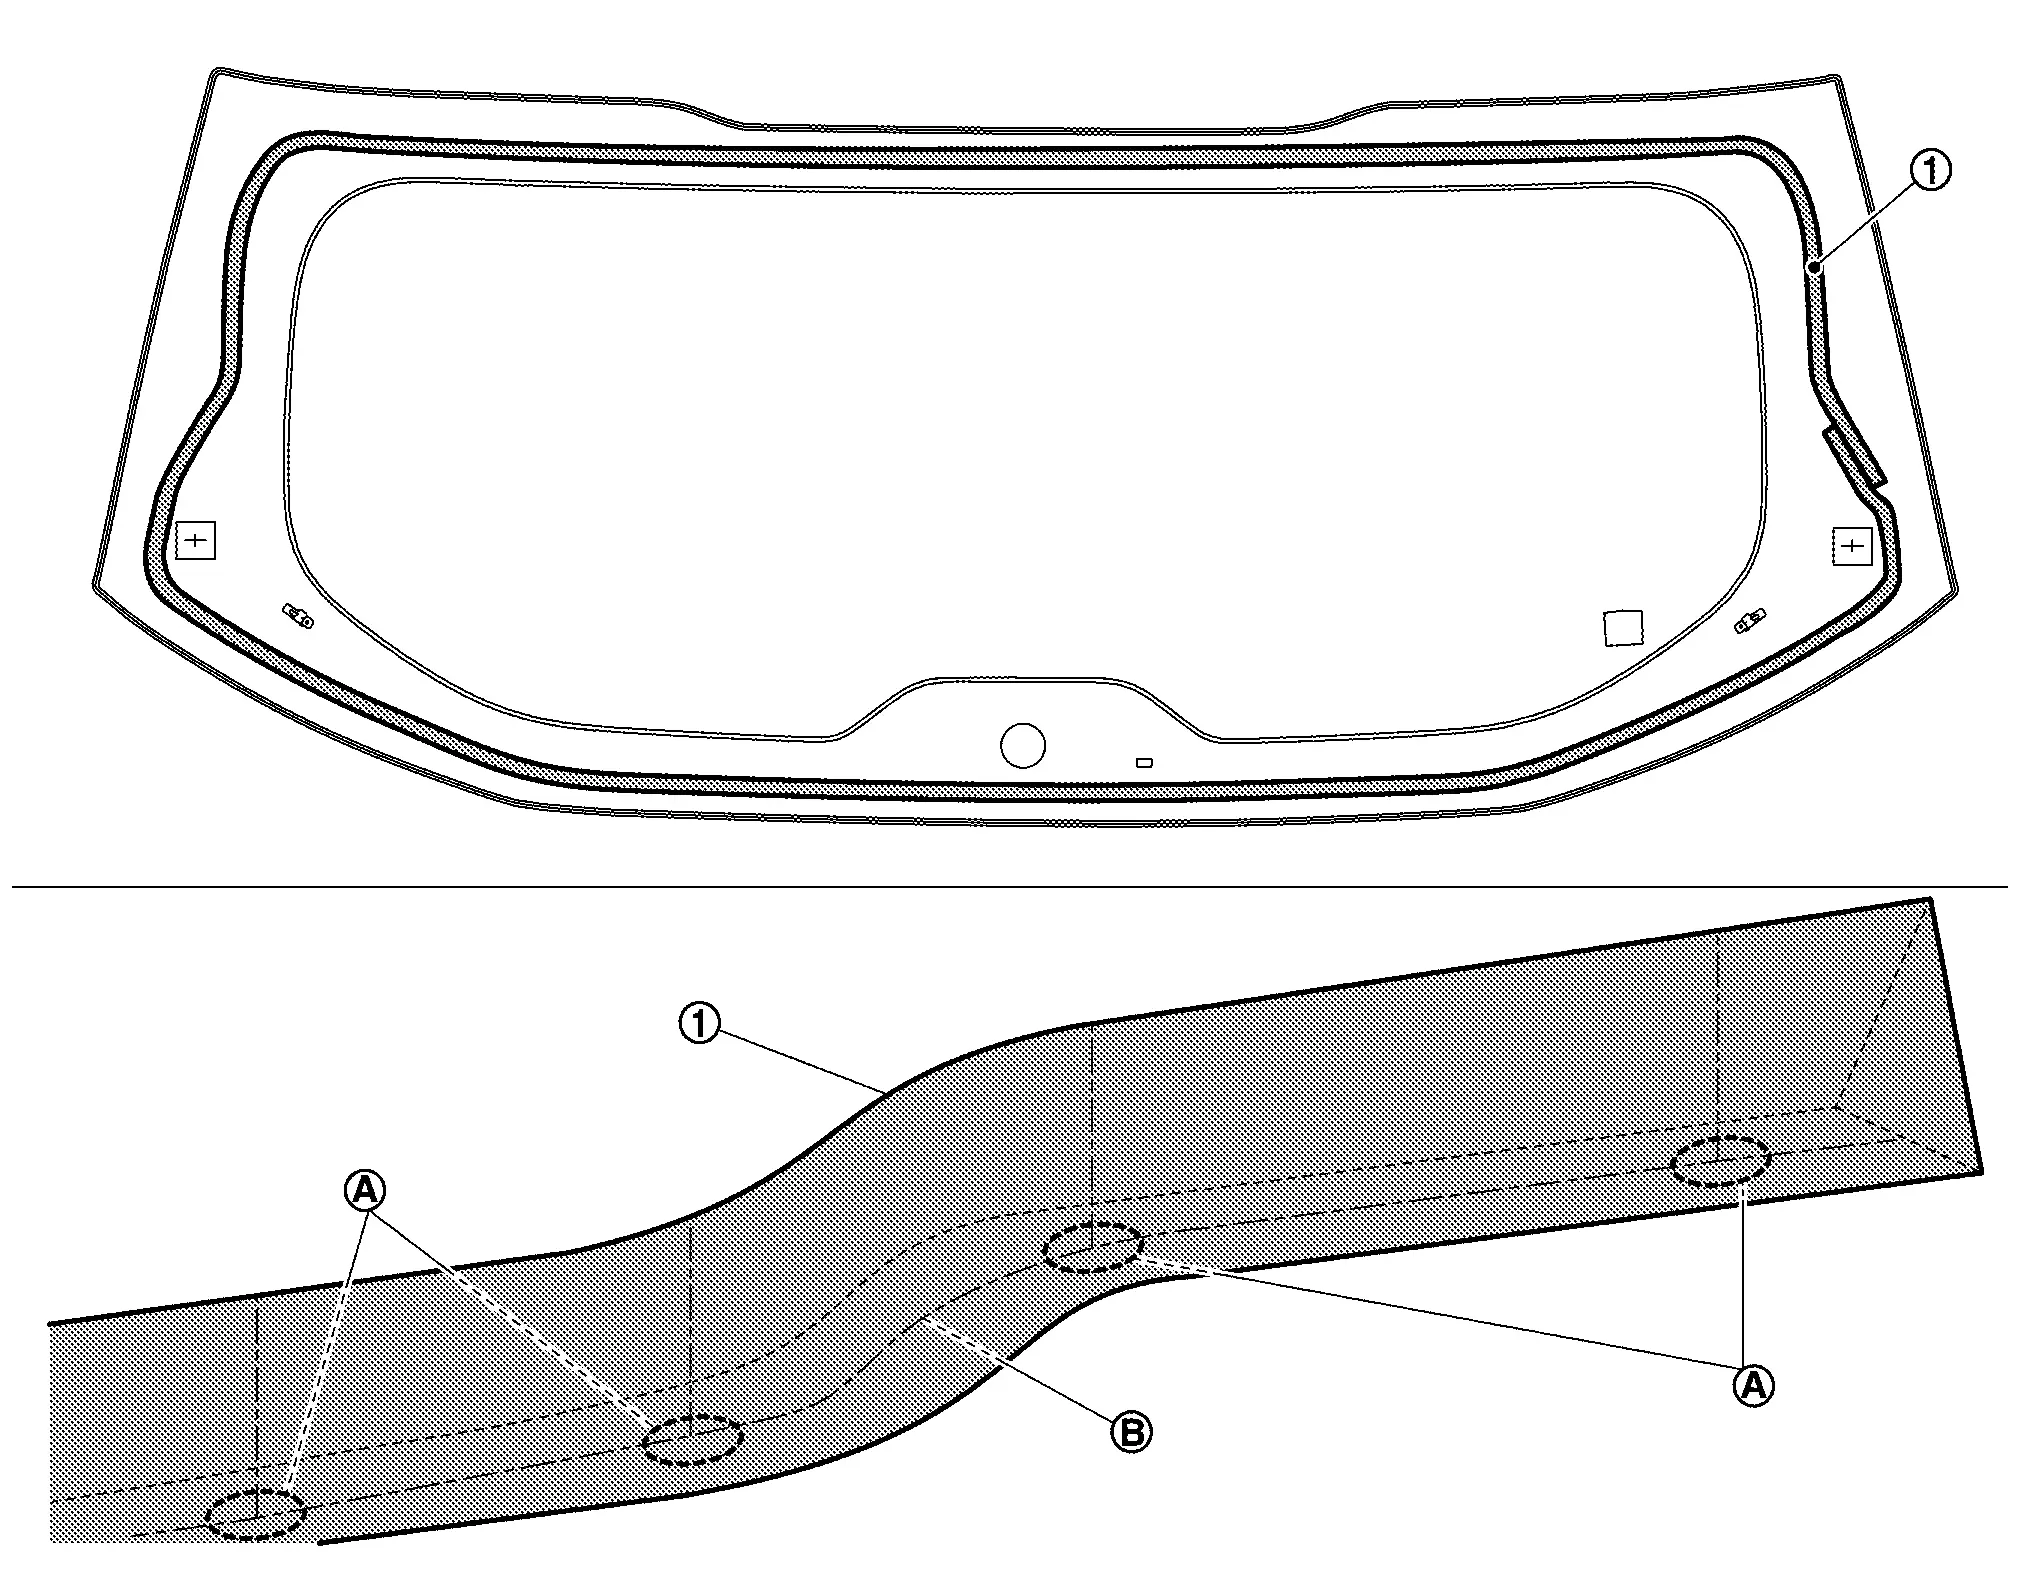
-
When finish to applying adhesive
, overlap from starting position to stop position as shown in figure.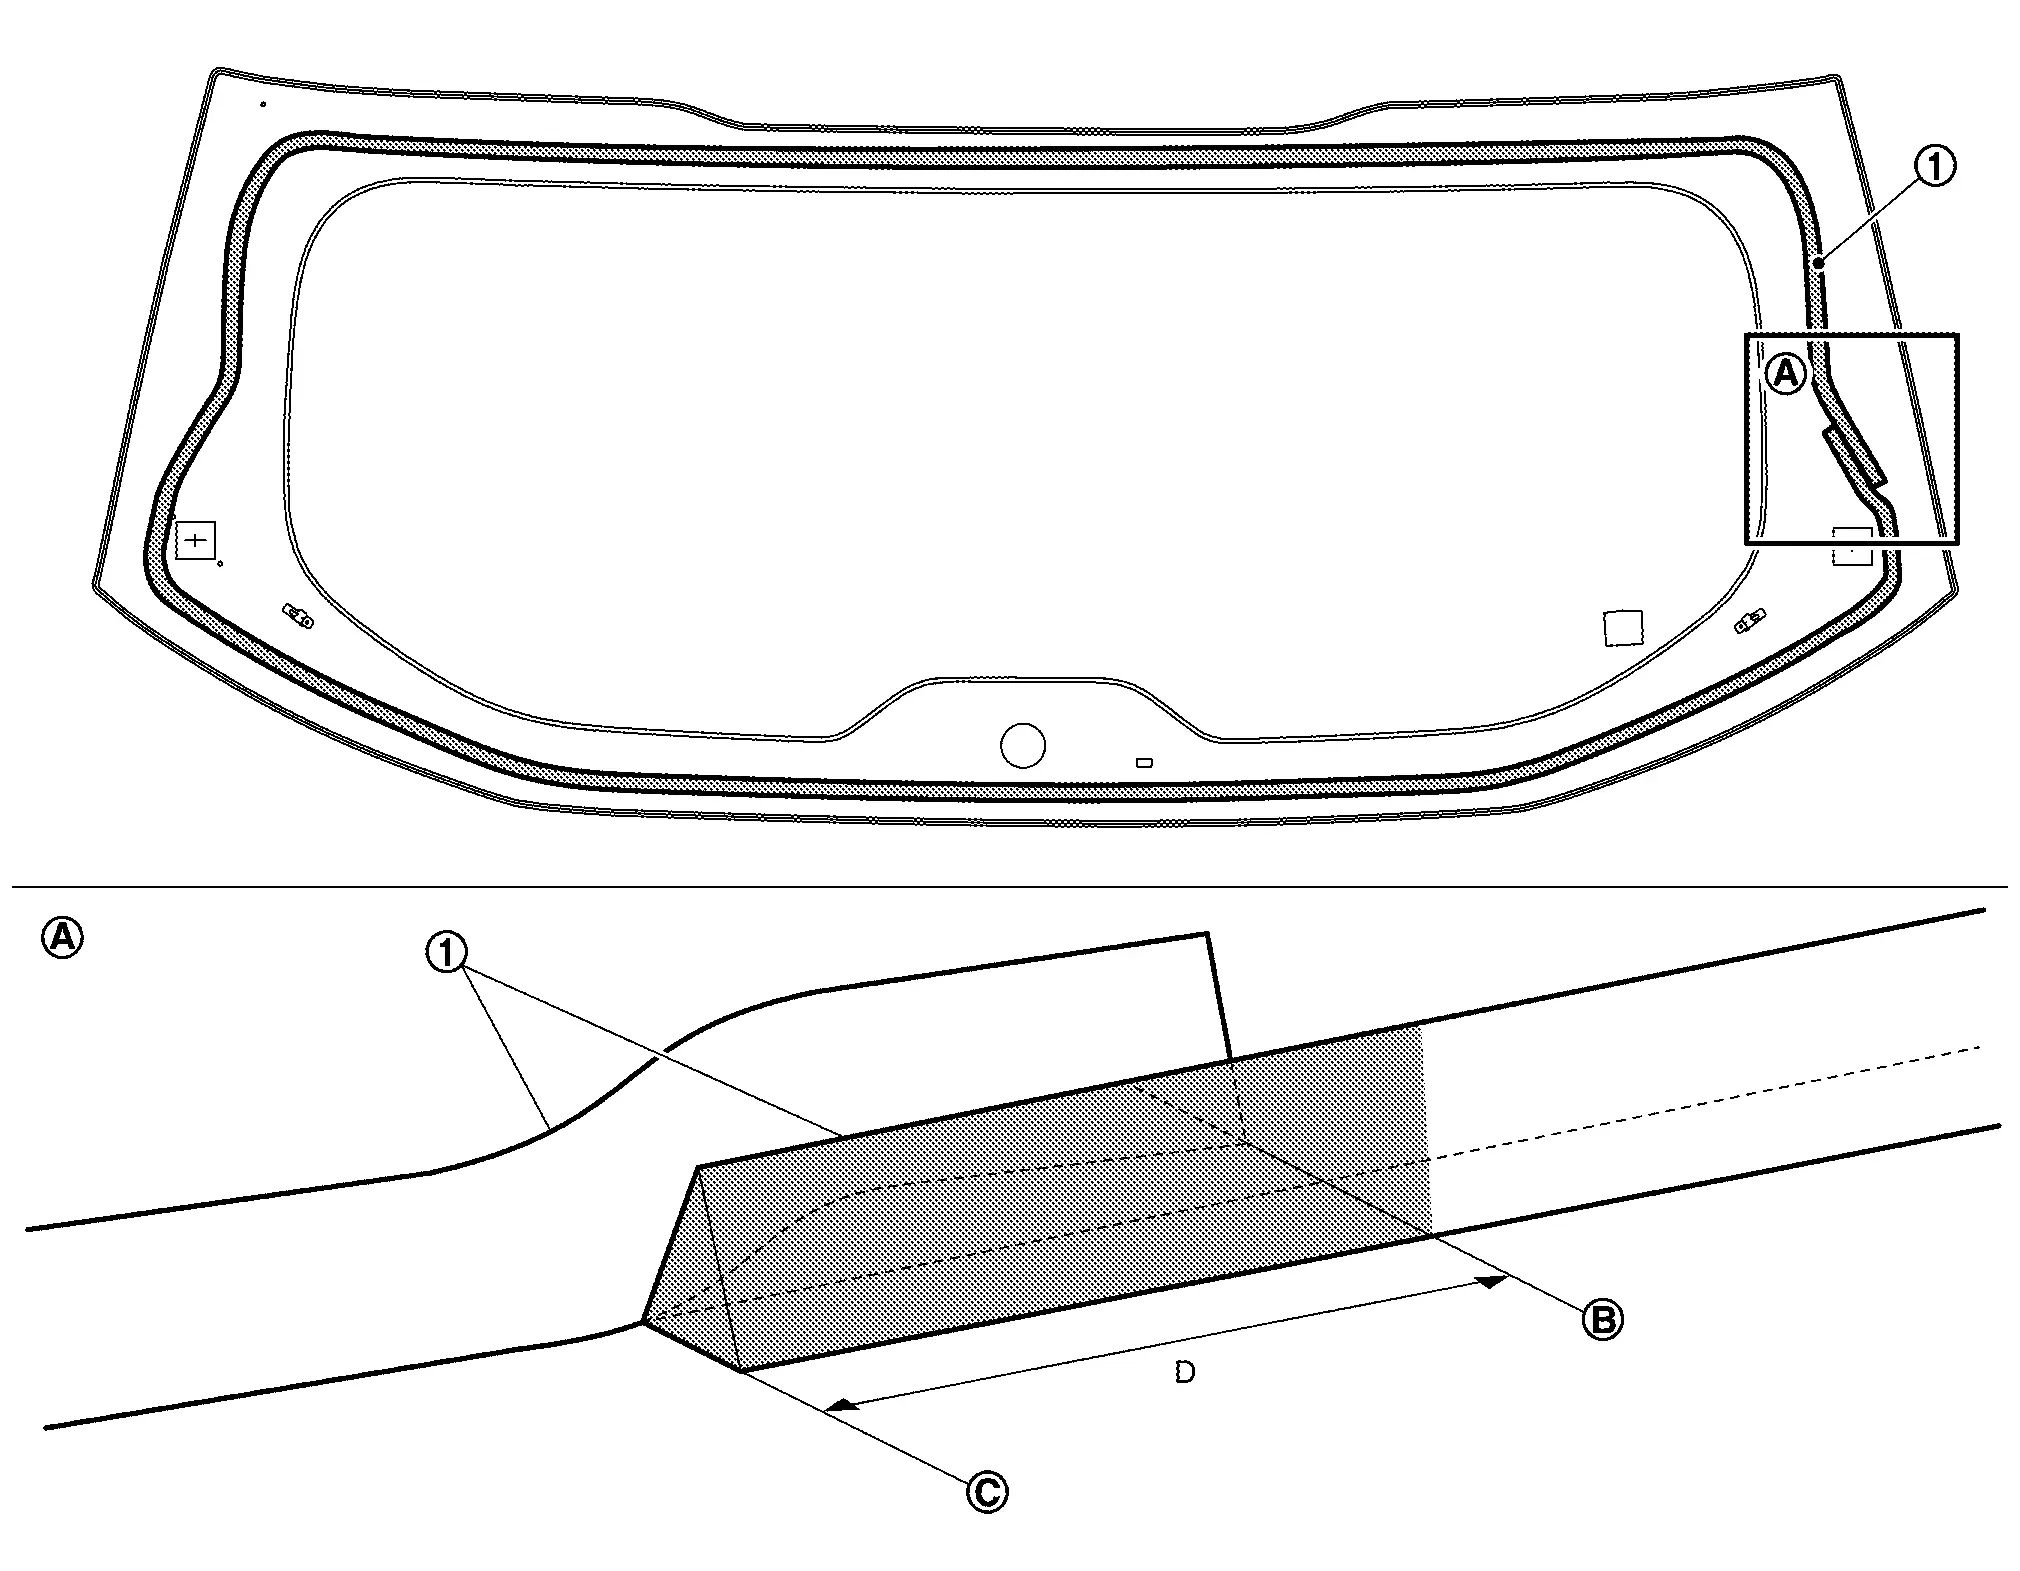
D : 50 mm (1.97 in)
Install back door window glass to Nissan Ariya vehicle by checking the matching marks on back door outer panel and back door window glass.
CAUTION:
Due to weight of back door window glass, 2 workers are required by all means.
Press entire surface of back door window glass lightly to fit it completely.
Correct any adhesive overflow or shortage using a spatula to make the surface smooth.
CAUTION:
-
Dry the adhesive according to the specification of adhesive kit.
-
After installing back door window glass, keep the all door glass open until the adhesive is completely cured.
-
Never drive the Nissan Ariya vehicle before the adhesive is completely cured.
Remove protective tape.
Install the removed parts.
CAUTION:
-
Adjust the rear wiper arm stop position. Refer to Adjustment.
-
Check the matching with surrounding parts. Adjust if necessary.
Reuse Back Door Window Glass
CAUTION:
-
Never damage back door window glass and resinous back door outer panel.
-
Never reuse back door window glass if it has damage, scratch, crack etc..
Use a cutter knife or scraper, and leave the of adhesive on the back door side approximately 2 mm (0.079 in) (A) to make adhesive surface smooth.
CAUTION:
-
If the bonded area on the body is scratched, repair it using a 2 liquid types urethane paint. Never use lacquer type paint.
-
Smooth out adhesive surface.
Remove remaining adhesive using a cutter knife or scraper smooth out back door window glass surface.
CAUTION:
Smooth out adhesive surface.
Clean the bonded area on back door window glass and back door outer panel using a white gasoline or degreasing agent.
Install clip.Clean back door window glass to install position of clip by using white gasoline or degreasing agent. Apply glass primer on back door window of clip install positions. Remove release liner of double sided tape for installing clip. Install clip on back door window glass.
CAUTION:
Install clips as shown in figure.
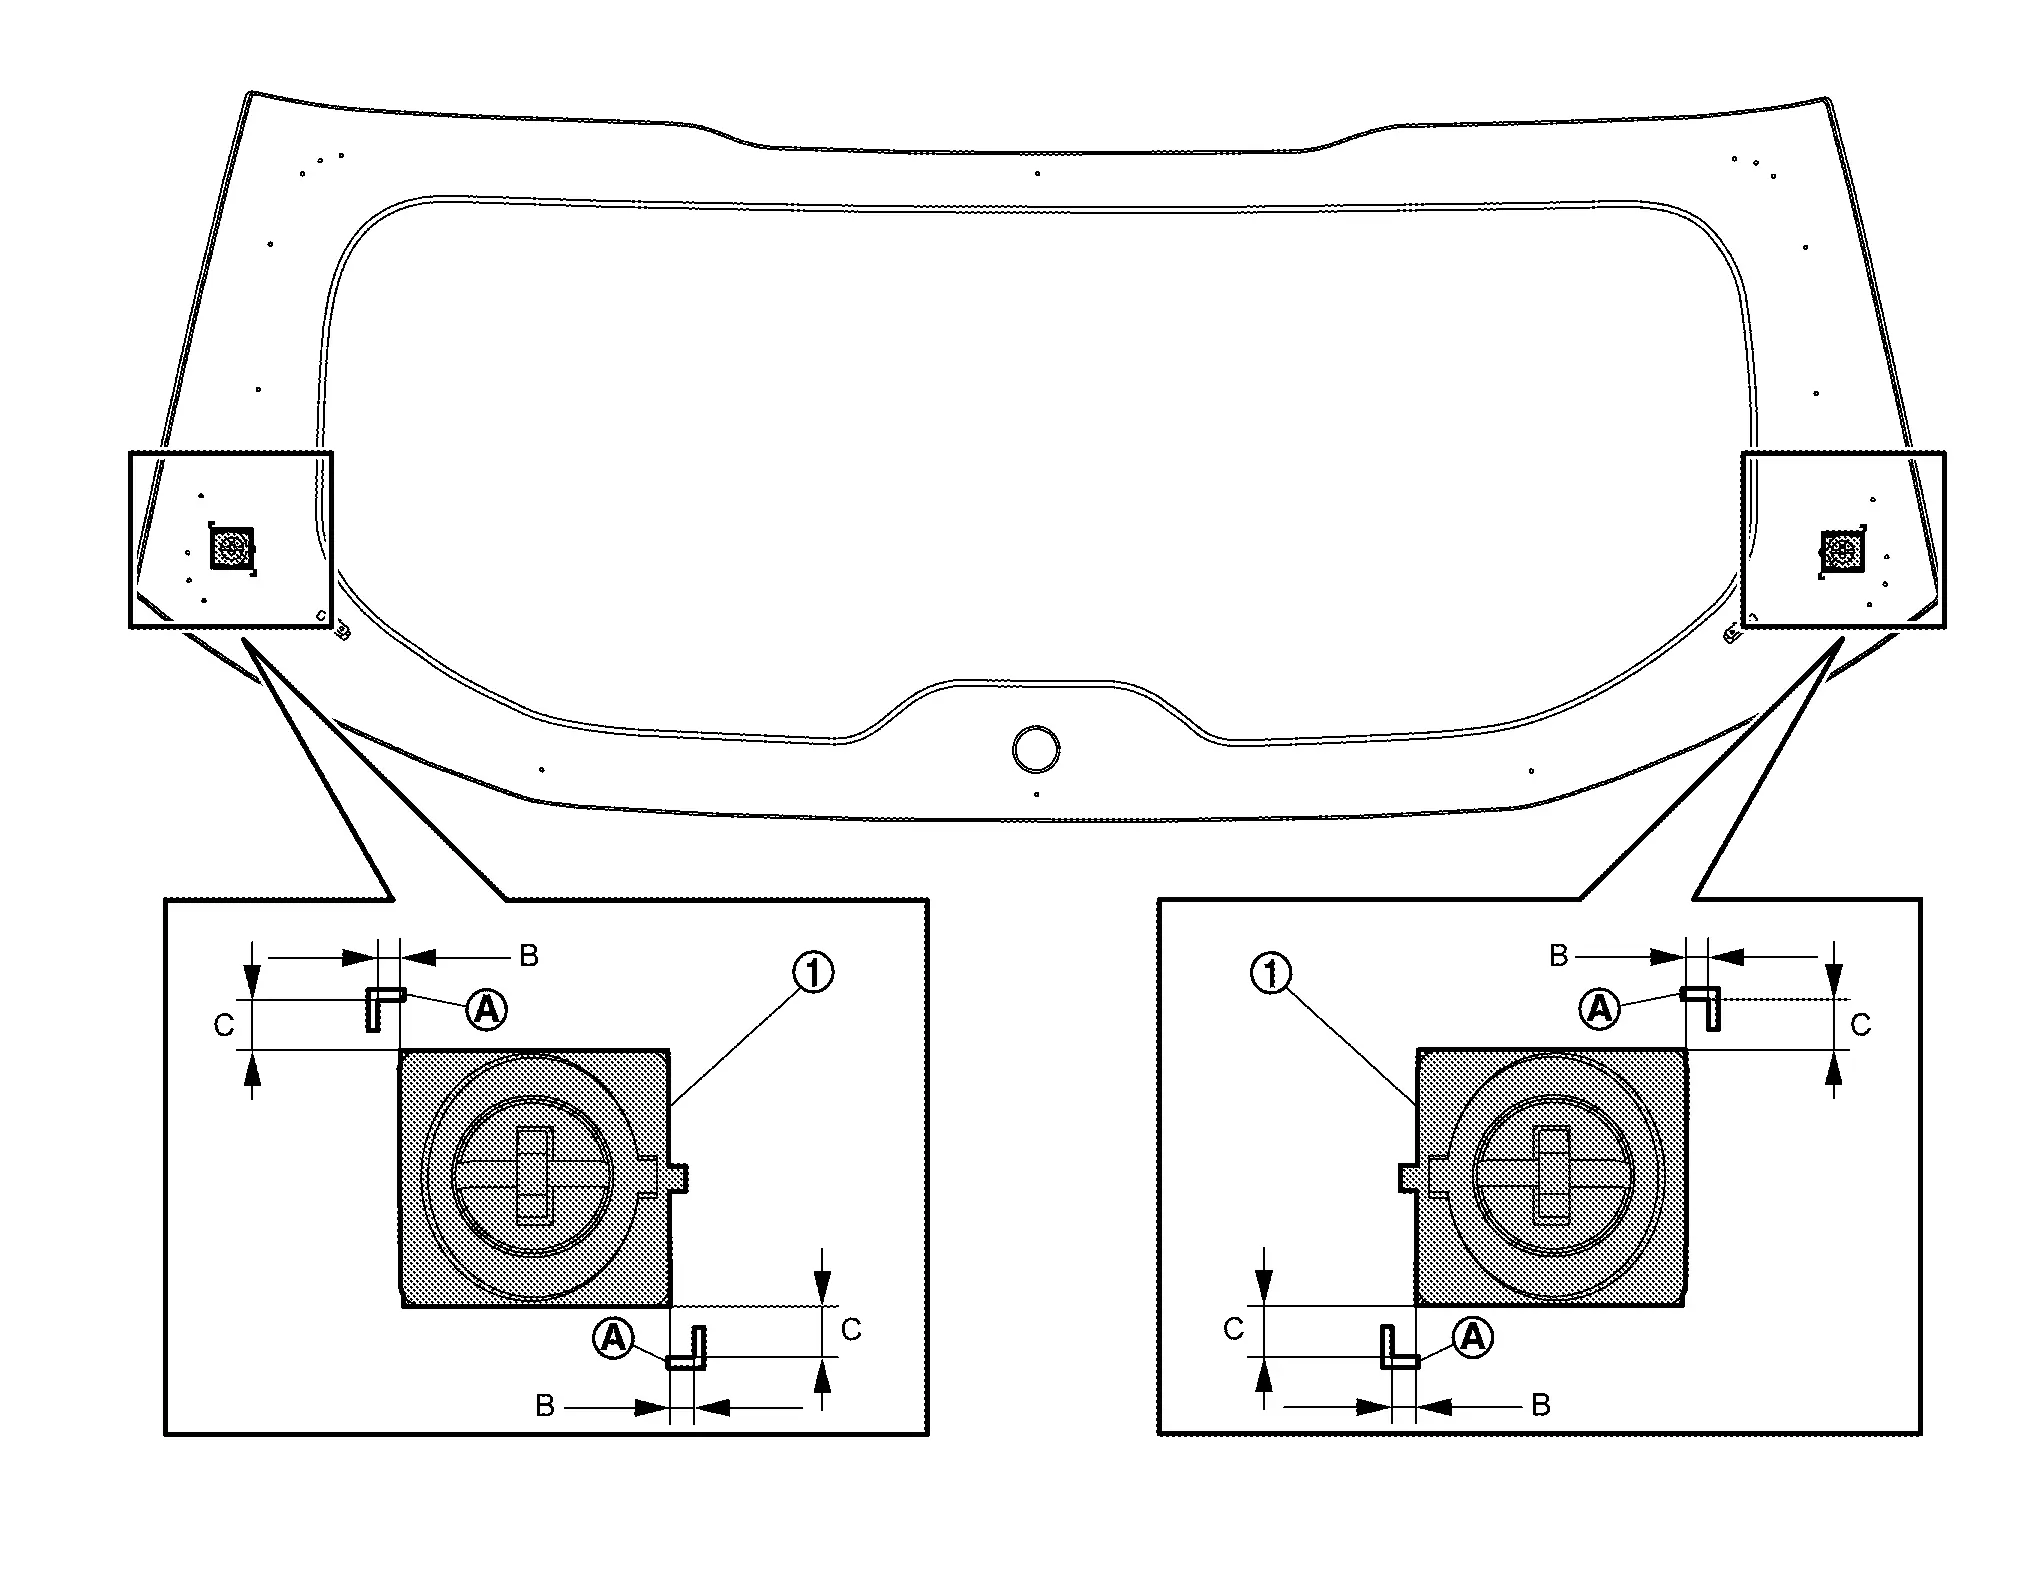
|
: Black print matching marks |
| B | : 2.4 ±0.7 mm (0.094 ±0.028 in) |
| C | : 4.9 ±0.7 mm (0.193 ±0.028 in) |
Install spacer.Clean back door window glass to install position of spacer by using white gasoline or degreasing agent. Apply glass primer on back door window of spacer install positions. Remove release liner of double sided tape for installing spacer. Install spacer on back door window glass.
CAUTION:
-
Install spacer (middle)
on back door window glass as shown in figure.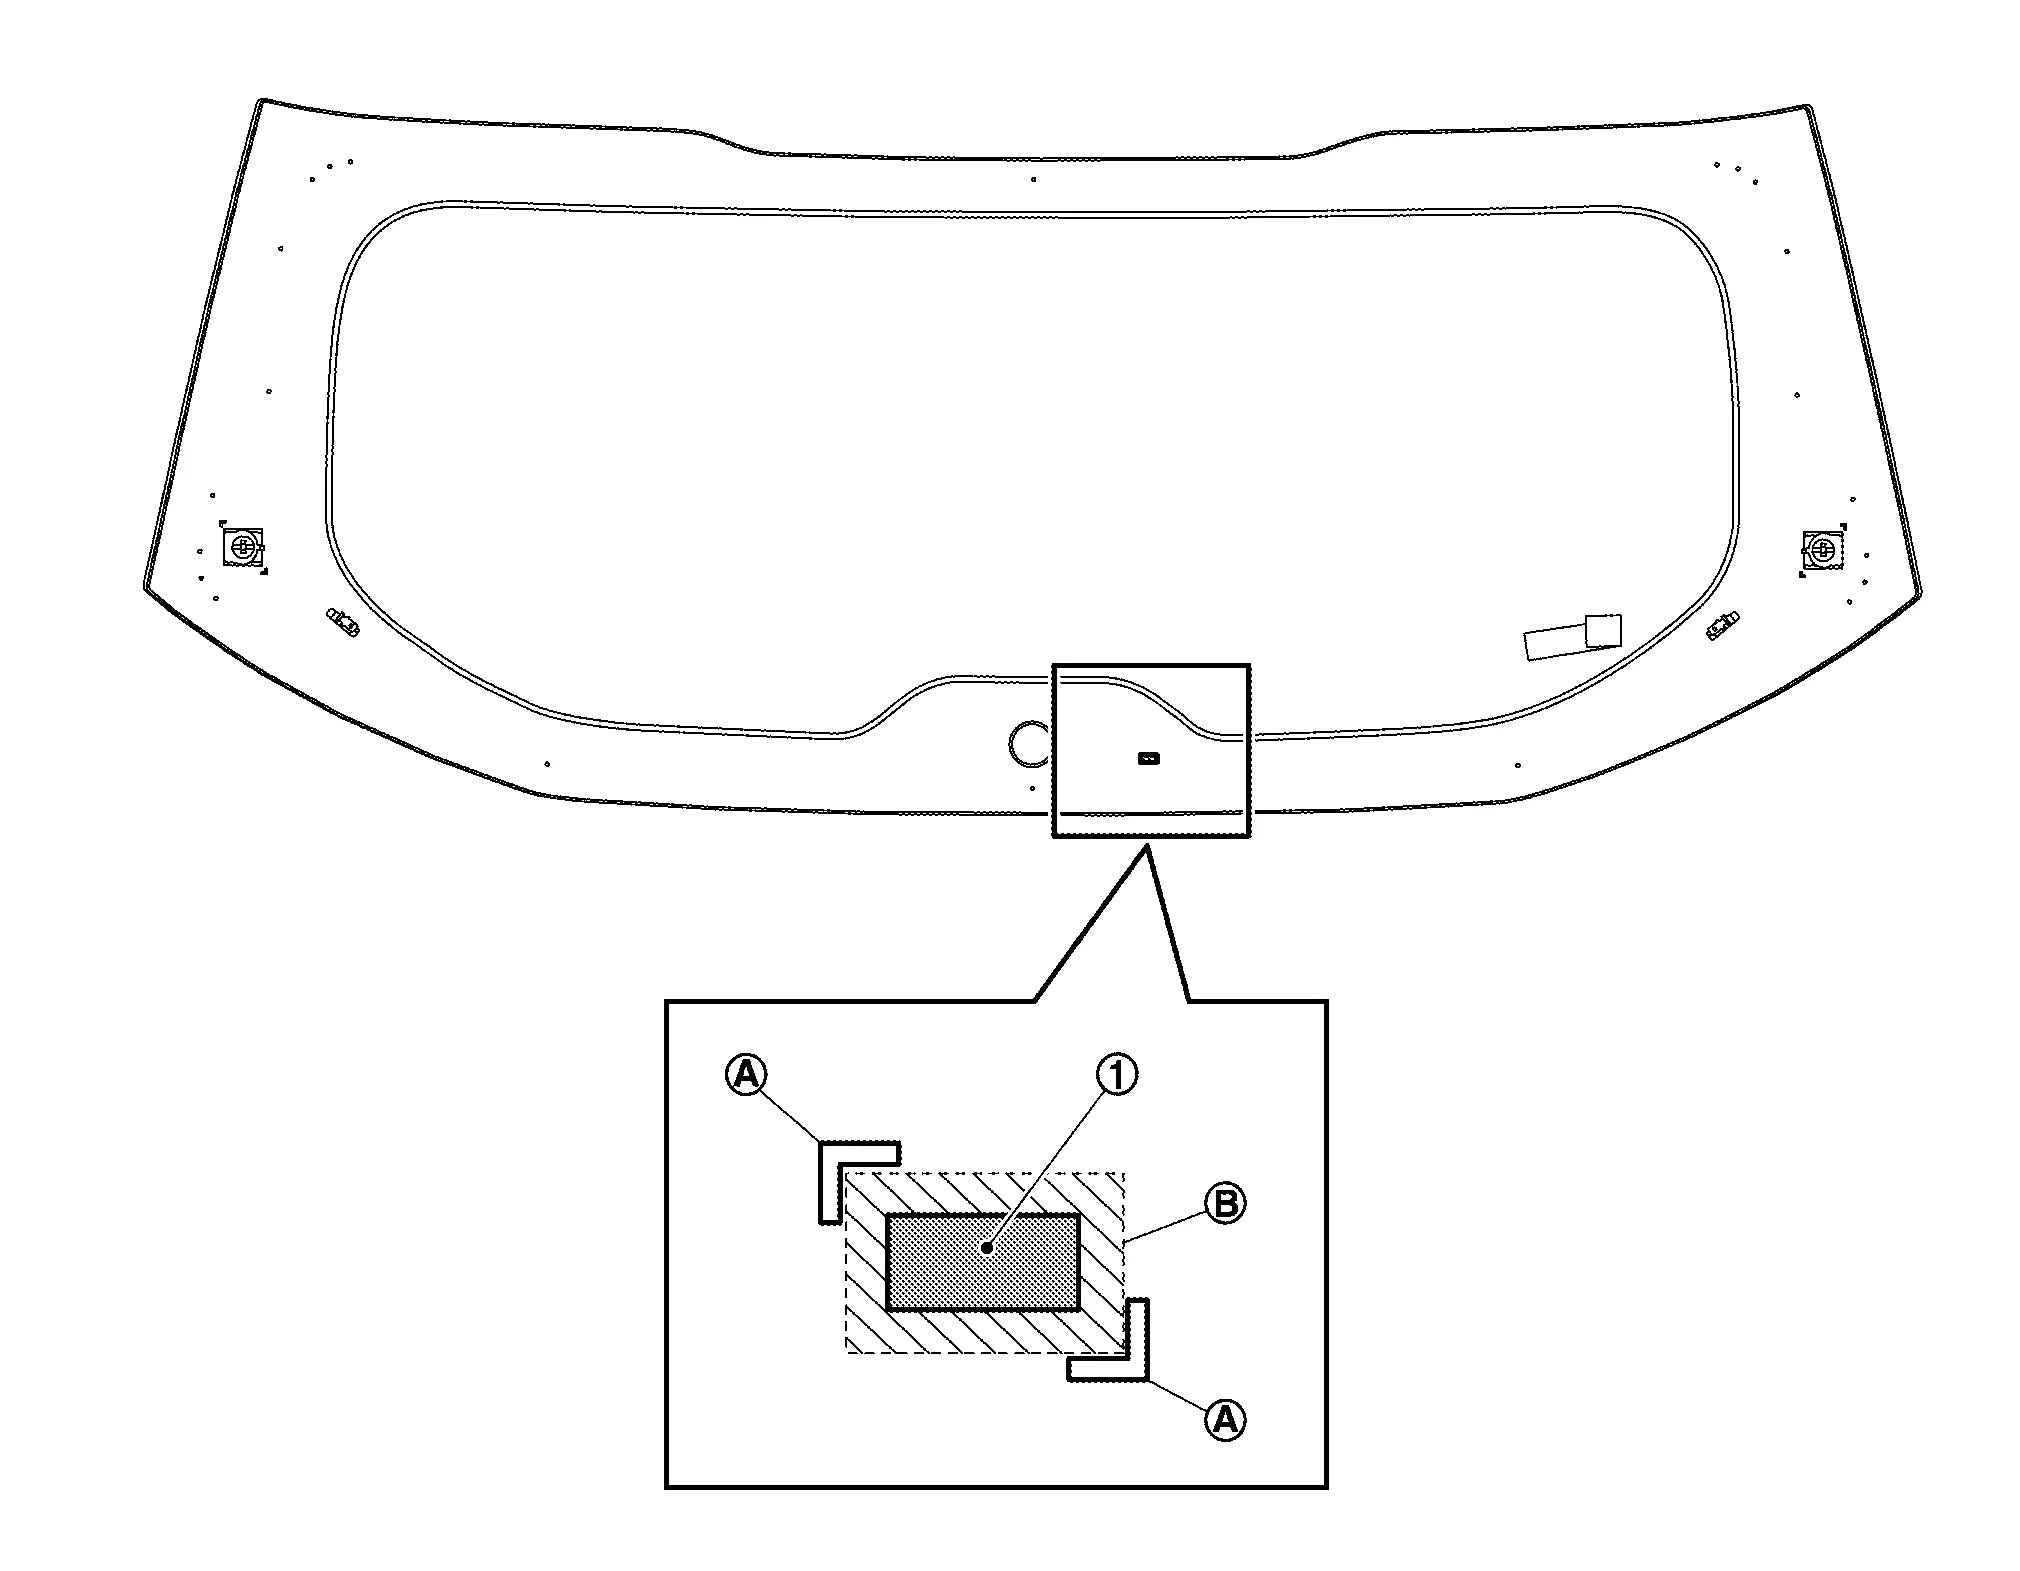
FOR USA PRODUCTION
Install spacer (upper)
on back door window glass as shown in figure.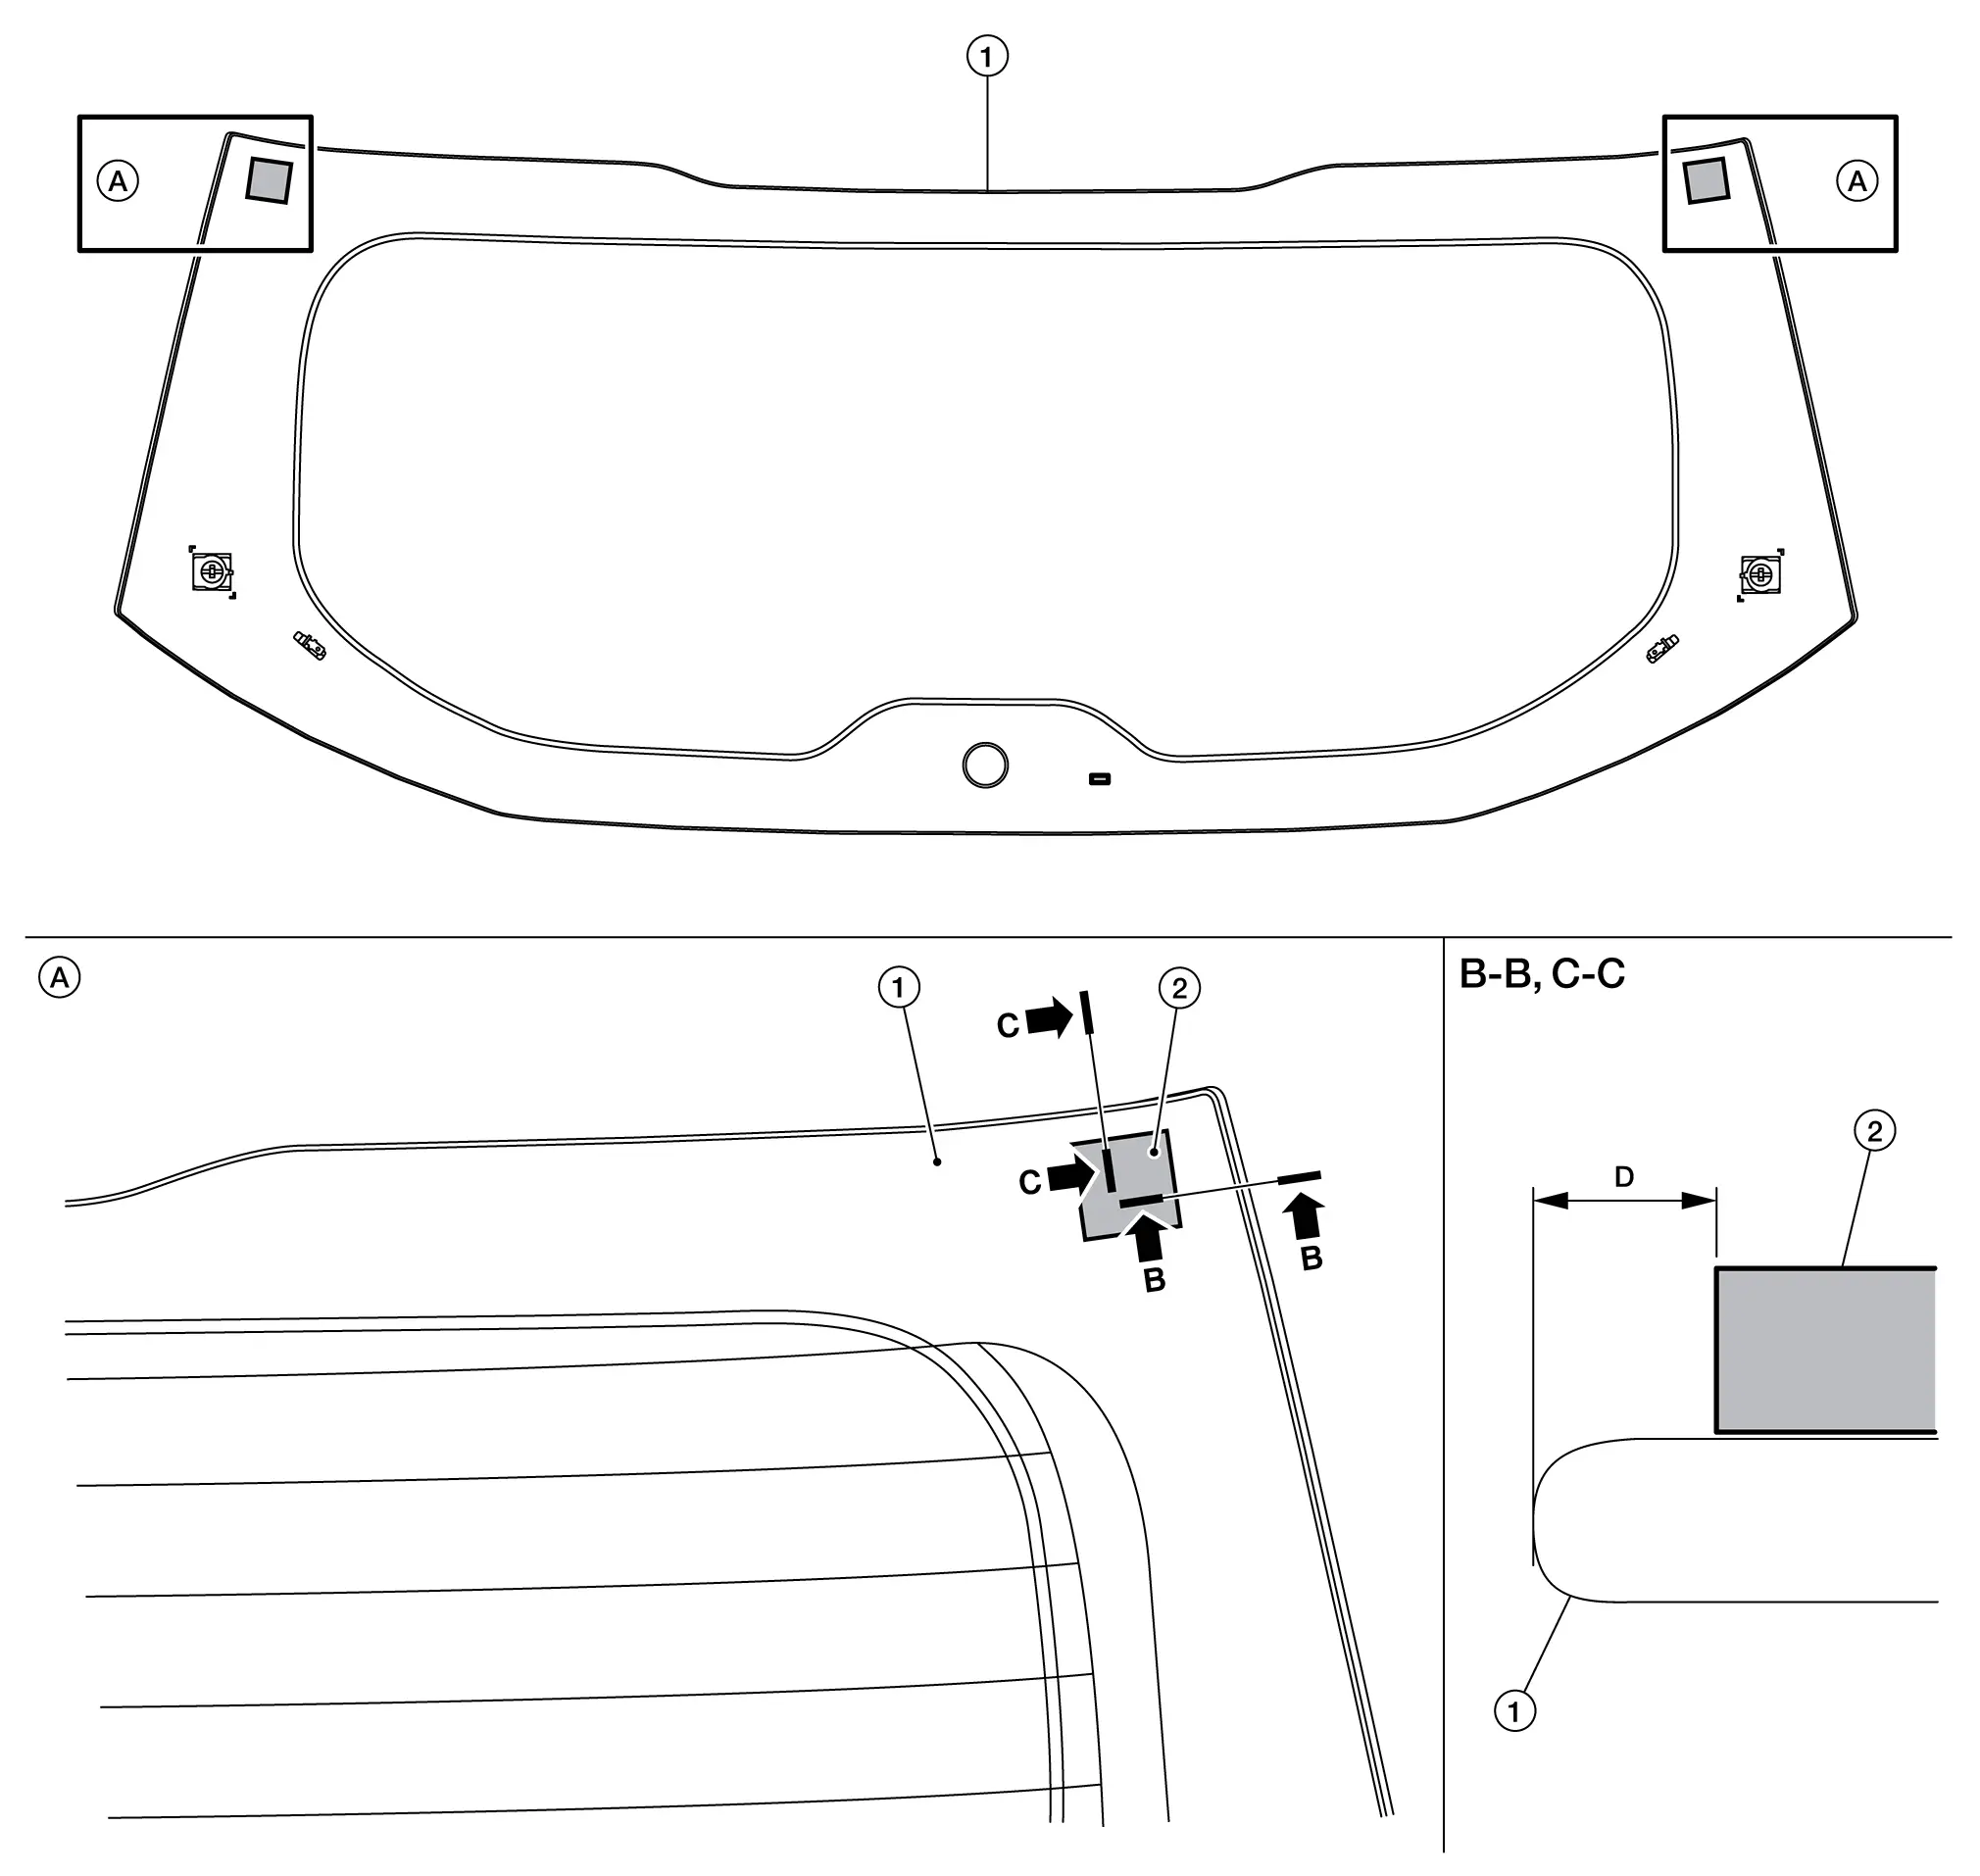
D : 10.0 ±5.0 mm (0.39 ±0.20in) EXCEPT FOR USA PRODUCTION
Install spacer [middle (except for USA production)]
on back door window glass as shown in figure.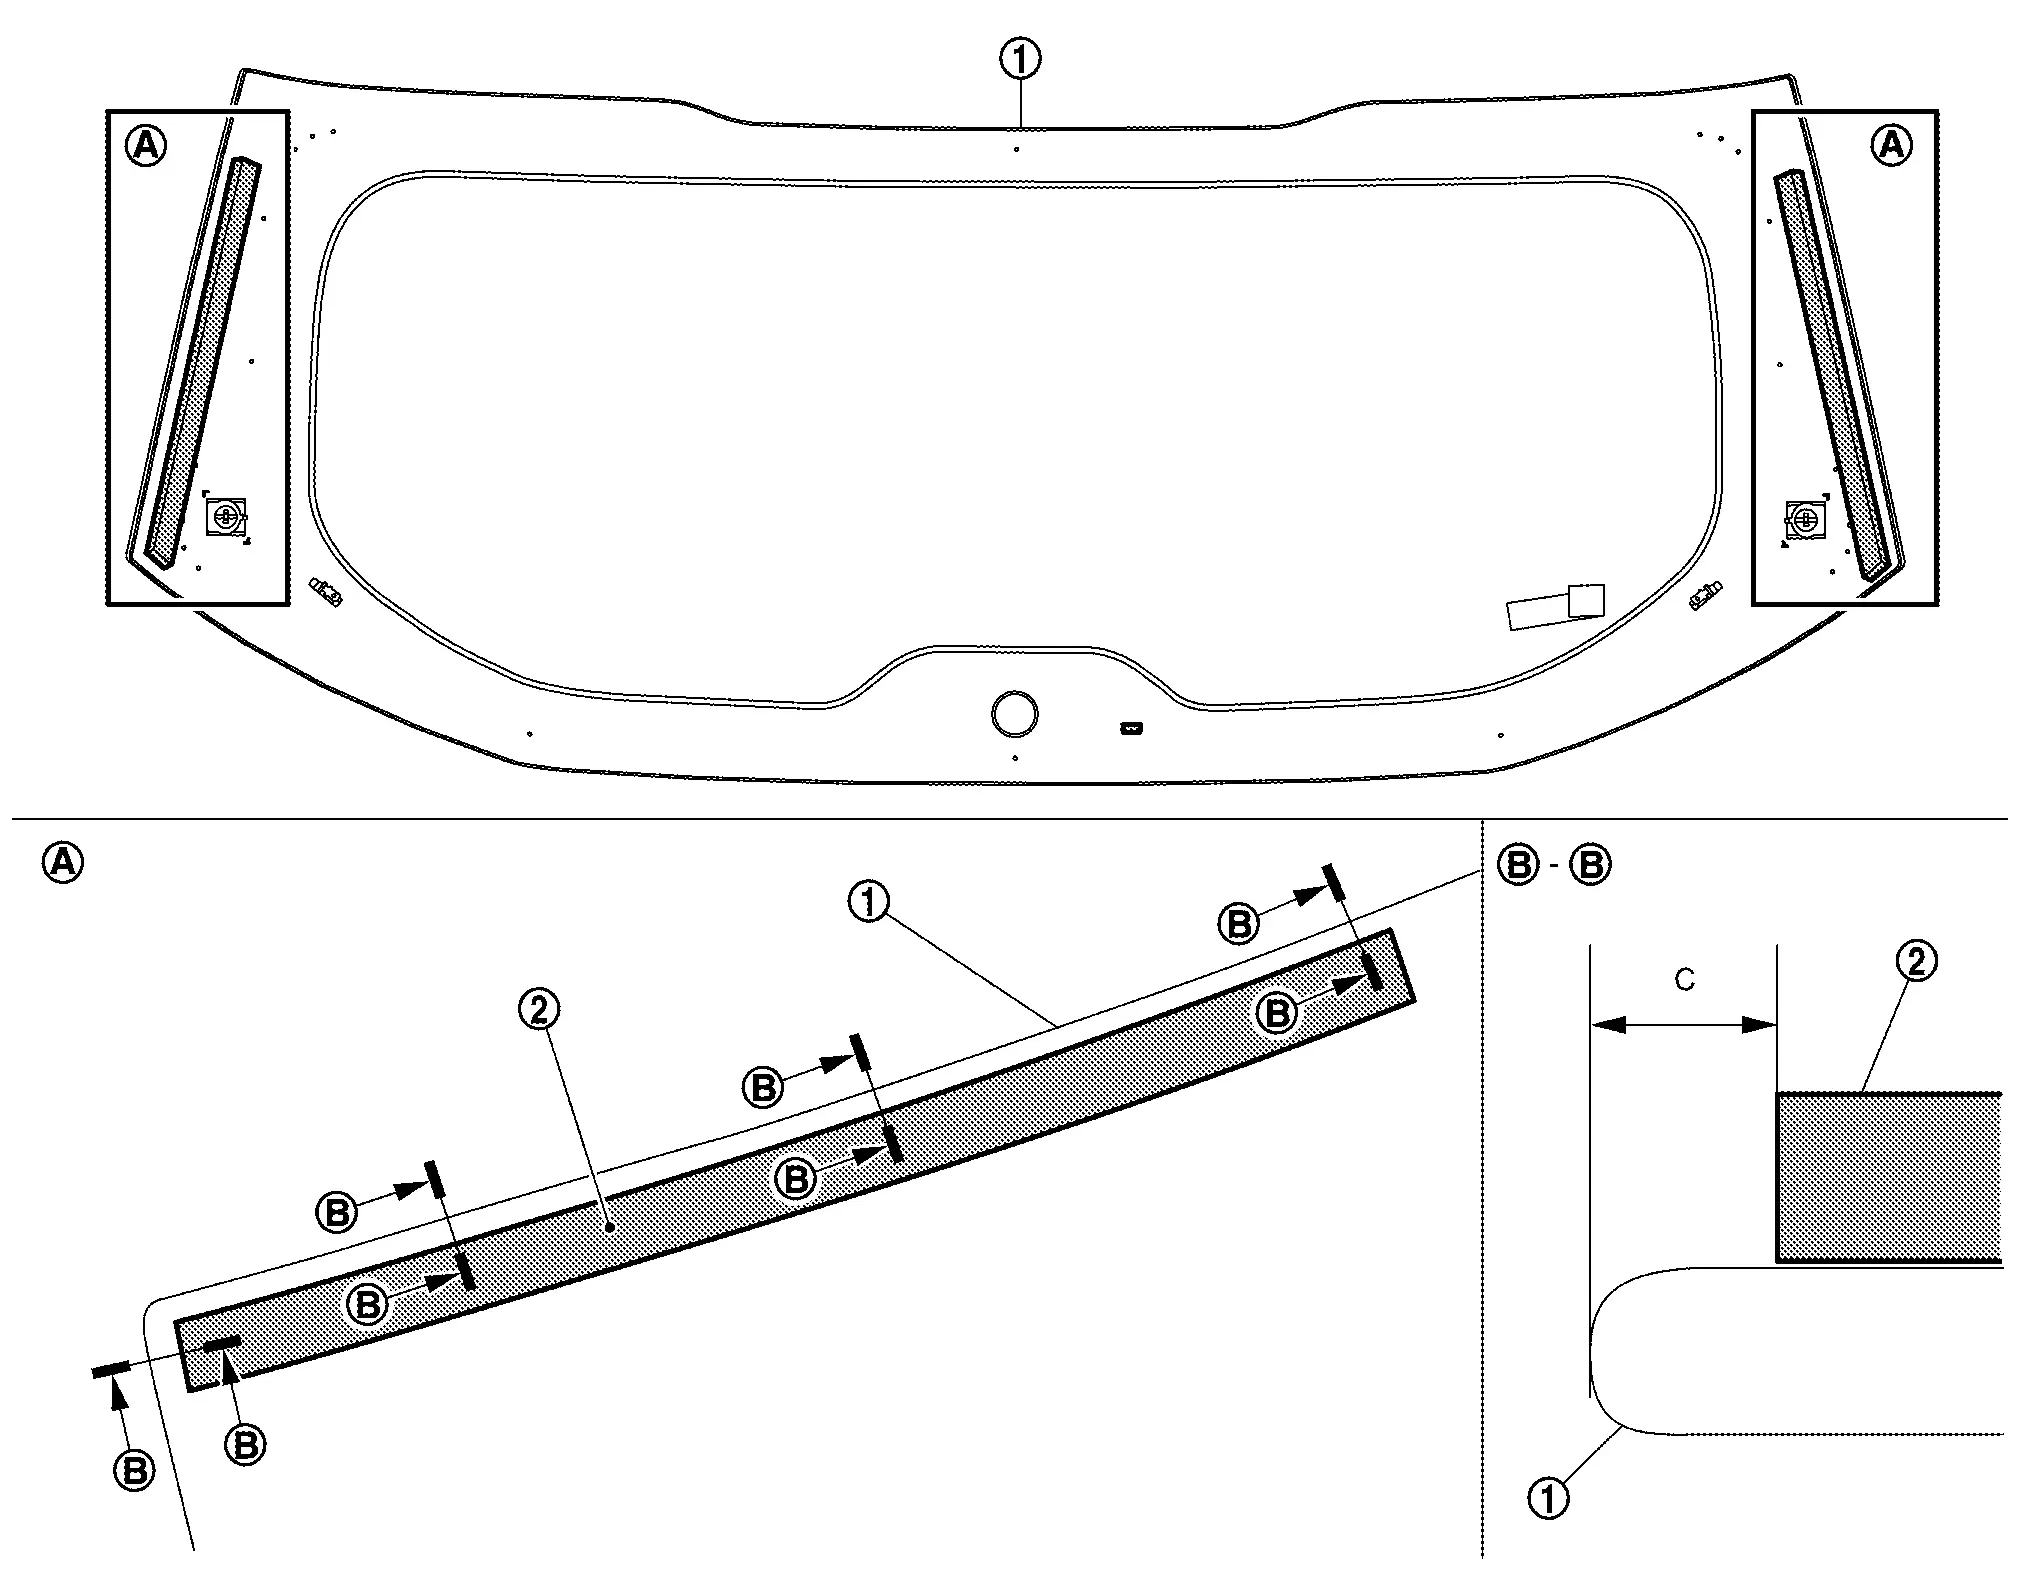
C : 10.0 ±5.0 mm (0.39 ±0.20in) -
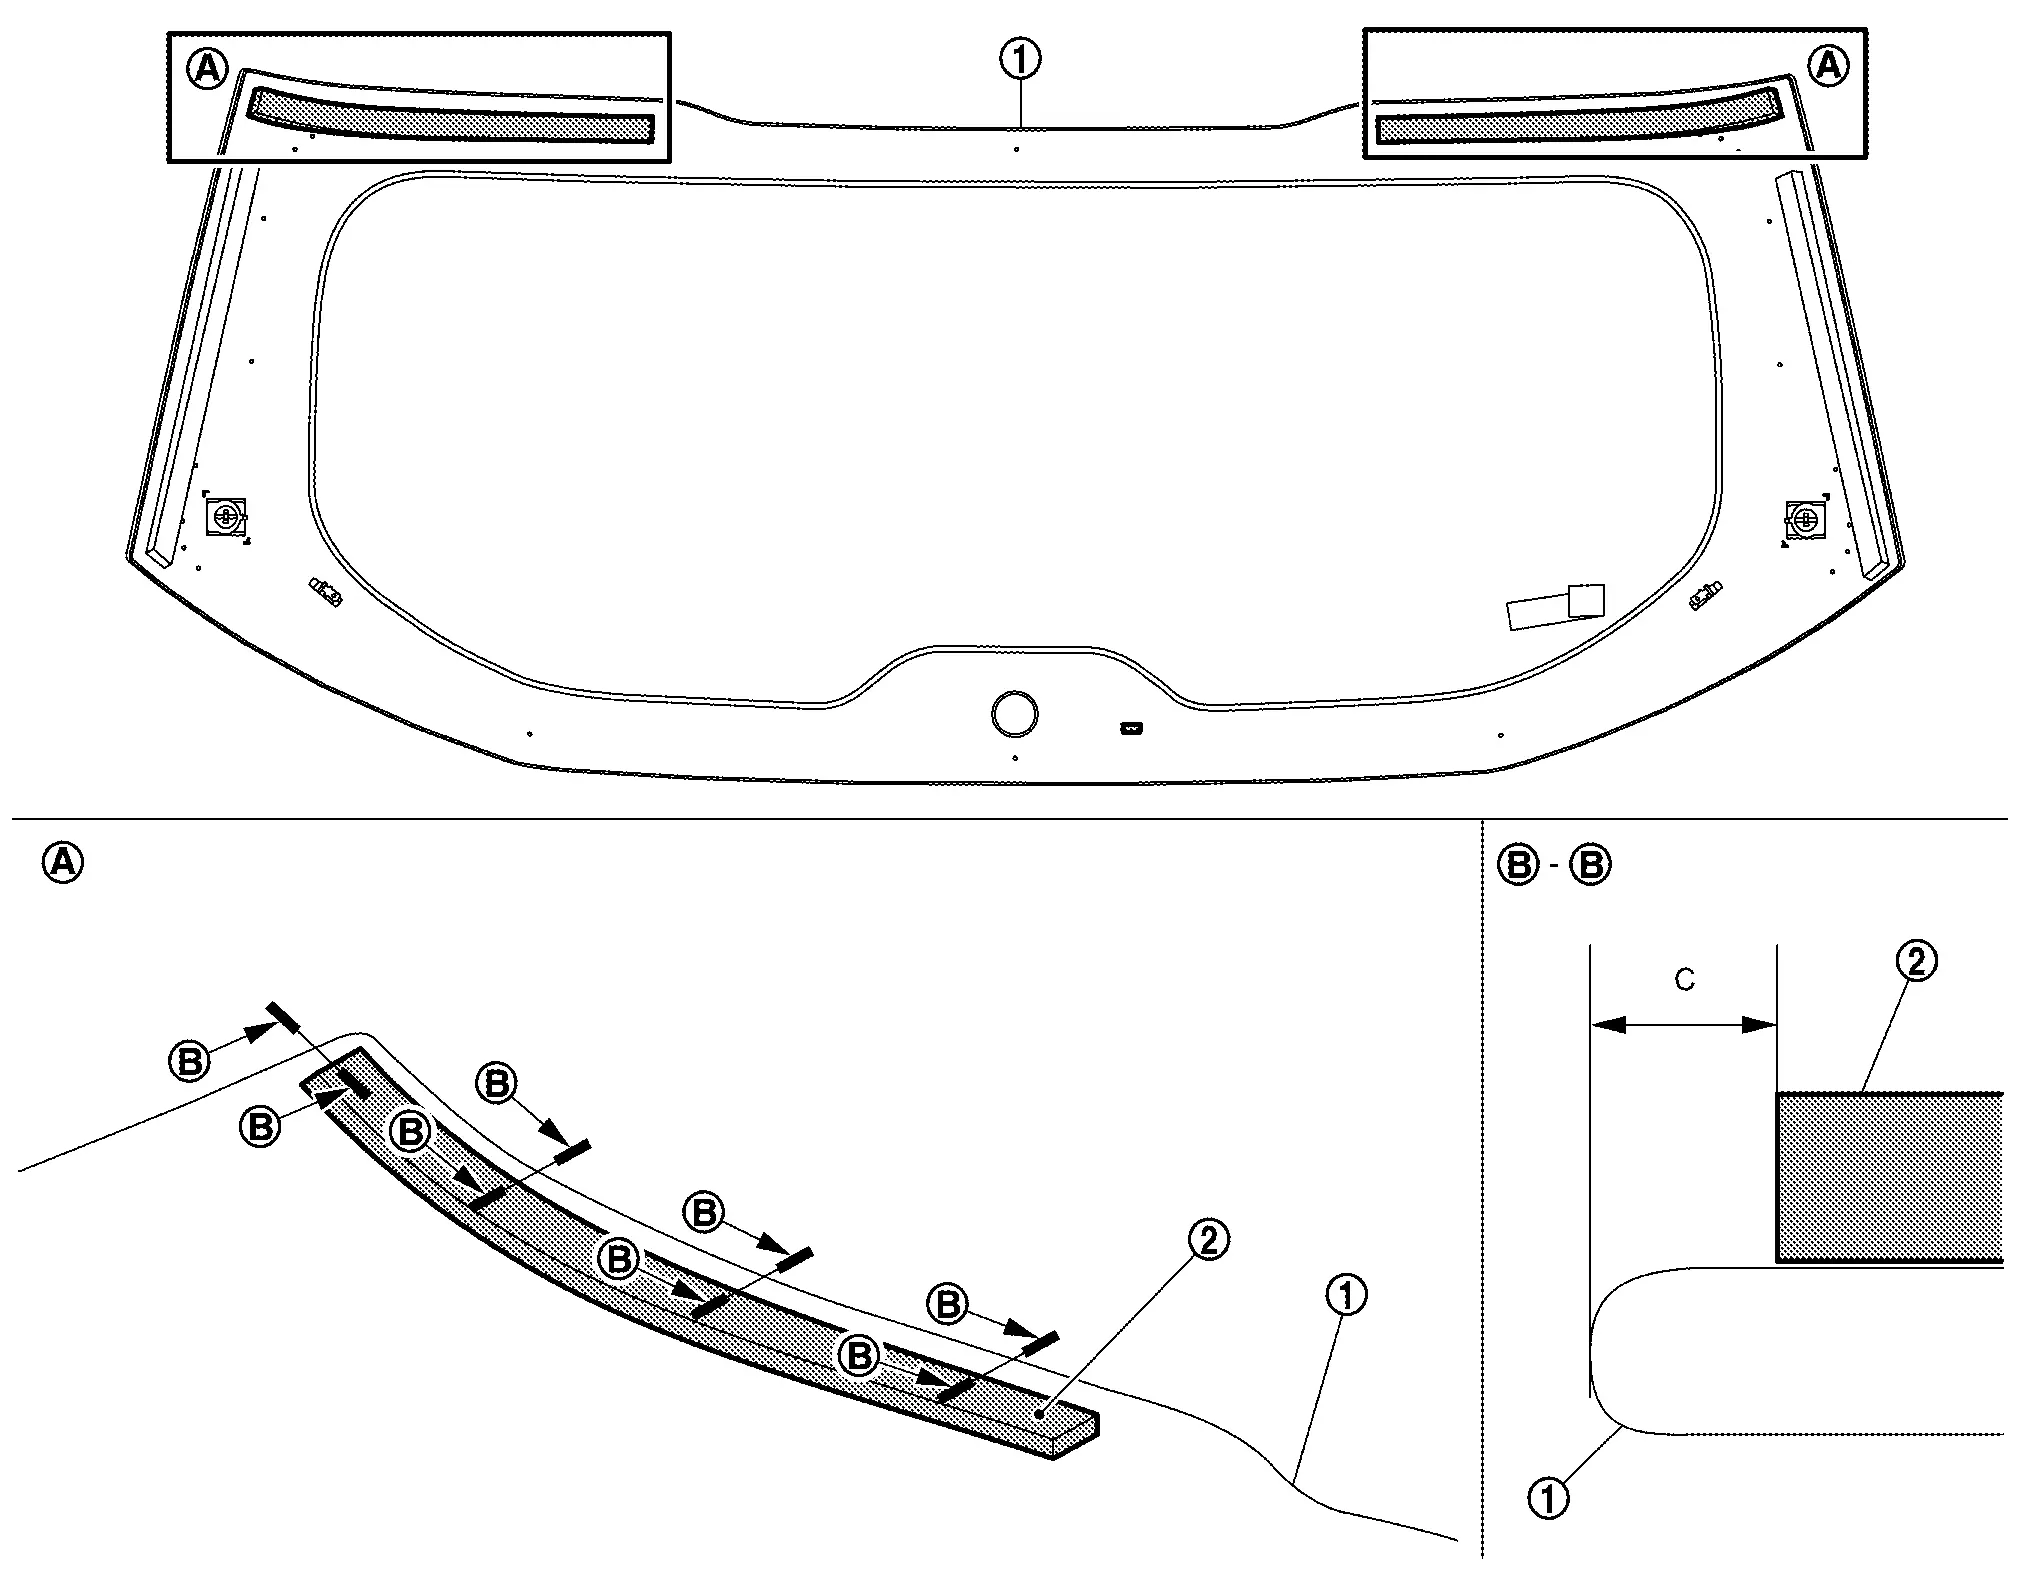
C : 10.0 ±5.0 mm (0.39 ±0.20in)
Apply glass primer along the entire circumference of back door window glass. The range of glass primer, refer to Exploded View.
Apply painted surface primer to the back door outer panel bonding surface. The range of painted surface primer, refer to Exploded View.
Apply adhesive to back door window glass.
-
The start position
of apply adhesive is behind from matching mark as shown in figure.D : 57.2 mm (2.252 in) -
When apply adhesive, the adhesive
center on the connected line of matching marks as shown in figure. -
When finish to applying adhesive
, overlap from starting position to stop position as shown in figure.D : 50 mm (1.97 in)
Install back door window glass to Nissan Ariya vehicle by checking the matching marks on back door outer panel and back door window glass.
CAUTION:
Due to weight of back door window glass, 2 workers are required by all means.
Press entire surface of back door window glass lightly to fit it completely.
Correct any adhesive overflow or shortage using a spatula to make the surface smooth.
CAUTION:
-
Dry the adhesive according to the specification of adhesive kit.
-
After installing back door window glass, keep the all door glass open until the adhesive is completely cured.
-
Never drive the Nissan Ariya vehicle before the adhesive is completely cured.
Remove protective tape.
Install the removed parts.
CAUTION:
-
Adjust the rear wiper arm stop position. Refer to Adjustment.
-
Check the matching with surrounding parts. Adjust if necessary.
Inspection
WATER LEAKAGE INSPECTION
CAUTION:
-
Dry adhesive according to the specification of adhesive kit, do the leaking check when adhesive is stiffen.
-
If leakage was found, start over from the beginning as back door window glass removal, install and leaking check.
Other materials:
U0644 Sent Communication
DTC Description
DTC DETECTION LOGIC DTC No.
CONSULT screen terms
(Trouble diagnosis content) DTC detecting condition
U0644
00
Lost comm with w/g posi sen (b1)
(Lost Communication With Wastegate Position Sensor "A")
Diagnosis condition
Battery voltage: 8 V or more
Igni ...
Additional Service When Replacing Around View Monitor Control Unit
Description
CAUTION:
When replacing the around view monitor control unit, always replace
it with a new one. Intelligent around view monitor system does not
operate properly in case of reuse of the around view monitor control
unit from another Nissan Ariya vehicle.
When before writin ...
How to Use This Manual. How to Read Wiring Diagrams
Connector Symbols
Most of connector symbols in wiring diagrams are shown from the terminal side.
Connector symbols shown from the terminal side are enclosed by a single line and followed by the direction mark.
Connector symbols shown from the harness side are enclosed by a double line and ...