Nissan Rogue (T33) 2021-Present Service Manual: Kr15ddt :: Removal and Installation
A/c Compressor
Exploded View
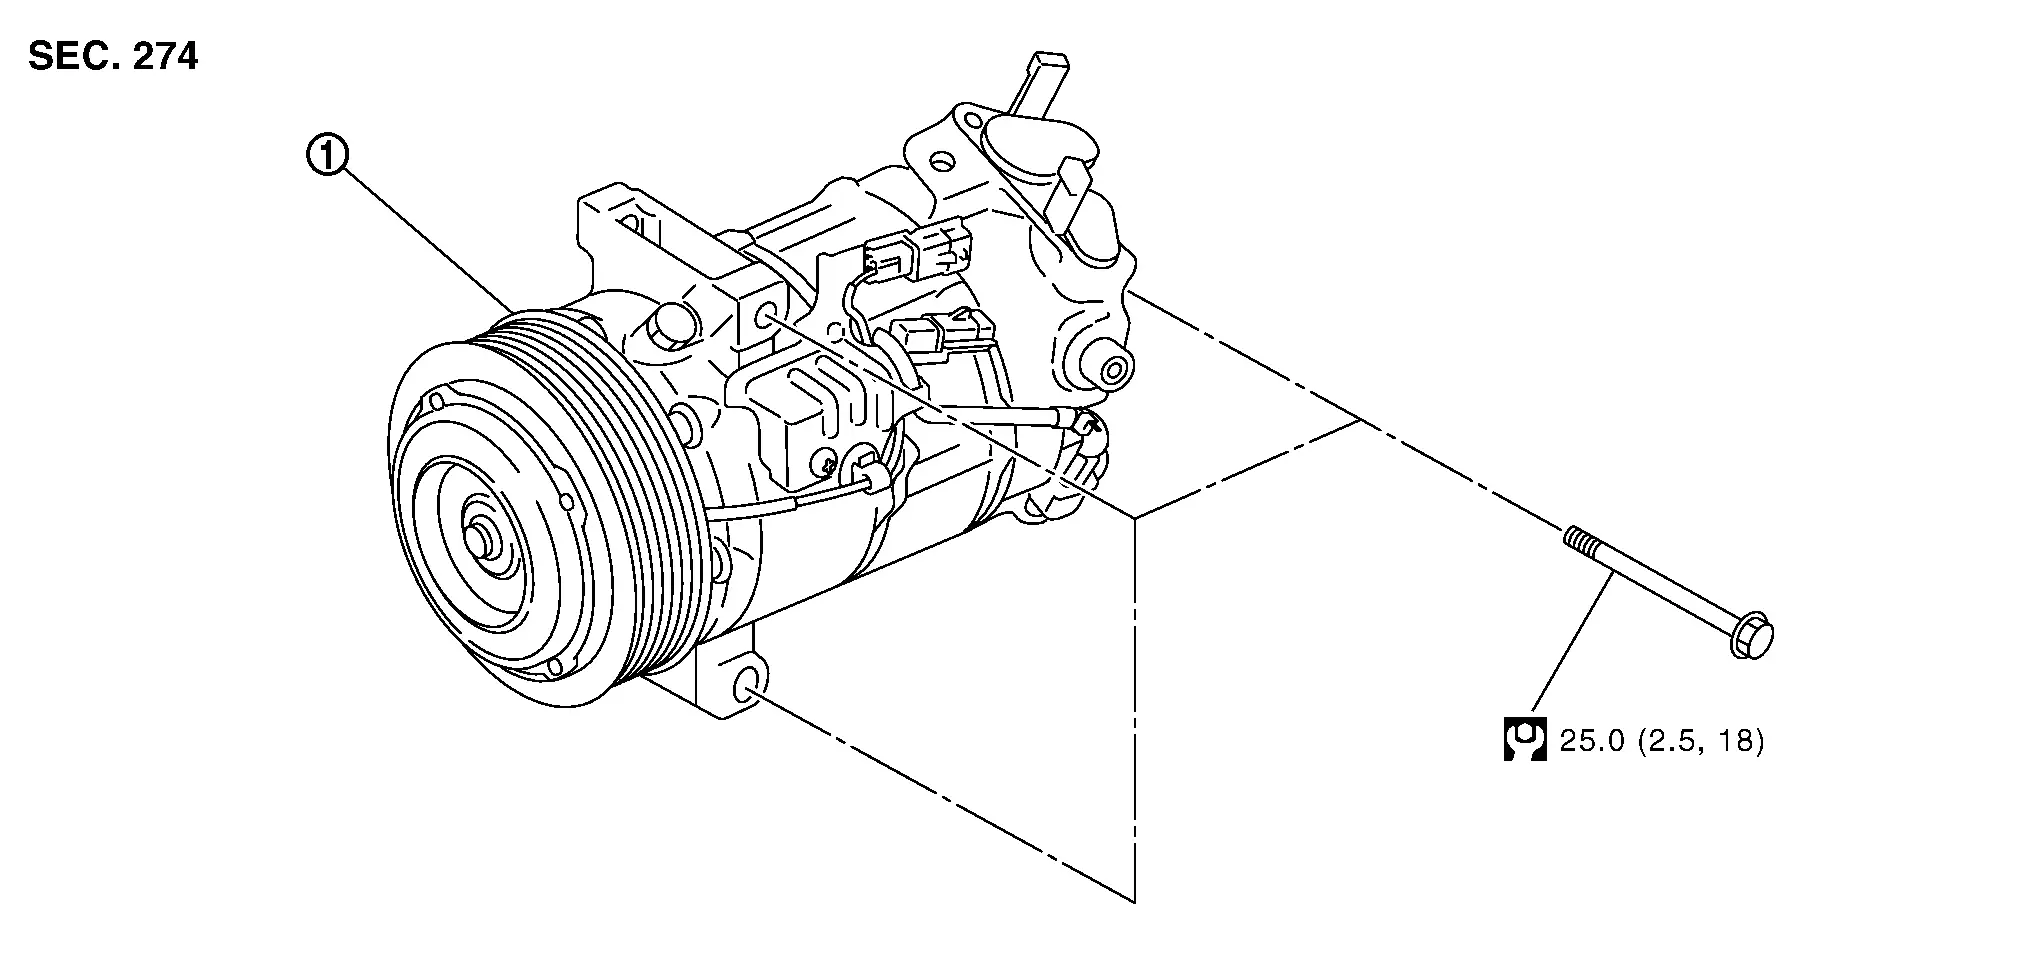
 |
A/C compressor | ||||
 |
: N·m (kg-m, ft-lb) |
Removal and Installation
CAUTION:
Perform lubricant return operation before each refrigeration system disassembly. However, if a large amount of refrigerant or lubricant leak is detected, never perform lubricant return operation. Refer to Perform Lubricant Return Operation.
REMOVAL
Use a refrigerant collecting equipment (for HFO-1234yf) to discharge the refrigerant. Refer to Recycle Refrigerant.
Remove engine under cover. Refer to Removal and Installation.
Remove drive belt. Refer to Removal and Installation.
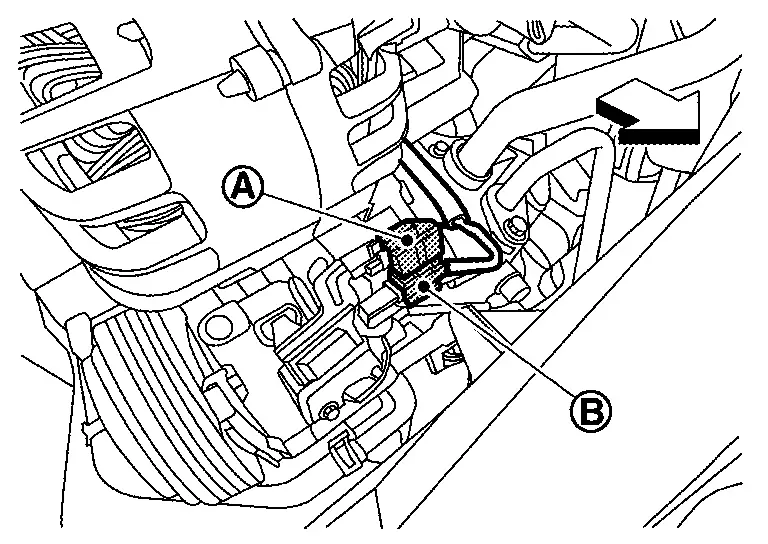
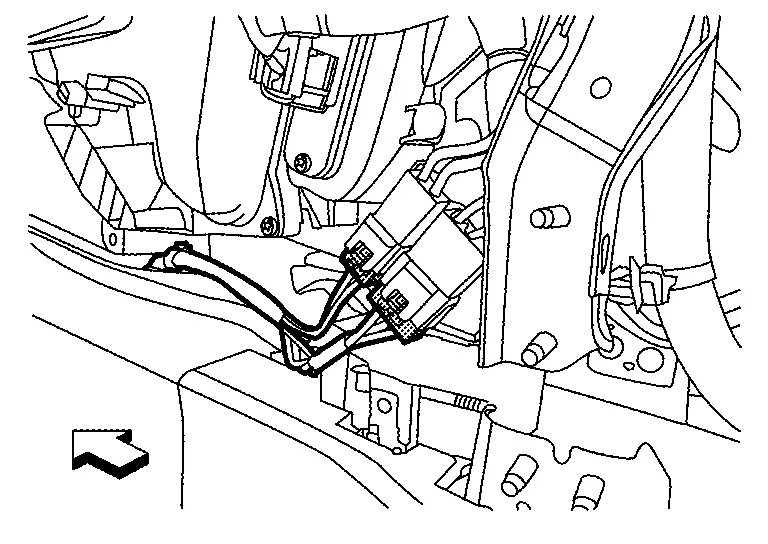
Disconnect harness connectors (A) and (B) from A/C compressor.
| : Nissan Ariya Vehicle front |
Disconnect low-pressure flexible hose from A/C compressor. Refer to Removal and Installation.
Disconnect high-pressure flexible hose from A/C compressor. Refer to Removal and Installation.
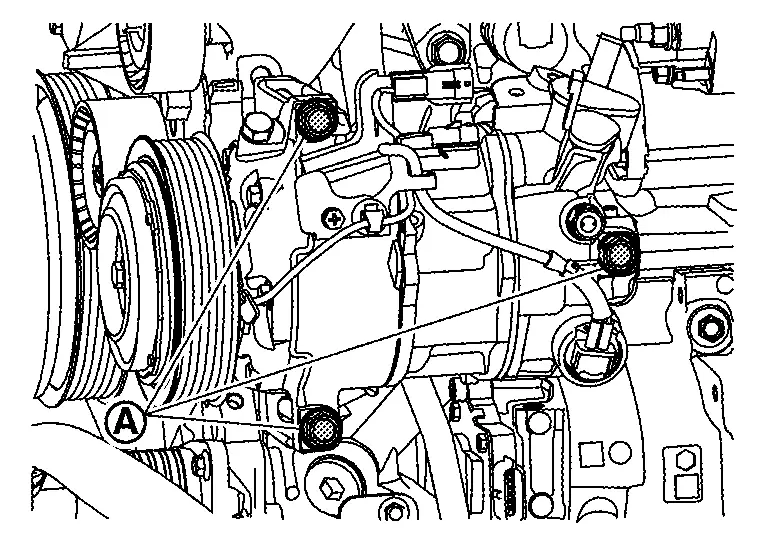
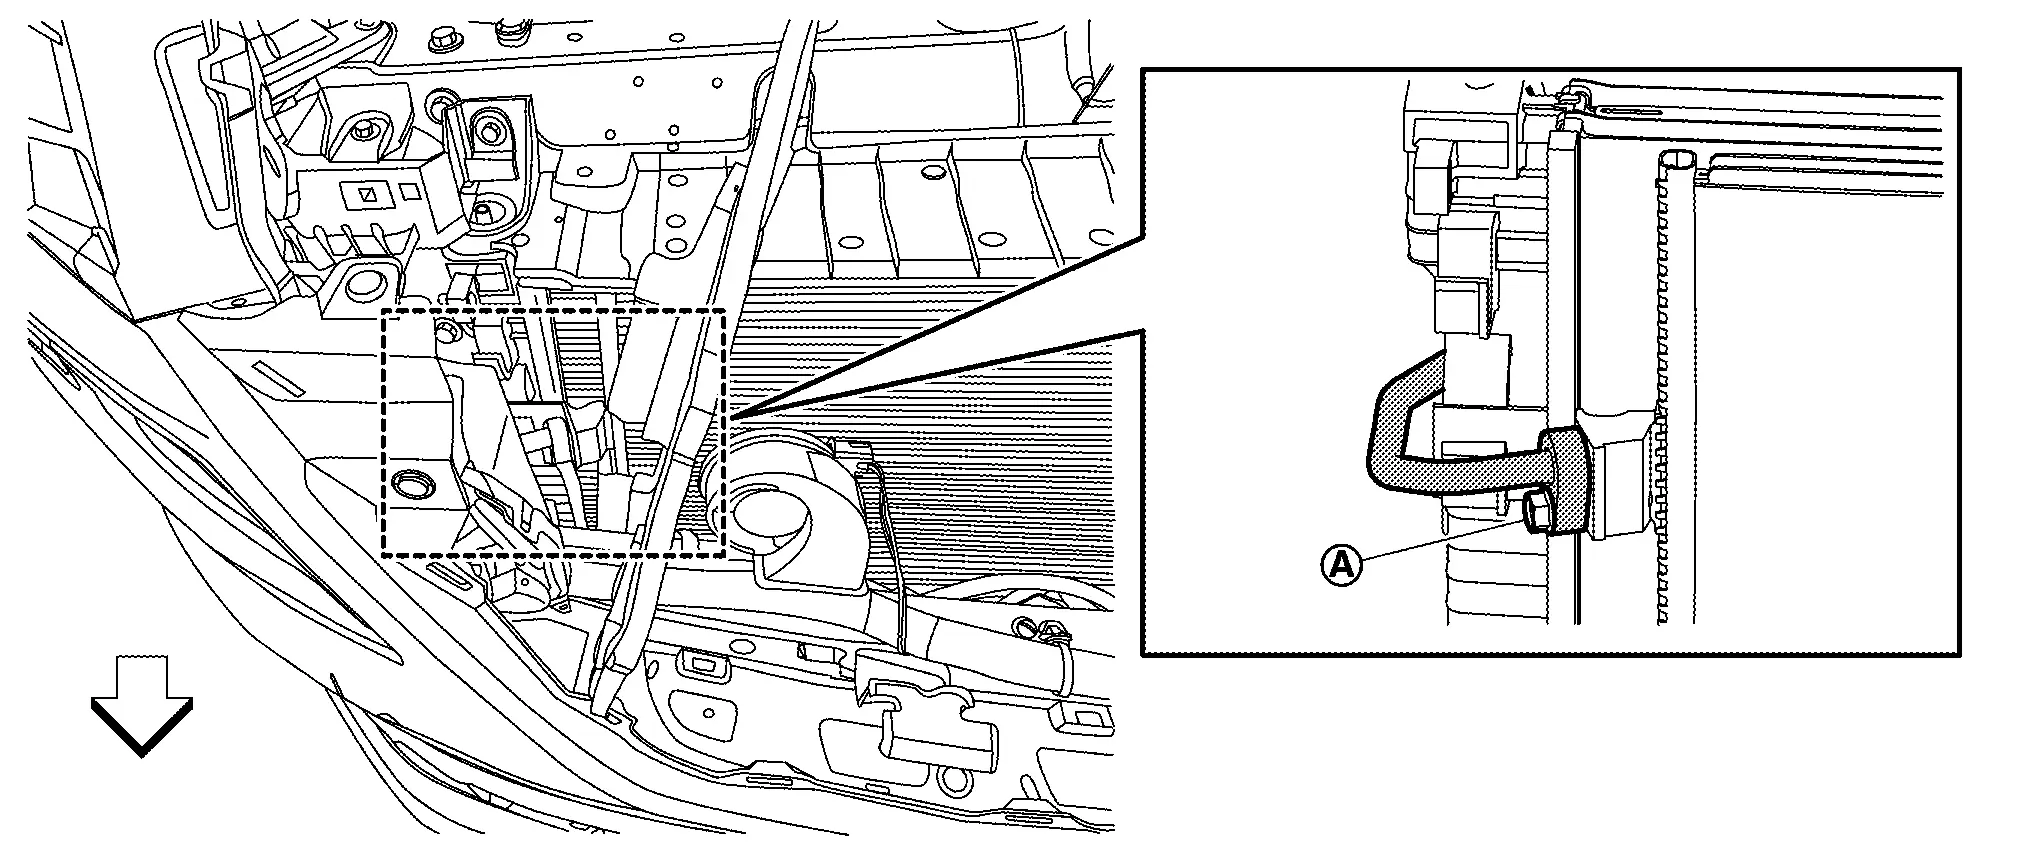
Remove mounting bolts (A), and then remove A/C compressor.
INSTALLATION
Note the following items, and then install in the reverse order of removal.
CAUTION:
-
Perform compressor lubricant adjusting procedure before installing new compressor. Refer to Lubricant Adjusting Procedure for A/C compressor Replacement.
-
Check for leakages when recharging refrigerant. Refer to Leak Test.
-
Check tension of the drive belt after installing A/C compressor. Refer to Inspection.
-
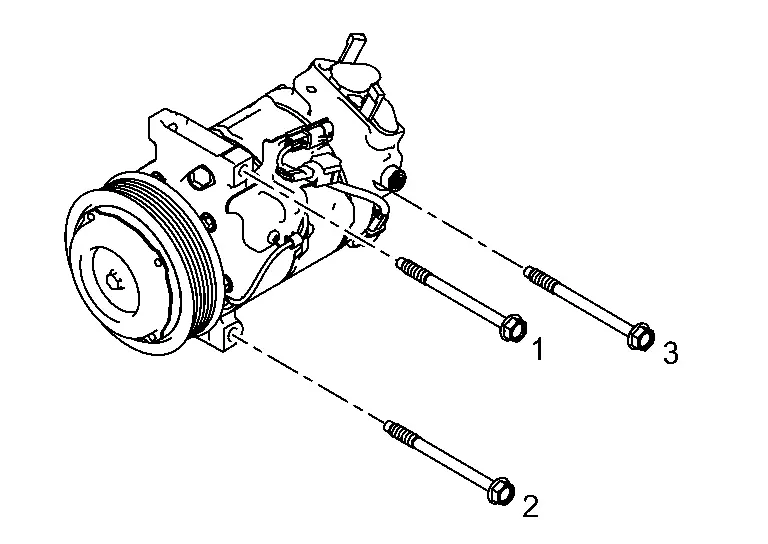
For A/C compressor installed, temporarily tighten bolts according to numerical order 1→3, and then tighten bolts to specified torque.
Cooler Pipe and Hose
Exploded View
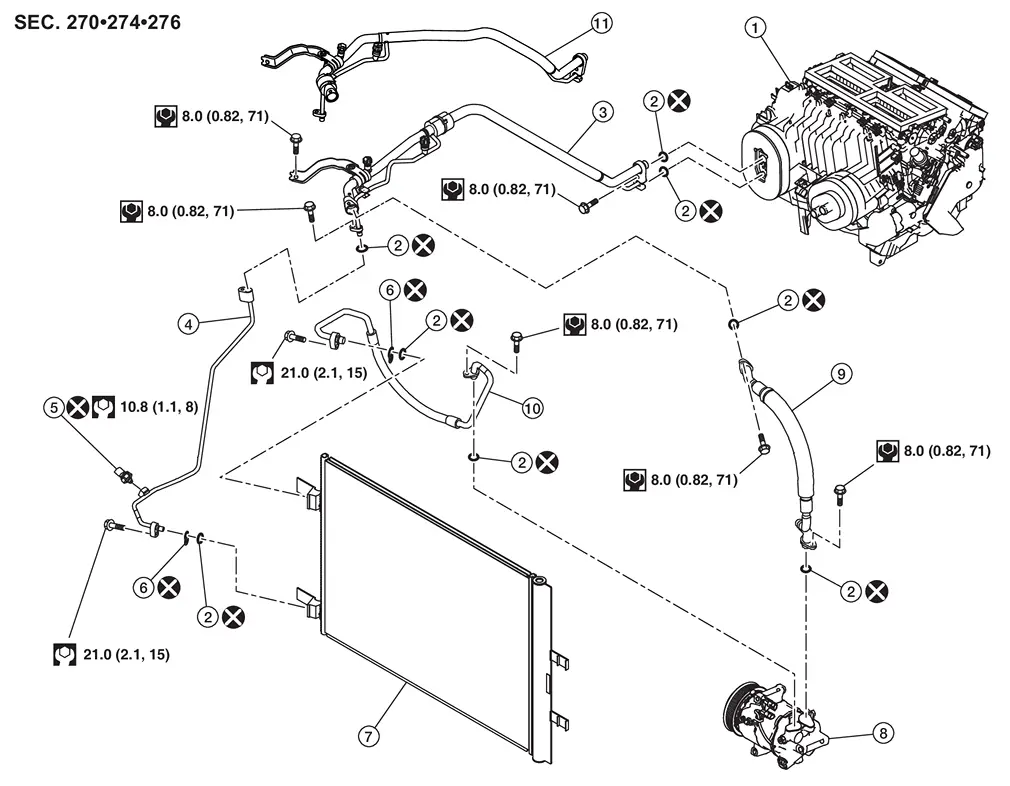
|
Heater & cooling unit assembly |  |
O-ring |  |
Internal heat exchanger pipe (USA production) |
 |
High-pressure pipe |  |
Refrigerant pressure sensor |  |
Washer seal |
 |
Condenser & liquid tank assembly |  |
A/C compressor |  |
Low-pressure flexible hose |
 |
High-pressure flexible hose |  |
Internal heat exchanger pipe (Japan production) | ||
 |
: Always replace after every disassembly. | ||||
 |
: N·m (kg-m, in-lb) | ||||
|
: N·m (kg-m, ft-lb) | ||||
Low-Pressure Flexible Hose
Removal and Installation
CAUTION:
Perform lubricant return operation before each refrigeration system disassembly. However, if a large amount of refrigerant or lubricant leak is detected, never perform lubricant return operation. Refer to Perform Lubricant Return Operation.
REMOVAL
Use a refrigerant collecting equipment (for HFO-1234yf) to discharge the refrigerant. Refer to Recycle Refrigerant.
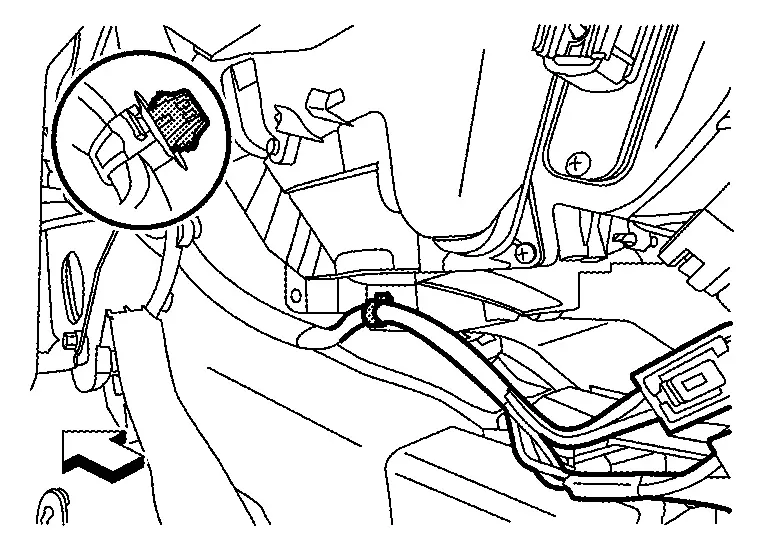
Remove mounting bolt  , and then disconnect low-pressure flexible hose from internal heat exchanger pipe.
CAUTION:
Cap or wrap the joint of the A/C piping with suitable material such as vinyl tape to avoid the entry of air.
| : Nissan Ariya Vehicle front |
Remove engine under cover. Refer to Removal and Installation.
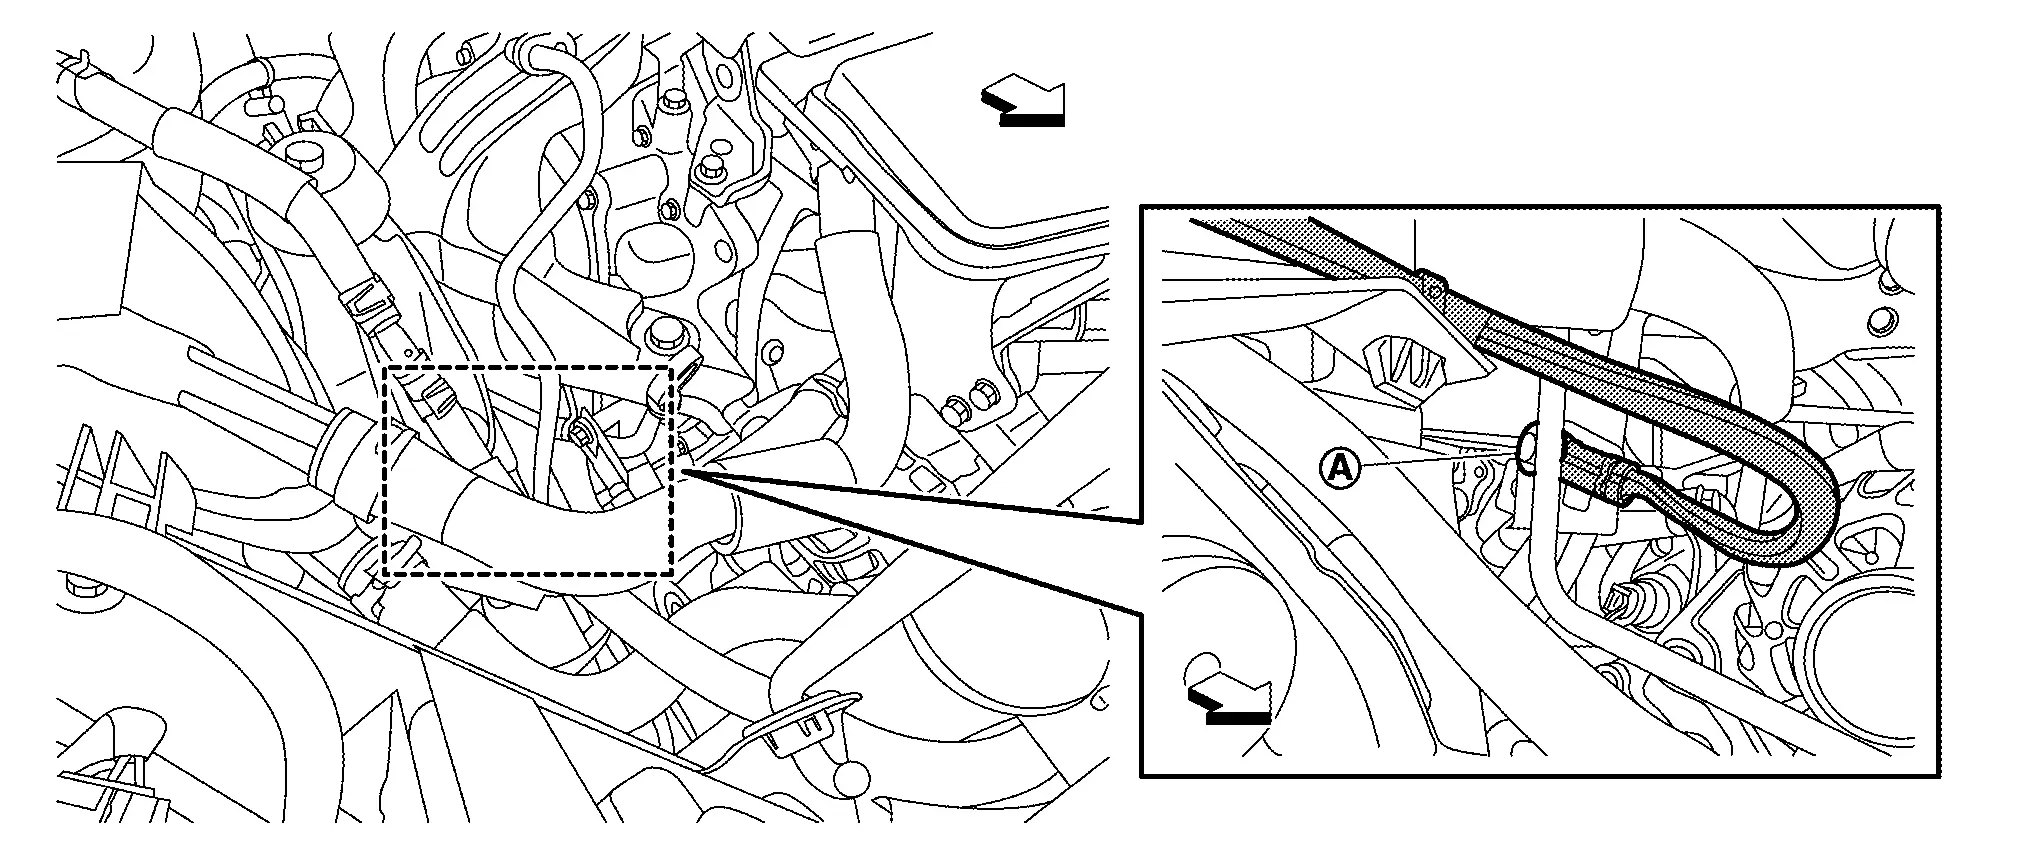
Remove mounting bolt , and then remove low-pressure flexible hose from A/C compressor.
CAUTION:
Cap or wrap the joint of the A/C piping and A/C compressor with suitable material such as vinyl tape to avoid the entry of air.
| : Nissan Ariya Vehicle front |
Remove low-pressure flexible hose from vehicle.
INSTALLATION
Note the following items, and then install in the reverse order of removal.
CAUTION:
-
Replace O-rings with new ones. Then apply A/C compressor oil to them when installing.
-
Check for leakages when recharging refrigerant. Refer to Leak Test.
High-Pressure Flexible Hose
Removal and Installation
CAUTION:
Perform lubricant return operation before each refrigeration system disassembly. However, if a large amount of refrigerant or lubricant leak is detected, never perform lubricant return operation. Refer to Perform Lubricant Return Operation.
REMOVAL
Use a refrigerant collecting equipment (for HFO-1234yf) to discharge the refrigerant. Refer to Recycle Refrigerant.
Remove engine under cover. Refer to Removal and Installation.
Remove mounting bolt , and then disconnect high-pressure flexible hose from A/C compressor.
CAUTION:
Cap or wrap the joint of the A/C piping and A/C compressor with suitable material such as vinyl tape to avoid the entry of air.
| : Nissan Ariya Vehicle front |
Remove front grille. Refer to Removal and Installation.
Remove upper side fixing clip of radiator air guide RH, and then move radiator air guide RH to secure work space. Refer to Exploded View.
Remove mounting bolt , and then disconnect high-pressure flexible hose from condenser &liquid tank assembly.
CAUTION:
Cap or wrap the joint of the A/C piping and condenser & liquid tank assembly with suitable material such as vinyl tape to avoid the entry of air.
| : Nissan Ariya Vehicle front |
Remove high-pressure flexible hose from vehicle under side.
INSTALLATION
Note the following items, and then install in the reverse order of removal.
CAUTION:
-
Replace O-rings and washer seal with new ones. Then apply A/C compressor oil to them when installing.
-
Check for leakages when recharging refrigerant. Refer to Leak Test.
High-Pressure Pipe
Removal and Installation
CAUTION:
Perform lubricant return operation before each refrigeration system disassembly. However, if a large amount of refrigerant or lubricant leak is detected, never perform lubricant return operation. Refer to Perform Lubricant Return Operation.
REMOVAL
Use a refrigerant collecting equipment (for HFO-1234yf) to discharge the refrigerant. Refer to Recycle Refrigerant.
Remove engine under cover and engine under cover front. Refer to Removal and Installation.
Drain charge air cooler coolant from sub radiator. Refer to Draining.
Remove front side of front fender protector RH, and then move front fender protector RH to secure work space. Refer to Exploded View.
Remove internal heat exchanger pipe. Refer to Removal and Installation.
Disconnect reservoir tank hose 1 and reservoir tank hose 2 from reservoir tank. Refer to Exploded View.
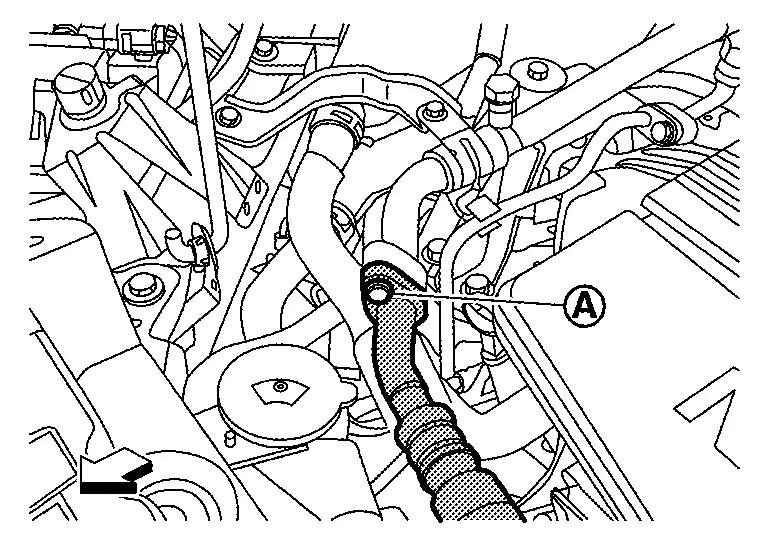
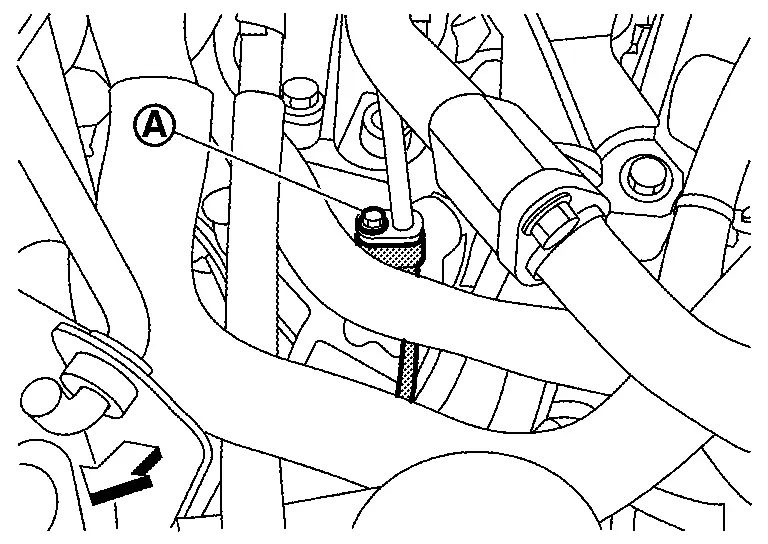
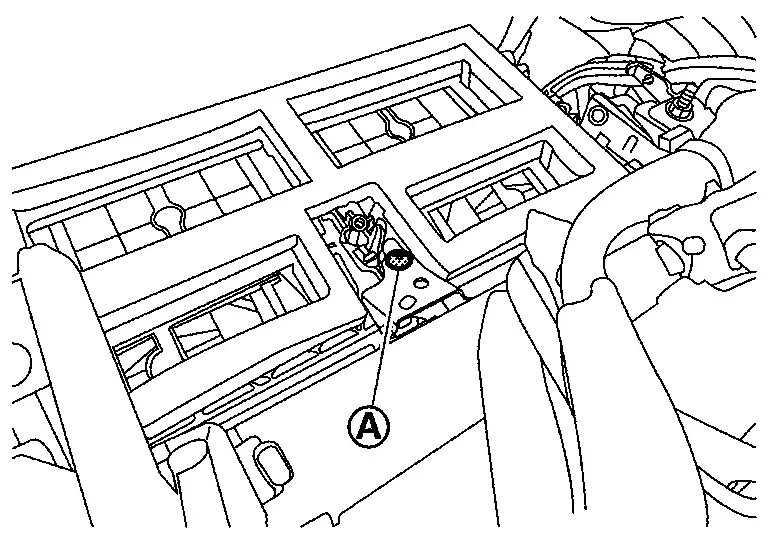
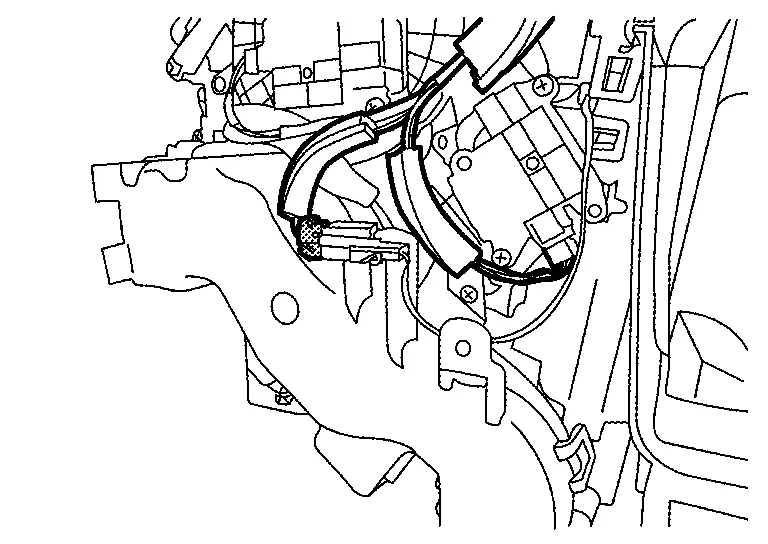
Remove mounting bolt (A), and then remove ground wire.
| : Nissan Ariya Vehicle front |
Disconnect refrigerant pressure sensor connector (A).
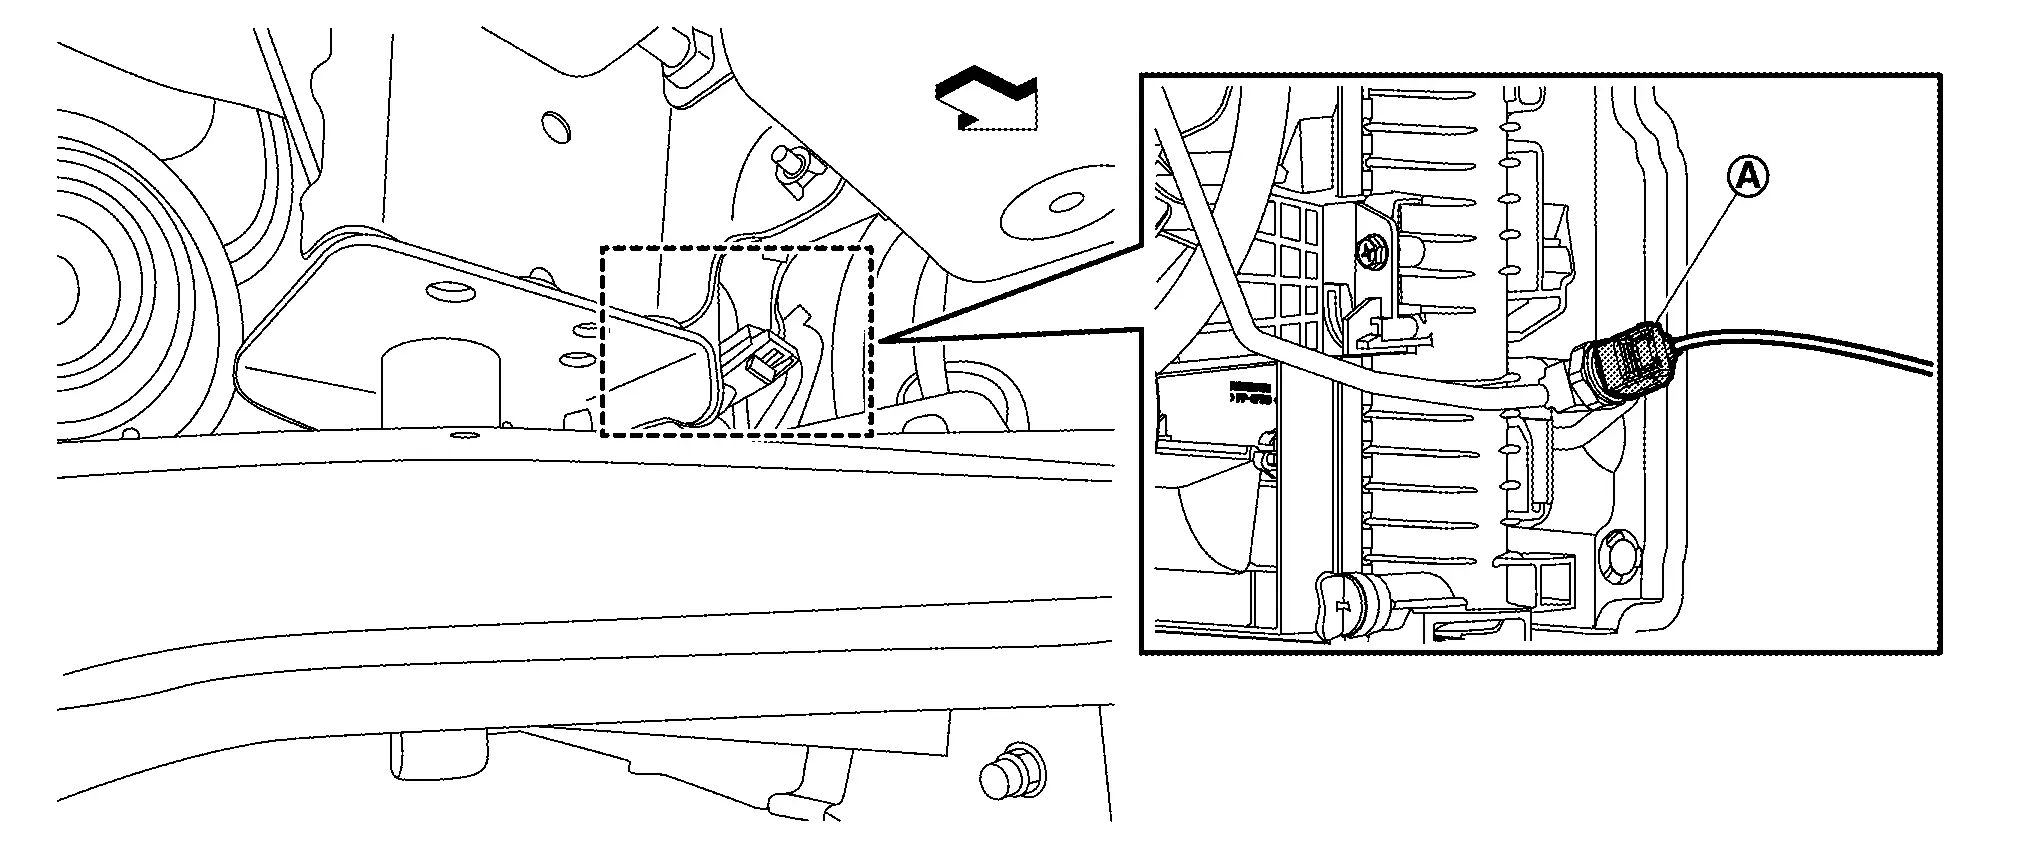
| : Nissan Ariya Vehicle front |
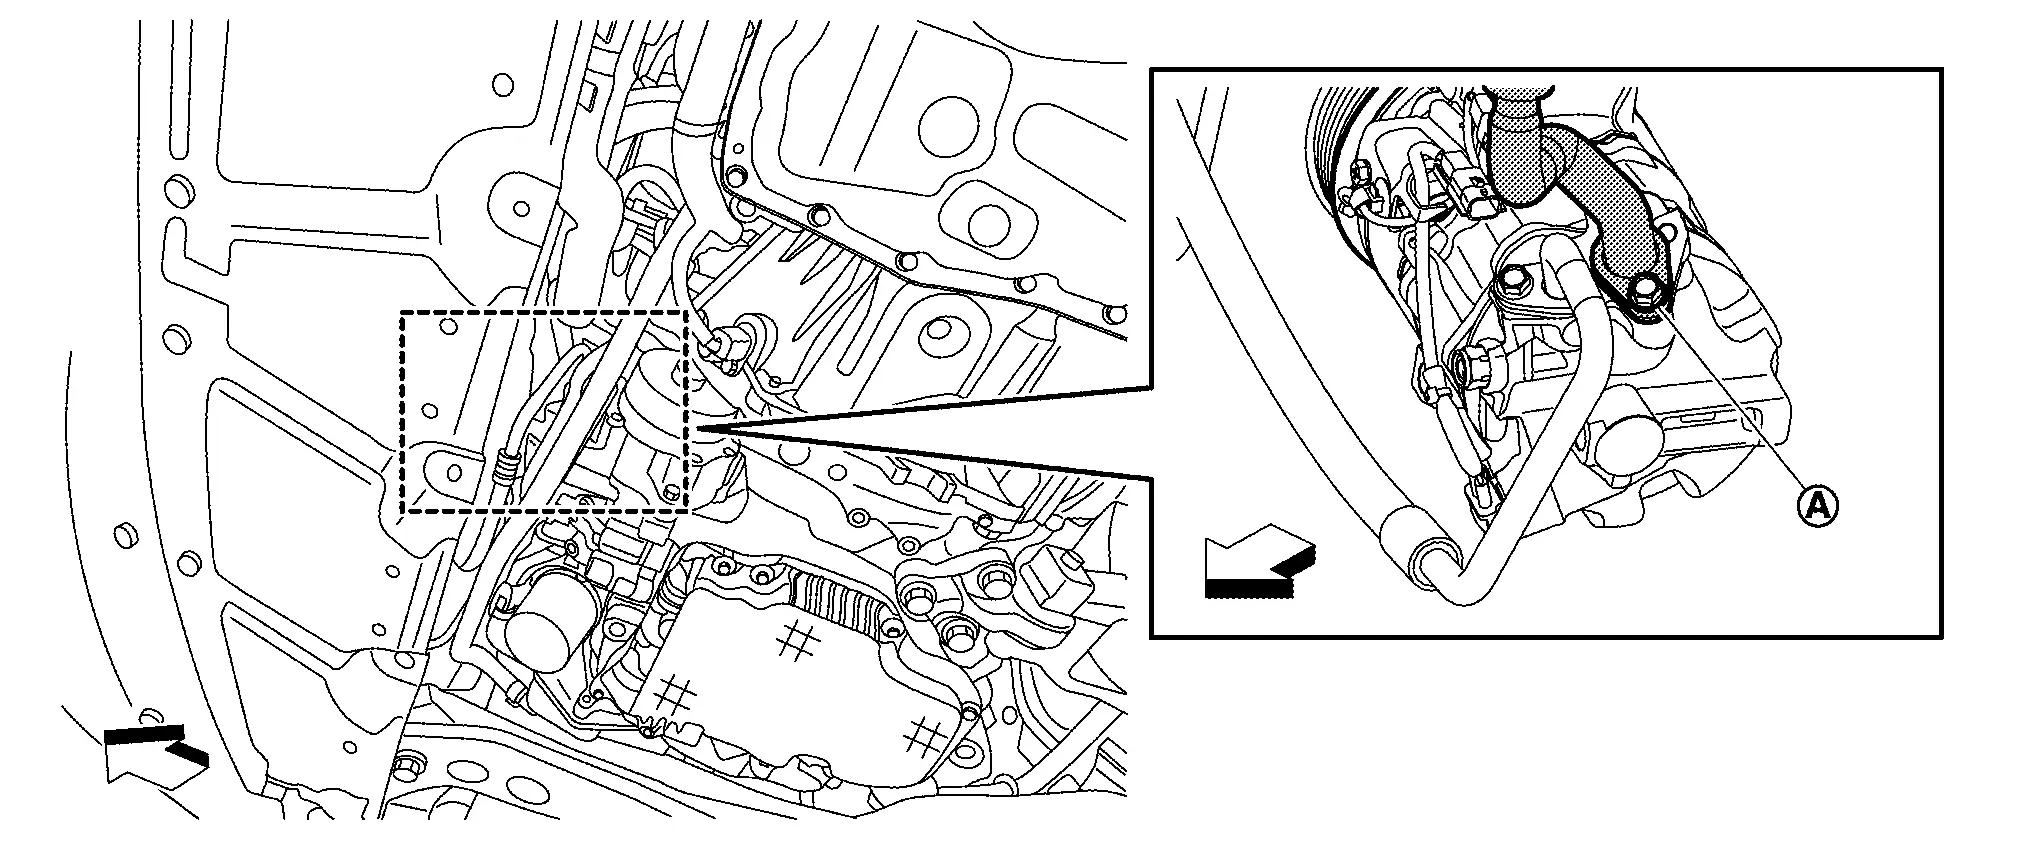
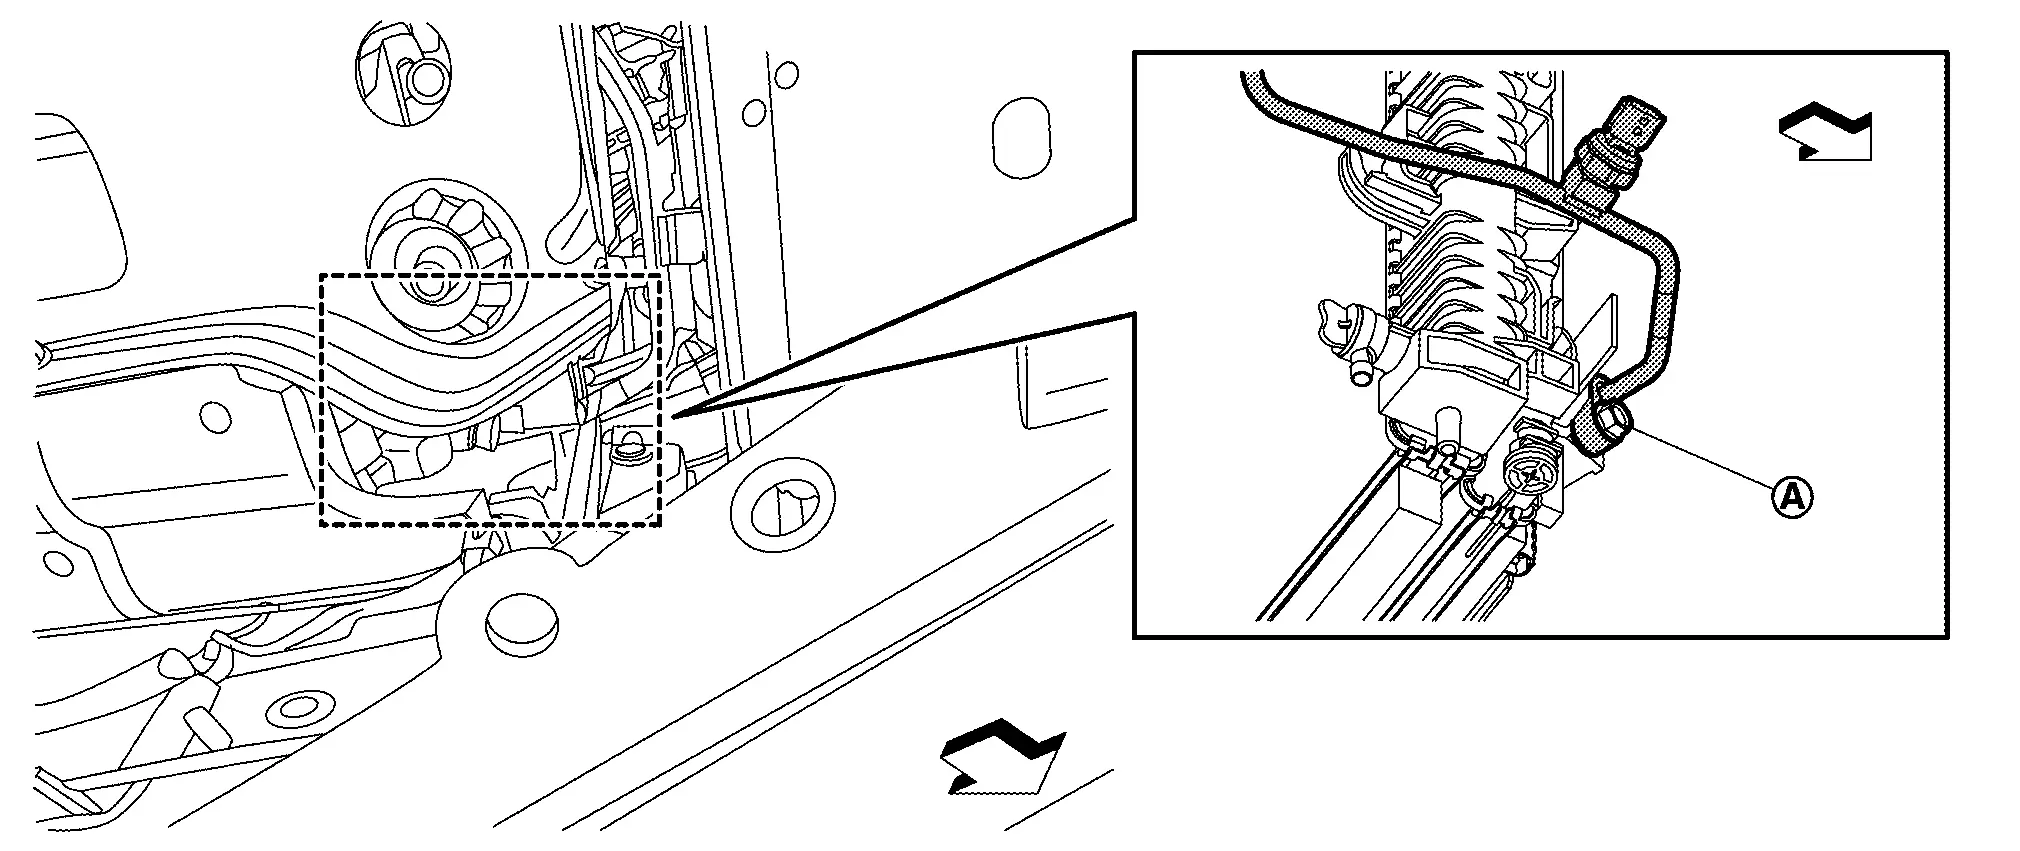
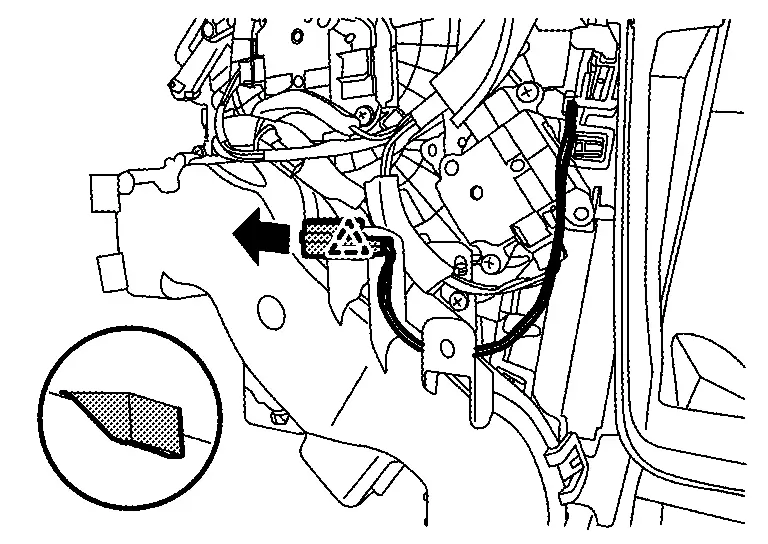
Remove mounting bolt (A), and then disconnect high-pressure pipe from condenser & liquid tank assembly.
CAUTION:
Cap or wrap the joint of the A/C piping and condenser & liquid tank assembly with suitable material such as vinyl tape to avoid the entry of air.
| : Nissan Ariya Vehicle front |
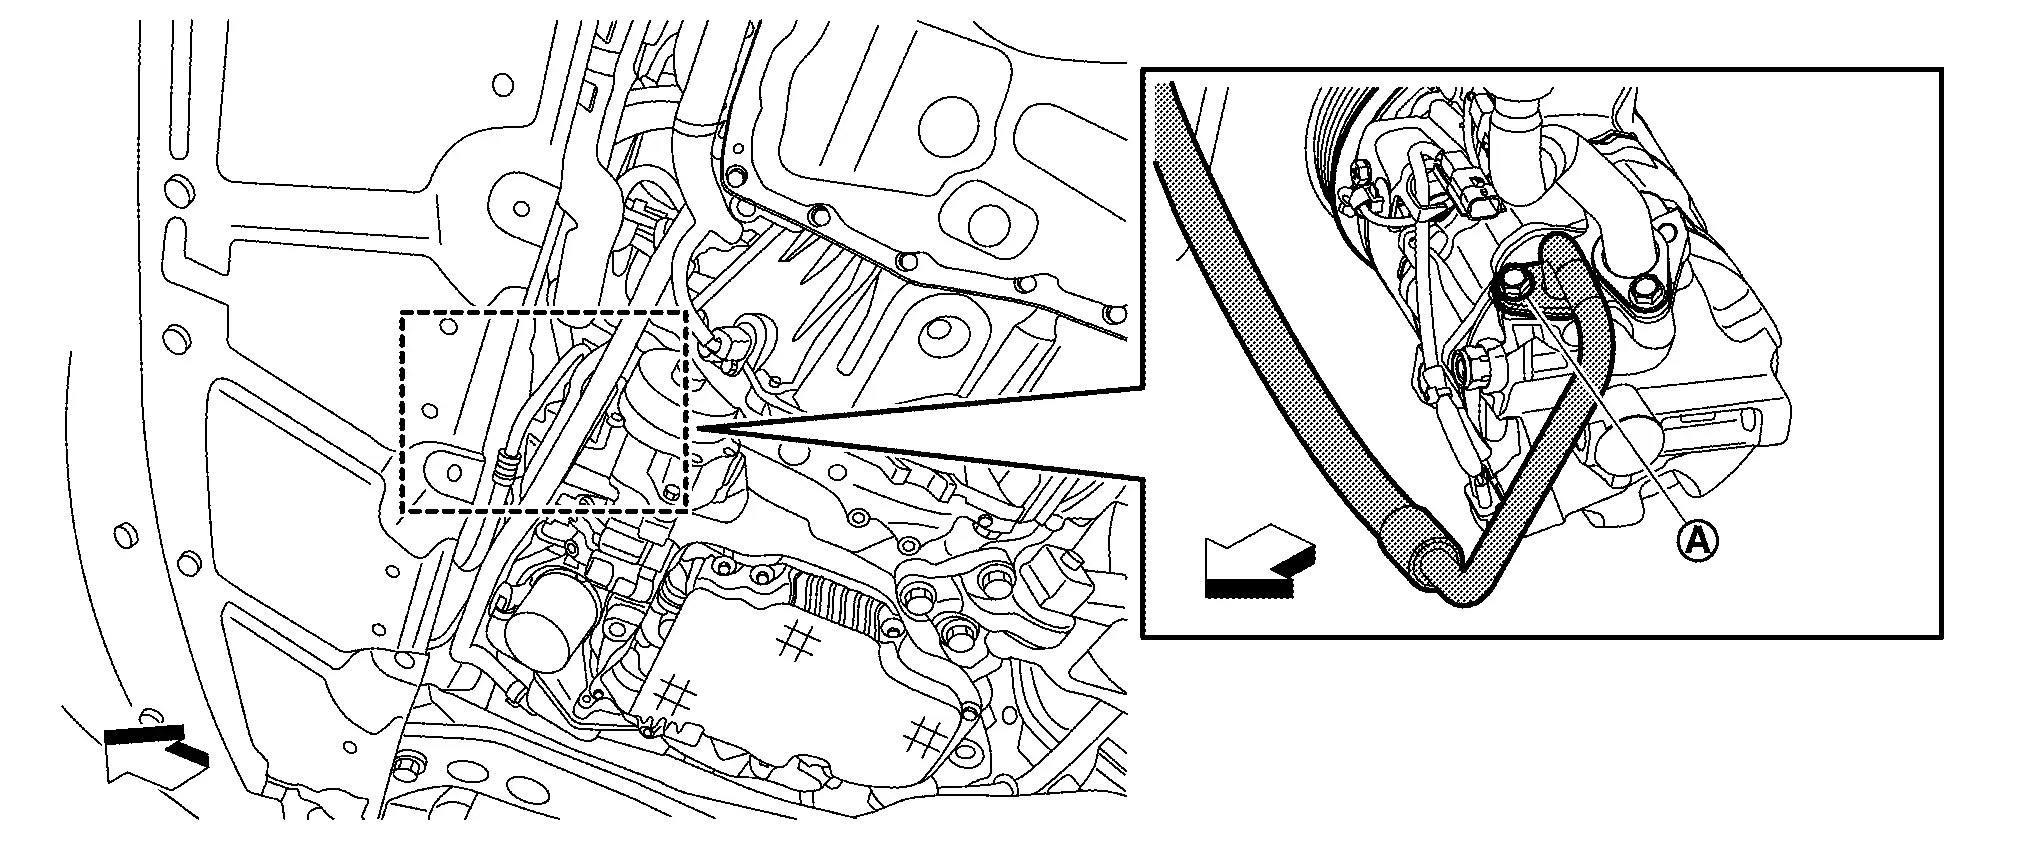
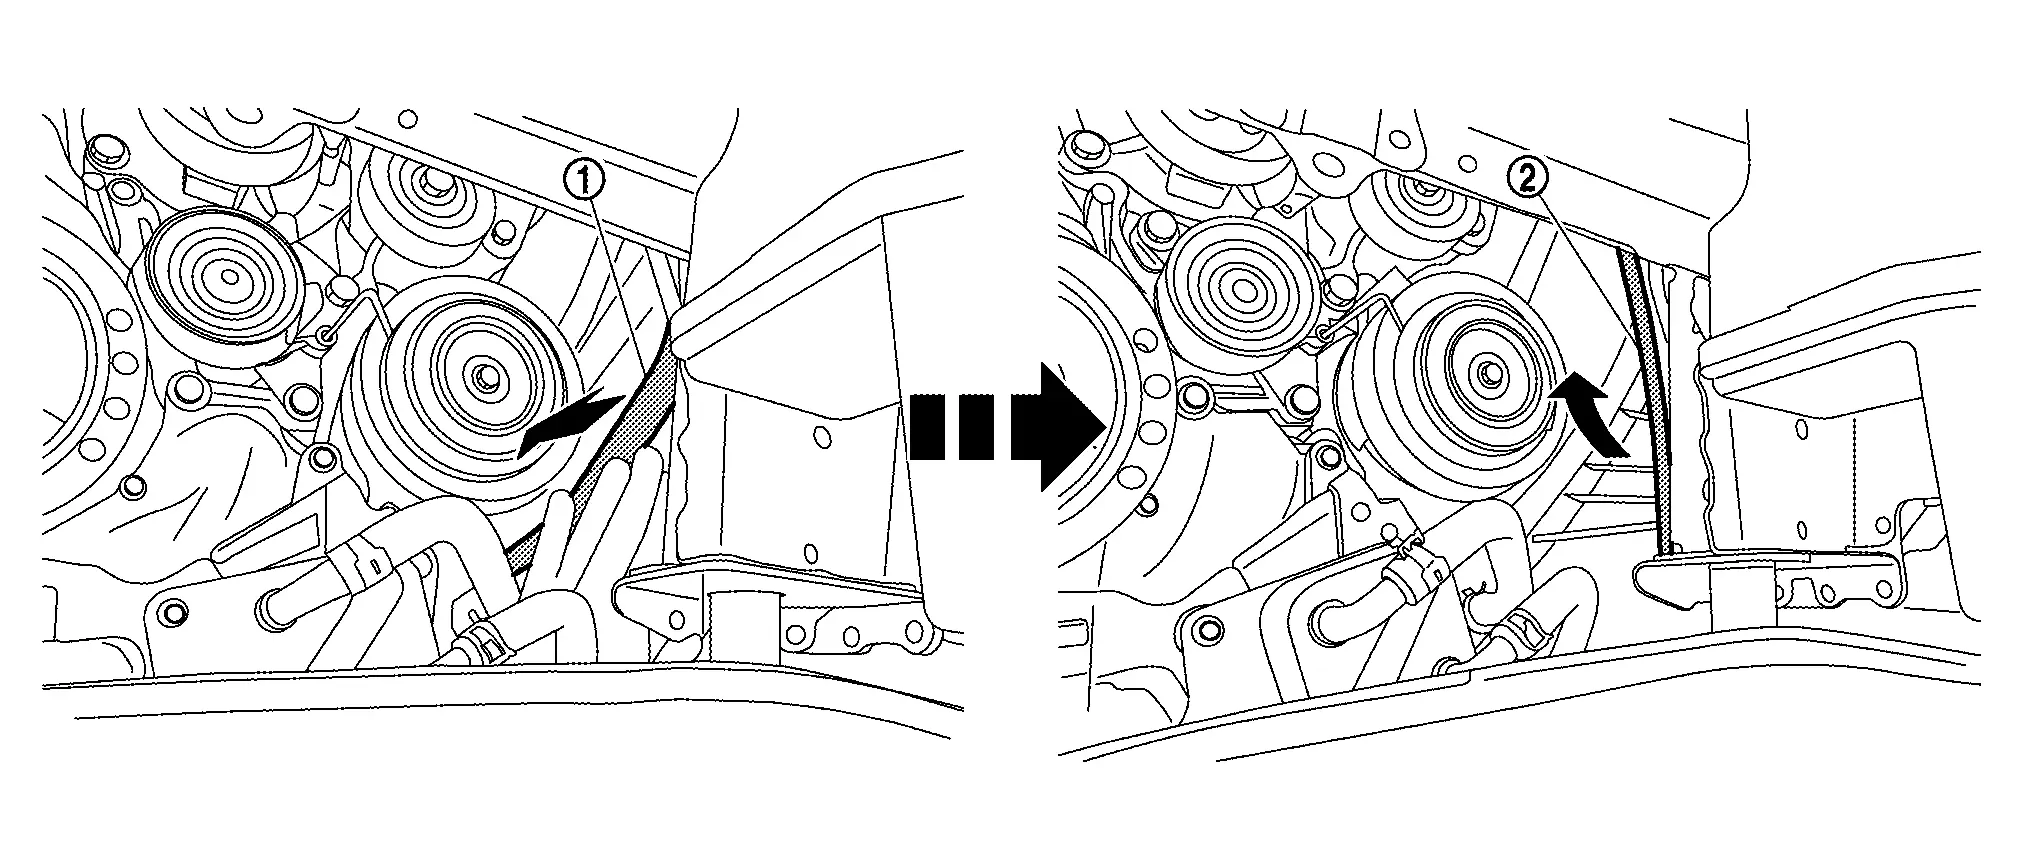
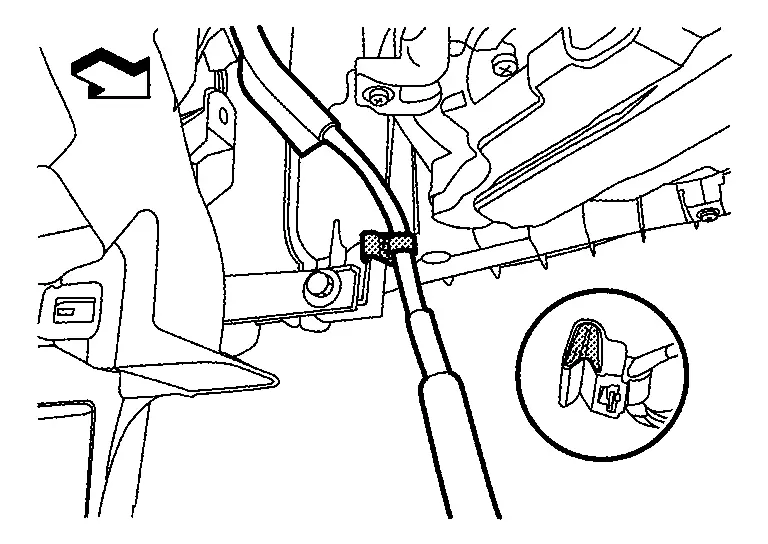
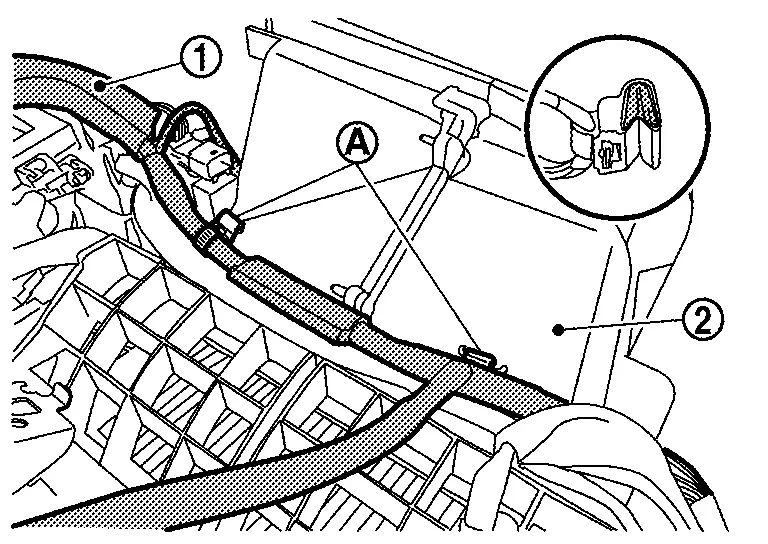
Move high-pressure flexible hose (1) in the direction of the arrow in the figure to make a work space, and remove high-pressure pipe (2) to the upper side of the Nissan Ariya vehicle.
INSTALLATION
Note the following items, then install in the reverse order of removal.
CAUTION:
-
Replace O-rings and washer seal with new ones. Then apply A/C compressor oil to them when installing.
-
Check for leakages when recharging refrigerant. Refer to Leak Test.
 NOTE:
NOTE:
When filling sub radiator with charge air cooler coolant. Refer to Refilling.
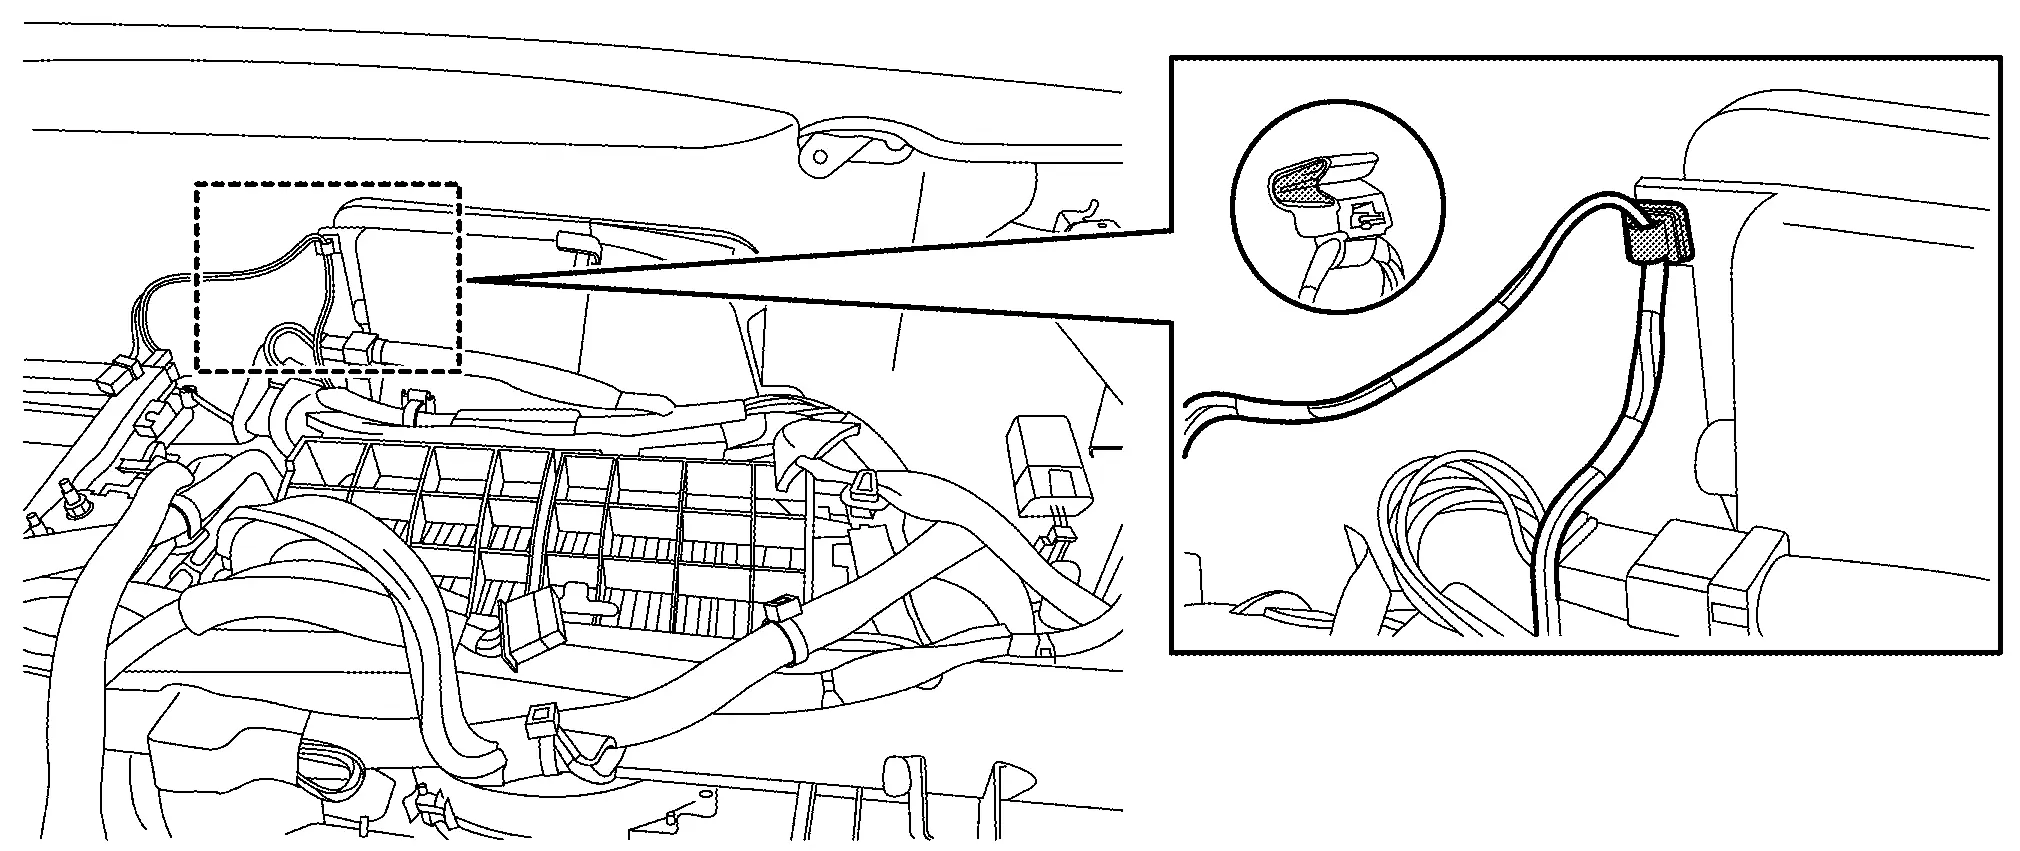
Internal Heat Exchanger Pipe
Removal and Installation
CAUTION:
Perform lubricant return operation before each refrigeration system disassembly. However, if a large amount of refrigerant or lubricant leak is detected, never perform lubricant return operation. Refer to Perform Lubricant Return Operation.
REMOVAL
Use a refrigerant collecting equipment (for HFO-1234yf) to discharge the refrigerant. Refer to Recycle Refrigerant.
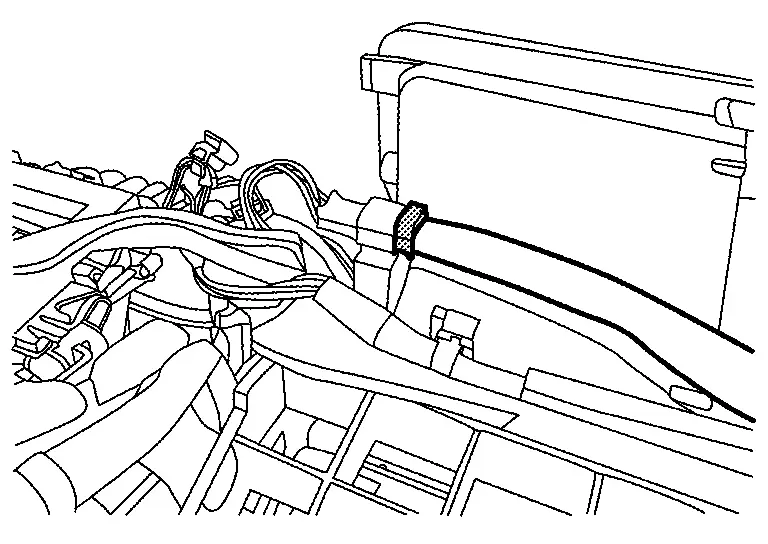
Remove mounting bolt , and then disconnect high-pressure pipe from internal heat exchanger pipe.
CAUTION:
Cap or wrap the joint of the A/C piping with suitable material such as vinyl tape to avoid the entry of air.
| : Nissan Ariya Vehicle front |
Disconnect low-pressure flexible hose from internal heat exchanger pipe. Refer to Removal and Installation.
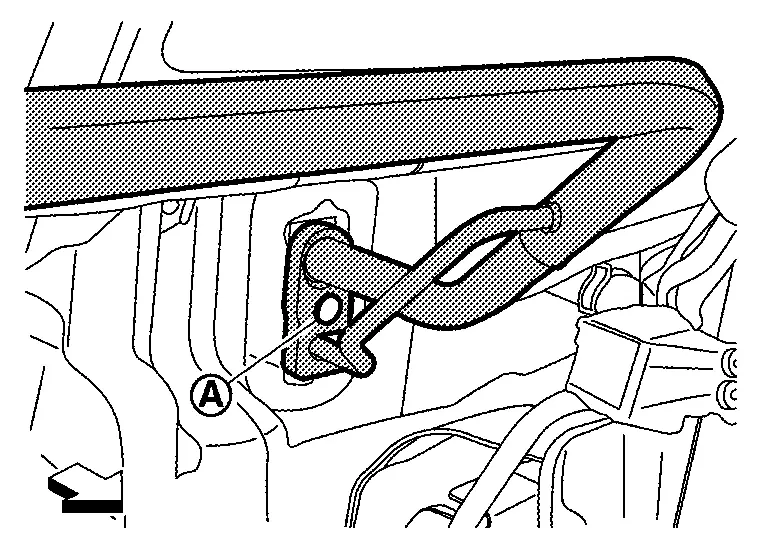
Remove bracket stay mounting bolt of internal heat exchanger pipe.
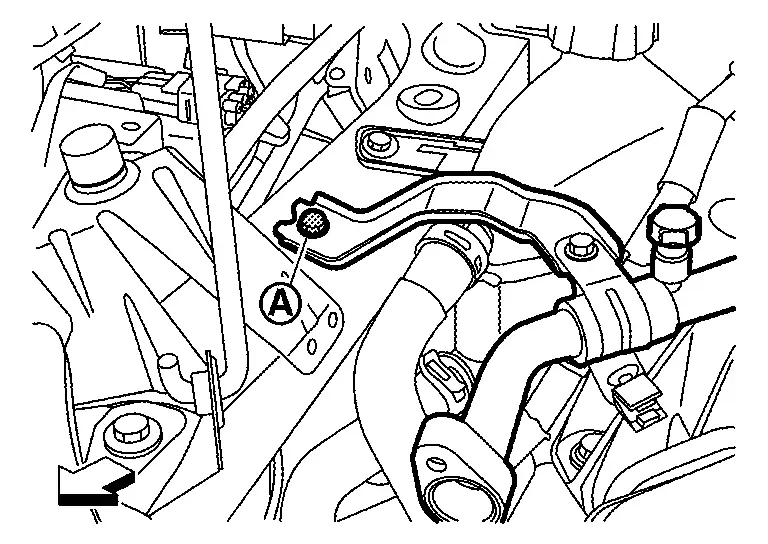
| : Nissan Ariya Vehicle front |
Remove mounting bolt , and then disconnect internal heat exchanger pipe from expansion valve.
CAUTION:
Cap or wrap the joint of the A/C piping and expansion valve with suitable material such as vinyl tape to avoid the entry of air.
| : Nissan Ariya Vehicle front |
Remove internal heat exchanger pipe from vehicle.
INSTALLATION
Note the following items, then install in the reverse order of removal.
CAUTION:
-
Replace O-rings with new ones. Then apply A/C compressor oil to them when installing.
-
Check for leakages when recharging refrigerant. Refer to Leak Test.
Refrigerant Pressure Sensor
Removal and Installation
CAUTION:
Perform lubricant return operation before each refrigeration system disassembly. However, if a large amount of refrigerant or lubricant leak is detected, never perform lubricant return operation. Refer to Perform Lubricant Return Operation.
REMOVAL
Use a refrigerant collecting equipment (for HFO-1234yf) to discharge the refrigerant. Refer to Recycle Refrigerant.
Remove engine under cover and engine under cover front. Refer to Removal and Installation.
Remove front side of front fender protector RH, and then move front fender protector RH to secure work space. Refer to Exploded View.
Clean refrigerant pressure sensor and its surrounding area, and then remove dust and rust from refrigerant pressure sensor.
CAUTION:
Be sure to clean carefully.
Disconnect refrigerant pressure sensor connector .
| : Nissan Ariya Vehicle front |
Use a adjustable wrench or other tool to hold the refrigerant pressure sensor mounting block, and then remove the refrigerant pressure sensor from high-pressure pipe.
CAUTION:
Cap or wrap the joint of the high-pressure pipe with suitable material such as vinyl tape avoid the entry of air.
INSTALLATION
Note the following items, and then install in the reverse order of removal.
CAUTION:
-
Replace refrigerant pressure sensor with new one. Then apply A/C compressor oil to O-ring them when installing.
-
Check for leakages when recharging refrigerant. Refer to Leak Test.
Condenser
Exploded View
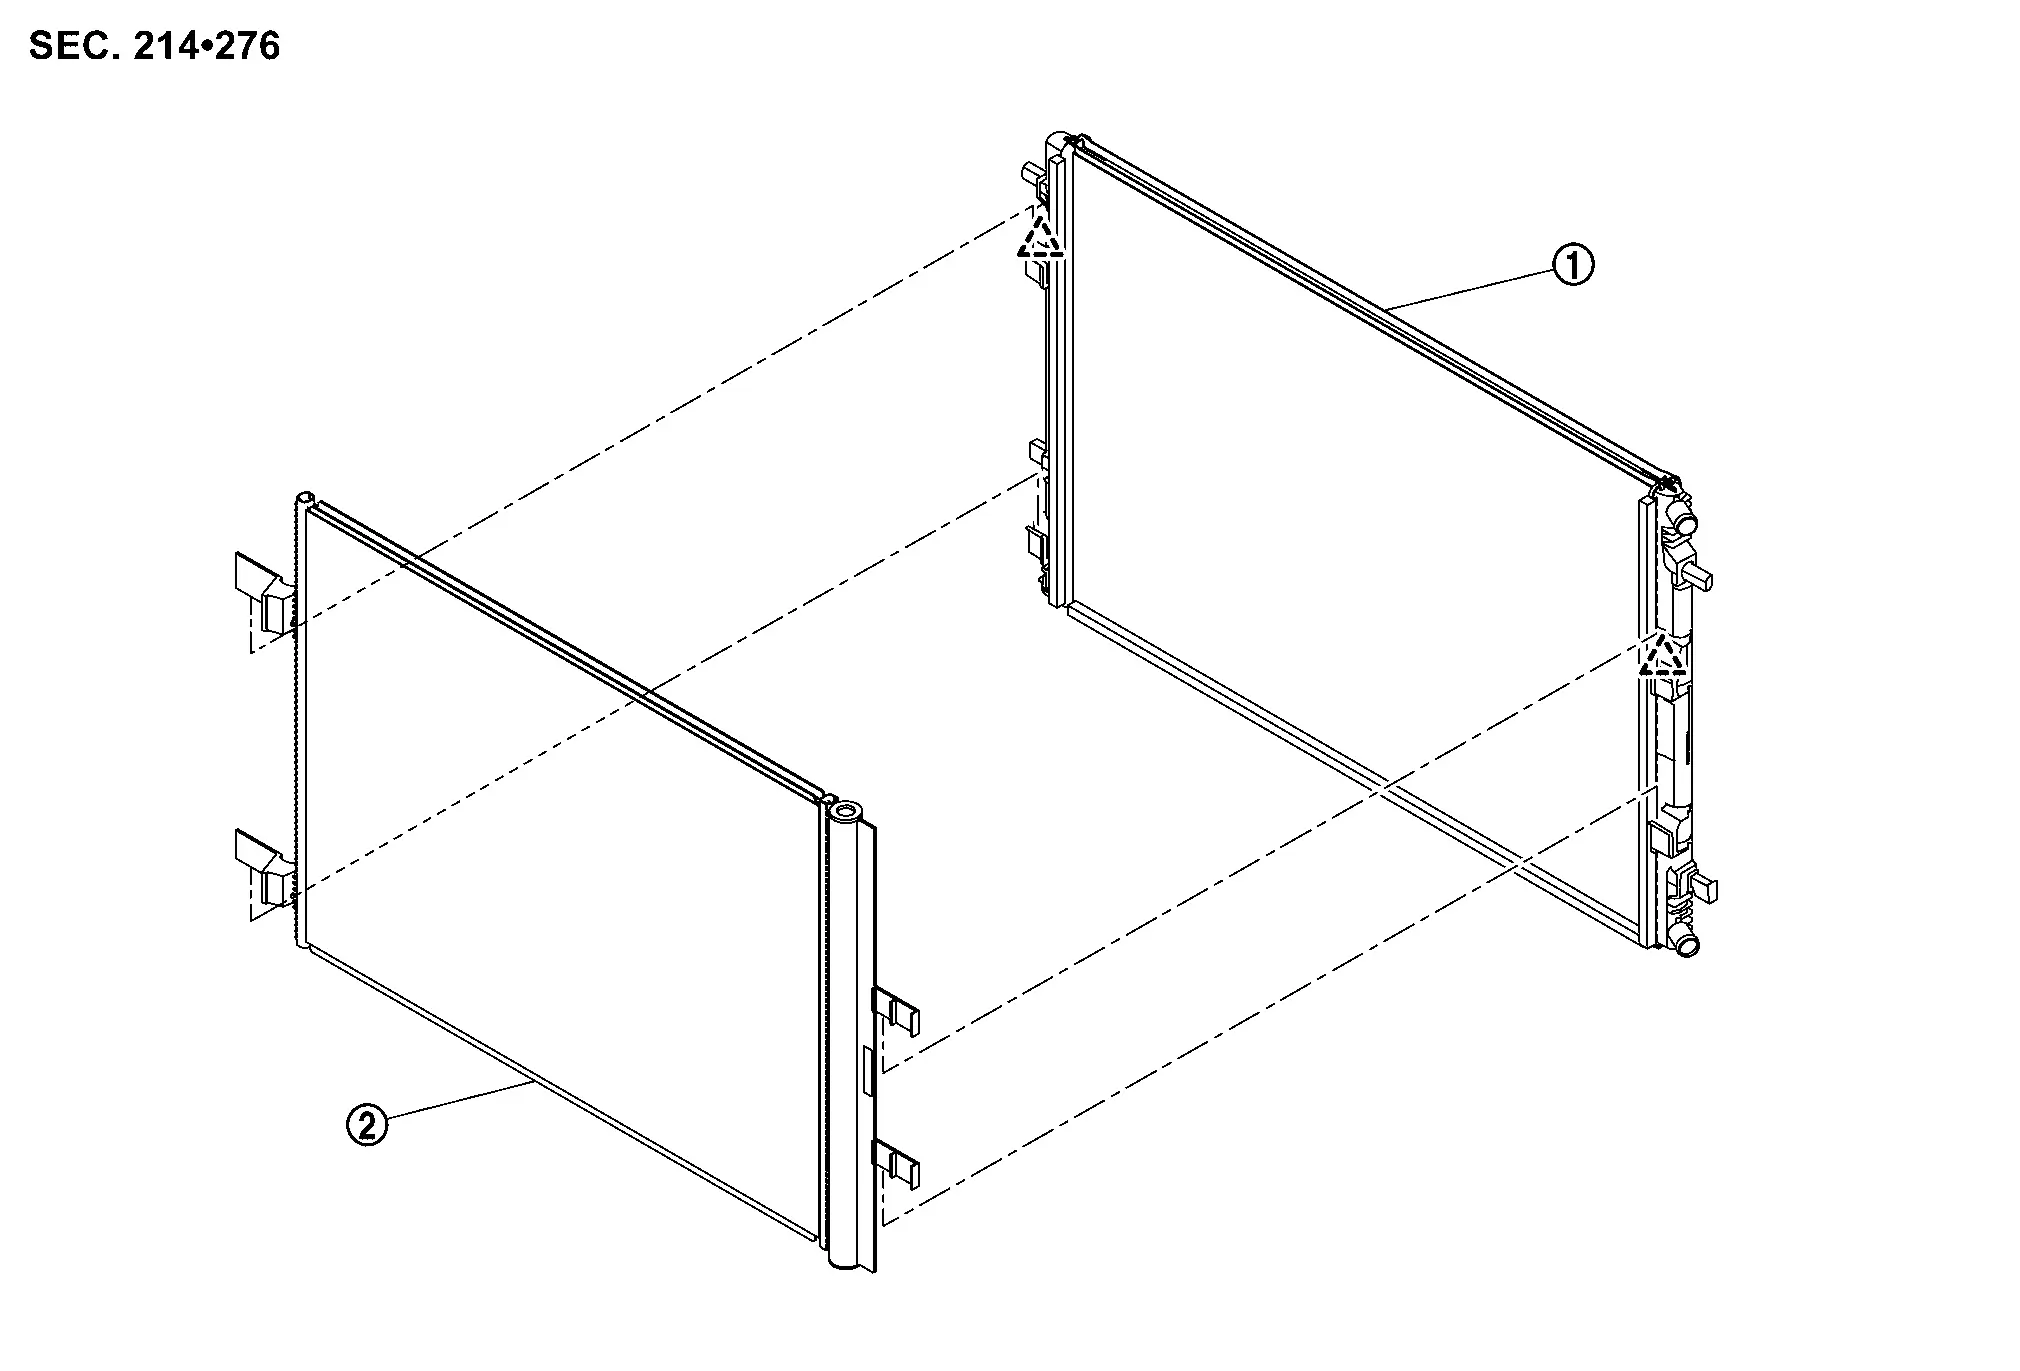
|
Sub radiator | |
Condenser & liquid tank assembly | ||
 |
: Pawl | ||||
Removal and Installation
CAUTION:
Perform lubricant return operation before each refrigeration system disassembly. However, if a large amount of refrigerant or lubricant leak is detected, never perform lubricant return operation. Refer to Perform Lubricant Return Operation.
REMOVAL
Use a refrigerant collecting equipment (for HFO-1234yf) to discharge the refrigerant. Refer to Recycle Refrigerant.
Remove front bumper fascia. Refer to Removal and Installation.
Remove air duct (Inlet). Refer to Removal and Installation.
Remove hood lock. Refer to Removal and Installation.
Remove radiator air guide LH and RH. Refer to Removal and Installation.
Remove mounting bracket of radiator. Refer toRemoval and Installation.
Disconnect high-pressure flexible hose from condenser & liquid tank assembly. Refer to Removal and Installation.
Disconnect high-pressure pipe from condenser & liquid tank assembly. Refer to Removal and Installation.
Disengage fixing pawls, and then lift the condenser & liquid tank assembly upwards and remove condenser & liquid tank assembly from sub radiator.
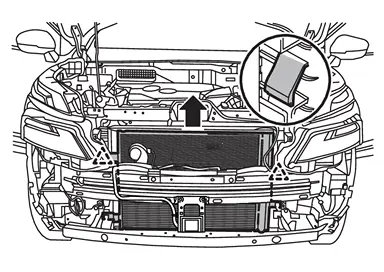
|
: Pawl |
INSTALLATION
Note the following items, and then install in the reverse order of removal.
CAUTION:
-
Perform lubricant adjusting procedure before installing new condenser & liquid tank assembly. Refer to Lubricant Adjusting Procedure for Components Replacement Except A/C compressor.
-
Check for leakages when recharging refrigerant. Refer to Leak Test.
Heater Cooling Unit Assembly
Exploded View
REMOVAL
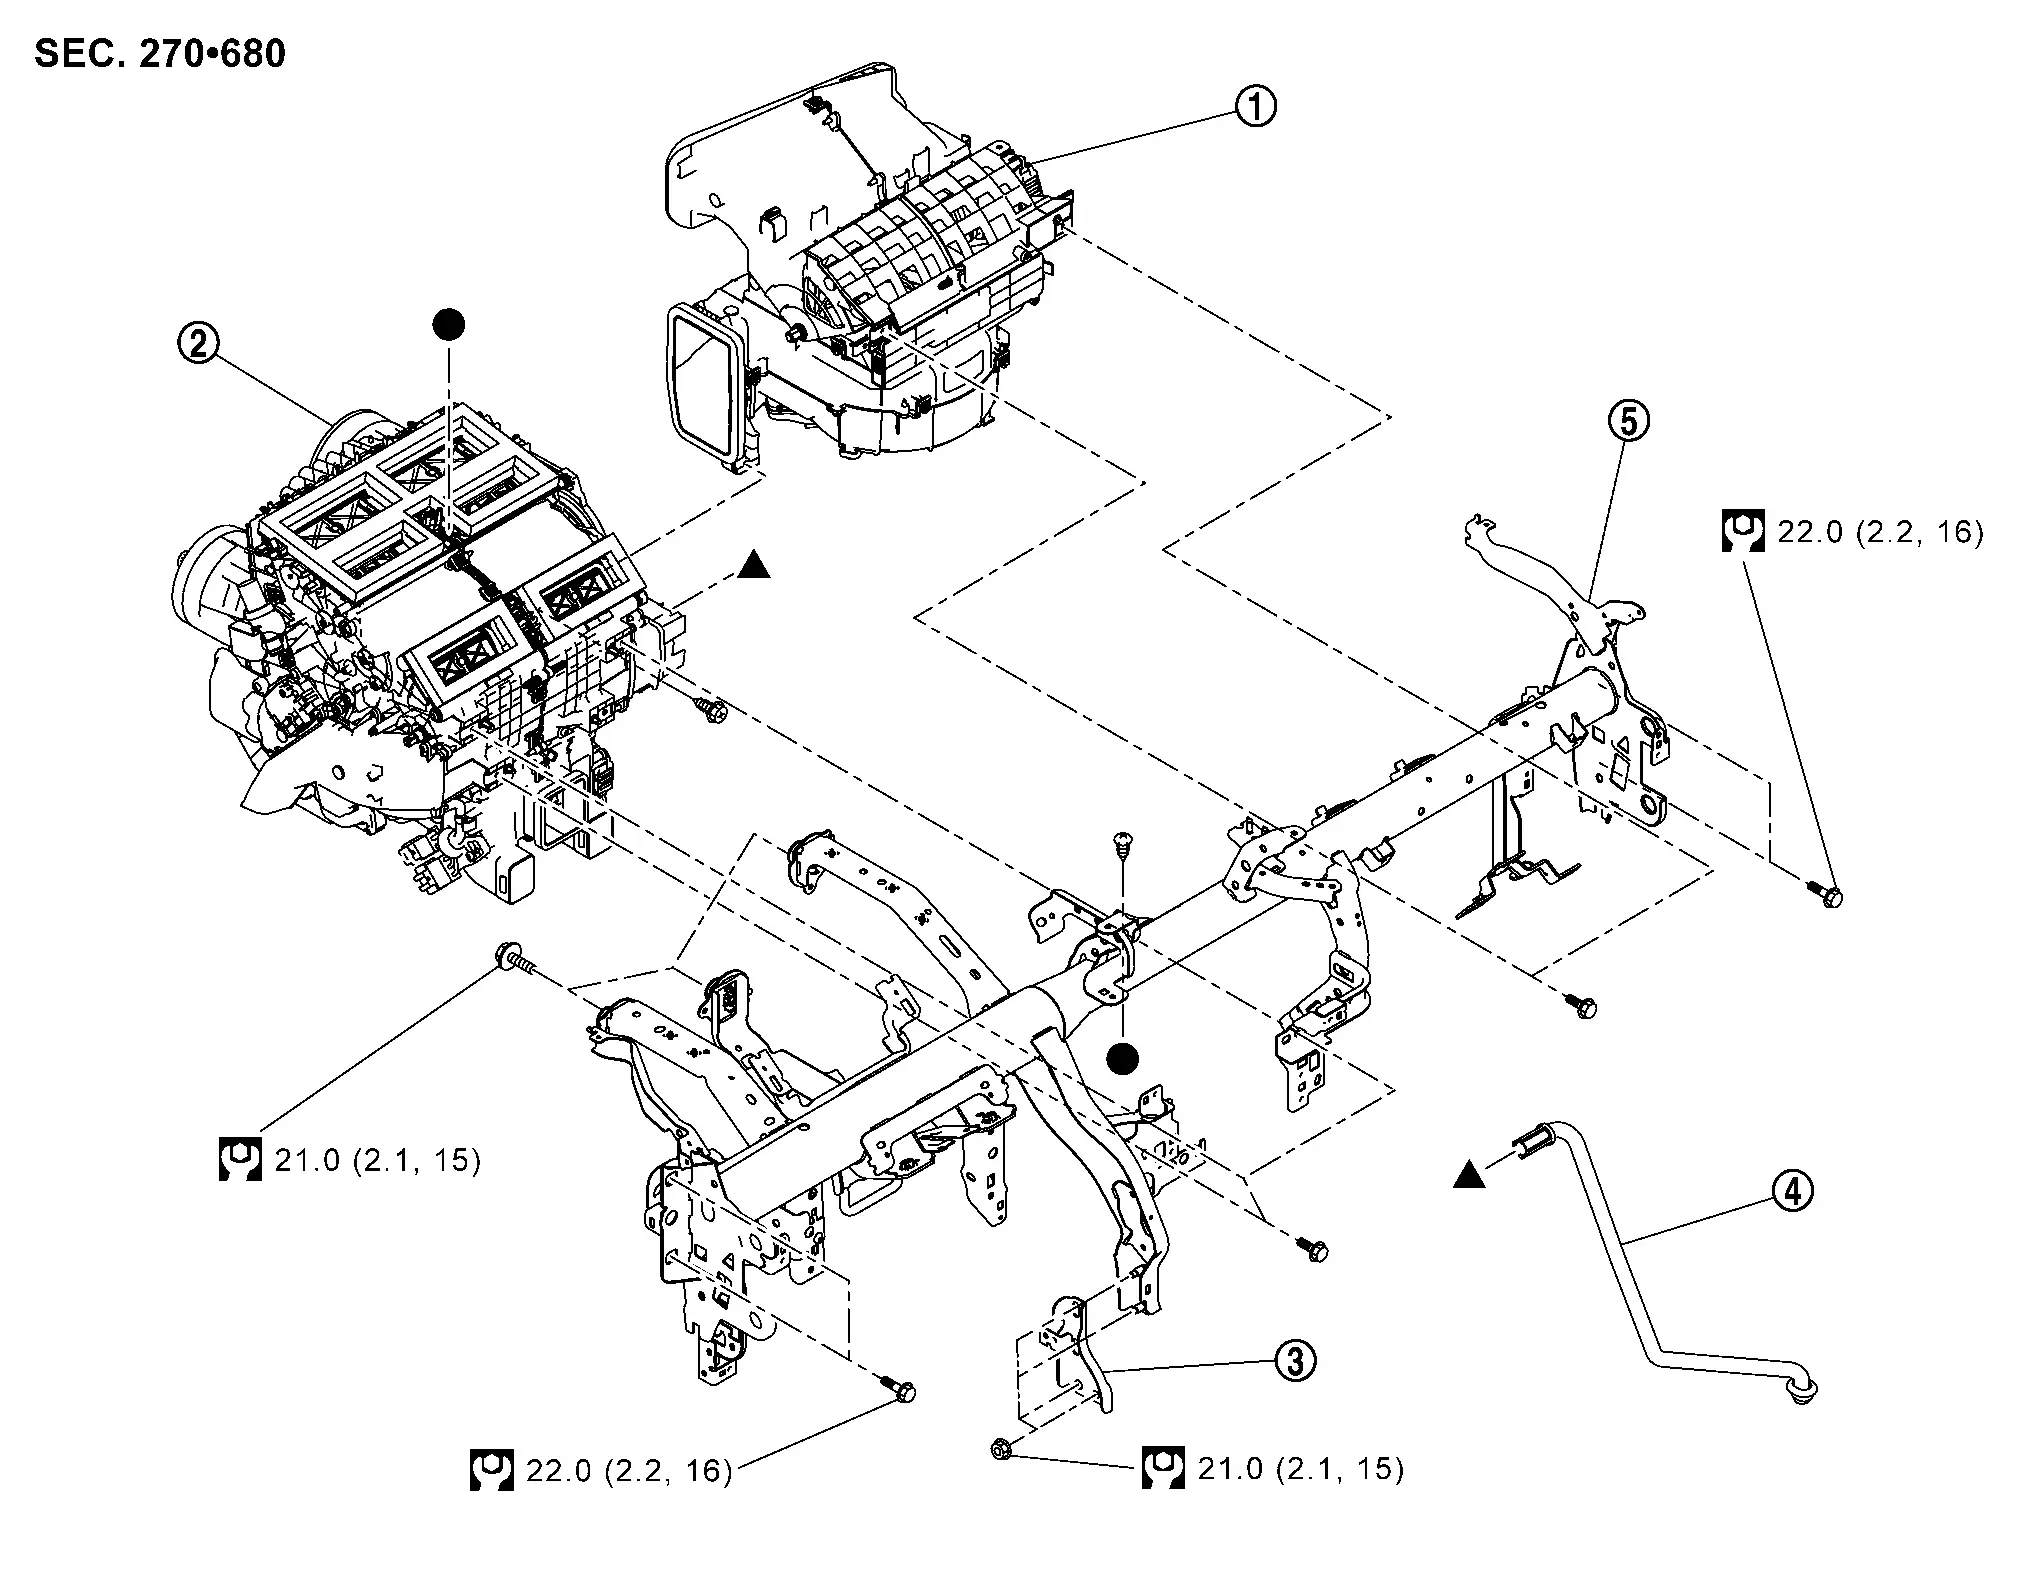
|
Blower unit | |
Heater & cooling unit assembly | |
Instrument stay |
|
Drain hose | |
Steering member | ||
|
: N·m (kg-m, ft-lb) | ||||
 , ,  : Indicates that the part is connected at points with same symbol in actual Nissan Ariya vehicle : Indicates that the part is connected at points with same symbol in actual Nissan Ariya vehicle |
|||||
DISASSEMBLY
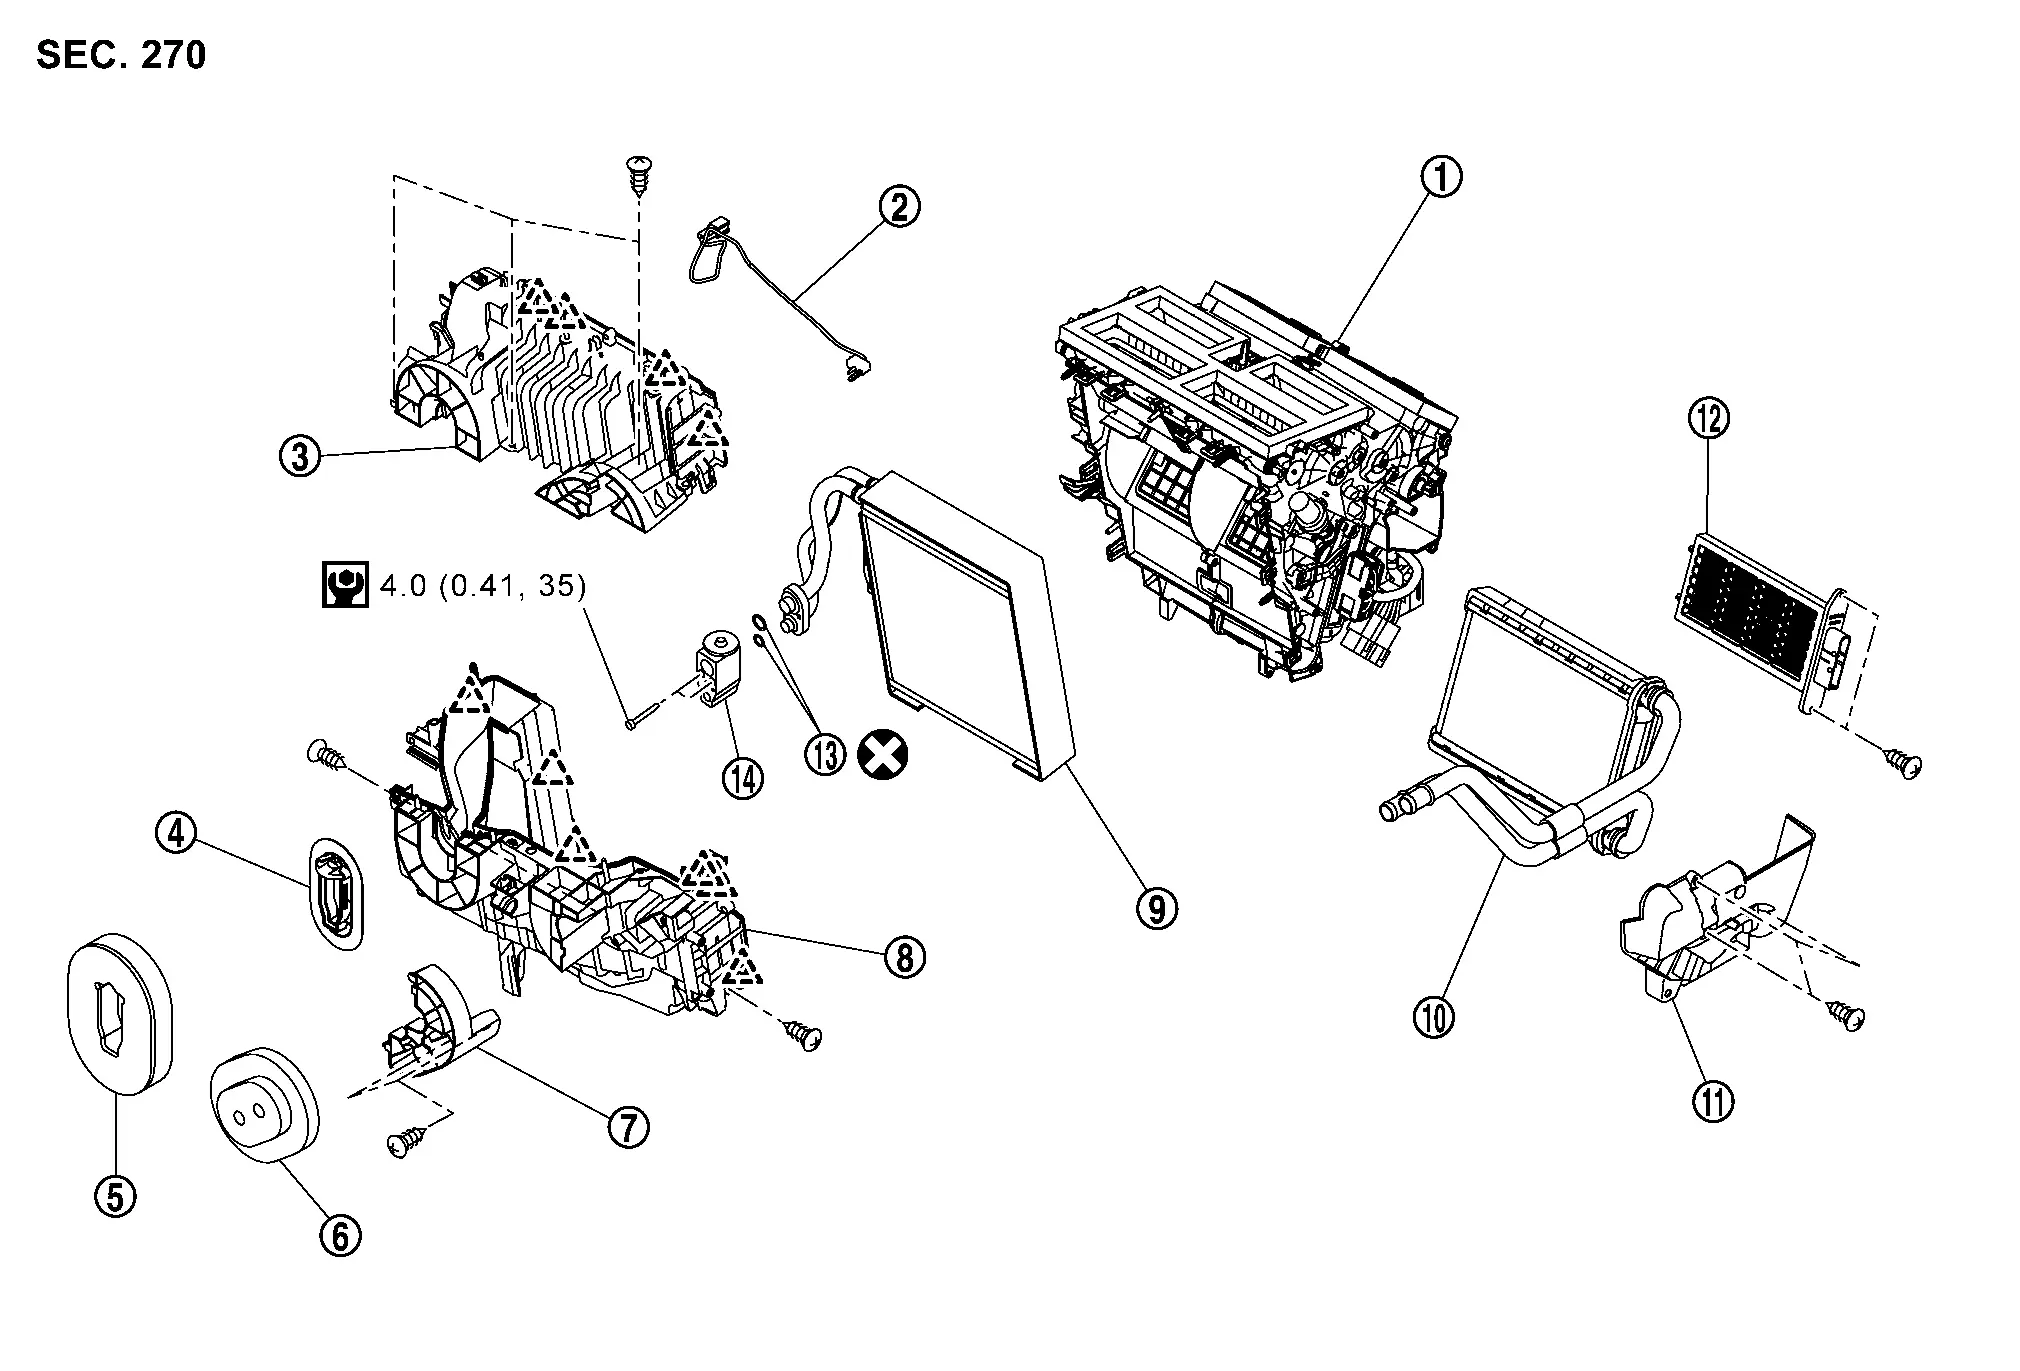
|
Heater & cooling unit | |
Intake sensor | |
Front case upper |
|
Cooler grommet | |
Cooler packing | |
Heater pipe packing |
|
Heater pipe clamp | |
Front case lower | |
Evaporator |
|
Heater core | |
Heater core pipe cover |  |
PTC heater |
 |
O-ring |  |
Expansion valve | ||
|
: Pawl | ||||
|
: Always replace after every disassembly. | ||||
|
: N·m (kg-m, in-lb) | ||||
Heater & Cooling Unit Assembly
Removal and Installation
CAUTION:
Perform lubricant return operation before each refrigeration system disassembly. However, if a large amount of refrigerant or lubricant leak is detected, never perform lubricant return operation. Refer to Perform Lubricant Return Operation.
REMOVAL
Use a refrigerant collecting equipment (for HFO-1234yf) to discharge the refrigerant. Refer to Recycle Refrigerant.
Drain engine coolant from cooling system. Refer to Draining.
Remove cowl top extension. Refer to Removal and Installation.
Disconnect internal heat exchanger pipe from expansion valve. Refer to Removal and Installation.
Disconnect heater hoses from heater core.
Remove instrument panel assembly. Refer to Removal and Installation.
Remove each duct and nozzle.
-
Side ventilator duct. Refer to Removal and Installation.
-
Front defroster nozzle. Refer to Removal and Installation.
-
Center ventilator duct. Refer to Removal and Installation.
-
Rear floor duct 1. Refer to Removal and Installation.
Disconnect drain hose from heater & cooling unit assembly.
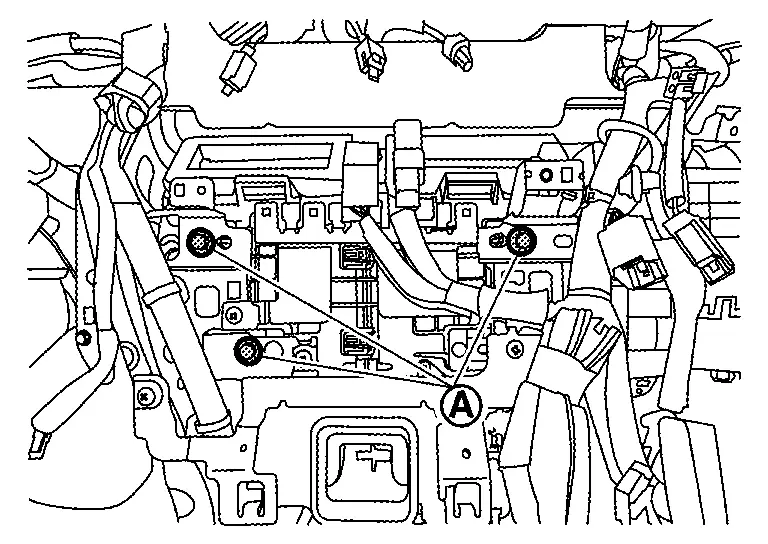
Remove main harness from heater & cooling unit assembly and blower unit.Disconnect A/C amp. harness connectors. Disconnect front blower motor harness connector. Disengage harness fixing metal clip of front blower motor harness.
| : Nissan Ariya Vehicle front |
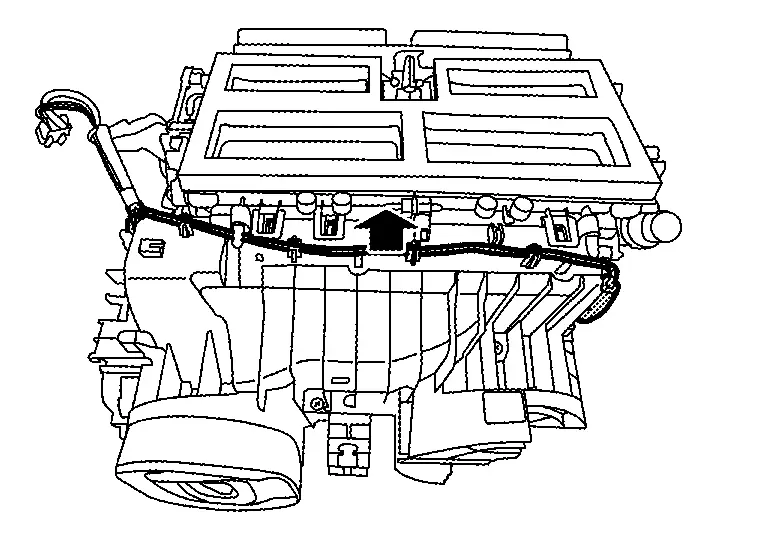
Disconnect engine harness connectors from PTC harness.
| : Nissan Ariya Vehicle front |
Disengage harness fixing clip of engine harness from Heater & cooling unit assembly.
| : Nissan Ariya Vehicle front |
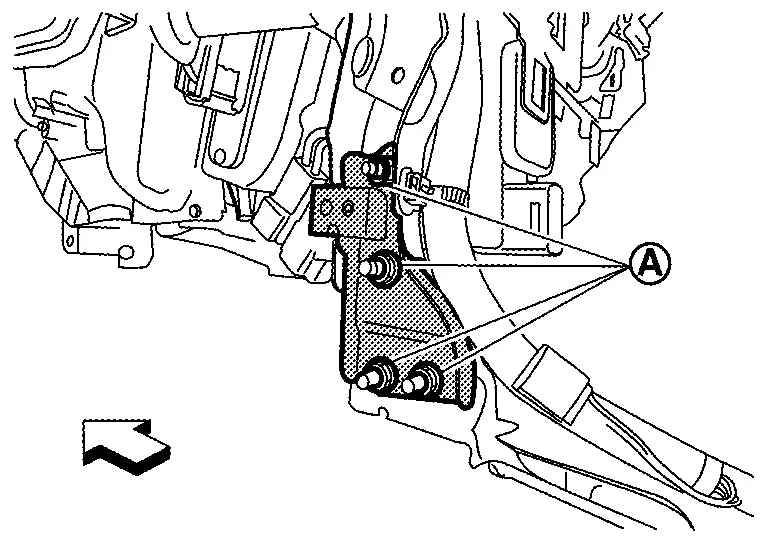
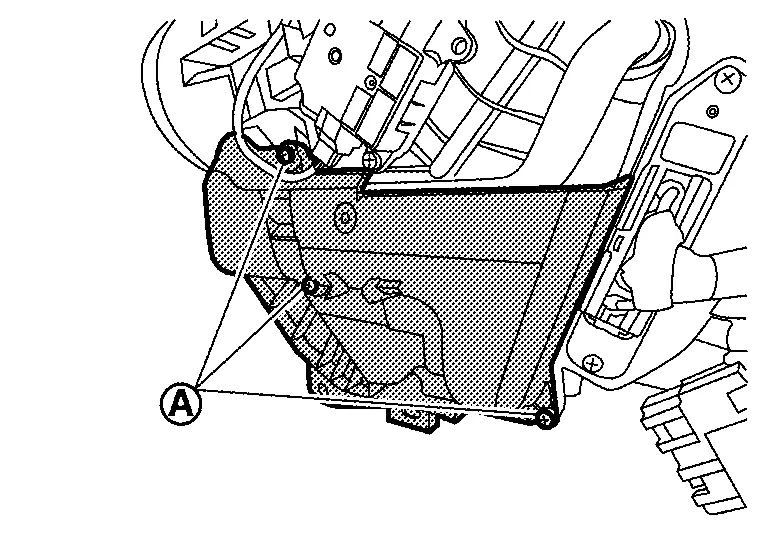
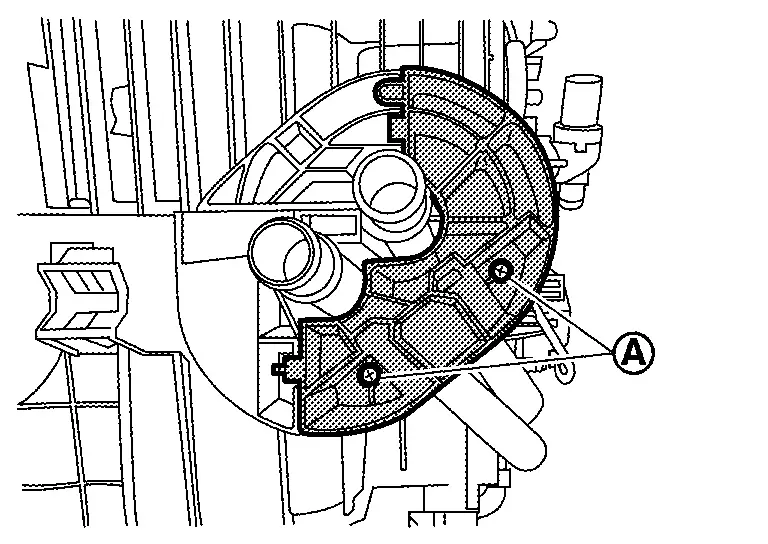
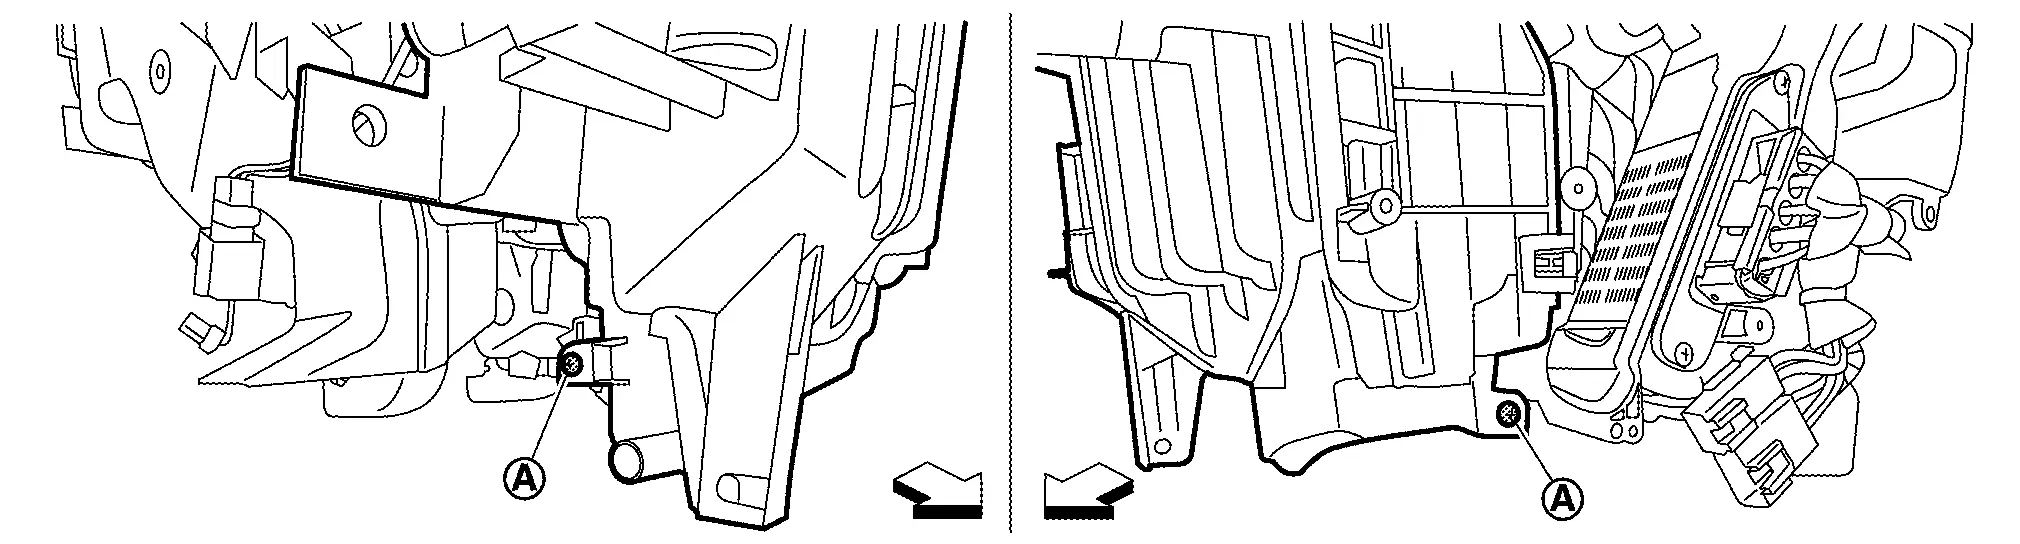
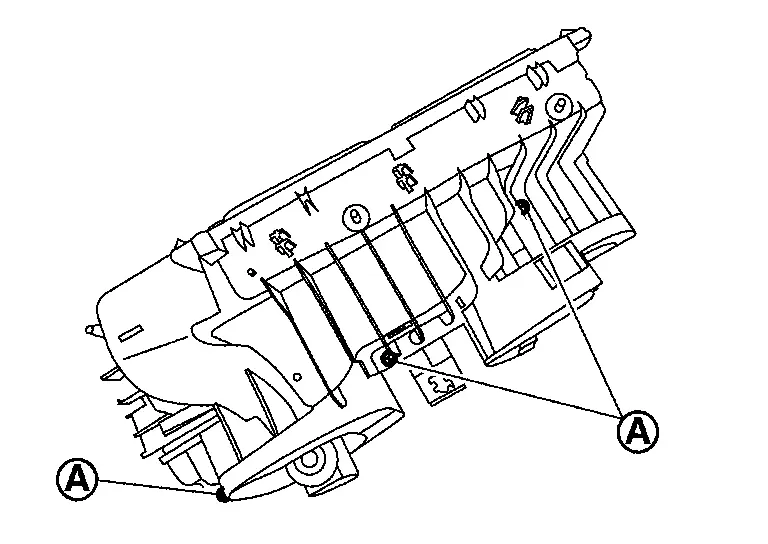
Remove blower unit mounting bolts (A).
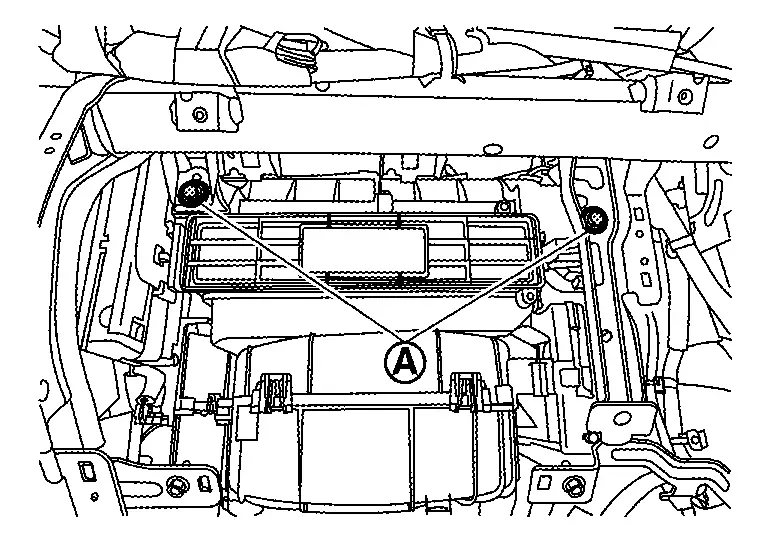
Remove heater & cooling unit assembly mounting bolts (A).
Remove heater & cooling unit assembly fixing screw (A).
Remove harness connector, harness clips and bracket necessary to remove steering member. Move Nissan Ariya vehicle harness aside.
Remove steering column mounting bolts and nuts, and then move steering column assembly to secure work space. Refer to Removal and Installation.
Remove mounting nuts , and then remove instrument stay.
| : Nissan Ariya Vehicle front |
Remove steering member mounting bolts .

Remove steering member from Nissan Ariya vehicle.
CAUTION:
When removing steering member, 2 workers are required to prevent it from dropping.
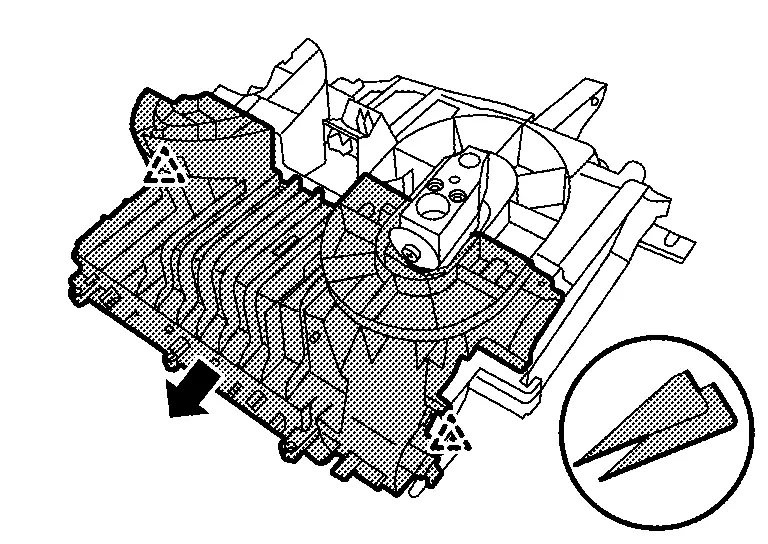
Remove heater & cooling unit assembly and blower as a set from Nissan Ariya vehicle.
CAUTION:
When removing heater & cooling unit assembly, 2 workers are required to prevent it from dropping.
Remove blower unit from heater & cooling unit assembly. Refer to Removal and Installation.
INSTALLATION
Note the following items, and then install in the reverse order of removal.
CAUTION:
-
Replace O-rings with new ones. Then apply compressor oil to them when installing.
-
Check for leakages when recharging refrigerant. Refer to Leak Test.
NOTE:
When filling radiator with engine coolant. Refer to Refilling.
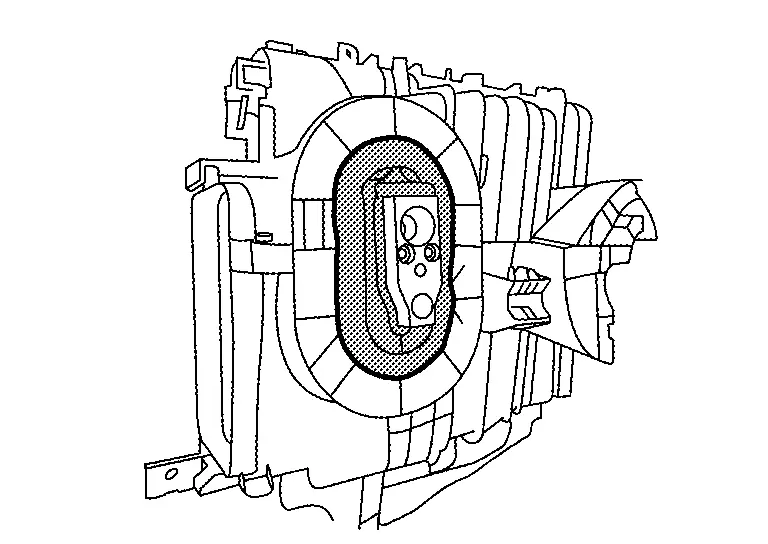
Heater Core
Removal and Installation
REMOVAL
Remove heater & cooling unit assembly. Refer to Removal and Installation.
Remove foot duct LH. Refer to Removal and Installation.
Remove fixing screws , and then remove heater core pipe cover.
Remove heater pipe packing.
Remove fixing screws , and then remove heater pipe clamp.
Remove heater core.
INSTALLATION
Install in the reverse order of removal.
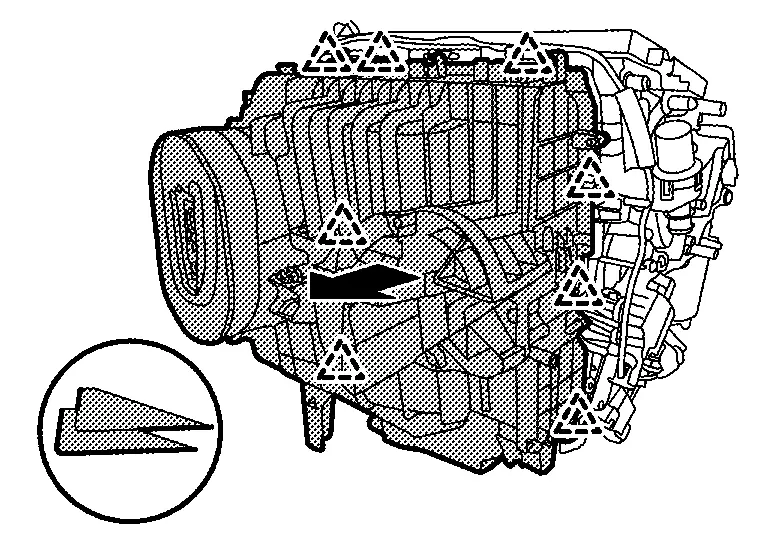
Evaporator
Removal and Installation
REMOVAL
Remove blower unit from heater & cooling unit assembly. Refer to Removal and Installation.
Remove heater core. Refer to Removal and Installation.
Disconnect A/C sub harness connector from intake sensor connector.
Disengage fixing pawl, and then remove intake sensor connector.
|
: Pawl |
Move A/C sub harness to position without hindrance for work.
Remove fixing screws of front case lower.
| : Nissan Ariya Vehicle front |
Disengage fixing pawls, and then remove front case upper and front case lower as a set.
|
: Pawl |
Remove intake sensor from evaporator. Refer to Removal and Installation.
Remove cooler packing.
Remove cooler grommet.
Remove fixing screws of front case upper.
Disengage fixing pawls, and then remove front case upper.
|
: Pawl |
Remove evaporator from front case lower.
Remove mounting bolts, and then remove expansion valve from evaporator.
INSTALLATION
Note the following items, and then install in the reverse order of removal.
CAUTION:
-
The air conditioning evaporator should never be repaired or replaced with a part from another Nissan Ariya vehicle. To replace a damaged or leaking evaporator, use only a new genuine NISSAN replacement part or equivalent.
-
Install so that there are no gaps in heater & cooling unit, front case upper and front case lower.
-
After installing a new evaporator, adjust the compressor lubricant level. Refer to Lubricant Adjusting Procedure for Components Replacement Except A/C compressor.
-
Replace O-rings with new ones. Then apply A/C compressor oil to them when installing.
-
Check for leakages when recharging refrigerant. Refer to Leak Test.
NOTE:
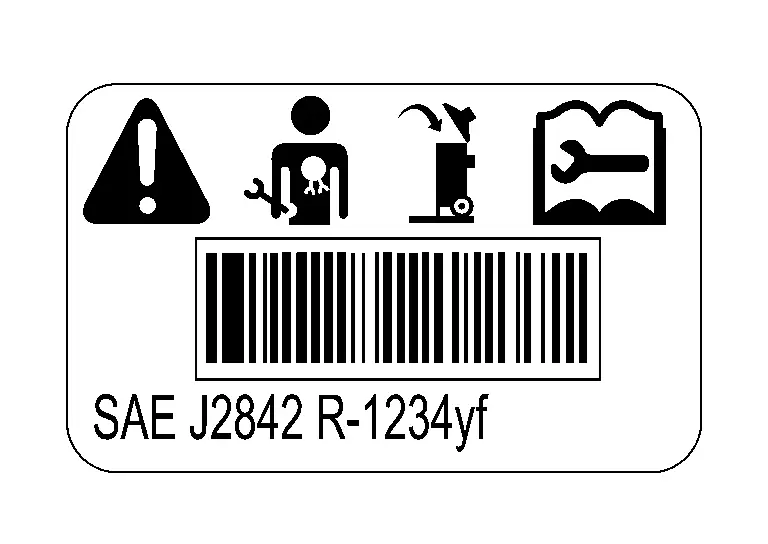
This label indicates that the evaporator complies with SAE J2842.
Expansion Valve
Removal and Installation
REMOVAL
Remove heater & cooling unit assembly. Refer to Removal and Installation.
Remove cooler packing.
Remove cooler grommet.
Remove mounting bolts and then remove expansion valve.
CAUTION:
Cap or wrap the joint of the evaporator and expansion valve with suitable material such as vinyl tape to avoid the entry of air.
INSTALLATION
Note the following items, and then install in the reverse order of removal.
CAUTION:
-
Replace O-rings with new ones. Then apply A/C compressor oil to them when installing.
-
Check for leakages when recharging refrigerant. Refer to Leak Test.
Other materials:
Diagnosis System (bcm)
Common Item
CONSULT Function (BCM - COMMON ITEM)
BCM
Refer to CONSULT Function (BCM - COMMON ITEM).
Flasher
CONSULT Function (BCM - FLASHER)
BCM
Refer to CONSULT Function (BCM - FLASHER).
...
Charge Air Cooler Electric Water Pump Relay
Component Inspection
CHECK ELECTRIC WATER PUMP RELAY
Turn ignition switch OFF.
Remove electric water pump relay.
Check the continuity between electric water pump relay terminals under the following conditions.
Terminals Conditions Continuity
and
12 V direct current supply ...
P2128 App Sensor
DTC Description
DTC DETECTION LOGIC DTC
CONSULT screen terms
(Trouble diagnosis content)
DTC detection condition
P2128
00
APP SEN 2/CIRC
(Throttle/Pedal position sensor/switch E circuit high)
Diagnosis condition
Engine running at idle
Signal (terminal)
Accelerator ...