Nissan Rogue (T33) 2021-Present OwnerŌĆÖs Manual & User Guide: Intelligent Key operation (models with request switch)
Example
Example
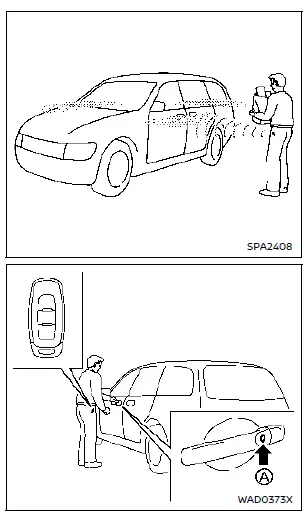
You can conveniently lock or unlock the doors of your Nissan Rogue without taking the key out of your pocket or bag.
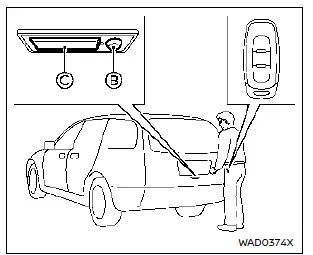
When you carry the Intelligent Key with you, the Nissan Rogue allows controlling all doors by pressing the door handle request switch A (front doors) or the liftgate request switch B within the operating range.
When you lock or unlock the Nissan Rogue, the hazard indicators flash and an outside chime sounds to confirm the action.
Welcome light function
- When you unlock the Nissan Rogue or the liftgate, the daytime running lights, parking lights and tail lights illuminate for a short period.
- With all doors locked, approaching or leaving the Nissan Rogue with the Intelligent Key (if equipped) causes the parking, tail and license plate lights to illuminate. If the vehicle is approached repeatedly, the system may pause to prevent unintended activation.
- The welcome light function can be turned off if desired.
Locking doors
1. Shift into P (Park), turn the ignition switch to OFF and keep the Intelligent Key with you.
2. Close all doors.
3. Press the door handle request switch A or the liftgate request switch B while carrying the Intelligent Key.
4. All doors and the liftgate of your Nissan Rogue will lock.
5. The hazard indicators flash twice and the buzzer sounds twice.
NOTE:
- Request switches can be turned off in the Vehicle Settings menu (ŌĆ£Ext. Door SwitchŌĆØ).
- Doors lock via request switch even when the ignition is not in the OFF position.
- The driverŌĆÖs door does not lock via request switch if it is open, but the mechanical key will still lock all doors.
- If the Intelligent Key is left inside the Nissan Rogue, the system beeps and prevents locking. However, another Intelligent Key can still lock the doors.
CAUTION
- After locking the doors using the request switch, always check that the Nissan Rogue doors are securely locked.
- Always have the Intelligent Key with you before pressing the request switch to avoid leaving it inside the vehicle.
- The request switch works only when the Intelligent Key is detected by the system.
Unlocking doors
1. Press the door handle request switch A or liftgate request switch B while carrying the Intelligent Key.
2. The hazard indicators flash once and the outside chime sounds once.
- Pressing the driverŌĆÖs door handle switch or liftgate switch unlocks the driverŌĆÖs door or liftgate.
The driver's door or the liftgate will unlock.
- Pressing the front passengerŌĆÖs door handle switch unlocks all doors and the liftgate of your Nissan Rogue.
3. Press the driverŌĆÖs door handle request switch or liftgate request switch again within 1 minute.
4. The hazard lights flash once more and the chime sounds once. All doors and the liftgate unlock.
All doors will lock automatically unless one of the following occurs within 1 minute after unlocking:
- Any door is opened.
- The ignition switch is pushed.
During this period, if the UNLOCK
 button on the Intelligent Key is pressed, the Nissan Rogue will re-lock all doors after another minute.
NOTE:
The unlocking behavior can be adjusted via ŌĆ£Selective UnlockŌĆØ in the Vehicle Settings menu.
Opening liftgate
1. Carry the Intelligent Key.
2. Press the liftgate opener switch C.
3. The liftgate of your Nissan Rogue unlocks and opens automatically.
Other materials:
Vehicle Security System
System Description
SYSTEM DIAGRAM Component Function
Door switch
Door switch detects door open/close condition and then transmits door switch signal to BCM.
IPDM E/R
IPDM E/R operates horns with horn request signal received from BCM.
IPDM E/R operates headlamps with high be ...
Event Data Recorders (EDR)
Basic information
This vehicle is equipped with an Event Data Recorder (EDR). Its primary purpose is to record data in certain crash or near crash-like situationsŌĆösuch as striking an obstacle or deploying the air bagsŌĆöto help engineers understand how the vehicle systems performed. Vehicles like ...
Power Supply and Ground Circuit
Av Control Unit
Diagnosis Procedure
CHECK FUSE
Turn ignition switch OFF.
Check that the following fuse is not blown (open)
Power source Fuse No. Capacity
Battery
#25
20 A
Is the fuse blown (open)?
YES>>
Replace fuse after repairing the applicable circuit ...