Nissan Rogue Owners Manual: How to use the [ ] button

For additional information, refer to the separate Navigation System OwnerÔÇÖs Manual regarding the ÔÇťSiriusXM┬« Travel LinkÔÇŁ, and ÔÇťTrafficÔÇŁ features.
For additional information, refer to ÔÇťNissan- ConnectSM with Mobile AppsÔÇŁ in this section regarding ÔÇťMy AppsÔÇŁ key.
For additional information, refer to ÔÇťNISSAN Voice Recognition SystemÔÇŁ in this section regarding the ÔÇťVoice CommandsÔÇŁ key.
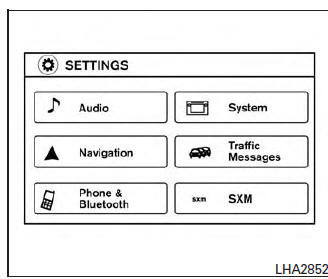
To select and/or adjust several functions, features and modes that are available for your vehicle:
- Press the [
 ] button.
 - Touch the ÔÇťSettingsÔÇŁ key.
- Touch the desired item.
| Menu item | Result | ||
| Audio | For additional information, refer to ÔÇťAudio systemÔÇŁ in this section. | ||
| Navigation | For additional information, refer to the separate Navigation System OwnerÔÇÖs Manual. | ||
| Phone & Bluetooth | For additional information, refer to ÔÇťBluetooth┬« Hands-Free Phone System with Navigation SystemÔÇŁ in this section. | ||
| System | Touch this key to select and/or adjust various functions of this system. A screen with additional options will appear. | ||
| Display | Touch this key to adjust the appearance of the displa | ||
| Brightness | Adjusts the brightness of the display. | ||
| Display Mode | Adjusts to fit the level of lighting in the vehicle. Touch key to cycle through options. ÔÇťDayÔÇŁ and ÔÇťNightÔÇŁ modes are suited for the respective times of day while ÔÇťAutoÔÇŁ controls the display automatically | ||
| Scroll Direction | Adjusts the direction of the menu scroll. Choose to either move up or dow | ||
| Clock | Touch this key to adjust the time. | ||
| Time Format | The clock can be set to 12 hours or 24 hours. | ||
| Date Format | Select from five possible formats of displaying the day, month, and year. | ||
| Clock Mode | Adjust the mode for the clock. ÔÇťAutoÔÇŁ uses the systemÔÇÖs GPS to automatically maintain the time. ÔÇťManualÔÇŁ allows you to set the clock using the ÔÇťSet Clock ManuallyÔÇŁ key. | ||
| Set Clock Manually | Adjust the clock manually, Touch the ÔÇť+ÔÇŁ or ÔÇť-ÔÇŁ keys to adjust the hours, minutes, day, month and year up or down. ÔÇťClock ModeÔÇŁ must be set to manual for this option to be available. | ||
| Daylight Savings Time | Adjusts the daylight savings time on or off. | ||
| Time Zone | Choose the applicable time zone from the list | ||
| Language | Touch this key to change the language on the display. | ||
| Camera | Touch this key to change the camera settings. | ||
| Display Mode | Touch this key to select the touch-screen display mode (day, night, or automatic). | ||
| Brightness | Adjust touch-screen brightness | ||
| Contrast | Adjust touch-screen contrast. | ||
| Color | Adjust touch-screen color. | ||
| Temperature Unit | Touch this key to change the temperature unit being displayed (Fahrenheit or Celsius). | ||
| Touchscreen click | Toggles the touch-screen click feature on or off. When activated a click sound will be heard every time a key on the screen is touched | ||
| System Beeps | Toggle the system beep tones feature on or off. When
activated, a beep sound will be heard when a pop-up message appears on
the
screen or a button on the unit (such as the
 button) is pressed and held
for 2 seconds. button) is pressed and held
for 2 seconds. |
||
| Return to Factory Settings/ Clear Memory | Touch this key to return all settings to default and to clear the memory. | ||
| Software Licenses | Touch this key to display software licensing information. | ||
| Traffic messages | Touch this key to display traffic settings. For additional information, refer to the separate Navigation System OwnerÔÇÖs Manual. | ||
| SXM | Touch this key to start SiriusXM┬« radio. For additional information, refer to ÔÇťAudio systemÔÇŁ regarding SXM setup in this section. | ||
 button
To change the display brightness, press
the  button. Pressing the button
again will
change the display to the day or the night display.
button. Pressing the button
again will
change the display to the day or the night display.
If no operation is performed within 5 seconds, the display will return to the previous display.
Press and hold the  button for more
than
2 seconds to turn the display off. Press the button
again to turn the display on.
button for more
than
2 seconds to turn the display off. Press the button
again to turn the display on.
How to use the POWER button/VOLUME control knob
Press the POWER button to turn audio function on and off. Turn the VOLUME control knob to adjust audio volume.
How to use the CAMERA button
For additional information, refer to ÔÇťREARVIEW MONITORÔÇŁregarding the CAMERA button in this section.
 How to use the touch-screen
CAUTION
The glass display screen may break if it
is hit with a hard or sharp object. If the
glass screen breaks, do not touch it.
Doing so could result in an injury.
& ...
 RearView Monitor (if so equipped)
When the shift lever is shifted into the R (Reverse)
position, the monitor display shows the
view to the rear of the vehicle.
WARNINGFailure to follow the warnings and instructions
for pr ...
Other materials:
Diagnosis system (combination meter)
Description
COMBINATION METER SELF-DIAGNOSIS MODE
The following meter functions can be checked during Combination Meter
Self-Diagnosis Mode:
Pointer sweep of speedometer, tachometer and gauges.
Illumination of all LCD segments and color patterns for meter
displays.
I ...
Preparation
Commercial Service Tool
Tool name
Description
Ball joint remover
Removing wheel stud
Power tools
Loosening nuts, screws, and bolts
...
Hill Descent Control System (if so equipped)
Hill Descent Control System
WARNING
Never rely solely on the hill descent
control system to control vehicle speed
when driving on steep downhill grades.
Always drive carefully and attentively
when using the hill descent control system
and decelerate the vehi ...
