
Nissan Rogue (T33) 2021-Present Owner’s Manual & User Guide: Garage mode system
The liftgate can be set to open to a specific height by performing the following:
1. Open the liftgate.
2. Pull the liftgate down to the desired position and hold the liftgate (the liftgate will have some resistance when being manually adjusted).
3. While holding the liftgate in position, press and hold the power liftgate close and lock switch located on the liftgate for approximately 3 seconds or until 2 beeps are heard.
The liftgate will open to the selected position setting. To change the position of the liftgate, repeat steps 1-3 for setting the position of the liftgate. This function is especially useful when parking the Nissan Rogue in garages with low ceilings.
CAUTION
Do not set the height of the liftgate below approximately 1/3 of the way to the floor using garage mode. Even if you set the height below approximately 1/3 of the way to the floor, the height will automatically be set to approximately 1/3 of the way to the floor.
Auto closure
When the liftgate reaches the secondary position, the closure motor engages and pulls the liftgate to its primary latch position.
Do not apply excessive force when the auto closure is operating. Excessive force applied may cause the mechanism to malfunction.
CAUTION
- The liftgate will automatically close from the secondary position.
- Do not let children operate the liftgate.
To avoid pinching, keep hands and fingers away from liftgate opening.
Liftgate release lever
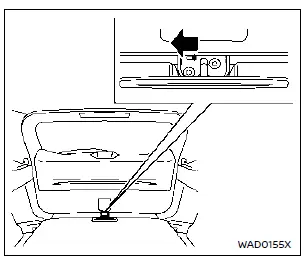
If the liftgate cannot be opened with the power door lock switch due to a discharged battery, follow these steps.
1. Fold the rear seats down.
2. Insert a suitable tool in the access opening. Move the release lever to the left. The liftgate will be unlatched.
3. Push the liftgate up to open.
Contact a NISSAN dealer as soon as possible for repair.
Other materials:
Additional Service When Replacing Side Radar
Work Procedure
Always perform the side radar configuration after replacing the side radar.SIDE RADAR CONFIGURATION
Perform saving vehicle internal information according to "Replace ECU" in CONSULT Operation Manual.
>>
GO TO 2.
SIDE RADAR ALIGNMENT
Perform the side radar alignment with ...
Dtc/circuit Diagnosis. Front Wiper Auto Stop Signal Circuit
Component Function Check
CHECK FRONT WIPER STOP POSITION SIGNAL
CONSULT
Select “FR WIPER STOP POSITION� in “Data monitor� mode of “IPDM E/R�.
Operate the front wiper.
With the front wiper operation, check the monitor status.
Monitor item Condition Monitor status
...
Adas Control Unit 2
List of ECU Reference
ECU Reference
ADAS control unit 2 (Without ProPILOT Assist 2.1)
Reference Value
Fail-safe (ADAS Control Unit 2)
DTC Inspection Priority Chart
DTC Index
ADAS control unit 2 (With ProPILOT Assist 2.1)
System Description
System Description
...