
Nissan Rogue (T33) 2021-Present Service Manual: Dtc/circuit Diagnosis :: Lin Communication Circuit
Diagnosis Procedure
CHECK BCM OUTPUT SIGNAL
-
Ignition switch ON.
-
Check signal between BCM harness connector and ground using an oscilloscope.
(+) (−) Signal
(Reference value)BCM Connector Terminal With type A meter: B123 91 Ground 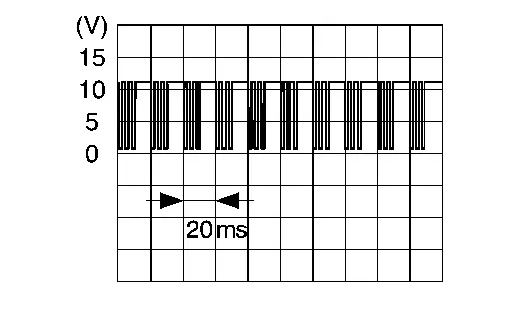
With type B meter: M18 24
Is the inspection result normal?
YES>>GO TO 3.
NO>>GO TO 2.
CHECK LIN COMMUNICATION CIRCUIT
-
Ignition switch OFF, and then wait for 3 minutes with driver door open.
 NOTE:
NOTE:
-
Even after ignition switch OFF, power is supplied to accessories for a certain amount of time by the AUTO ACC function.
-
When Nissan Ariya vehicle is operated while on standby, power may be supplied to accessories.
-
-
Disconnect following connectors:
-
BCM
-
Power window main switch
-
Front power window motor (driver side)
-
Passenger door mirror control module (if so equipped)
-
Moonroof motor assembly (if so equipped)
-
Sunshade motor assembly (if so equipped)
-
-
Check continuity between BCM harness connector and ground.
BCM (–) Continuity Connector Terminal With type A meter: B123 91 Ground No With type B meter: M18 24
Is the inspection result normal?
YES>>Replace BCM. Refer to Removal and Installation.
NO>>Repair or replace harness.
CHECK LIN COMMUNICATION SIGNAL
-
Ignition switch OFF, and then wait for 3 minutes with driver door open.
NOTE:
-
Even after ignition switch OFF, power is supplied to accessories for a certain amount of time by the AUTO ACC function.
-
When Nissan Ariya vehicle is operated while on standby, power may be supplied to accessories.
-
-
Disconnect following connectors:
-
Power window main switch
-
Front power window motor (driver side)
-
-
Ignition switch ON.
-
Check signal between power window main switch harness connector, front power window motor (driver side) harness connector and ground using an oscilloscope.
(+) (−) Signal
(Reference value)Connector Terminal Power window main switch D6*1
D27*24 Ground Front power window motor (driver side) D10 6 *1: With automatic drive positioner
*2: Without automatic drive positioner
Is the inspection result normal?
YES>>Inspection End.
NO-1>>Power window main switch: GO TO 4.
NO-2>>Front power window motor (driver side): GO TO 5.
CHECK LIN COMMUNICATION CIRCUIT (POWER WINDOW MAIN SWITCH)
-
Ignition switch OFF.
-
Disconnect BCM connector.
-
Check continuity between BCM harness connector and power window main switch harness connector.
BCM Power window main switch Continuity Connector Terminal Connector Terminal With type A meter: B123 91 D6*1
D27*24 Yes With type B meter: M18 24 D6*1
D27*24 Yes *1: With Automatic Drive Positioner
*2: Without Automatic Drive Positioner
Is the inspection result normal?
YES>>Inspection End.
NO>>Repair or replace harness.
CHECK LIN COMMUNICATION CIRCUIT [FRONT POWER WINDOW MOTOR (DRIVER SIDE)]
-
Ignition switch OFF.
-
Disconnect BCM connector.
-
Check continuity between BCM harness connector and front power window motor (driver side) harness connector.
BCM Front power window motor (driver side) Continuity Connector Terminal Connector Terminal With type A meter: B123 91 D10 6 Yes With type B meter: M18 24
Is the inspection result normal?
YES>>Inspection End.
NO>>Repair or replace harness.
Other materials:
Dtc/circuit Diagnosis. B2c20-23 Starter Control Relay
DTC Description
DTC DETECTION LOGIC DTC No.
CONSULT screen items
(Trouble diagnosis content) DTC detecting condition
B2C20-23
Starter control relay
(Starter control relay)
Diagnosis condition
Ignition switch ON
Signal (terminal)
Starter cut relay signal
Starter c ...
Preparation
Special Service Tool
The actual shape of the tools may differ from those illustrated here.
Tool number
(TechMate No.)
Tool name Description
KV10115801
(NI-38956)
Oil filter wrench
Removing and installing oil filter
a: 64.3 mm (2.531 in)
KV311039S0
( — )
Chargin ...
System Description. System
Lithium Ion Battery 12v
System Description
SYSTEM DIAGRAM
Component Function
12V sub battery (lithium ion battery)
Refer to 12V Sub Battery (Lithium Ion Battery).
Combination Meter
Receives li-ion battery error signal from 12V sub battery (lithium ion battery) through IPDM E/R via ...