Nissan Rogue Service Manual: Second row seats
Exploded View
RH SEAT
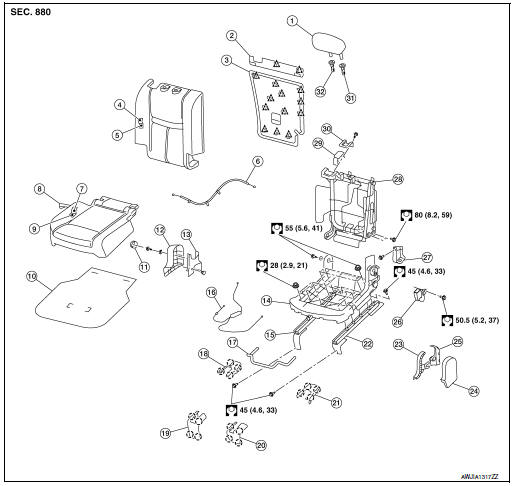
- Headrest
- Seatback upper luggage board
- Seatback luggage board
- Seatback trim
- Seatback pad
- Recline release cable
- Seat cushion trim
- Fold flat strap
- Seat cushion pad
- Seat cushion silencer
- Bolt cover
- Seat cushion outer finisher (RH)
- Seat cushion inner finisher (RH)
- Seat cushion frame
- Seat cushion slide (RH)
- Seat cushion slide cable
- Seat slide control lever
- Rear bolt cover (RH) (with third row seat)
- Front bolt cover (RH)
- Front bolt cover (LH)
- Rear bolt cover (LH) (with third row seat)
- Seat cushion slide (LH)
- Seat cushion inner finisher (LH)
- Seat cushion outer finisher (LH)
- Seat cushion rear finisher (LH)
- Seat belt buckle
- Recline lever finisher
- Seatback frame
- Recline device
- Recline device cover
- Headrest holder (locked)
- Headrest holder (free)
 Clip
Clip
 Pawl
Pawl
LH SEAT
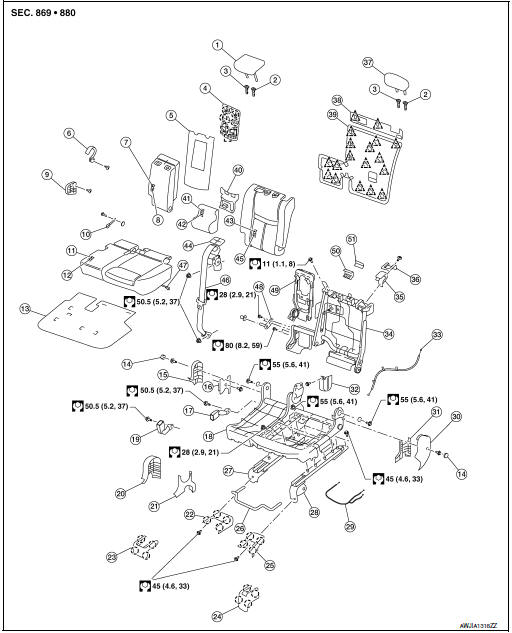
- Headrest (center)
- Headrest holder (locked)
- Headrest holder (free)
- Cup holder
- Armrest board
- Armrest inner finisher
- Armrest trim
- Armrest pad
- Armrest outer finisher
- Armrest fold flat strap
- Seat cushion trim
- Seat cushion pad
- Seat cushion silencer
- Bolt cover
- Seat cushion outer finisher (RH)
- Seat cushion inner finisher (RH)
- Seat belt buckle (center)
- Seat cushion frame
- Seat belt buckle (LH)
- Seat cushion center finisher (RH)
- Seat cushion center finisher (LH)
- Rear bolt cover (RH) (with third row seat)
- Front bolt cover (RH)
- Front bolt cover (LH)
- Rear bolt cover (LH) (with third row seat)
- Seat slide control lever
- Seat cushion slide (RH)
- Seat cushion slide (LH)
- Seat cushion slide cable
- Seat cushion outer finisher (LH)
- Seat cushion inner finisher (LH)
- Armrest inner finisher
- Recline release cable
- Seatback frame
- Recline device
- Recline device finisher
- Headrest (LH)
- Seatback luggage upper board
- Seatback luggage board
- Armrest lower pad
- Seatback center trim
- Seatback center pad
- Seatback trim
- Seat belt retractor finisher
- Seatback pad
- Seat belt retractor (center)
- Fold flat strap
- Armrest bracket
- Armrest frame
- Seat belt retractor inner finisher
- Seat belt retractor outer finisher
Clip
Pawl
Removal and Installation
LH SEAT
CAUTION: During removal and installation, an assistant is required to protect against injury or damage.
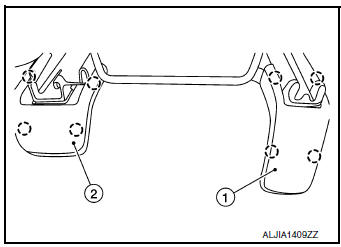
Removal
- Using a suitable tool release pawls and remove front bolt covers
RH (2) and LH (1).:Pawl
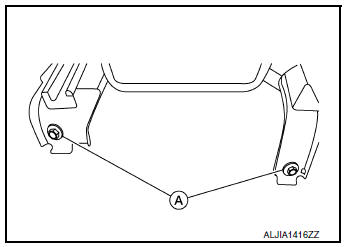
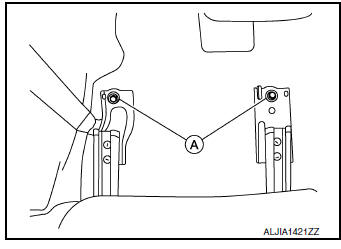
- Remove the seat front bolts (A).
- Slide the seat to the full forward position.
- Using a suitable tool release pawls and remove rear bolt covers
RH (2) and LH (1) (with third row seat).:Pawl
- Remove the seat rear bolts (A).
- Fold the seatback to the flat position, then remove the seat from the vehicle.
INSTALLATION
Installation is in the reverse order of removal.
RH SEAT
CAUTION: During removal and installation, an assistant is required to protect against injury or damage.
Removal
- Using a suitable tool release pawls and remove front bolt covers
LH (1) and RH (2).:Pawl
- Remove the seat front bolts (A).
- Slide the seat to the full forward position.
- Using a suitable tool release pawls and remove rear bolt covers
RH (2) and LH (1) (with third row seat).:Pawl
- Remove the seat rear bolts (A).
- Fold the seatback to the flat position, then remove the seat from the vehicle.
INSTALLATION
Installation is in the reverse order of removal.
 Front seat
DRIVER SIDE
DRIVER SIDE : Exploded View
POWER SEAT
Headrest
Seatback support
Seatback board
Seatback heater (if equipped)
Seatback trim
Seatback p ...
 Third row seats
Exploded View
Seatback board (RH)
Seatback trim (RH)
Seatback pad (RH)
Seat cushion trim (RH)
Seat cushion pad (RH)
Seat cushion silencer (LH/RH)
Seat hinge fi ...
Other materials:
Recommended fluids and lubricants
Fluids and Lubricants
*1: For additional information, see “Engine Oil Recommendation”.
*2: As an alternative to this recommended oil, SAE 5W-30 conventional petroleum
based oil may be used and meet all specifications
and requirements necessary to maintain the New Vehicle Limited Warra ...
Power switch illumination circuit
Description
Provides the power supply and the ground to control the power switch
illumination.
Component Function Check
1.CHECK POWER SWITCH ILLUMINATION OPERATION
CONSULT ACTIVE TEST
Turn the power switch ON.
Select “ENGINE SW ILLUMI” of “BCM” active test item.
&n ...
Unit removal and installation
ENGINE ASSEMBLY
Exploded view
Engine mounting insulator (RH)
Upper torque rod (RH)
Engine mounting bracket (RH)
Lower torque rod
Torque rod bracket
Engine mounting insulator (LH)
Removal and installation (FWD)
WARNING:
Situate the vehicl ...
