Nissan Rogue (T33) 2021-Present Service Manual: Removal and Installation :: Front Seat
Exploded View
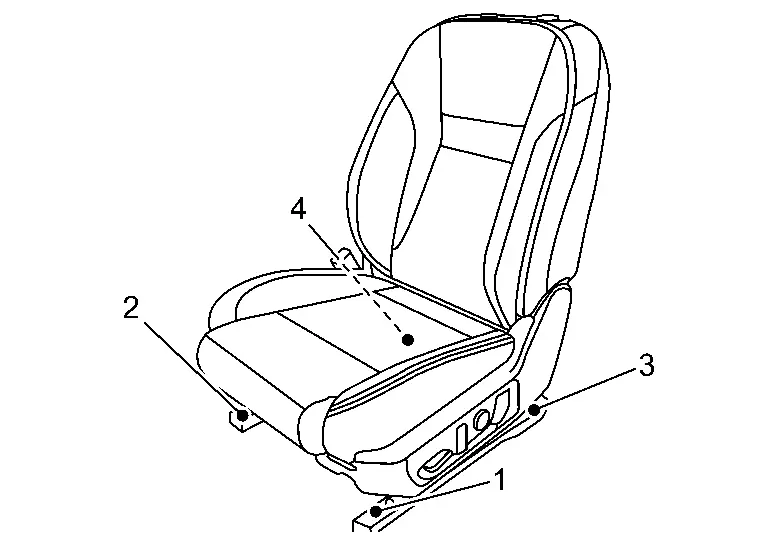
Exploded View (Removal)
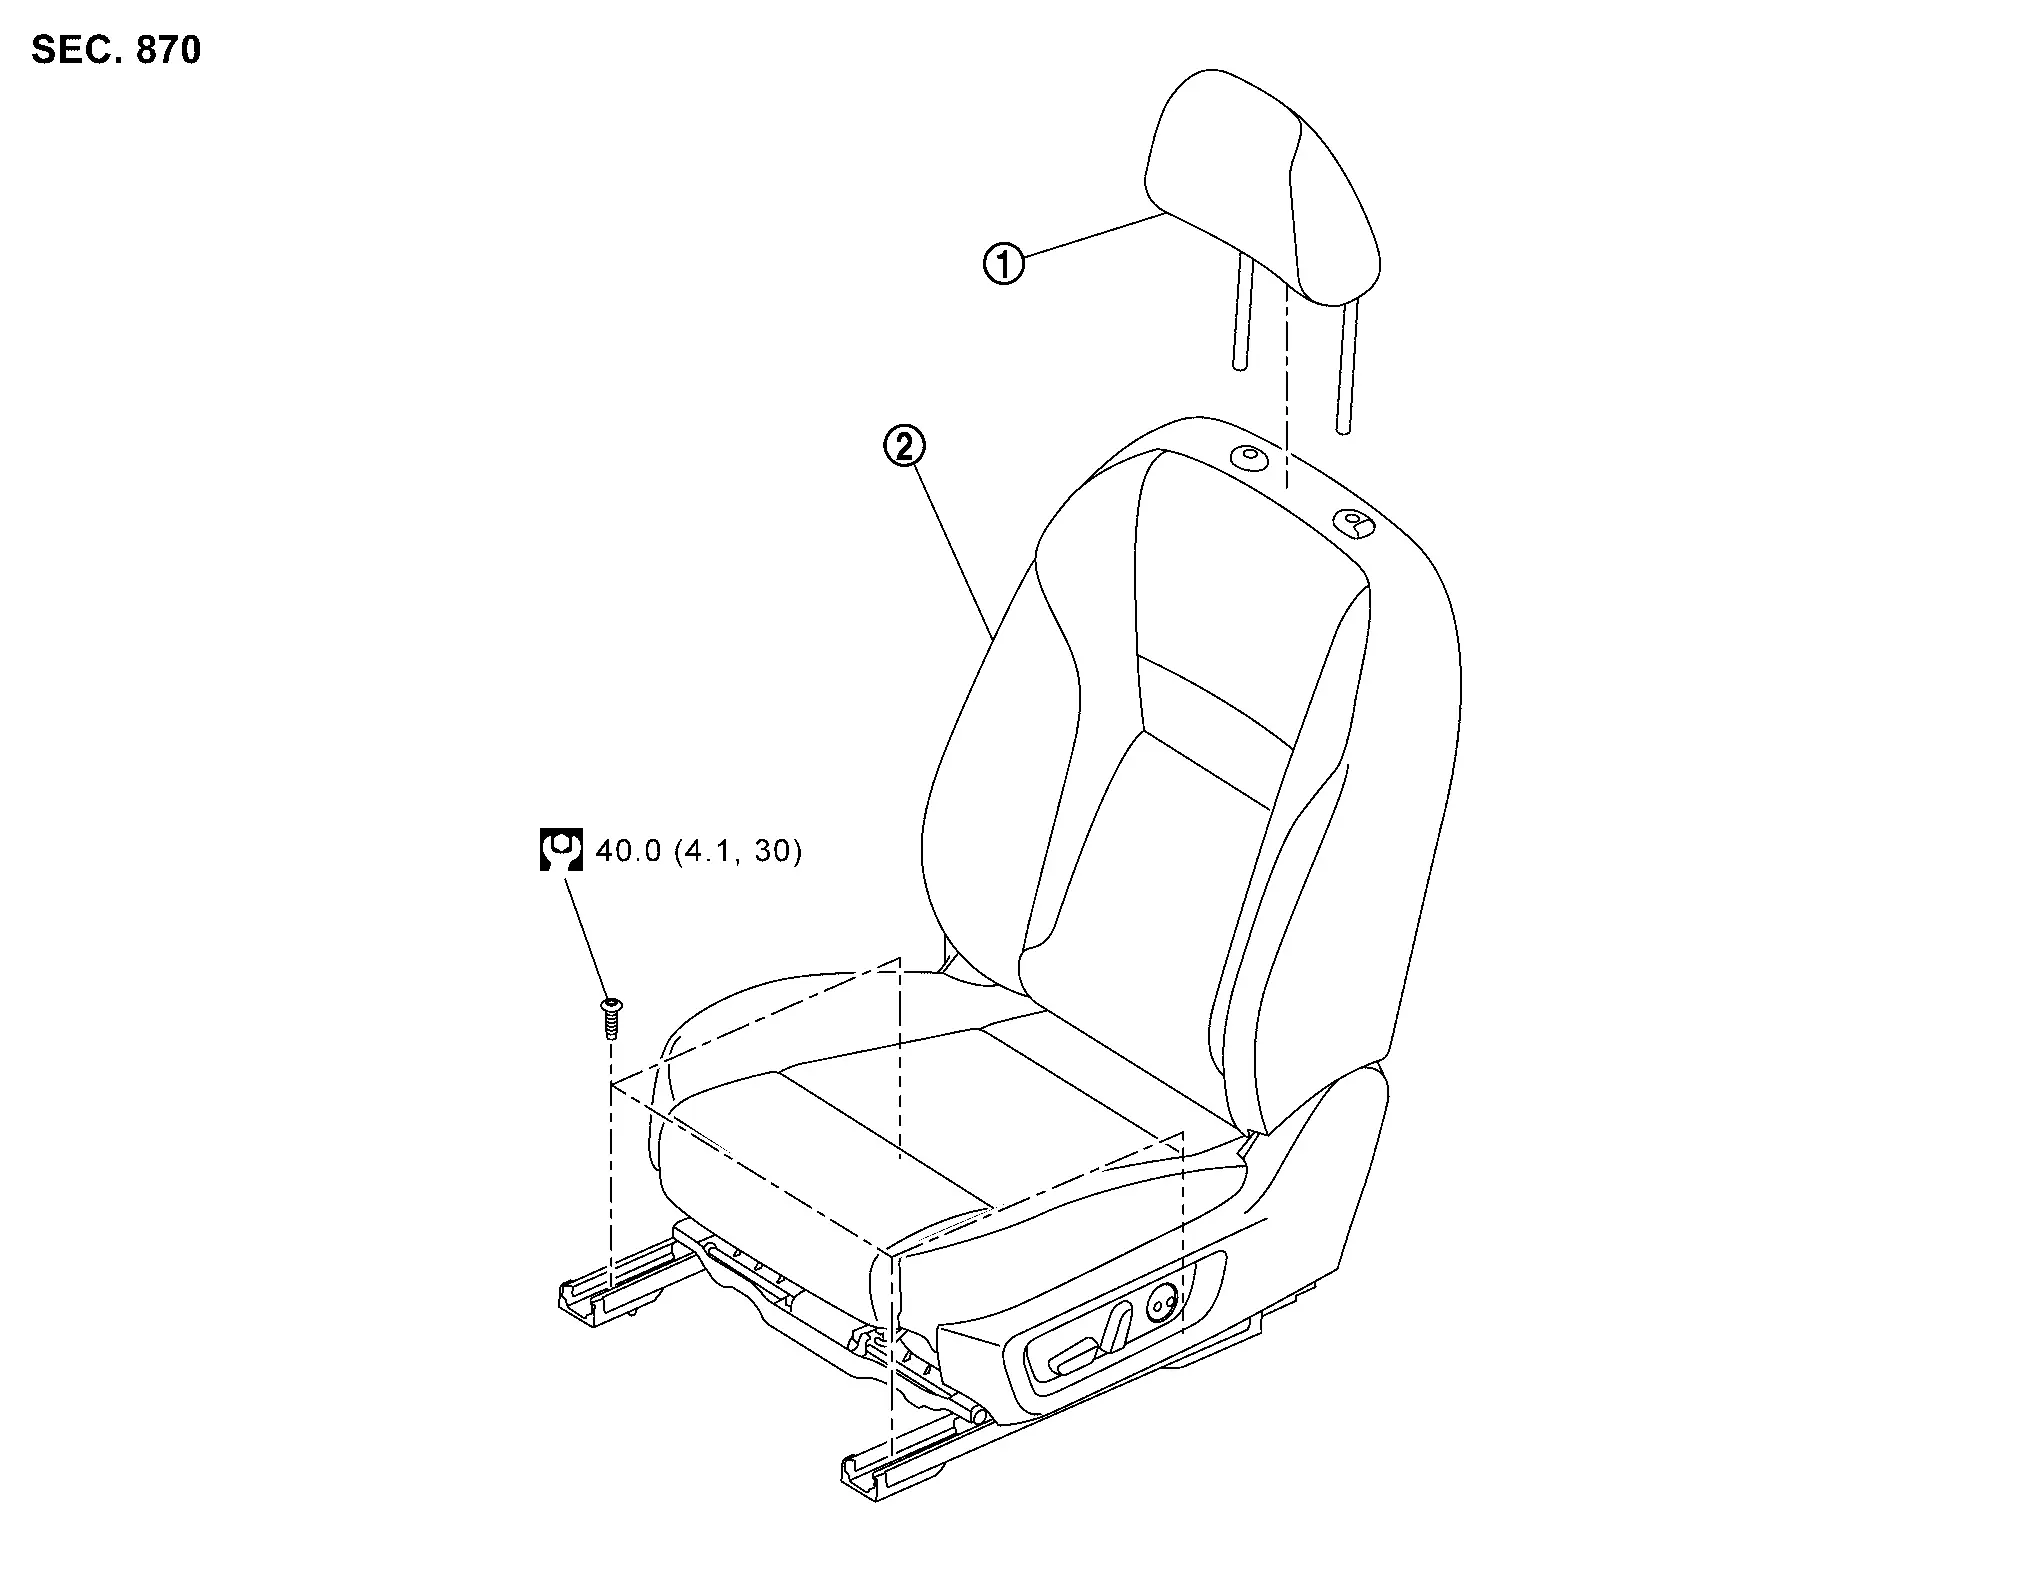
| 1. | Headrest | 2. | Front seat assembly | — | — |
 |
: N·m (kg-m, ft-lb) | ||||
Exploded View (Disassembly)
POWER SEAT
Driver Seat
| 1. | Seatback silencer | 2. | Seatback trim | 3. | Seatback pad |
| 4. | Inside seat cushion finisher outer | 5. | Inside seat cushion finisher inner | 6. | Seat cushion pad |
| 7. | Seat cushion trim | 8. | Seat cushion silencer | 9. | Seat cushion suspension |
| 10. | Driver seat control unit*1 | 11. | Bracket | 12. | Seat cushion lower end cap front |
| 13. | Seat cushion lower end cap rear | 14. | Outside seat cushion finisher bracket | 15. | Rivet |
| 16. | Power seat switch | 17 . | Outside seat cushion finisher outer | 18. | Slide knob |
| 19. | Reclining knob | 20. | Lumbar support switch | 21. | Outside seat cushion finisher inner |
| 22. | Front side air bag module | 23. | Seat harness | 24. | Seatback suspension |
| 25. | Lumbar support unit | 26. | Headrest holder (lock) | 27. | Headrest holder (free) |
| 28. | Front center air bag module*2 | 29. | Seatback frame | 30. | Seat cushion frame |
| 31. | Inside seat cushion finisher lower | 32. | Outside seat cushion finisher lower | — | — |
 |
: Clip | ||||
 |
: Pawl | ||||
 |
: Metal clip | ||||
 |
: Always replace after every disassembly. | ||||
 |
: N·m (kg-m, in-lb) | ||||
|
: N·m (kg-m, ft-lb) | ||||
 ,
,  ,
,  ,
,  ,
,  ,
,  , : Indicates that the part is connected at points with same symbol in actual Nissan Ariya vehicle.
*1 : With driver seat position memory function
*2 : With front center air bag module
Passenger Seat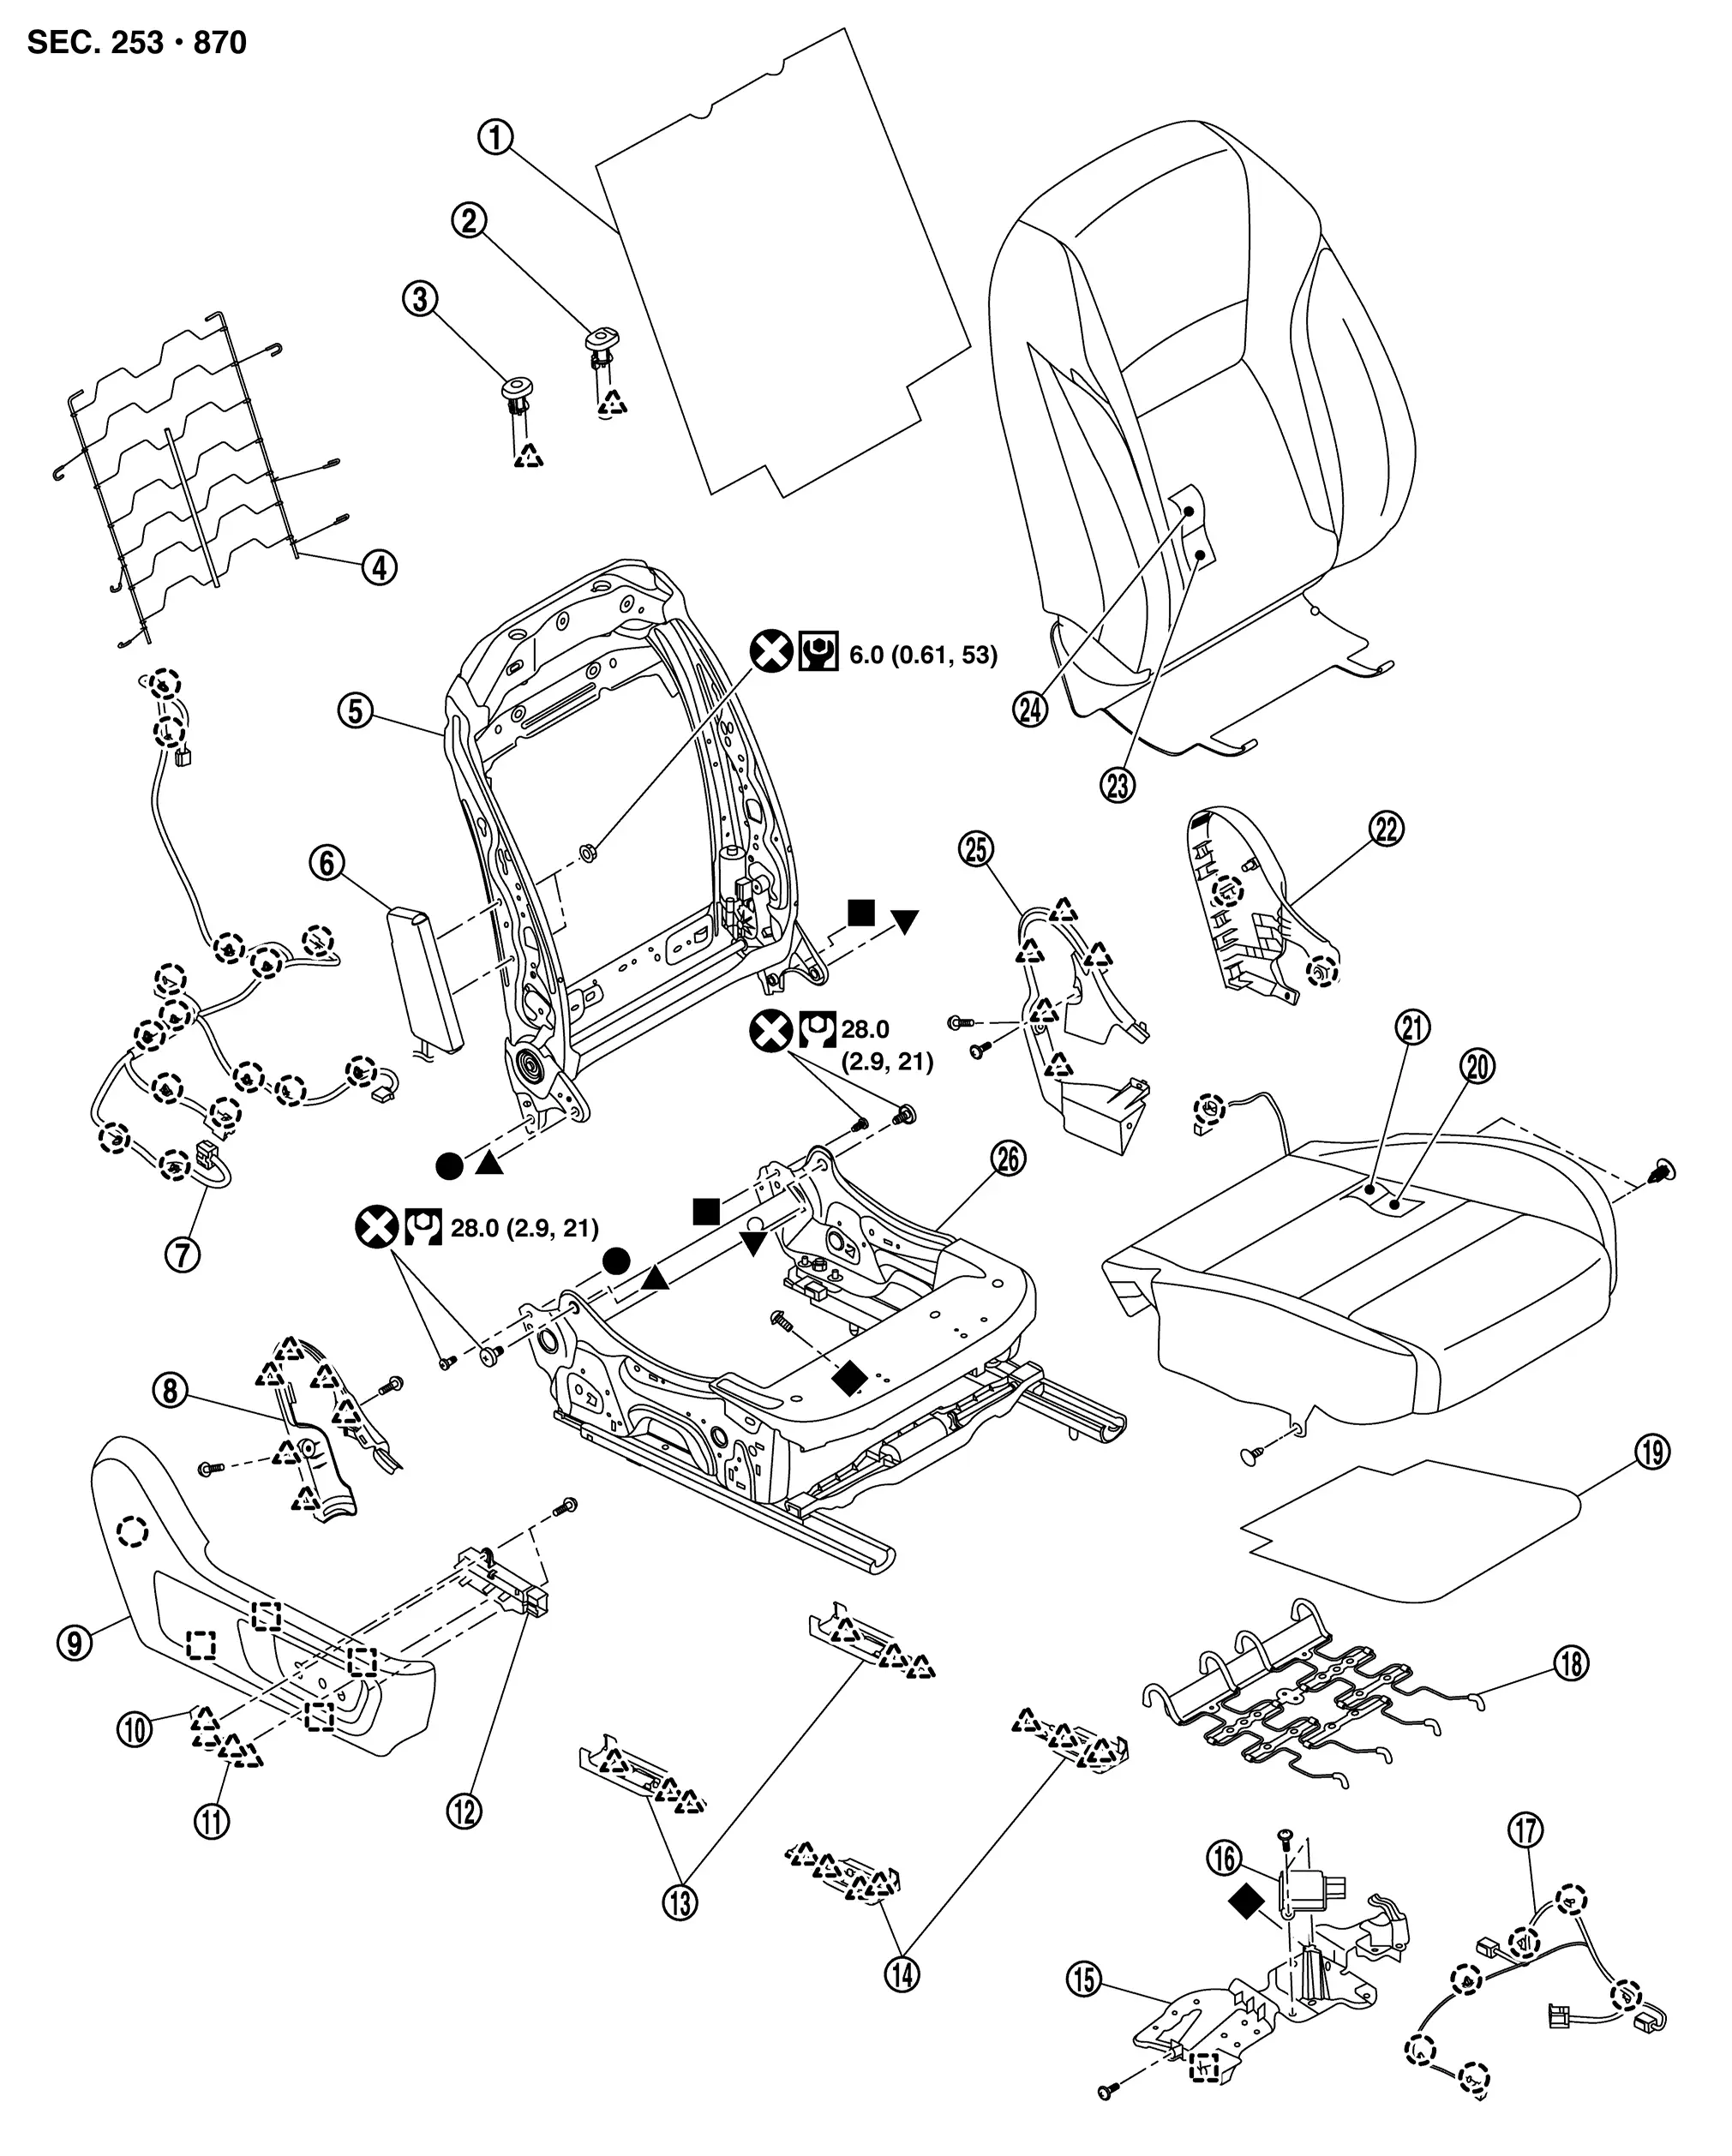
| 1. | Seatback silencer | 2. | Headrest holder (lock) | 3. | Headrest holder (free) |
| 4. | Seatback suspension | 5. | Seatback frame | 6. | Front side air bag module |
| 7. | Seat harness | 8. | Outside seat cushion finisher inner | 9. | Outside seat cushion finisher outer |
| 10. | Reclining knob | 11. | Slide knob | 12. | Power seat switch |
| 13. | Seat cushion lower end cap rear | 14. | Seat cushion lower end cap front | 15. | Bracket |
| 16. | Occupant detection system control unit | 17. | Occupant detection system harness | 18. | Seat cushion suspension |
| 19. | Seat cushion silencer | 20. | Seat cushion pad | 21. | Seat cushion trim |
| 22. | Inside seat cushion finisher outer | 23. | Seatback pad | 24. | Seatback trim |
| 25. | Inside seat cushion finisher inner | 26. | Seat cushion frame | — | — |
|
: Clip | ||||
|
: Pawl | ||||
|
: Metal clip | ||||
|
: Always replace after every disassembly. | ||||
|
: N·m (kg-m, in-lb) | ||||
|
: N·m (kg-m, ft-lb) | ||||
, , , , , : Indicates that the part is connected at points with same symbol in actual Nissan Ariya vehicle.
MANUAL SEAT
Driver Seat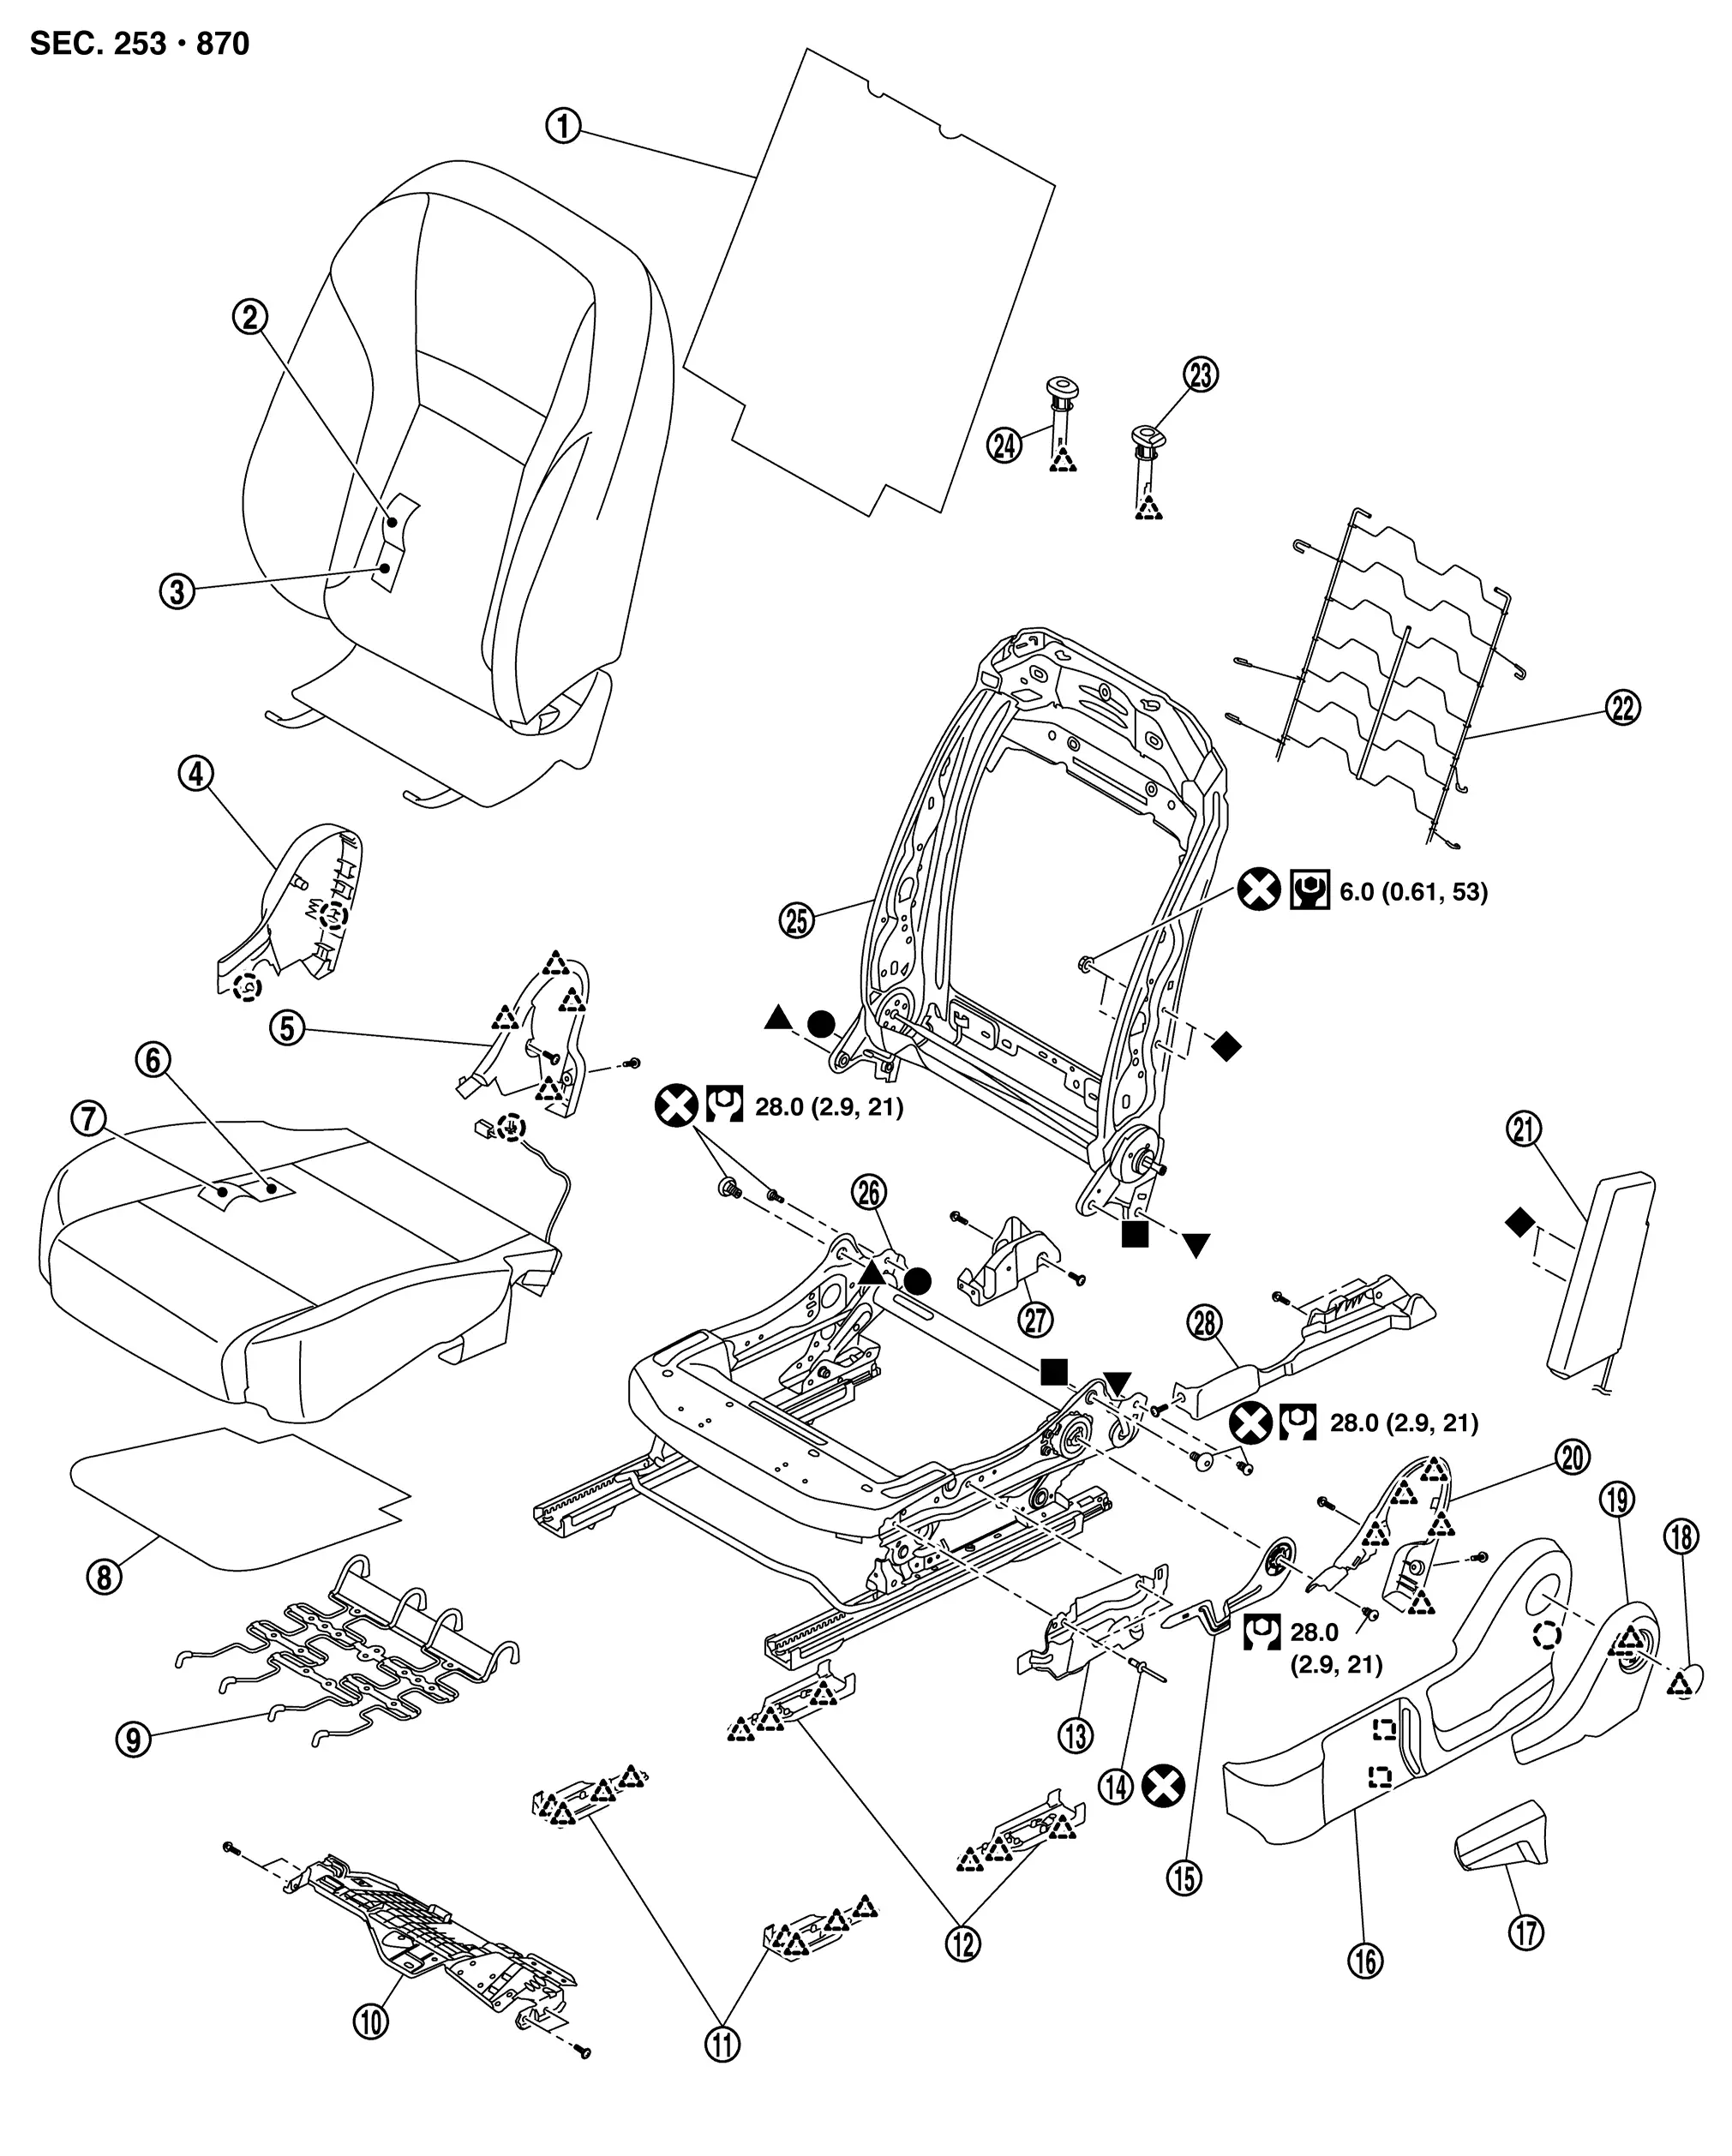
| 1. | Seatback silencer | 2. | Seatback trim | 3. | Seatback pad |
| 4. | Inside seat cushion finisher outer | 5. | Inside seat cushion finisher inner | 6. | Seat cushion pad |
| 7. | Seat cushion trim | 8. | Seat cushion silencer | 9. | Seat cushion suspension |
| 10. | Bracket | 11. | Seat cushion lower end cap front | 12. | Seat cushion lower end cap rear |
| 13. | Outside seat cushion finisher bracket | 14. | Rivet | 15. | Lifter lever |
| 16. | Outside seat cushion finisher outer | 17 | Lifter knob | 18. | Reclining knob cap |
| 19. | Reclining knob | 20. | Outside seat cushion finisher inner | 21. | Front side air bag module |
| 22. | Seatback suspension | 23. | Headrest holder (lock) | 24. | Headrest holder (free) |
| 25. | Seatback frame | 26. | Seat cushion frame | 27. | Inside seat cushion finisher lower |
| 28. | Outside seat cushion finisher lower | — | — | — | — |
|
: Clip | ||||
|
: Pawl | ||||
|
: Metal clip | ||||
|
: Always replace after every disassembly. | ||||
|
: N·m (kg-m, in-lb) | ||||
|
: N·m (kg-m, ft-lb) | ||||
, , , , , : Indicates that the part is connected at points with same symbol in actual Nissan Ariya vehicle.
Passenger Seat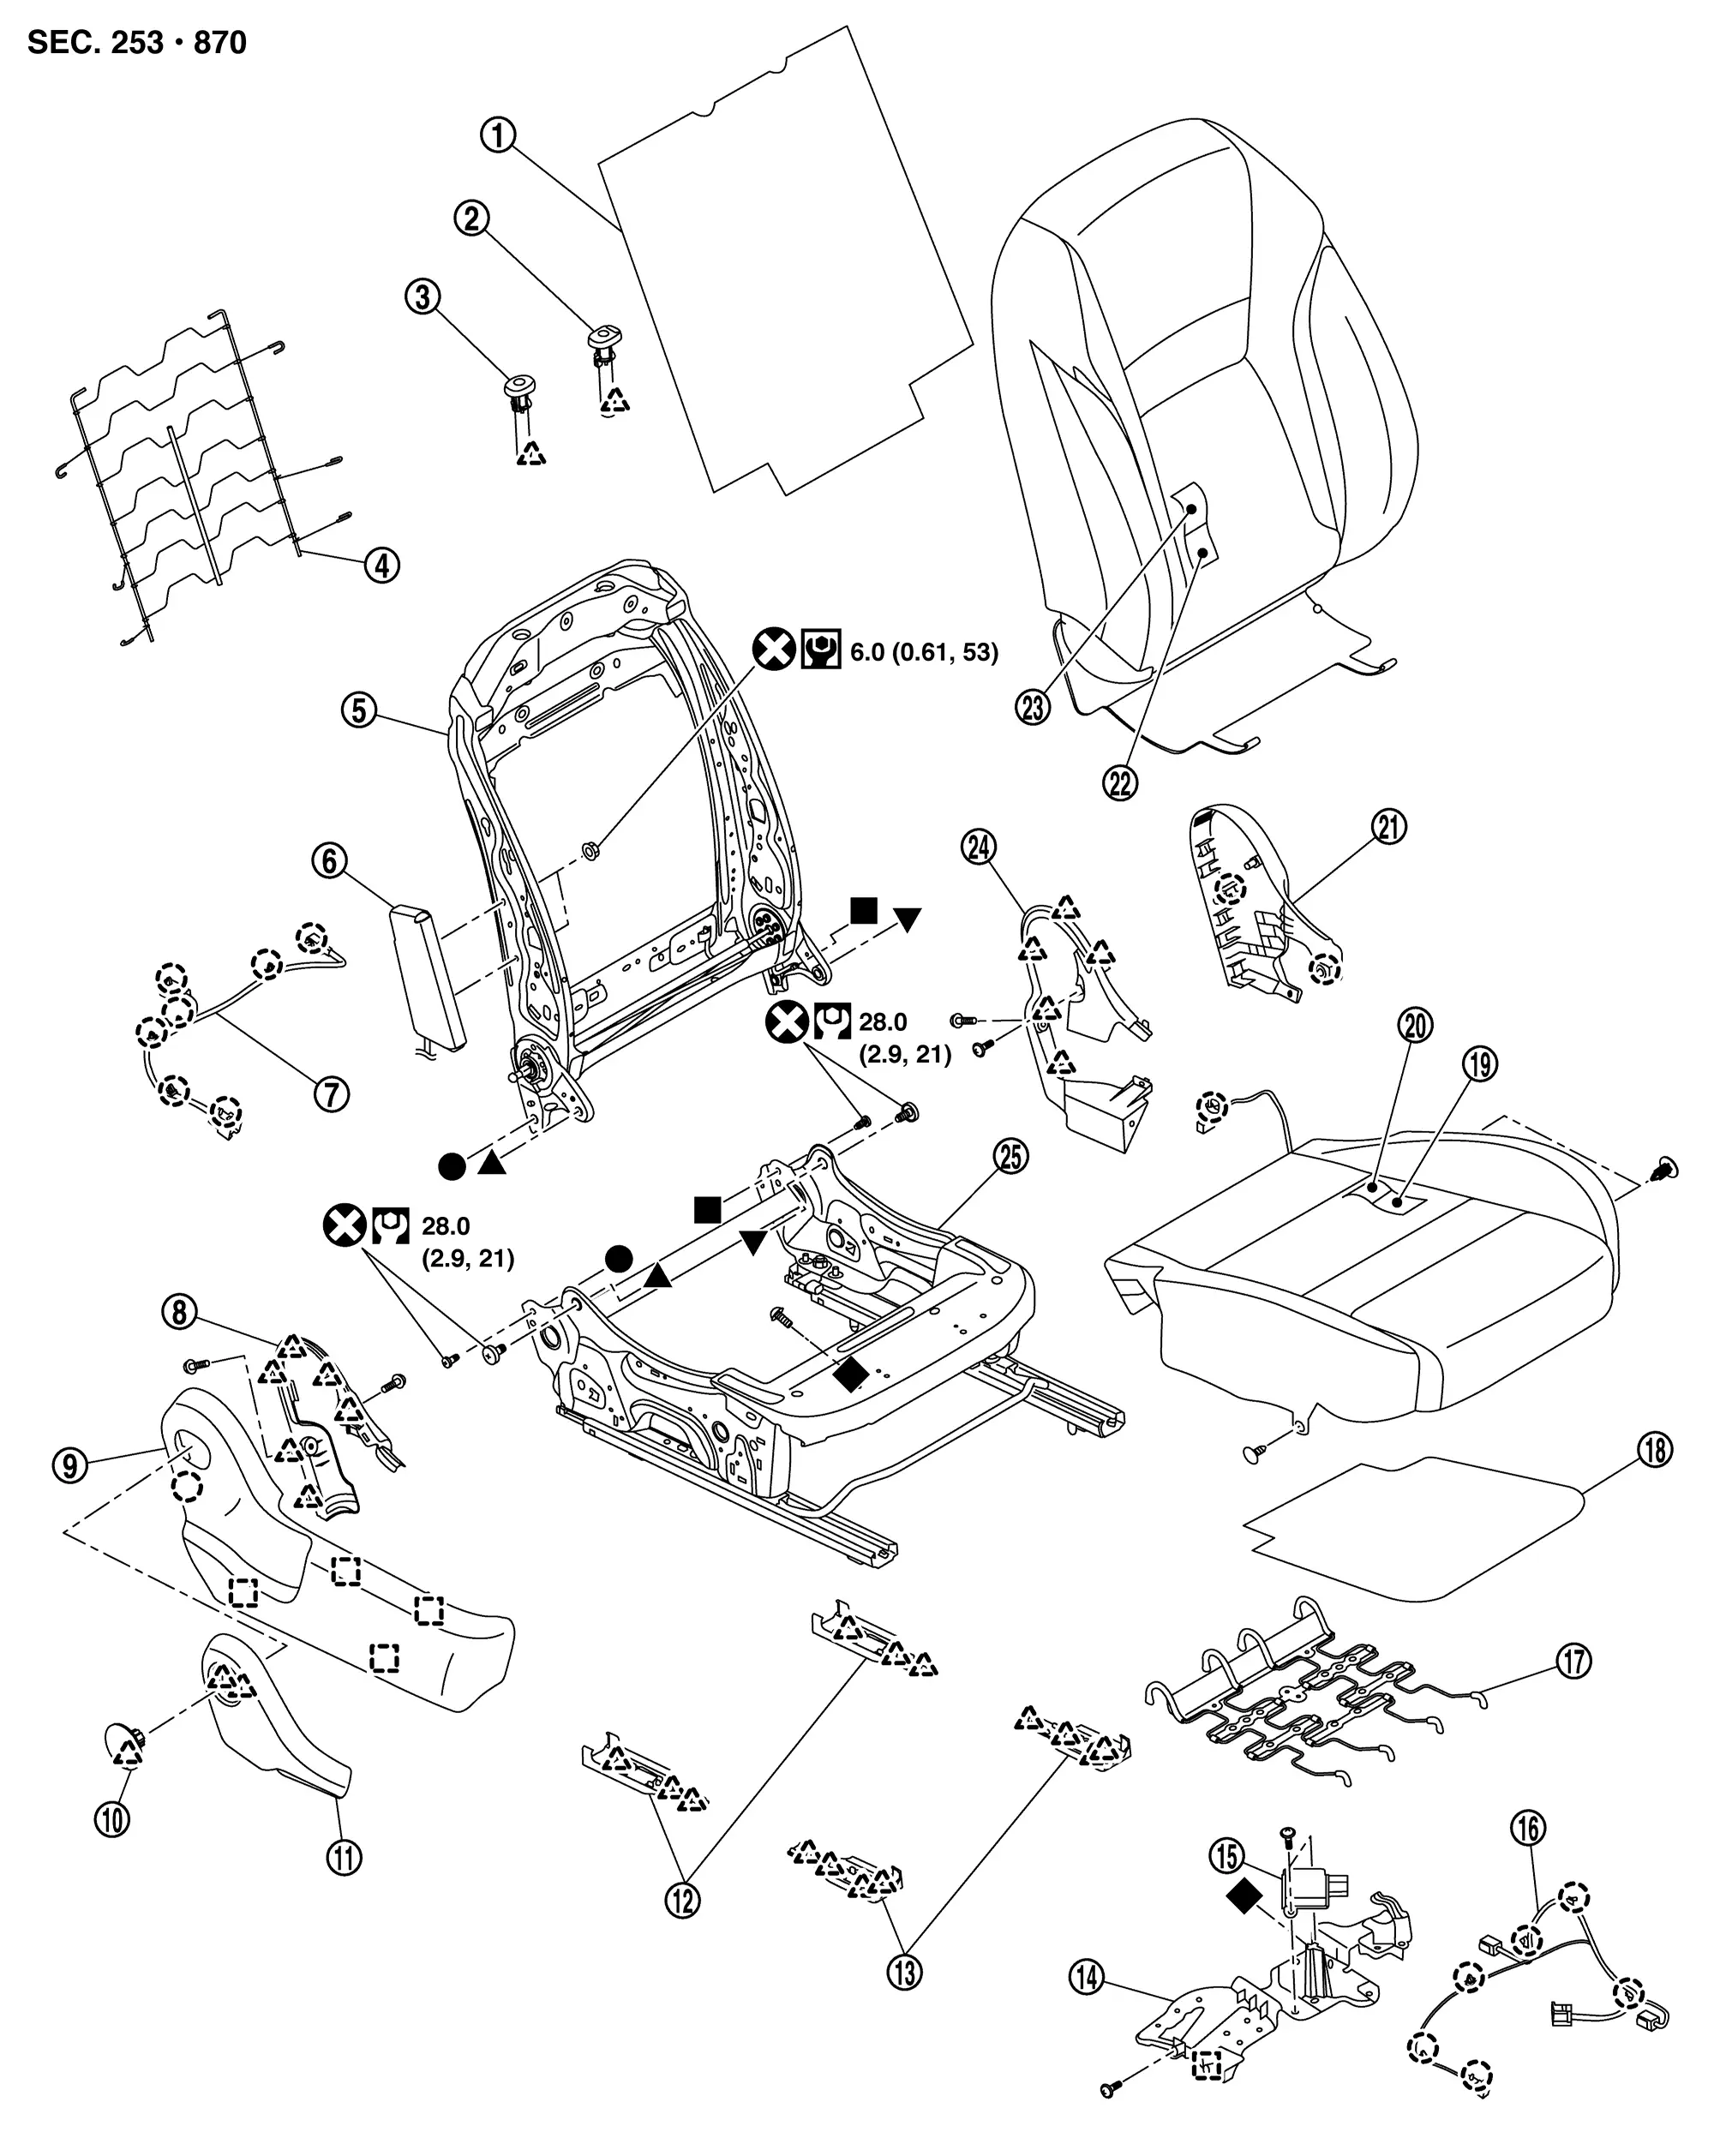
| 1. | Seatback silencer | 2. | Headrest holder (lock) | 3. | Headrest holder (free) |
| 4. | Seatback suspension | 5. | Seatback frame | 6. | Front side air bag module |
| 7. | Seat harness | 8. | Outside seat cushion finisher inner | 9. | Outside seat cushion finisher outer |
| 10. | Reclining knob cap | 11. | Reclining knob | 12. | Seat cushion lower end cap rear |
| 13. | Seat cushion lower end cap front | 14. | Bracket | 15. | Occupant detection system control unit |
| 16. | Occupant detection system harness | 17. | Seat cushion suspension | 18. | Seat cushion silencer |
| 19. | Seat cushion pad | 20. | Seat cushion trim | 21. | Inside seat cushion finisher outer |
| 22. | Seatback pad | 23. | Seatback trim | 24. | Inside seat cushion finisher inner |
| 25. | Seat cushion frame | — | — | — | — |
|
: Clip | ||||
|
: Pawl | ||||
|
: Metal clip | ||||
|
: Always replace after every disassembly. | ||||
|
: N·m (kg-m, in-lb) | ||||
|
: N·m (kg-m, ft-lb) | ||||
, , , , , : Indicates that the part is connected at points with same symbol in actual Nissan Ariya vehicle.
Removal and Installation
WARNING:
-
When removing the battery negative terminal, refer to Precautions for Removing Battery Terminal.
-
Never use air tools or electric tools for servicing (prevents the air bag diagnosis sensor unit from activating unexpectedly due to vibration).
CAUTION:
-
When removing and installing, use shop cloths to protect parts and Nissan Ariya vehicle from damage.
-
When removing and installing the passenger seat, perform the Zero-point reset operations. Refer to Description.
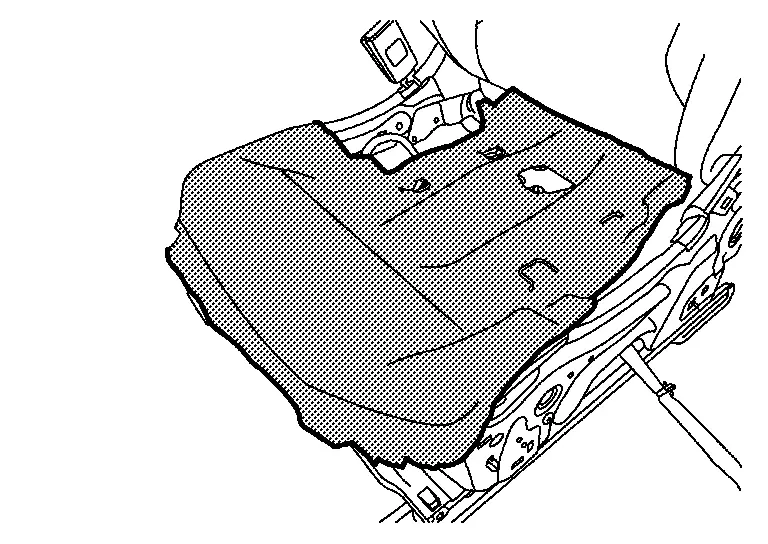
REMOVAL
Remove headrest.
Slide the front seat to front most position.
Remove rear side of front seat mounting bolts.
Slide the front seat to rear most position.
Remove front side of front seat mounting bolts.
Disconnect the battery negative terminal.
 NOTE:
NOTE:
If disassemble front seat, fully lift up front seat to ensure the work space of disassemble to seat cushion finisher (power seat).
Pull up the seat to rearward.
Disengage body harness fixing clips, and then disconnect harness connectors.
CAUTION:
Before performing disengage/disconnect operation, check the engage, connect position of harness/harness connector locations.
Remove front seat from Nissan Ariya vehicle.
INSTALLATION
Note the following items, and then install in the reverse order of removal.
CAUTION:
-
When installing, tighten mounting bolts according to numerical order 1→4 as shown in figure, starting from front outer mounting bolt.
-
After work is completed, check that on system malfunction is detected by air bag warning lamp.
Seatback
Disassembly and Assembly
DISASSEMBLY
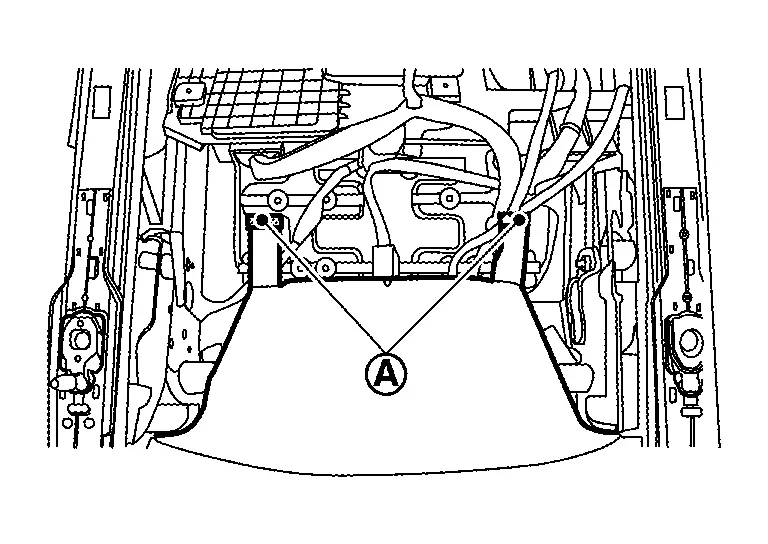
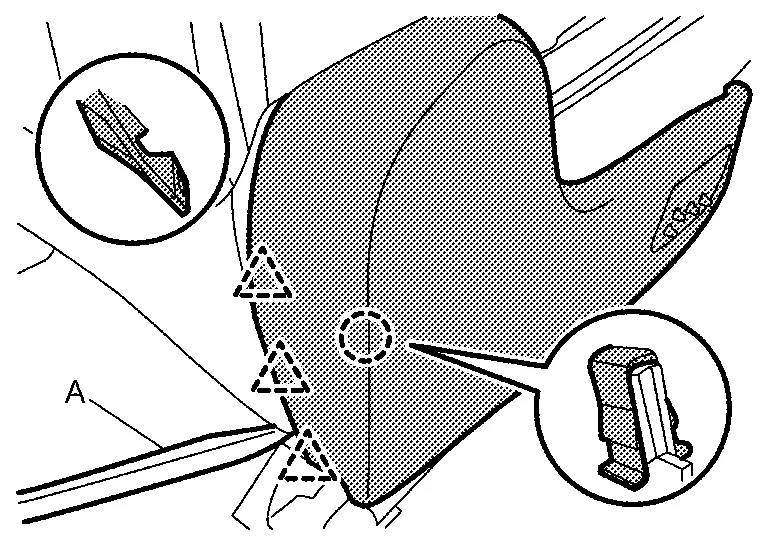
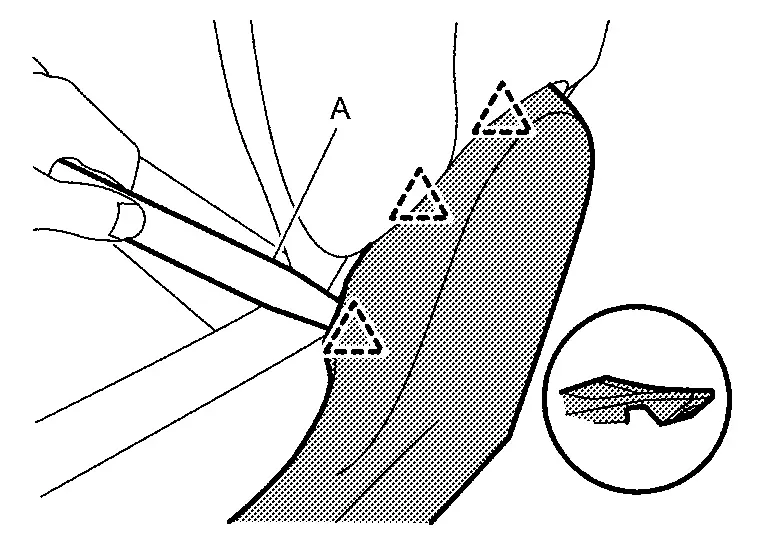
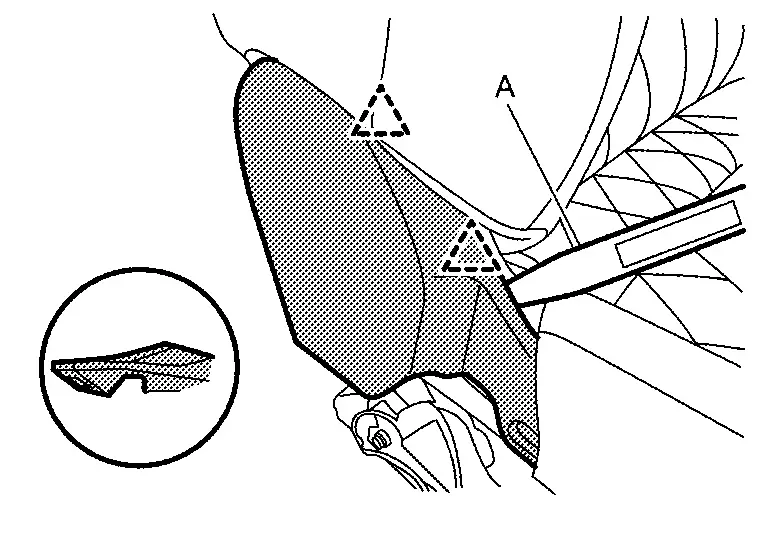
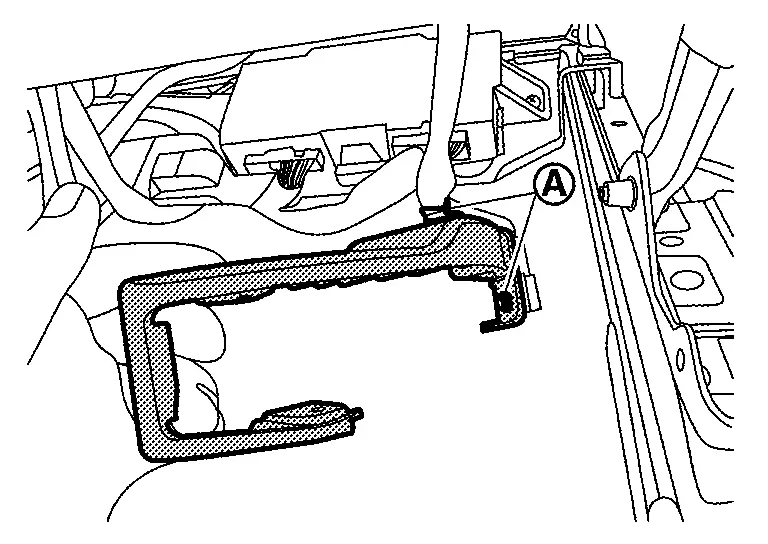
Disengage seatback trim fixing retainers (A).
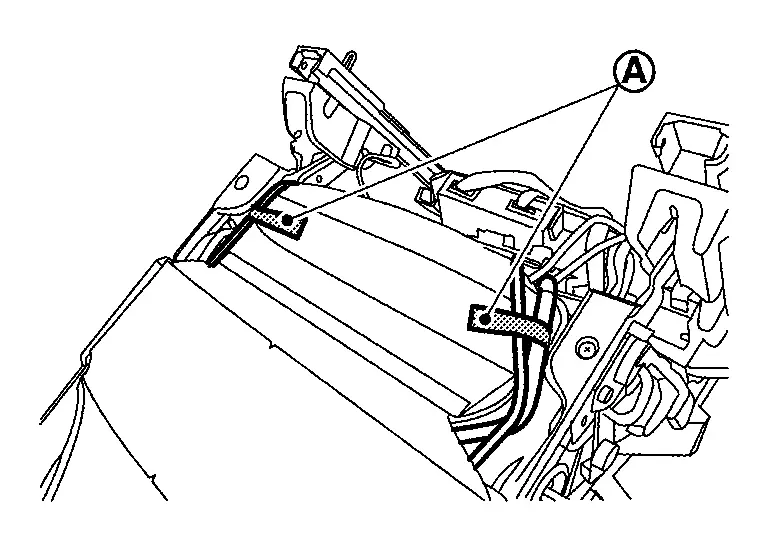
Disengage harnesses fixing seat cushion trim dual lock fasteners (A).
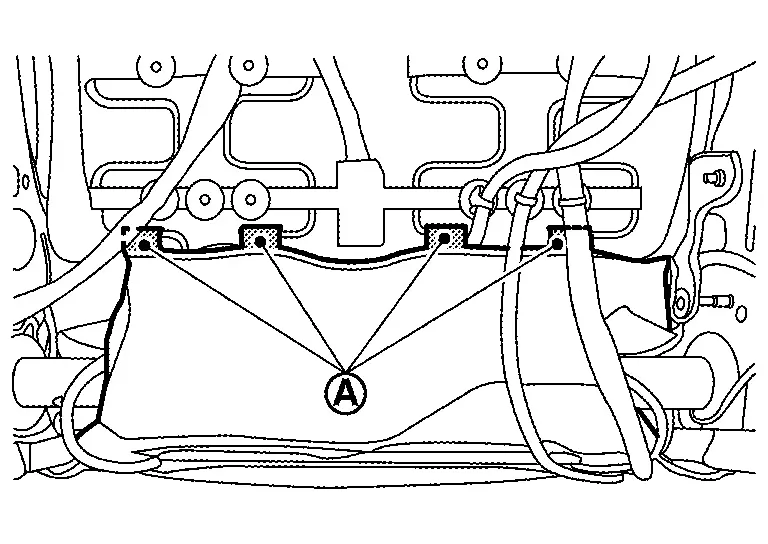
Disengage seat cushion trim fixing retainers (A).
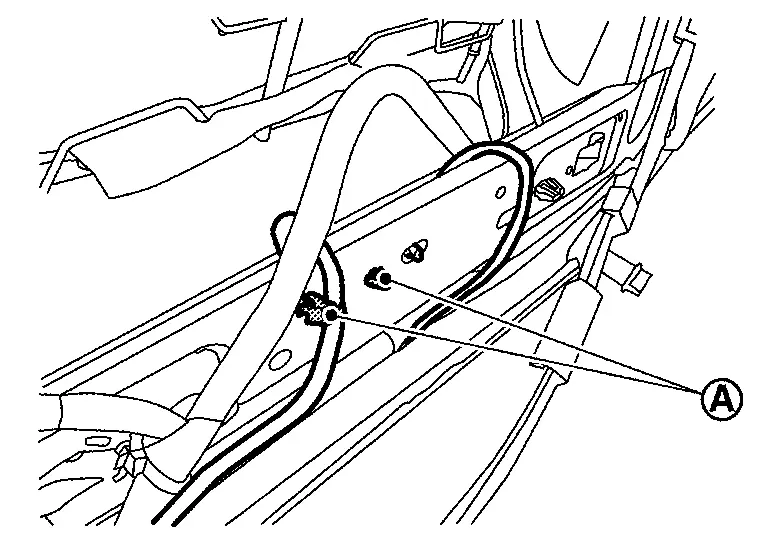
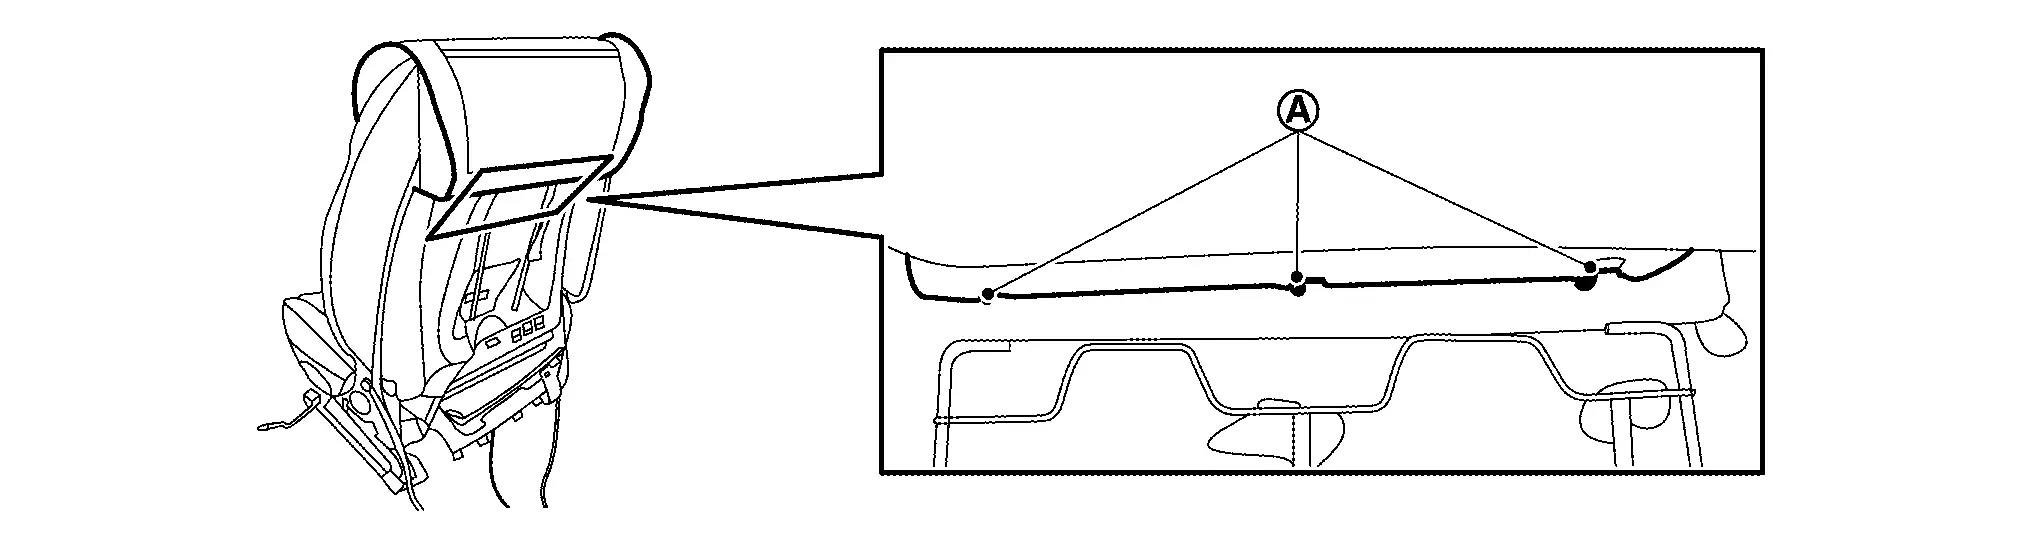
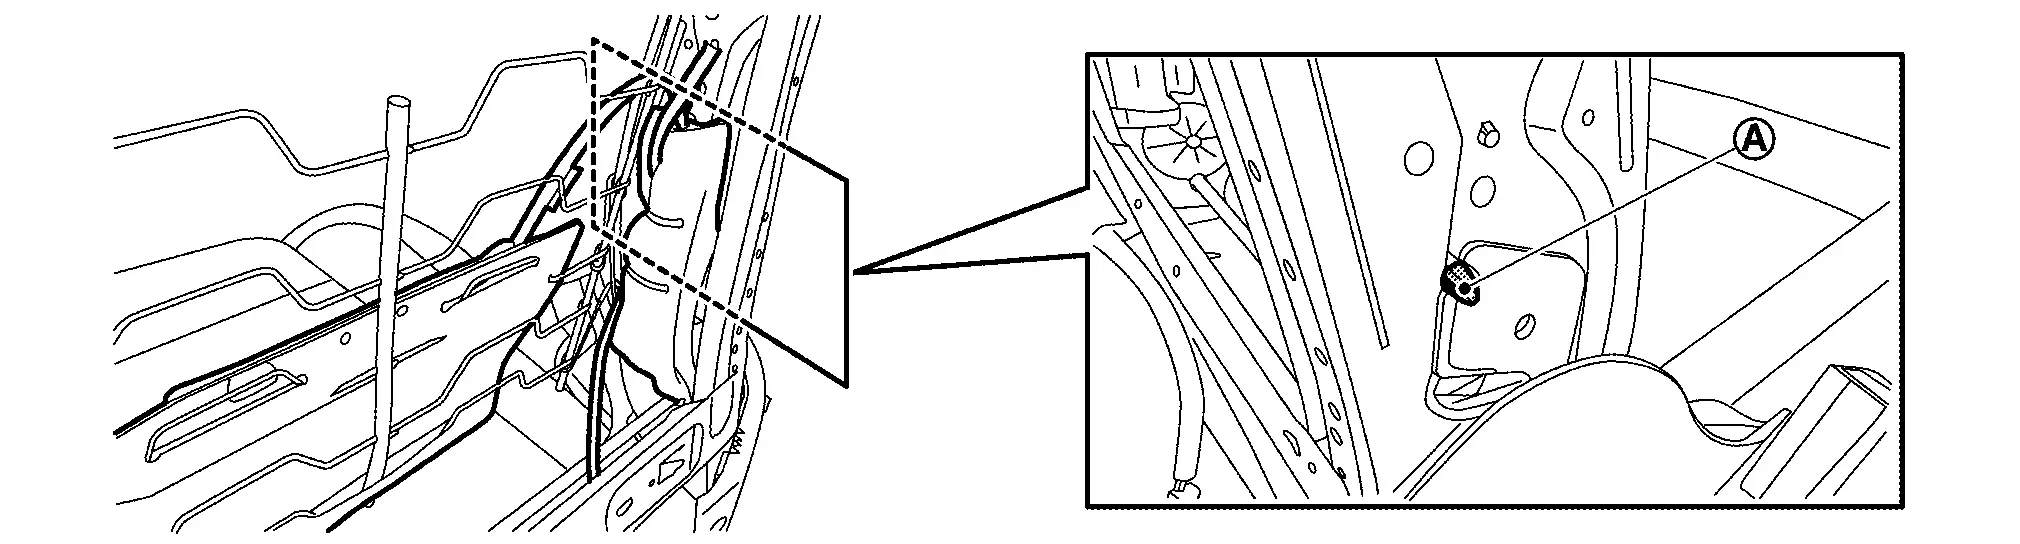
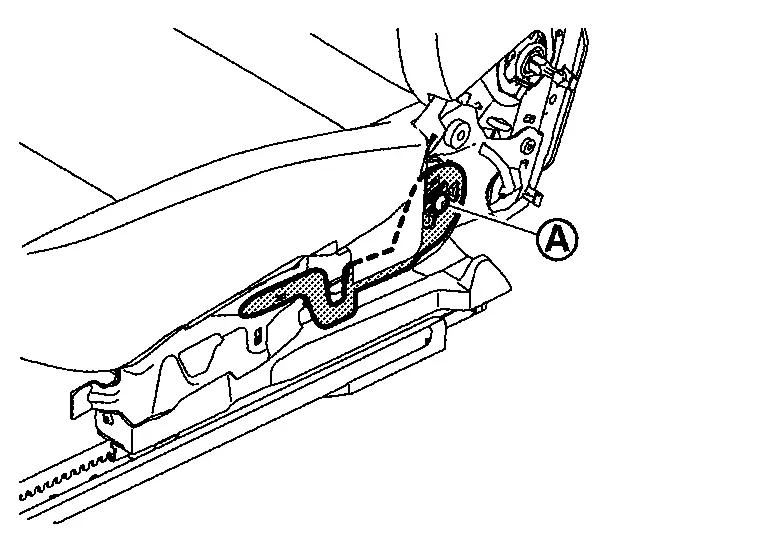
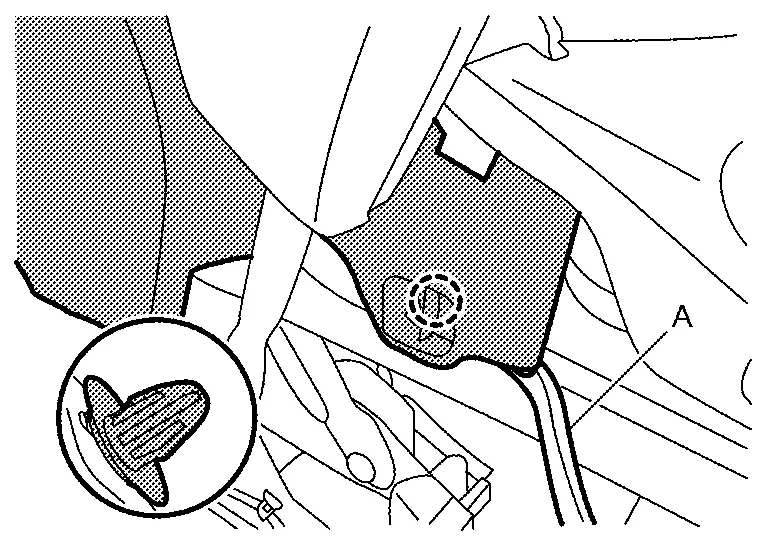
Disengage front center air bag module harness connector and harness fixing clips (A) (with front center air bag module).
|
: Clip |
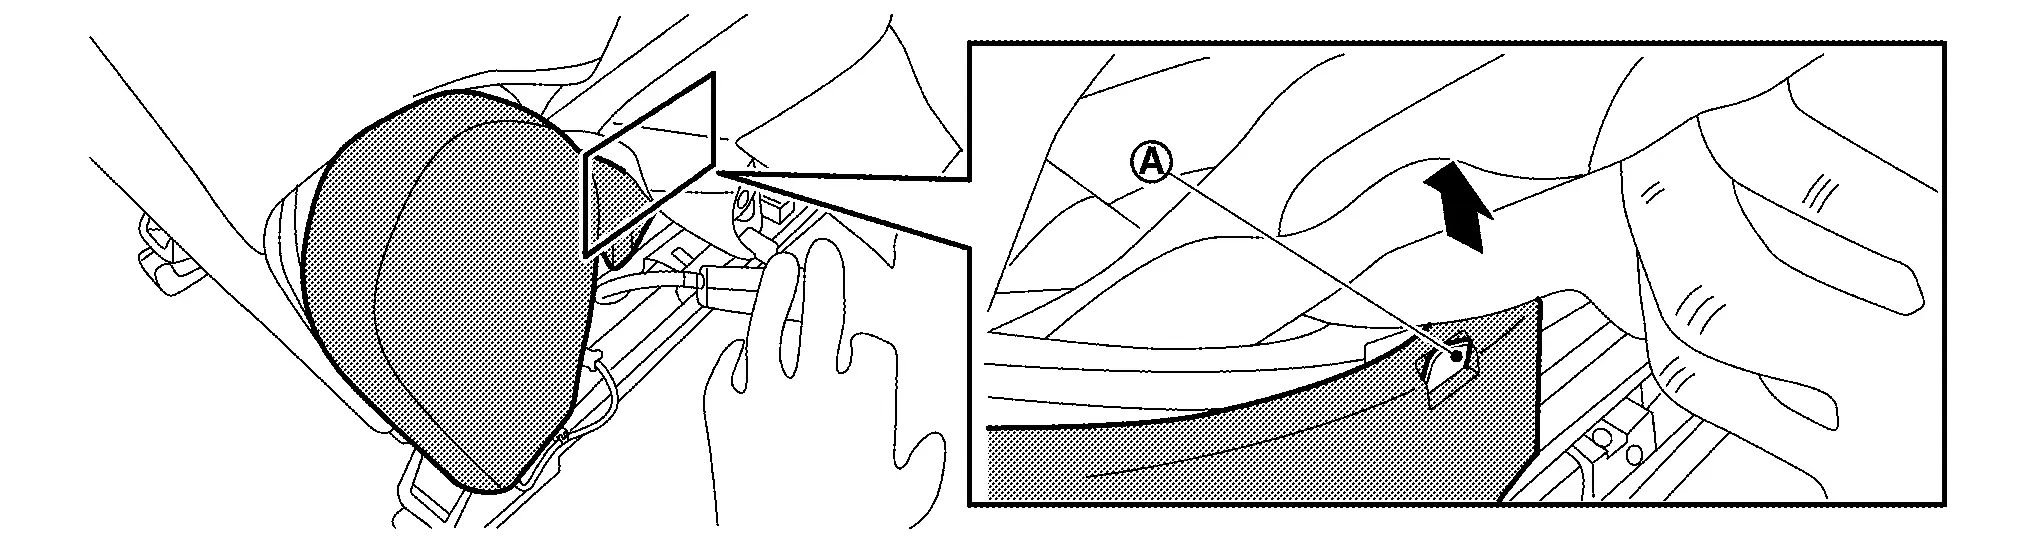
Disengage front side air bag module harness connector and harness fixing clips (A).
|
: Clip |
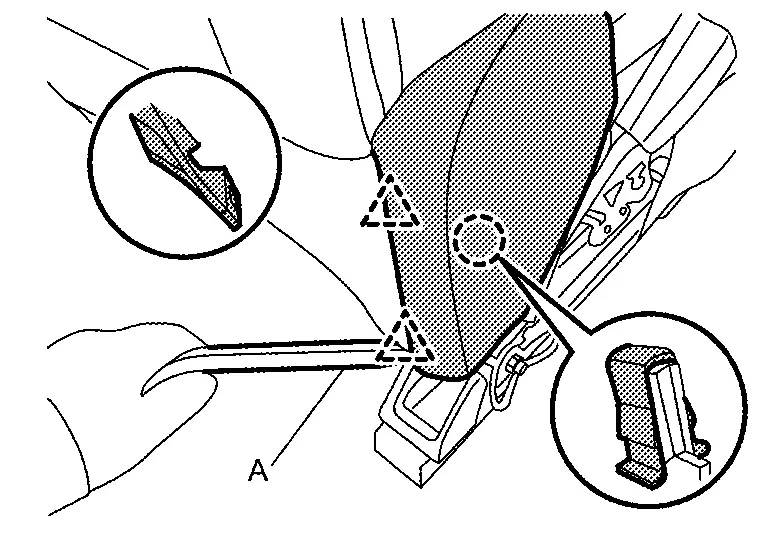
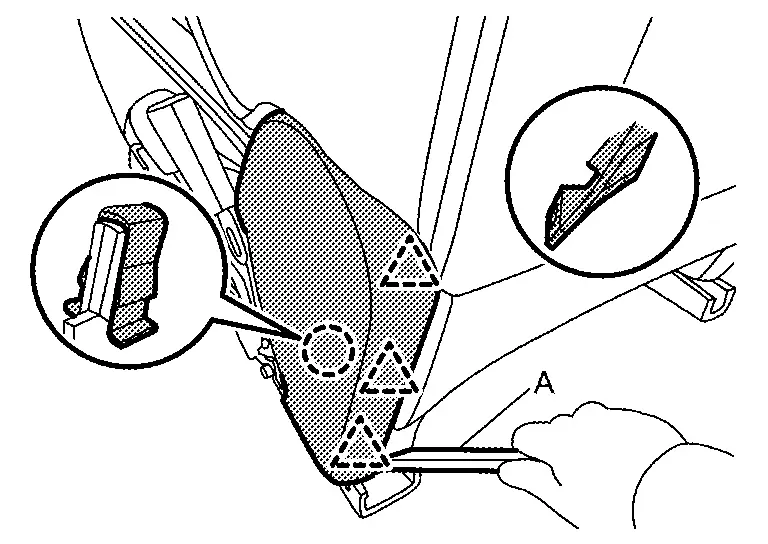
Disengage seatback trim fixing retainer (A).
Open seatback trim fixing fasteners (A).
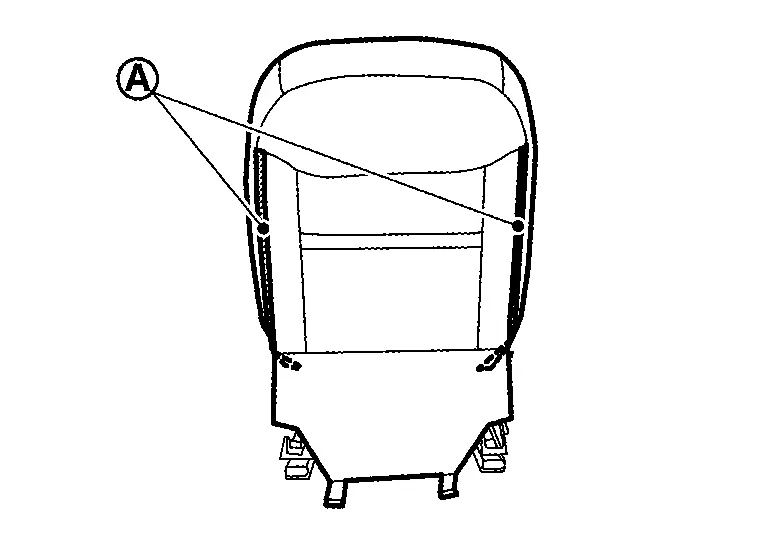
Disengage seatback trim fixing retainers (A).

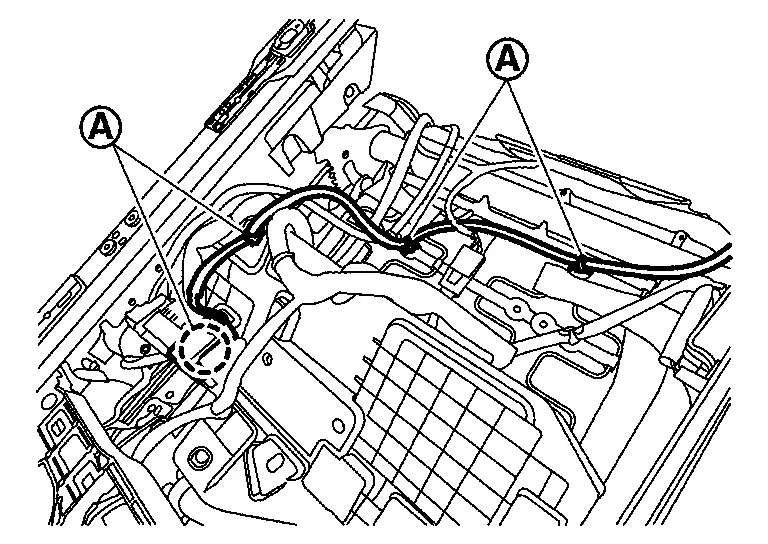
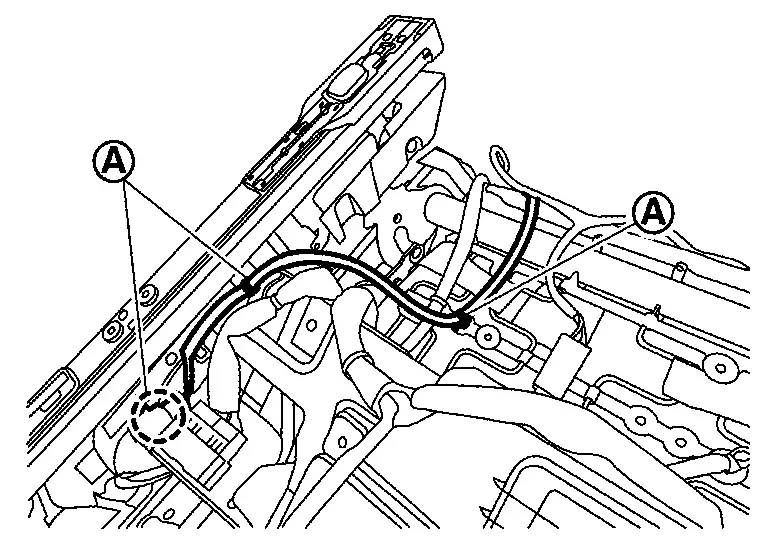
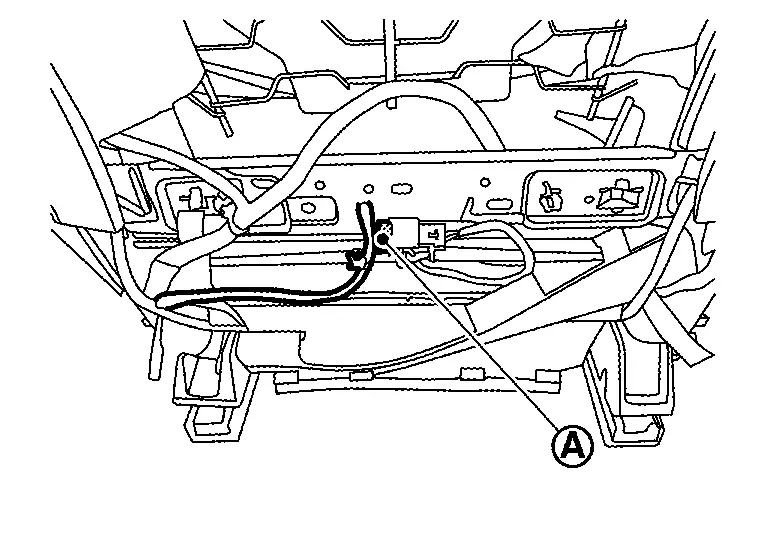
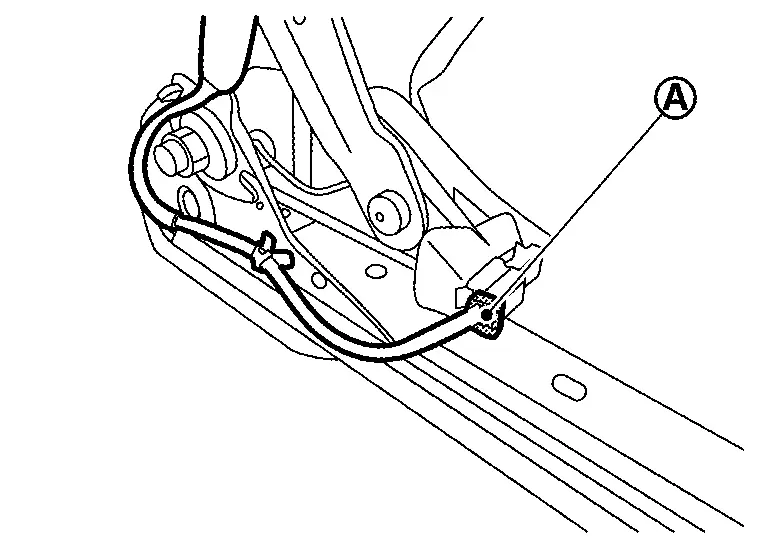
Disengage seat heater harness and harness connector fixing clips (A).
Disconnect seatback heater harness connector (A).
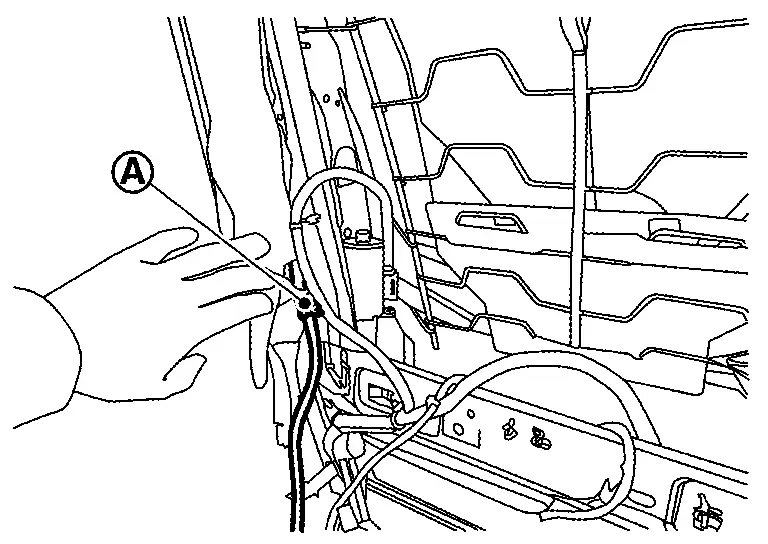
Disengage front side air bag module harness fixing clip (A).
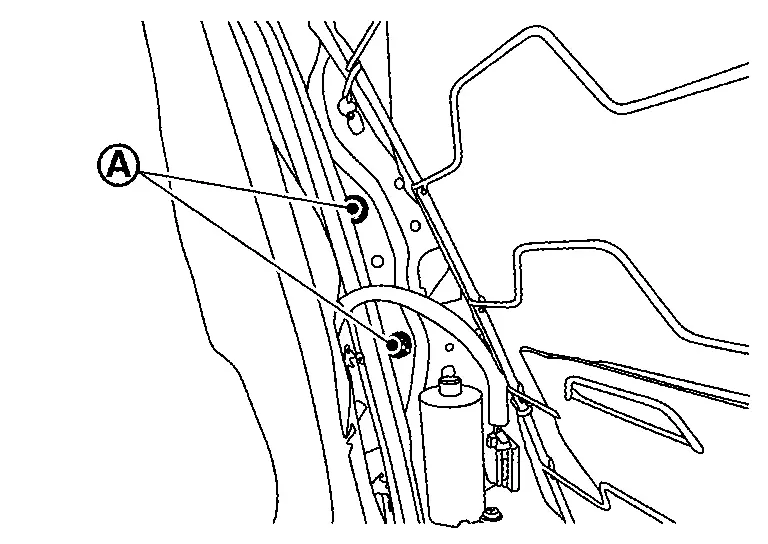
Remove side air bag module mounting nuts (A).
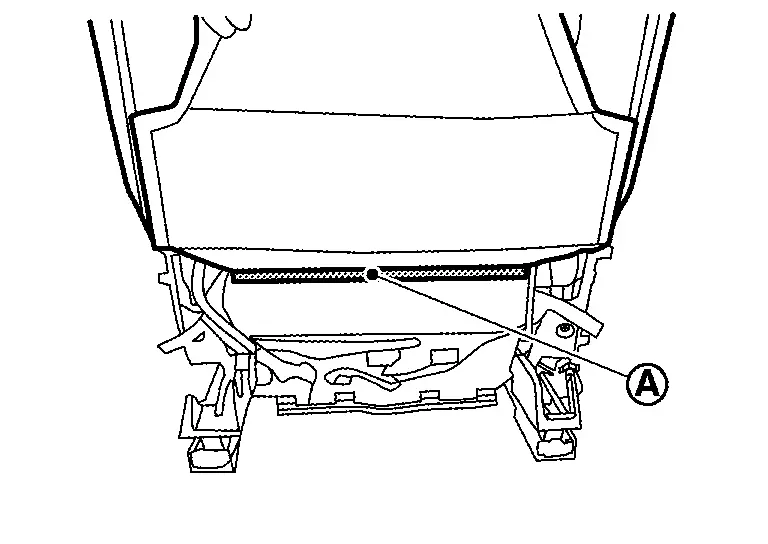
Remove seatback trim fixing hog rings (A).
Remove headrest holder by raising it while pinching the pawls from the bottom the headrest holder.
NOTE:
Before removing headrest holder, check its orientation (front/rear and right/left).
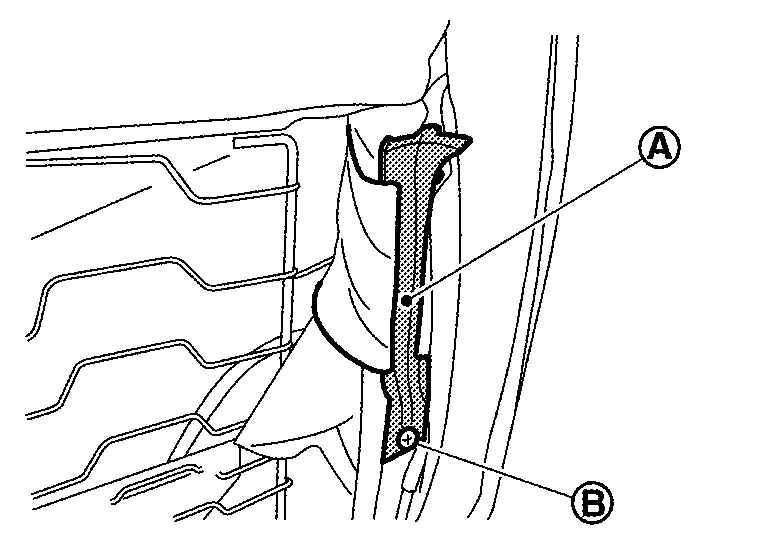
Remove fixing screw (B), and then open front center air bag module fixing inner cloth fastener (A) (with front center air bag module).
Remove seatback trim, pad and front side air bag module as a set.
Pull out front side air bag module from seatback trim inner cloth.
CAUTION:
-
Note how the part is installed for reference during assembly.
-
To prevent accidental explosion, always place the front side air bag module with deploying direction facing upward.
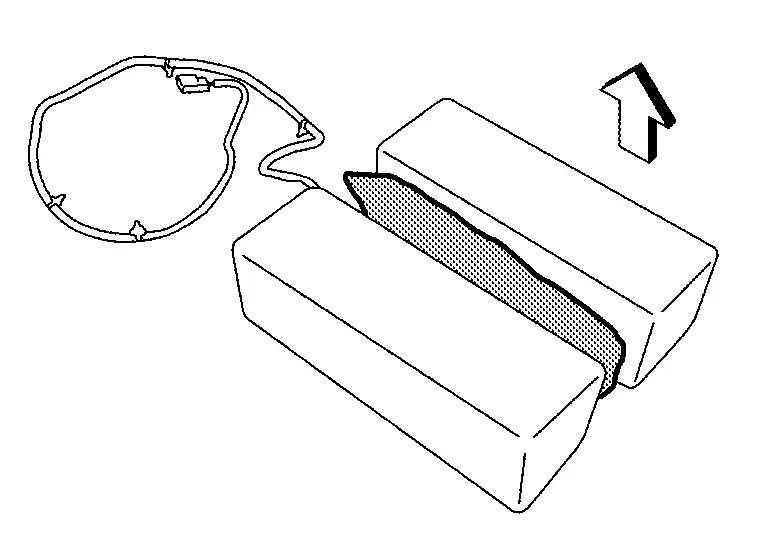

: Deploying direction -
To prevent damage to the parts, never impact the front side air bag module.
-
Replace the front side air bag module if it is dropped or sustains an impact.
-
To prevent accidental explosion, never insert any foreign objects (screwdriver, etc.) into the front side air bag module.
-
To prevent accidental explosion, never disassemble the front side air bag module.
-
To prevent accidental explosion, never expose the front side air bag module to temperature of more than 90°C (194°F).
-
To prevent damage to the parts, never allow oil, grease, detergent, or water to come in contact with the front side air bag module.
Remove hog rings, and then separate seatback pad and trim.
CAUTION:
Before perform separating operation, check the installed position of hog rings.
Remove front center air bag module.Disengage front center air bag module harness fixing clip  .
.
| : Nissan Ariya Vehicle front |
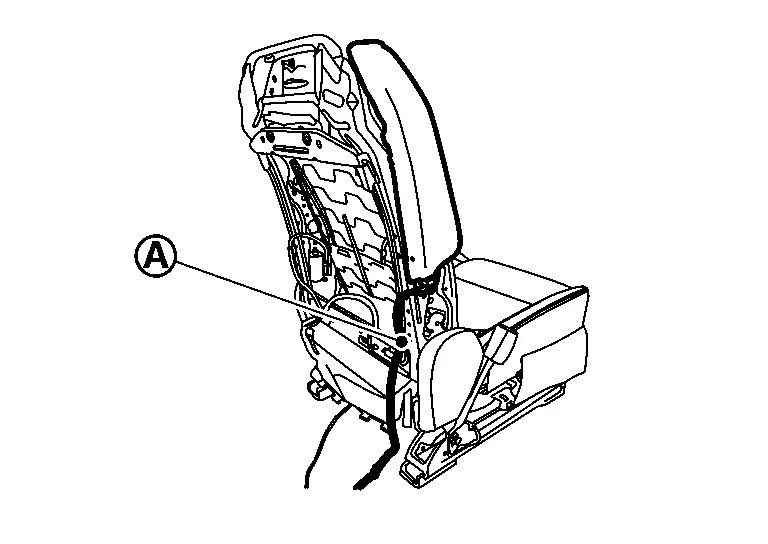
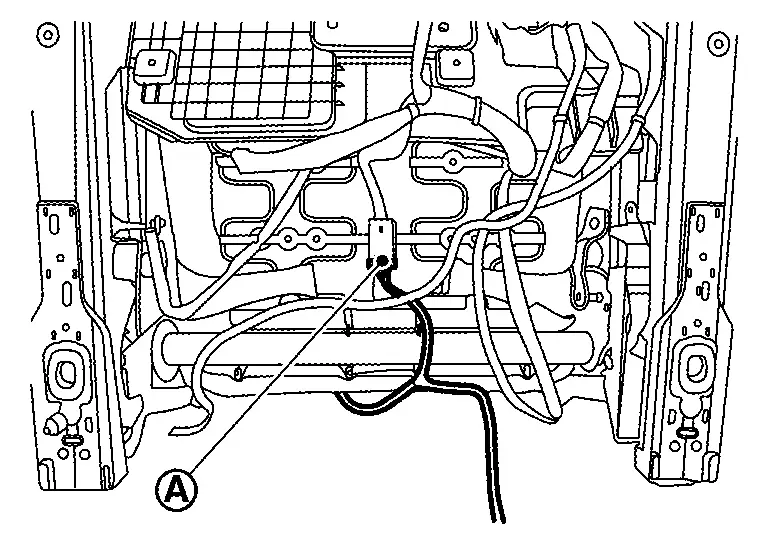
Remove seatback suspension.Disengage lumbar support motor harness connector fixing clip (A), and then disconnect connector (with lumbar support models).
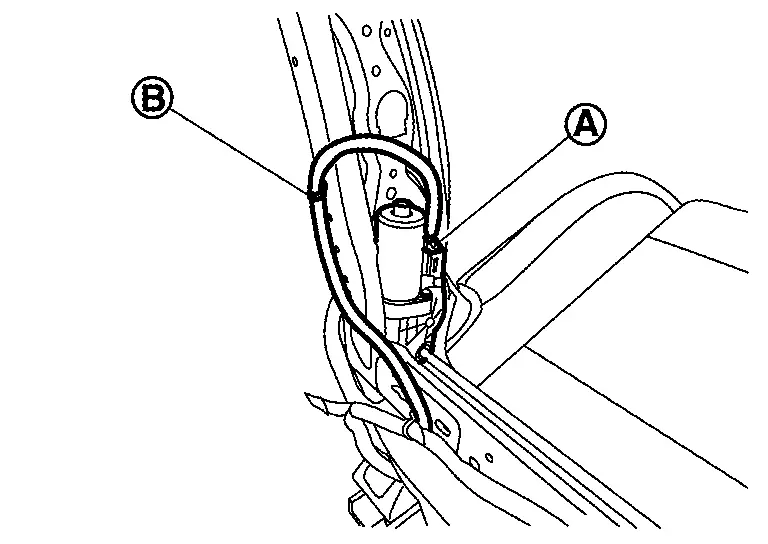
Remove seatback frame.Disconnect reclining motor harness connector (A) and disengage seat harness fixing clips (B) (power seat).
ASSEMBLY
Note the following items, and then assemble in the reverse order of disassembly.
CAUTION:
-
For hog ring that is removed or crimped unsuccessfully, fix it by using a new hog ring. (Never reuse hog ring.)
-
Always install the hog rings in position.
-
When installing the front side air bag, check that the inner cloth (reinforcement cloth) is not caught in bolt hole.
-
Note the following for front side and center air bag module mounting nuts.
-
Always use new fixing nuts (prevents the nut from loosening).
-
Never tighten nuts twice (prevents improper torque).
-
Seat Cushion
Disassembly and Assembly
DISASSEMBLY
CAUTION:
When removing, always use a remover tool that is made of plastic to prevent damage to the parts.
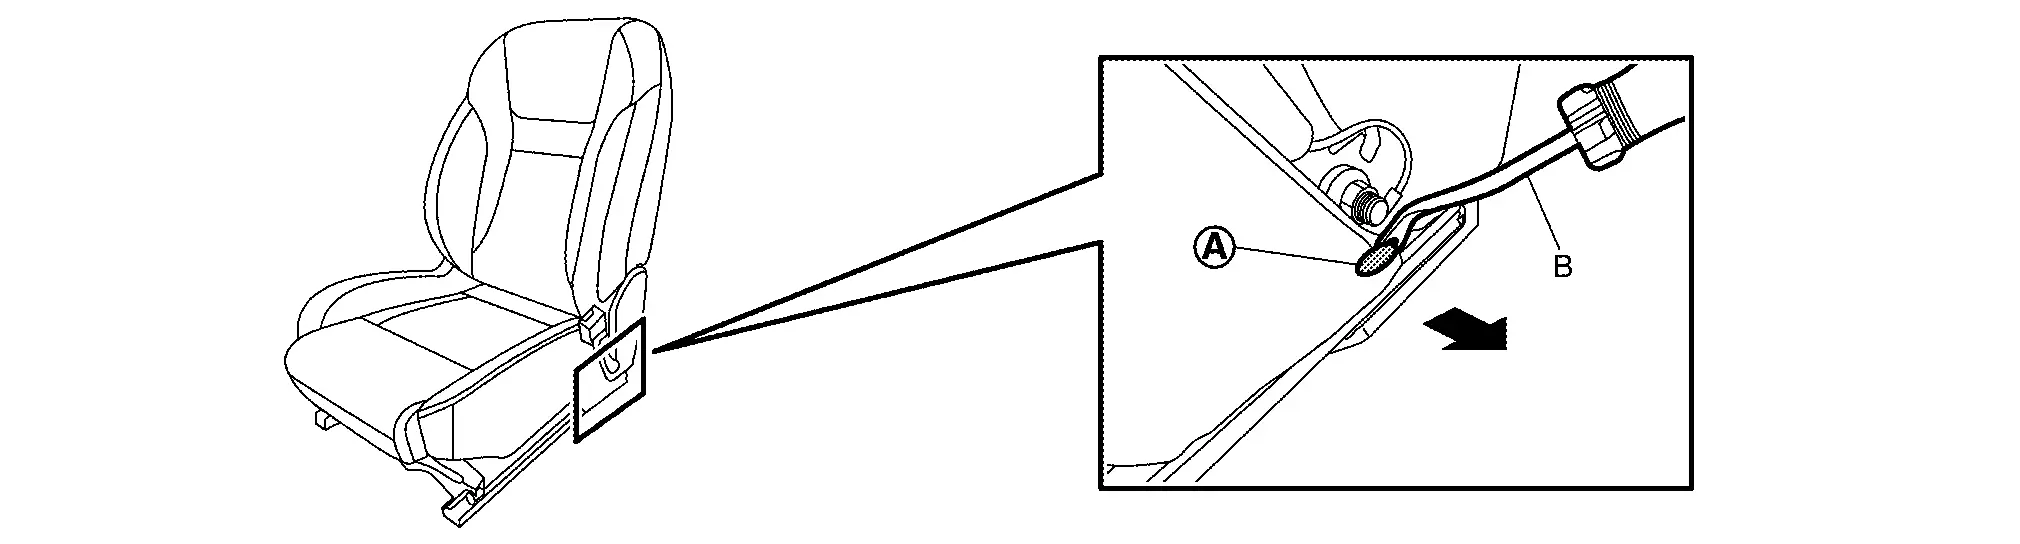
Disengage seat cushion trim fixing clip (A) by using remover tool (B) (passenger seat).
Remove outside and inside seat cushion finisher outer. Refer to Disassembly and Assembly.
Disengage seatback trim fixing retainers (A).
Disengage harness fixing seat cushion trim dual lock fasteners (A).
Disengage seat cushion trim fixing retainers (A).
Disengage seatback trim fixing retainer (A) (with seat heater models).
Open seatback trim fixing fasteners (A) (with seat heater models).
Disengage seatback trim fixing retainers (A) (with seat heater models).
Disengage seatback heater harness and harness connector fixing clips (A) (with seat heater models).
Disconnect seatback heater harness connector (A) (with seat heater models).
Disconnect seat cushion heater harness connector (A) (with seat heater models).
Disengage seat cushion trim fixing clips (A) by using a remover tool (B) (passenger seat).
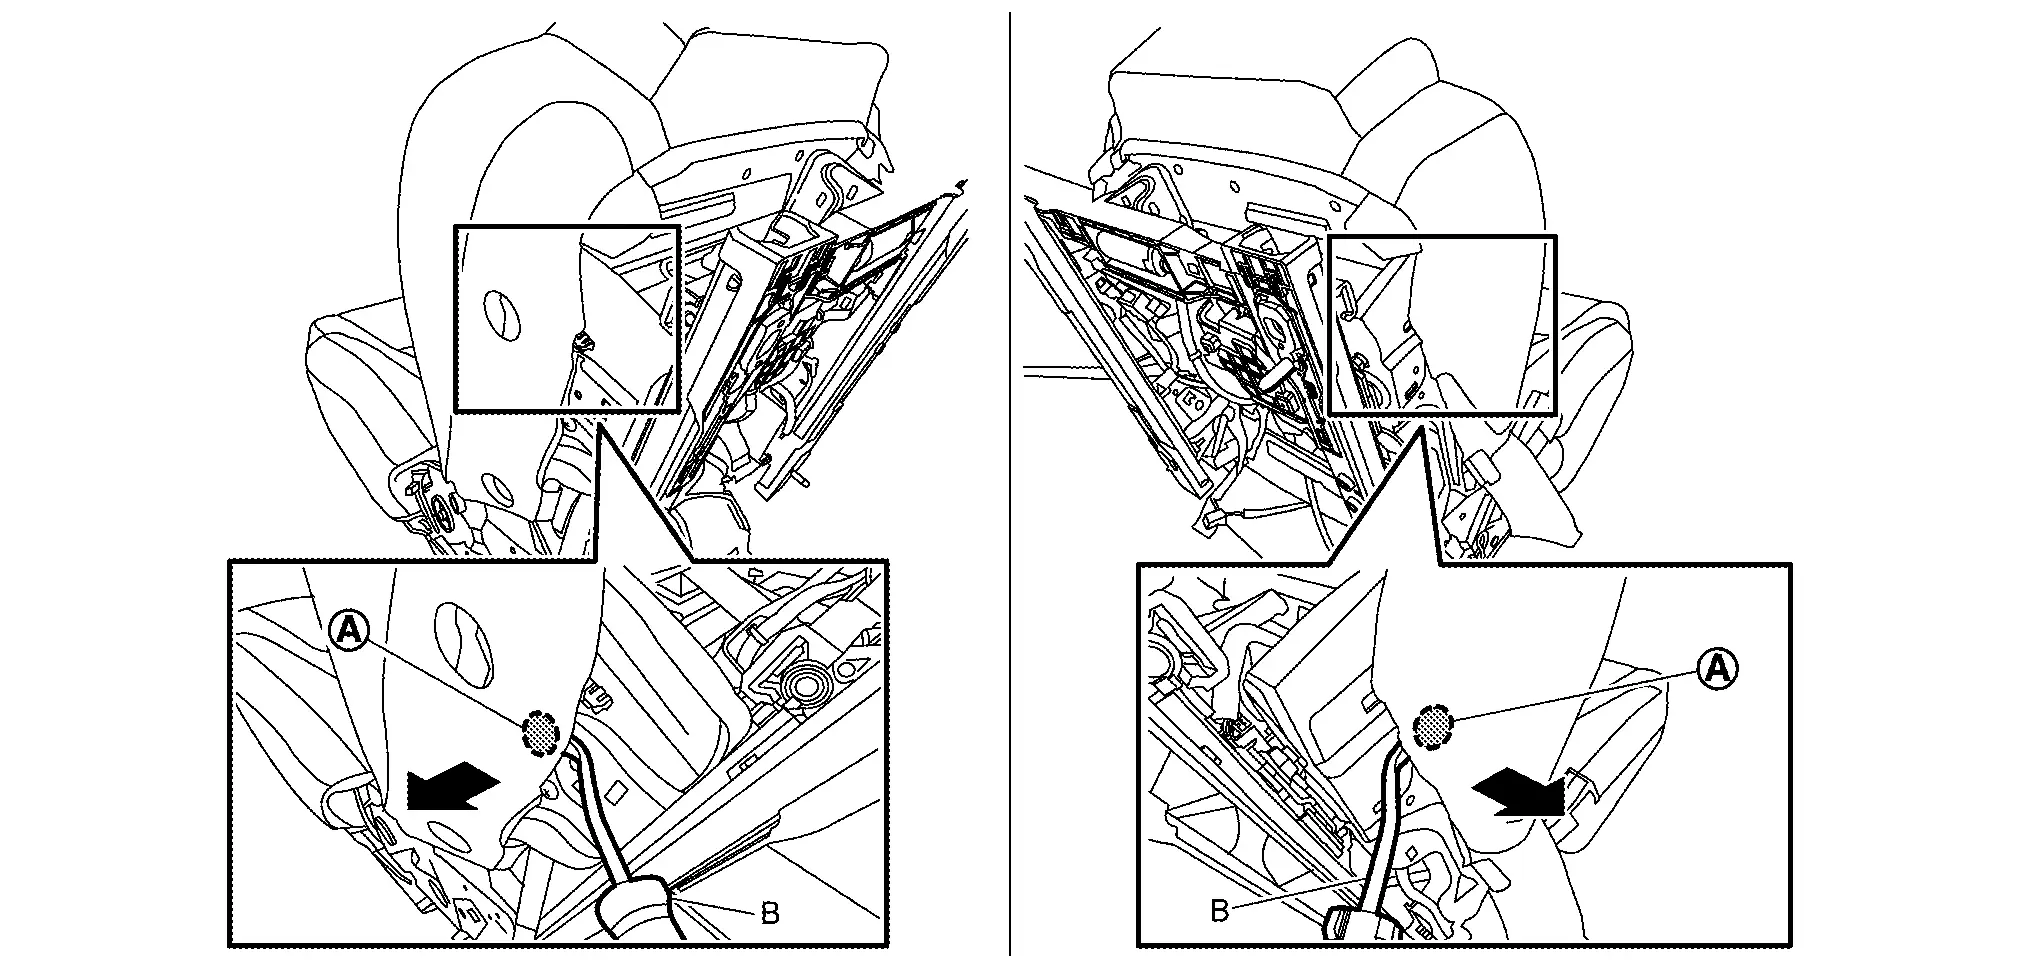
Disengage seat cushion trim fixing retainers (A), and then remove seat cushion pad and trim as a set.
-
Driver seat
-
Passenger seat
Remove hog rings, and then separate the seat cushion trim and pad.
CAUTION:
Before performing separating operation, check the installation position of hog rings.
Remove seat cushion silencer.
Disengage seat harness fixing clips on seat cushion suspension, and then remove seat cushion suspension.
ASSEMBLY
Note the following items, and then assemble in the reverse order of disassembly.
CAUTION:
-
For hog ring that is removed or crimped unsuccessfully, fix it by using a new hog ring. (Never reuse hog ring.)
-
Always install the hog rings in position.
Seat Cushion Finisher
Disassembly and Assembly
CAUTION:
When disassemble, always use the remover tool that is made of plastic to prevent damage to the parts.
OUTSIDE SEAT CUSHION FINISHER OUTER (POWER SEAT)
DISASSEMBLY
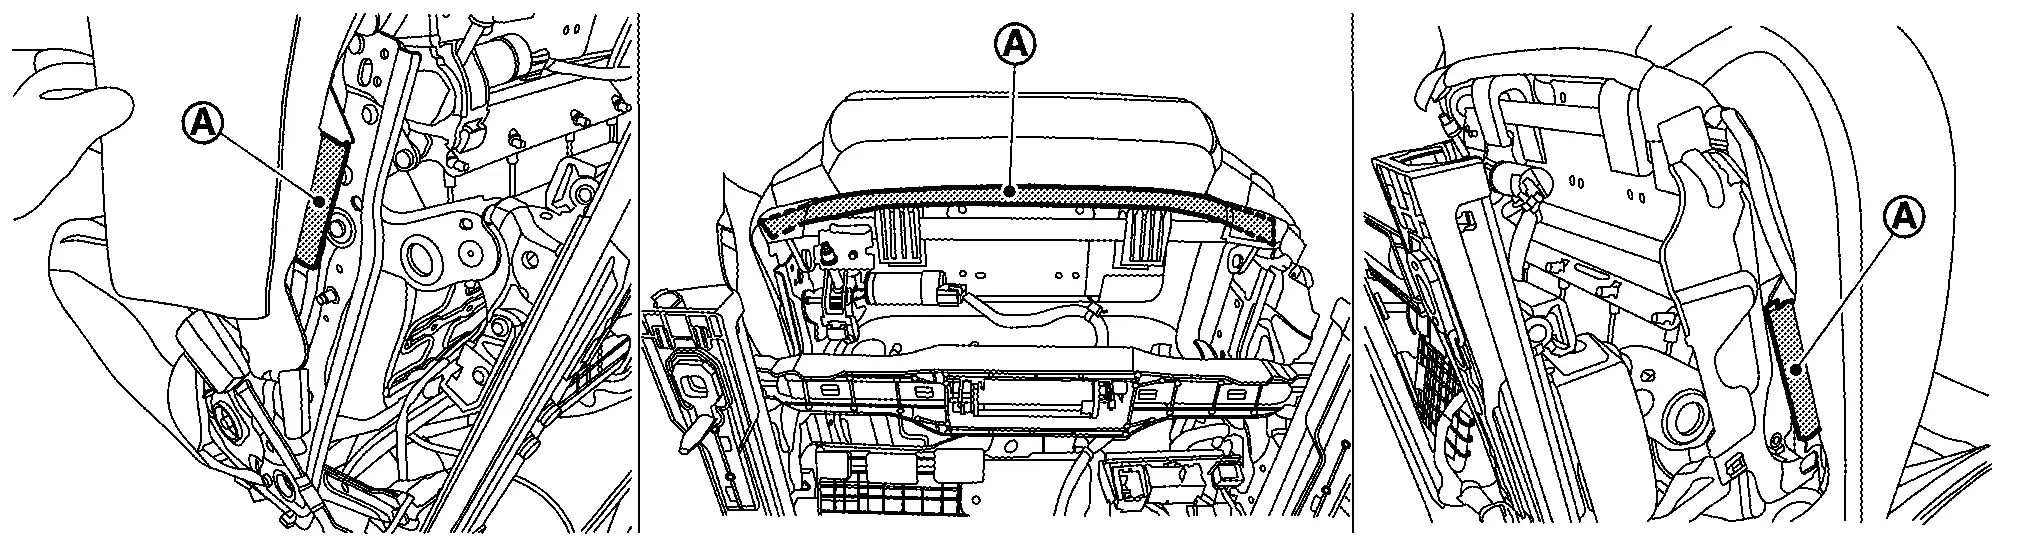
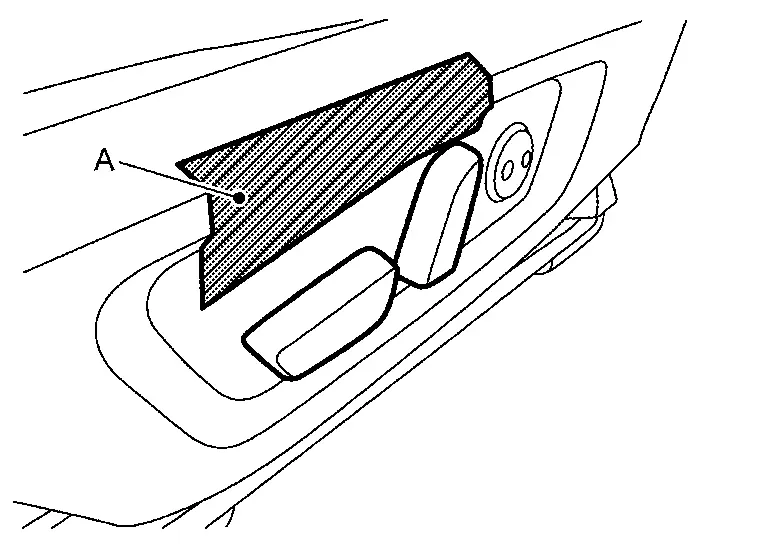
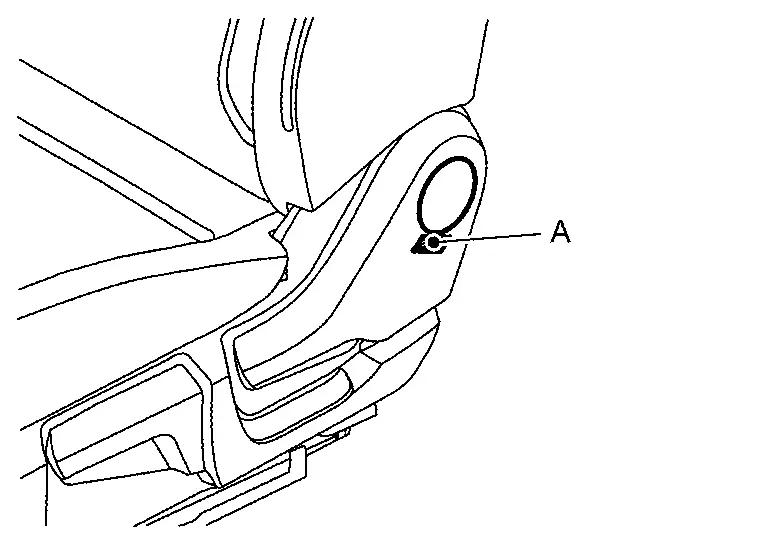
Apply protect tape (A) to prevent from damage.
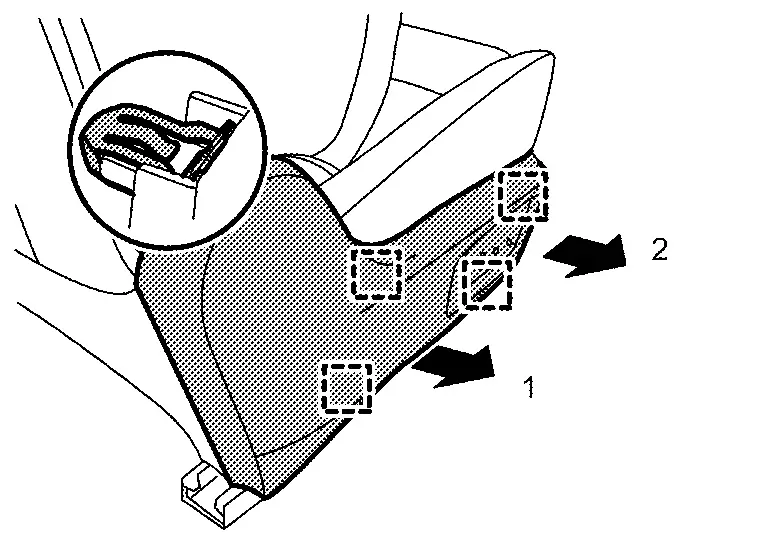
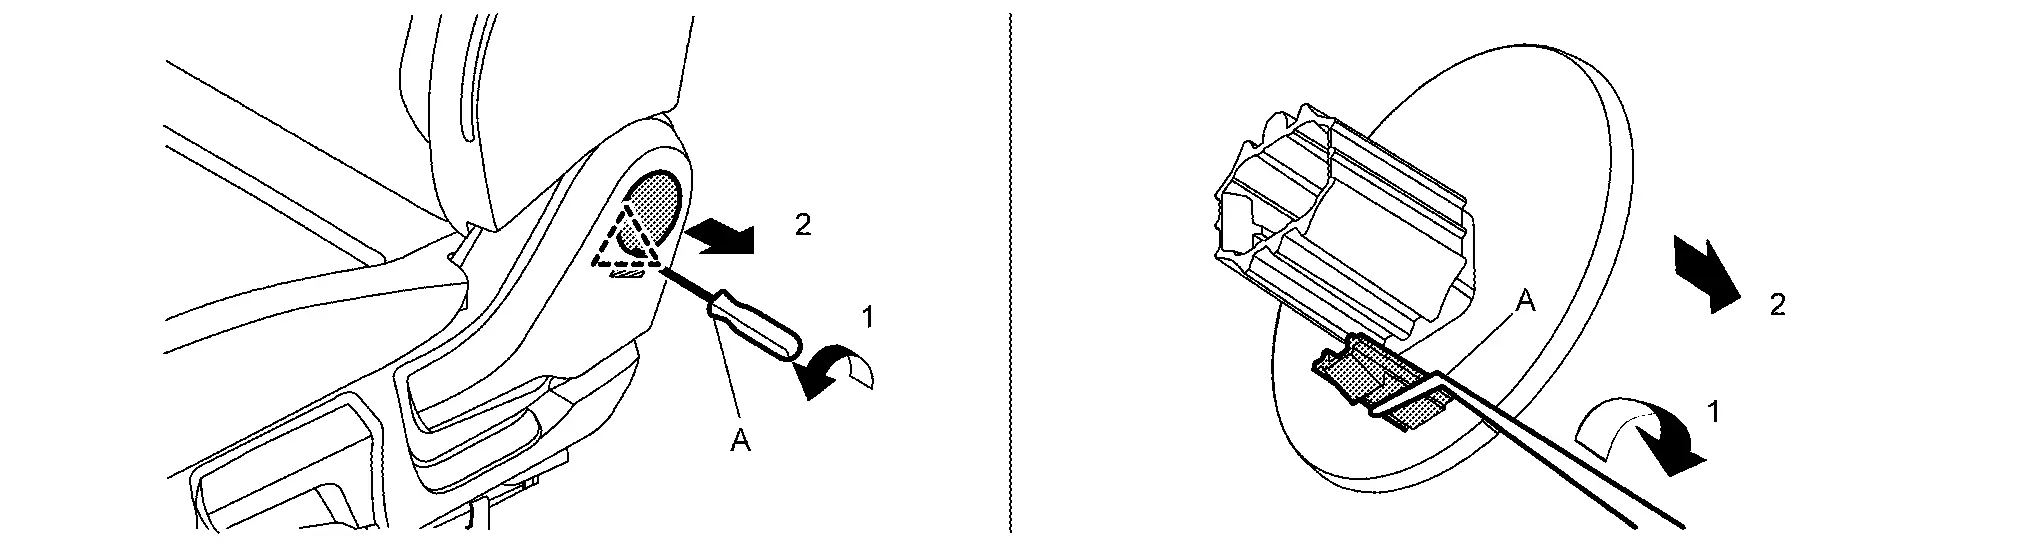
Disengage fixing pawls using a remover tool (A) according to numerical order 1→2 indicated by arrows, and then remove slide knob.
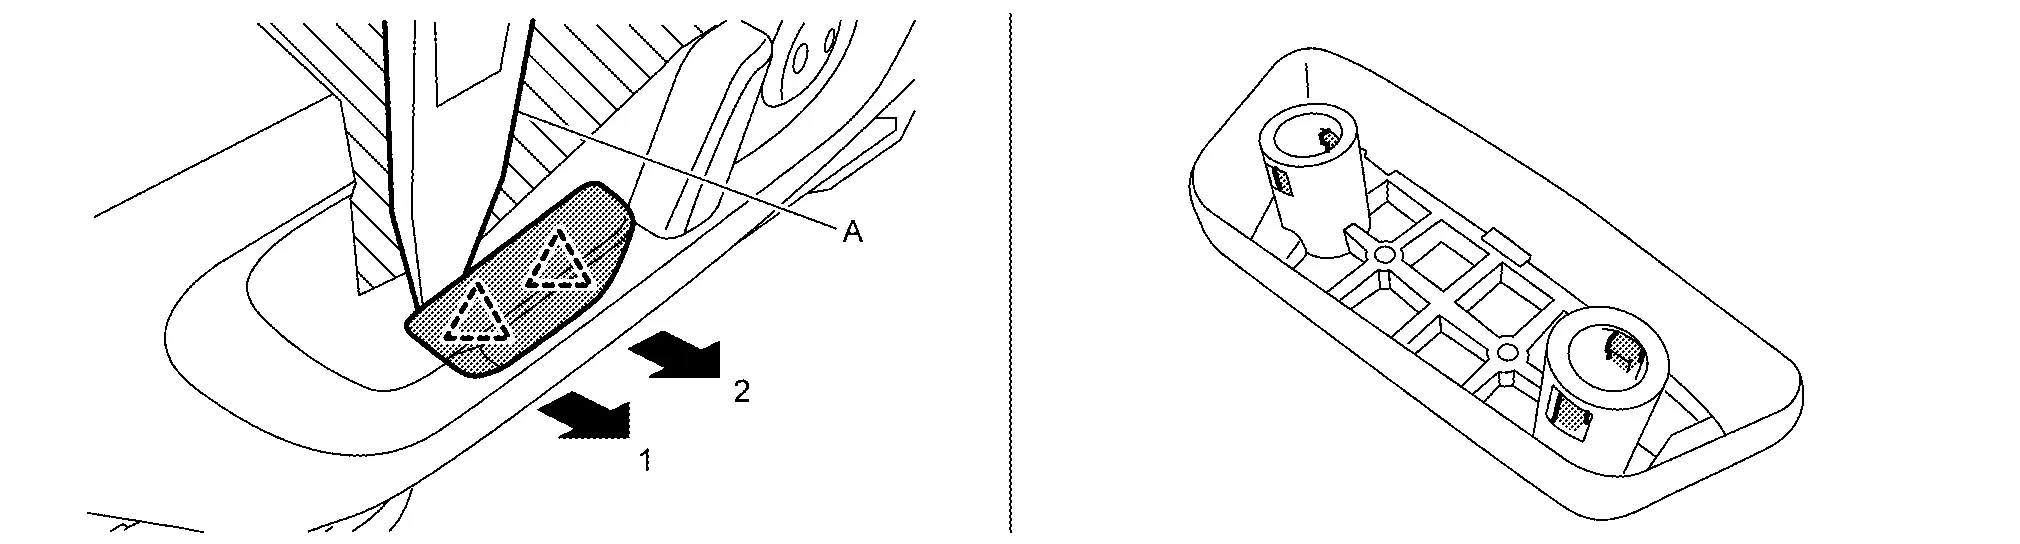
|
: Pawl |
Disengage fixing pawls using a remover tool (A), and then remove reclining knob.

|
: Pawl |
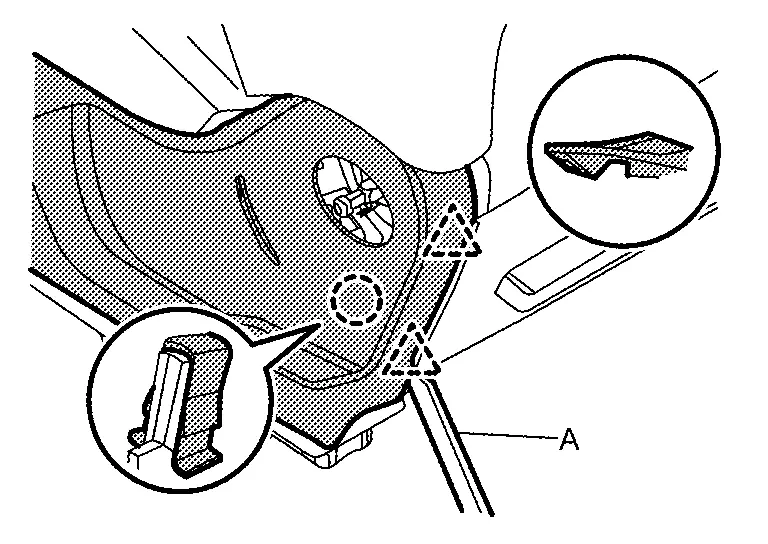
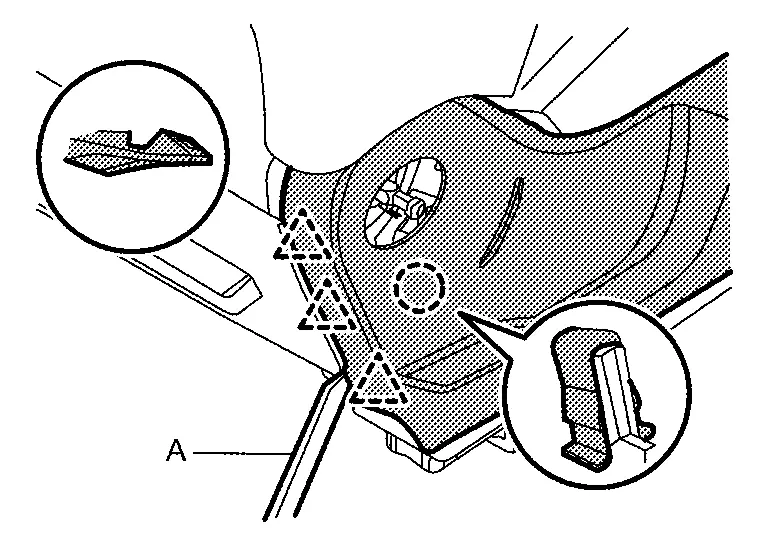
Disengage fixing pawls and clip of rear side using a remover tool (A).
-
Driver seat
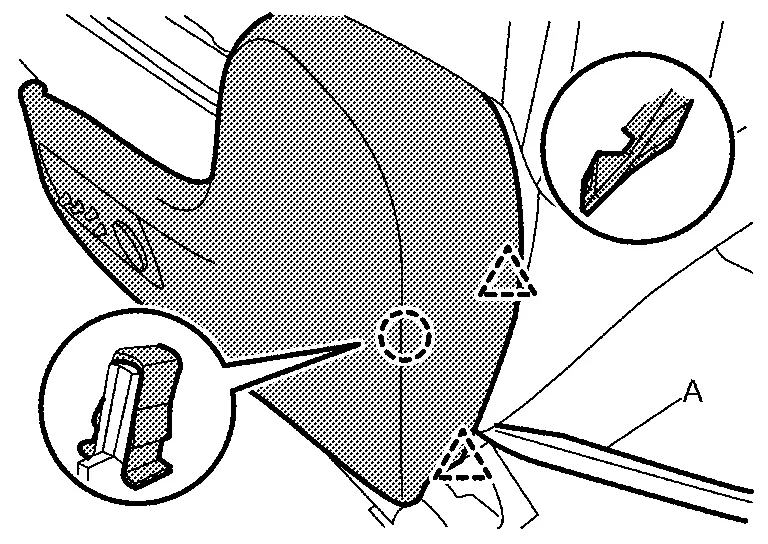
: Clip : Pawl -
Passenger seat
: Clip : Pawl
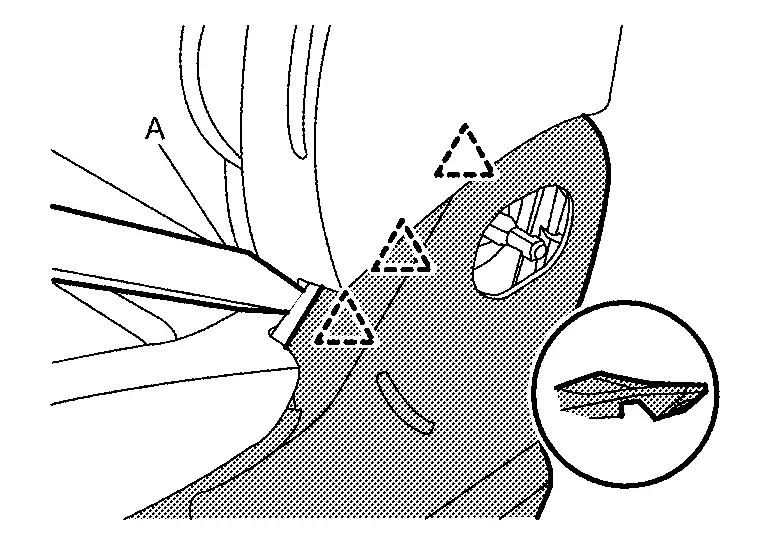
Disengage fixing pawls of upper side using a remover tool (A).
|
: Pawl |
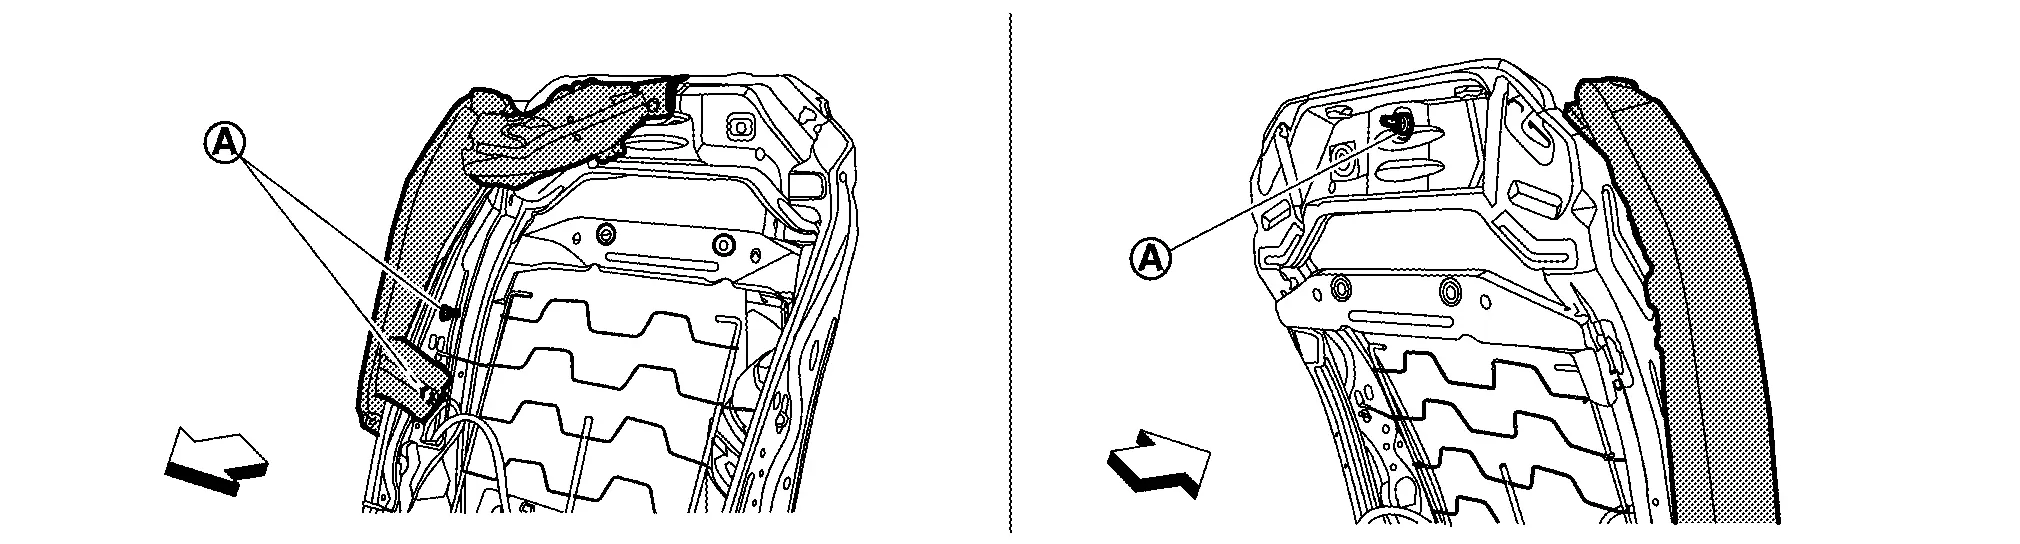
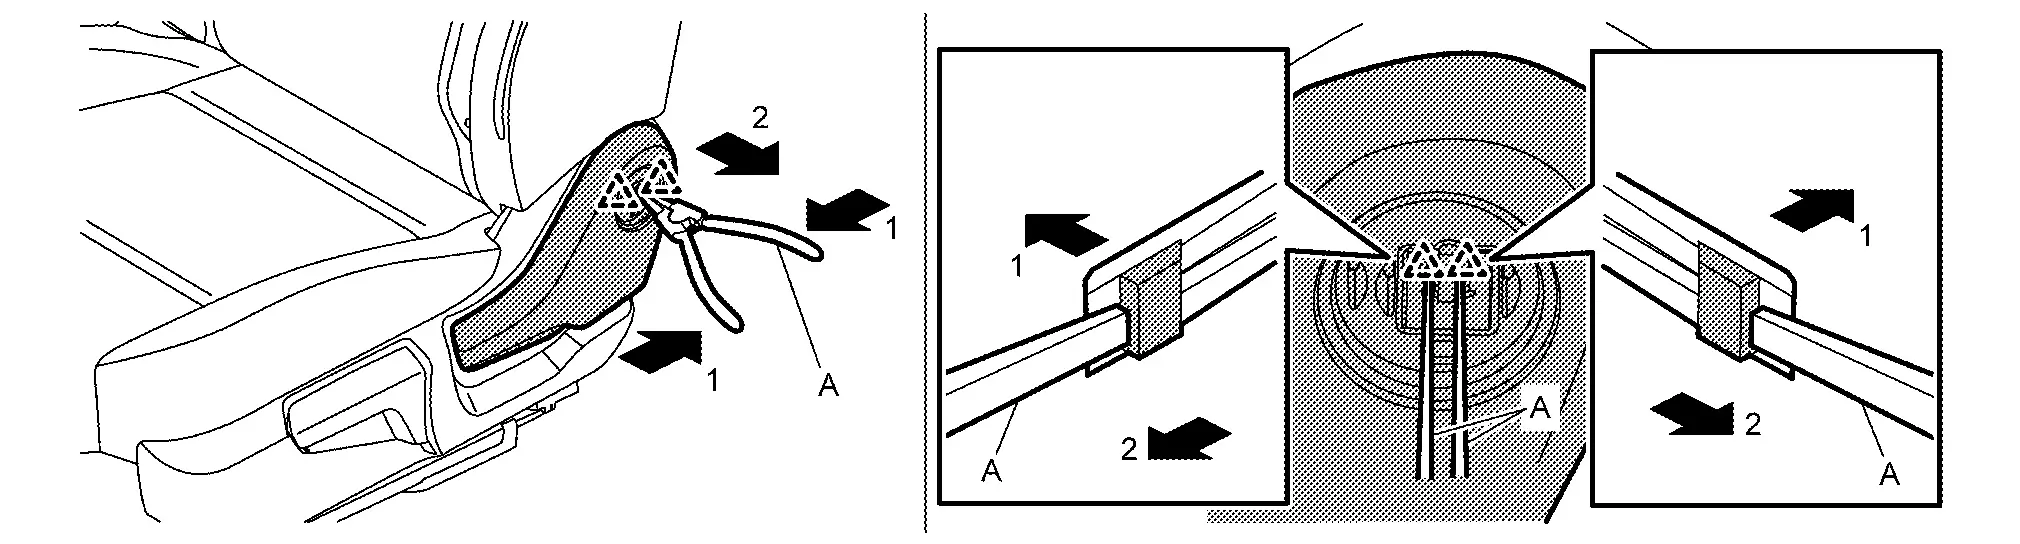
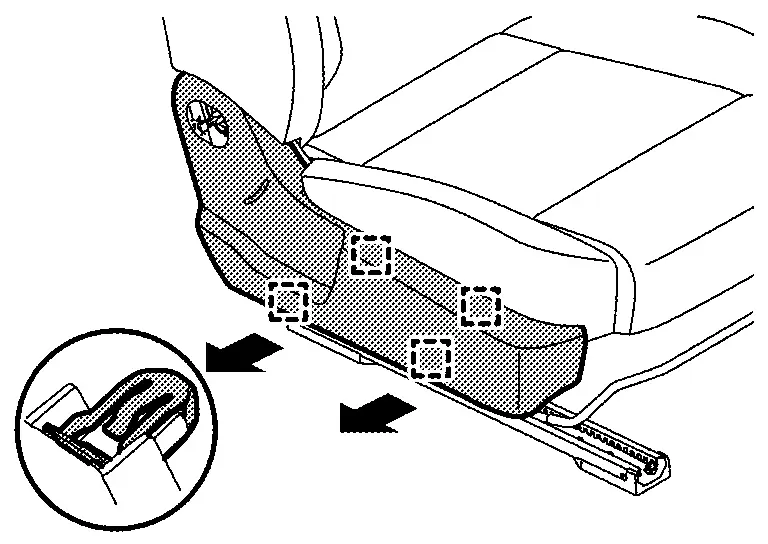
Disengage fixing metal clips according to numerical order 1→2 indicated by arrow as shown in figure.
-
Driver seat

: Metal clip -
Passenger seat
: Metal clip
Disengage outside seat cushion finisher outer fixing guide (A) of seat cushion finisher bracket (1) direction arrow as shown in figure (driver seat).

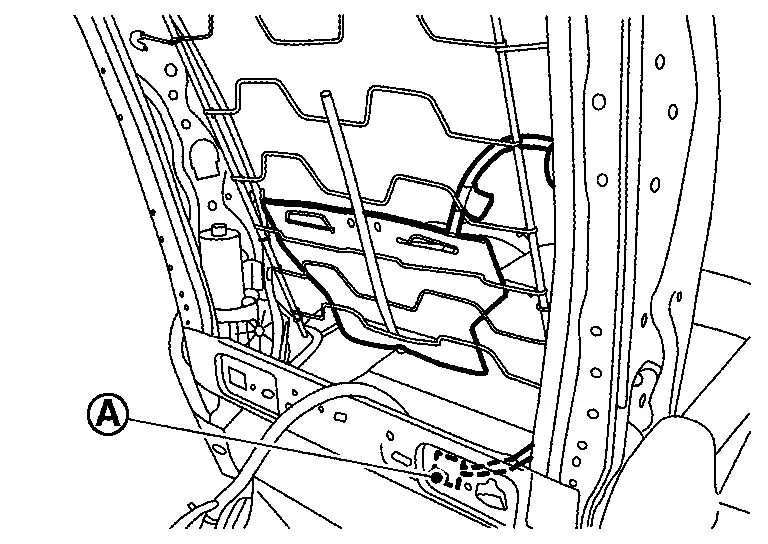
Disengage seat harness fixing clips (A).
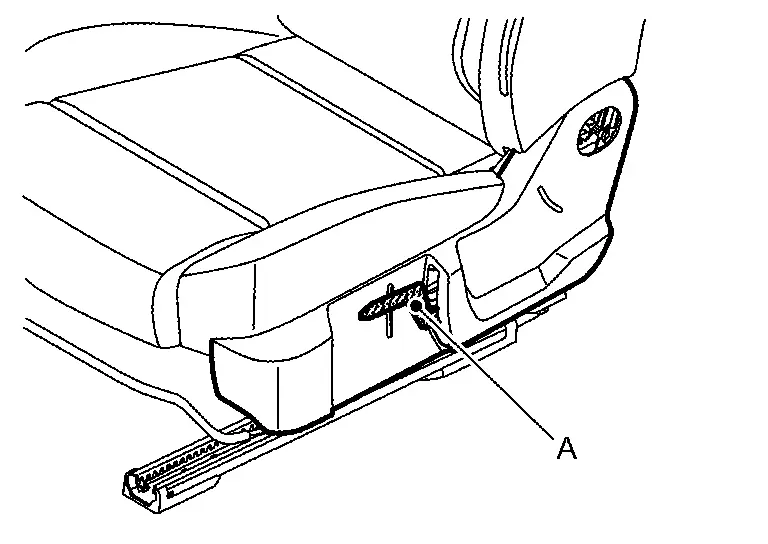
Remove fixing screws (A), and then remove lumbar support switch from outside seat cushion finisher outer (driver seat).
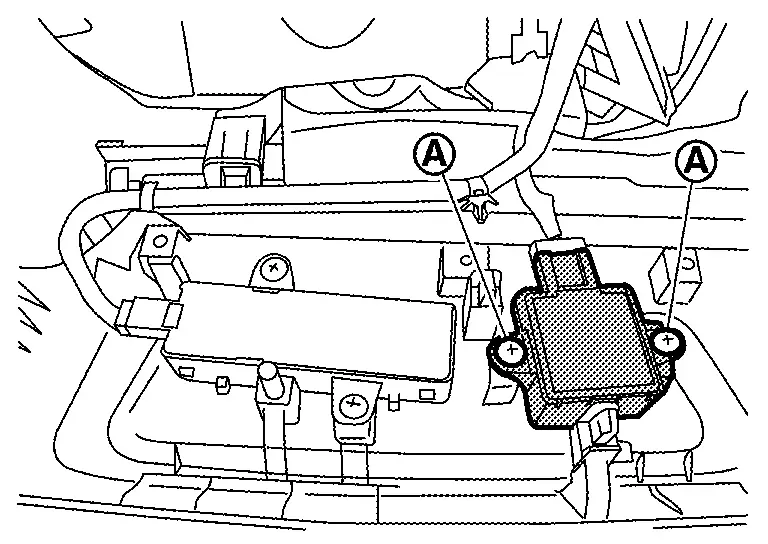
Disconnect harness connector, and then remove lumbar support switch (driver seat).
Remove fixing screws (A), and then remove power seat switch from outside seat cushion finisher outer.
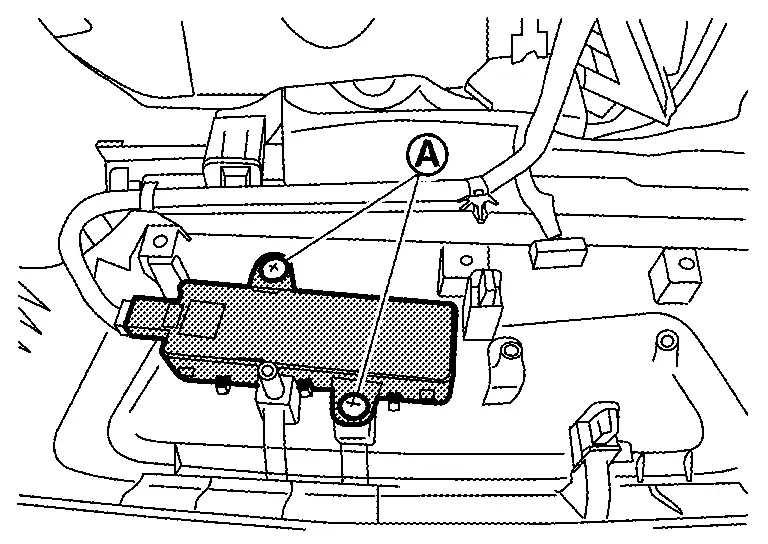
Disconnect harness connector, and then remove power seat switch.
Remove outside seat cushion finisher outer.
Remove seat cushion silencer. Refer to Disassembly and Assembly.
Remove mounting rivet (A) using a drill (B), and then remove outside seat cushion finisher bracket (driver seat).
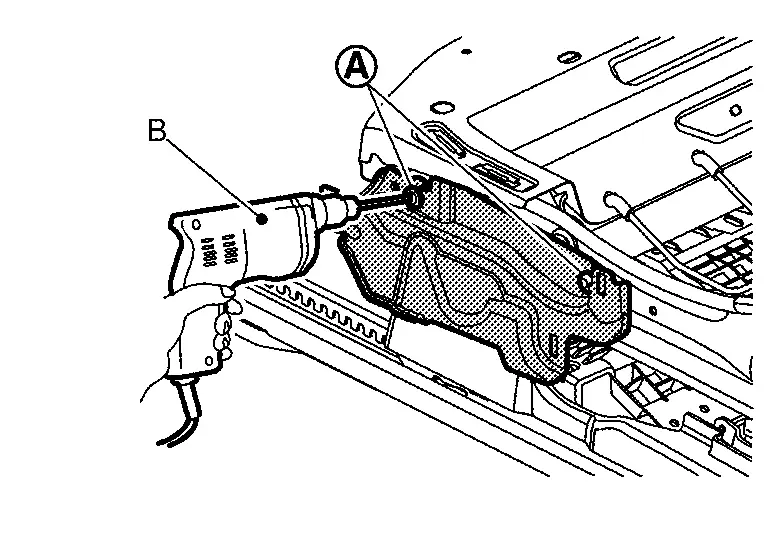
NOTE:
Grind the head of rivet with a drill [bit of 6.0 mm (0.24 in)]
ASSEMBLY
Note the following item, and then assemble in the reverse order of disassembly.
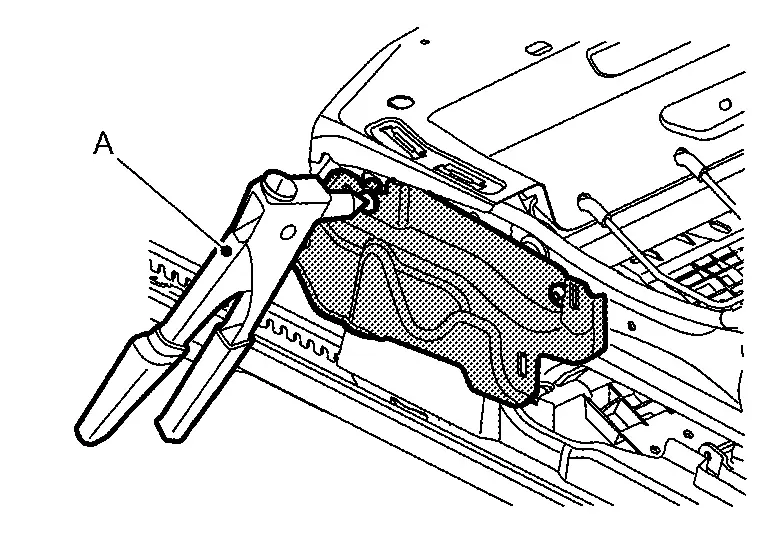
NOTE:
Securely crimp outside seat cushion finisher bracket with a riveter (A) as shown in figure.
OUTSIDE SEAT CUSHION FINISHER OUTER (MANUAL SEAT)
DISASSEMBLY
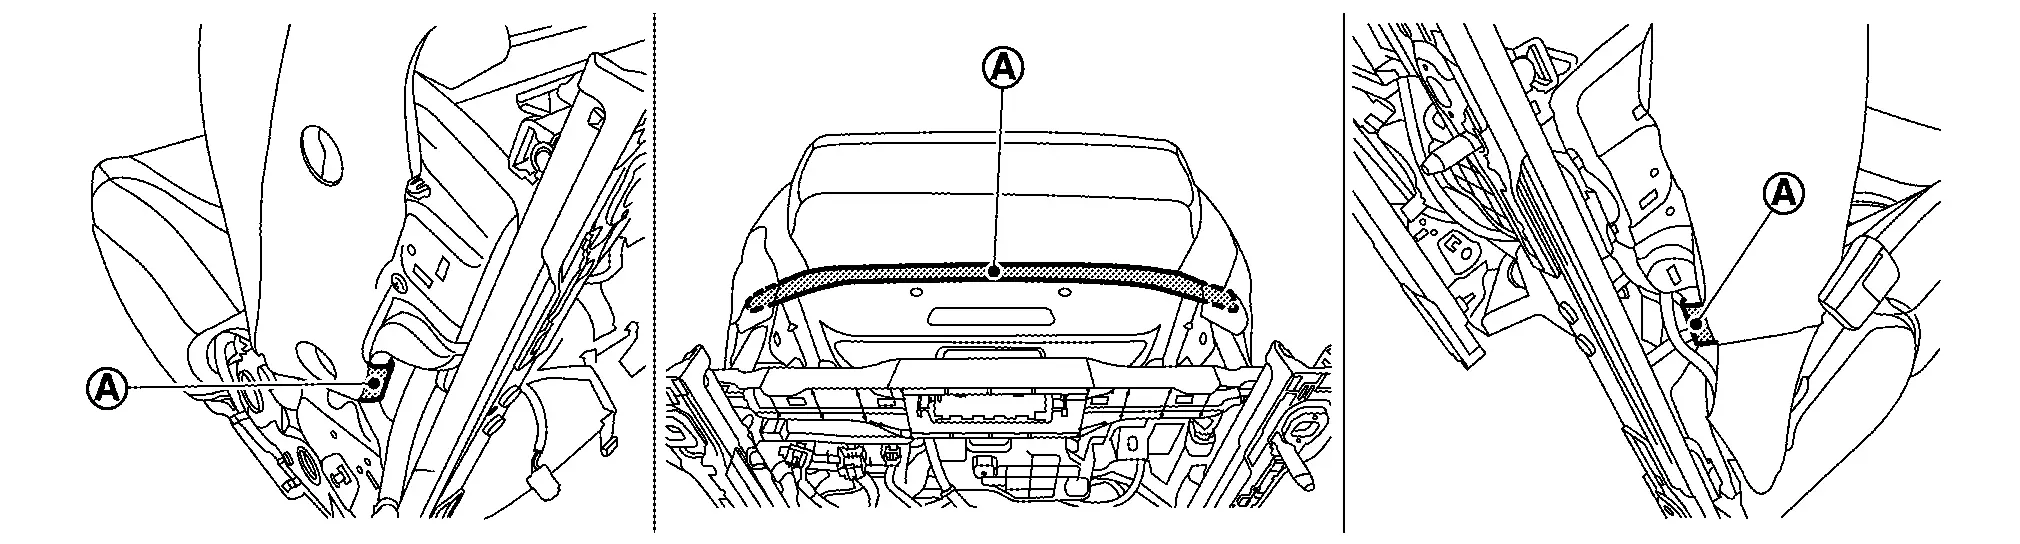
Remove reclining knob.Apply protect tape (A).
|
: Pawl |
|
: Pawl |
Disengage fixing portion area (B) while pull up by a remover tool (A) according to numerical order 1→2 indicated by arrows as shown in figure, and then remove lifter knob (driver seat).

Remove outside seat cushion finisher outer.Apply protect tape (A) (driver seat).
-
Driver seat
: Pawl : Metal clip -
Passenger seat
: Clip : Pawl
|
: Pawl |
-
Driver seat

: Metal clip -
Passenger seat
: Metal clip

Remove mounting bolt (A), and then remove lifter lever (driver seat).
Remove seat cushion silencer. Refer to Removal and Installation.
Remove mounting rivet (A) using a drill (B), and then remove outside seat cushion finisher bracket (driver seat).
NOTE:
Grind the head of rivet with a drill [bit of 6.0 mm (0.24 in)].
ASSEMBLY
Note the following item, and then assemble in the reverse order of disassembly.
NOTE:
Securely crimp outside seat cushion finisher bracket with a riveter (A) as shown in figure.
OUTSIDE SEAT CUSHION FINISHER LOWER
DISASSEMBLY
Fully lift up seat cushion.
Remove fixing screws, and then remove outside seat cushion finisher lower.
ASSEMBLY
Assemble is reverse order of disassembly.
OUTSIDE SEAT CUSHION FINISHER INNER
DISASSEMBLY
Remove seatback pad and trim as a set. Refer to Disassembly and Assembly.
Remove seat cushion pad and trim as a set. Refer to Disassembly and Assembly.
Remove fixing screws, and then remove outside seat cushion finisher inner.
ASSEMBLY
Assemble is reverse order of disassemble.
INSIDE SEAT CUSHION FINISHER OUTER
DISASSEMBLY
Disengage seat cushion trim fixing clip (passenger seat) and retainer of inside seat cushion outer side. Refer to Disassembly and Assembly.
Disengage inside seat cushion finisher outer fixing clip and pawls of rear side using a remover tool (A).
-
Driver seat
: Clip : Pawl -
Passenger seat
: Clip : Pawl
Disengage inside seat cushion finisher outer fixing pawls of upper side using a remover tool (A).
|
: Pawl |
Disengage fixing clip using a remover tool (A).
|
: Clip |
Disengage fixing guide (A) direction arrow as shown in figure, and then remove inside seat cushion finisher outer.
ASSEMBLY
Assemble is reverse order of disassemble.
INSIDE SEAT CUSHION FINISHER INNER
DISASSEMBLY
Remove seatback trim and pad as a set. Refer to Disassembly and Assembly.
Remove seat cushion trim and pad as a set. Refer to Disassembly and Assembly.
Remove fixing screws, and then remove inside seat cushion finisher inner.
ASSEMBLY
Assemble is reverse order of disassemble.
INSIDE SEAT CUSHION FINISHER LOWER
DISASSEMBLY
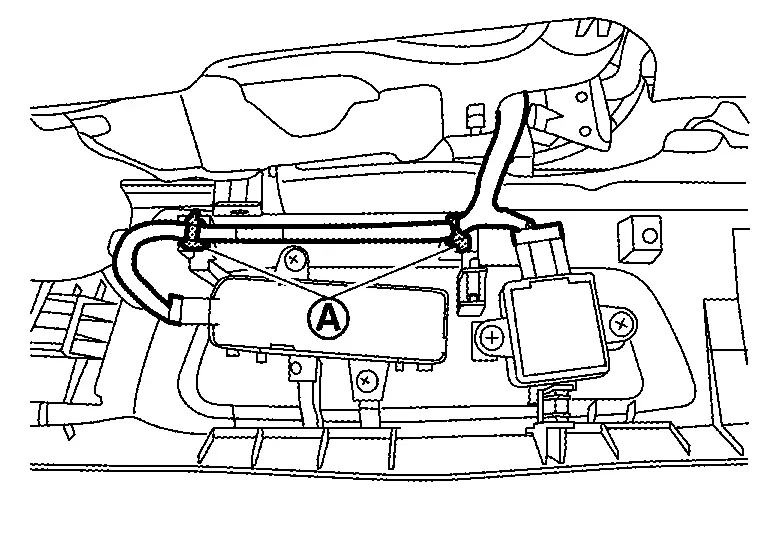
Disconnect seat belt buckle harness connector (A).
Remove fixing screws, and then remove inside seat cushion finisher lower from seat cushion frame.
Disengage seat harness and harness connector fixing clips (A), and then remove inside seat cushion finisher lower.
ASSEMBLY
Assemble is reverse order of disassemble.
BRACKET (DRIVER SEAT)
DISASSEMBLY
Remove fixing screws, and then remove outside seat cushion finisher lower.
Disconnect driver seat control unit harness connector.
Disengage harness and harness connector fixing clips on bracket.
NOTE:
Before perform disengage procedure, check the assembly position.
1
Remove fixing screws, and then remove bracket.
Remove fixing screws, and then remove driver seat control unit (driver seat memory models).
ASSEMBLY
Assemble is reverse order of disassemble.
BRACKET (PASSENGER SEAT)
DISASSEMBLY
Remove seat cushion silencer. Refer to Disassembly and Assembly.
Disconnect occupant detection system control unit harness connector.
Disengage harness and harness connectors fixing clips on bracket.
Remove bracket mounting screws.
Disengage fixing metal clip.
Disengage fixing hook, and then remove bracket.
Remove fixing screws, and then remove occupant detection system control unit.
ASSEMBLY
Assemble is reverse order of disassemble.
WARNING:
-
Perform additional services when installing front passenger seat. Refer to Description.
-
Zero point reset must be performed every time the front passenger seat is removed from the Nissan Ariya vehicle.
-
Zero point reset is done after the front passenger seat is installed in vehicle and all bolts are tightened to specification.
SEAT CUSHION LOWER END CAP
DISASSEMBLY
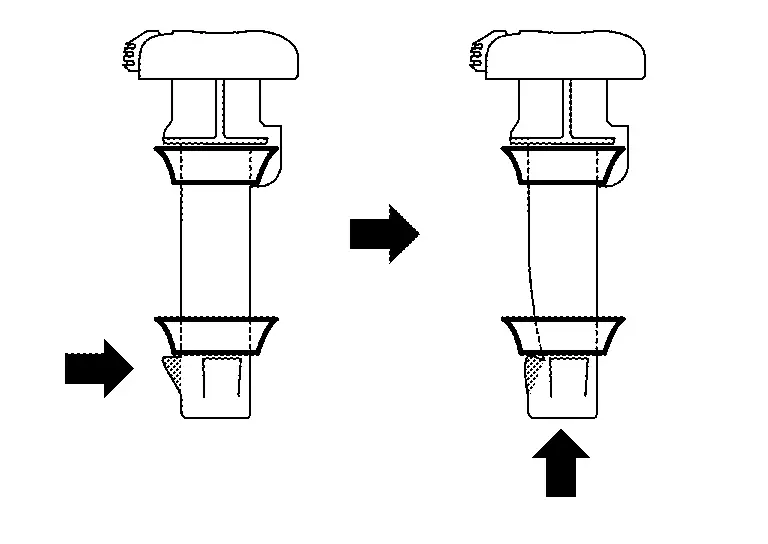
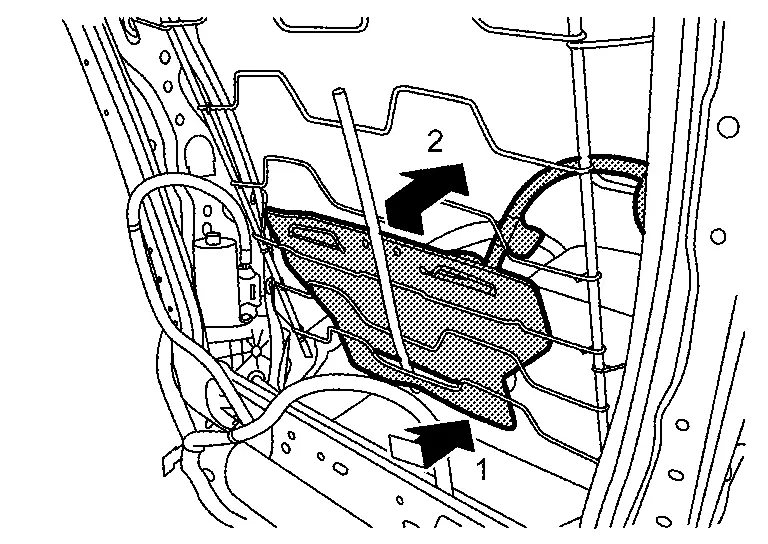
Disengage fixing pawls (A) and (B) using a remover tool (C) according to numerical order 1, 2 indicated by arrows as shown in figure, and then remove seat cushion lower end cap.
-
Front side
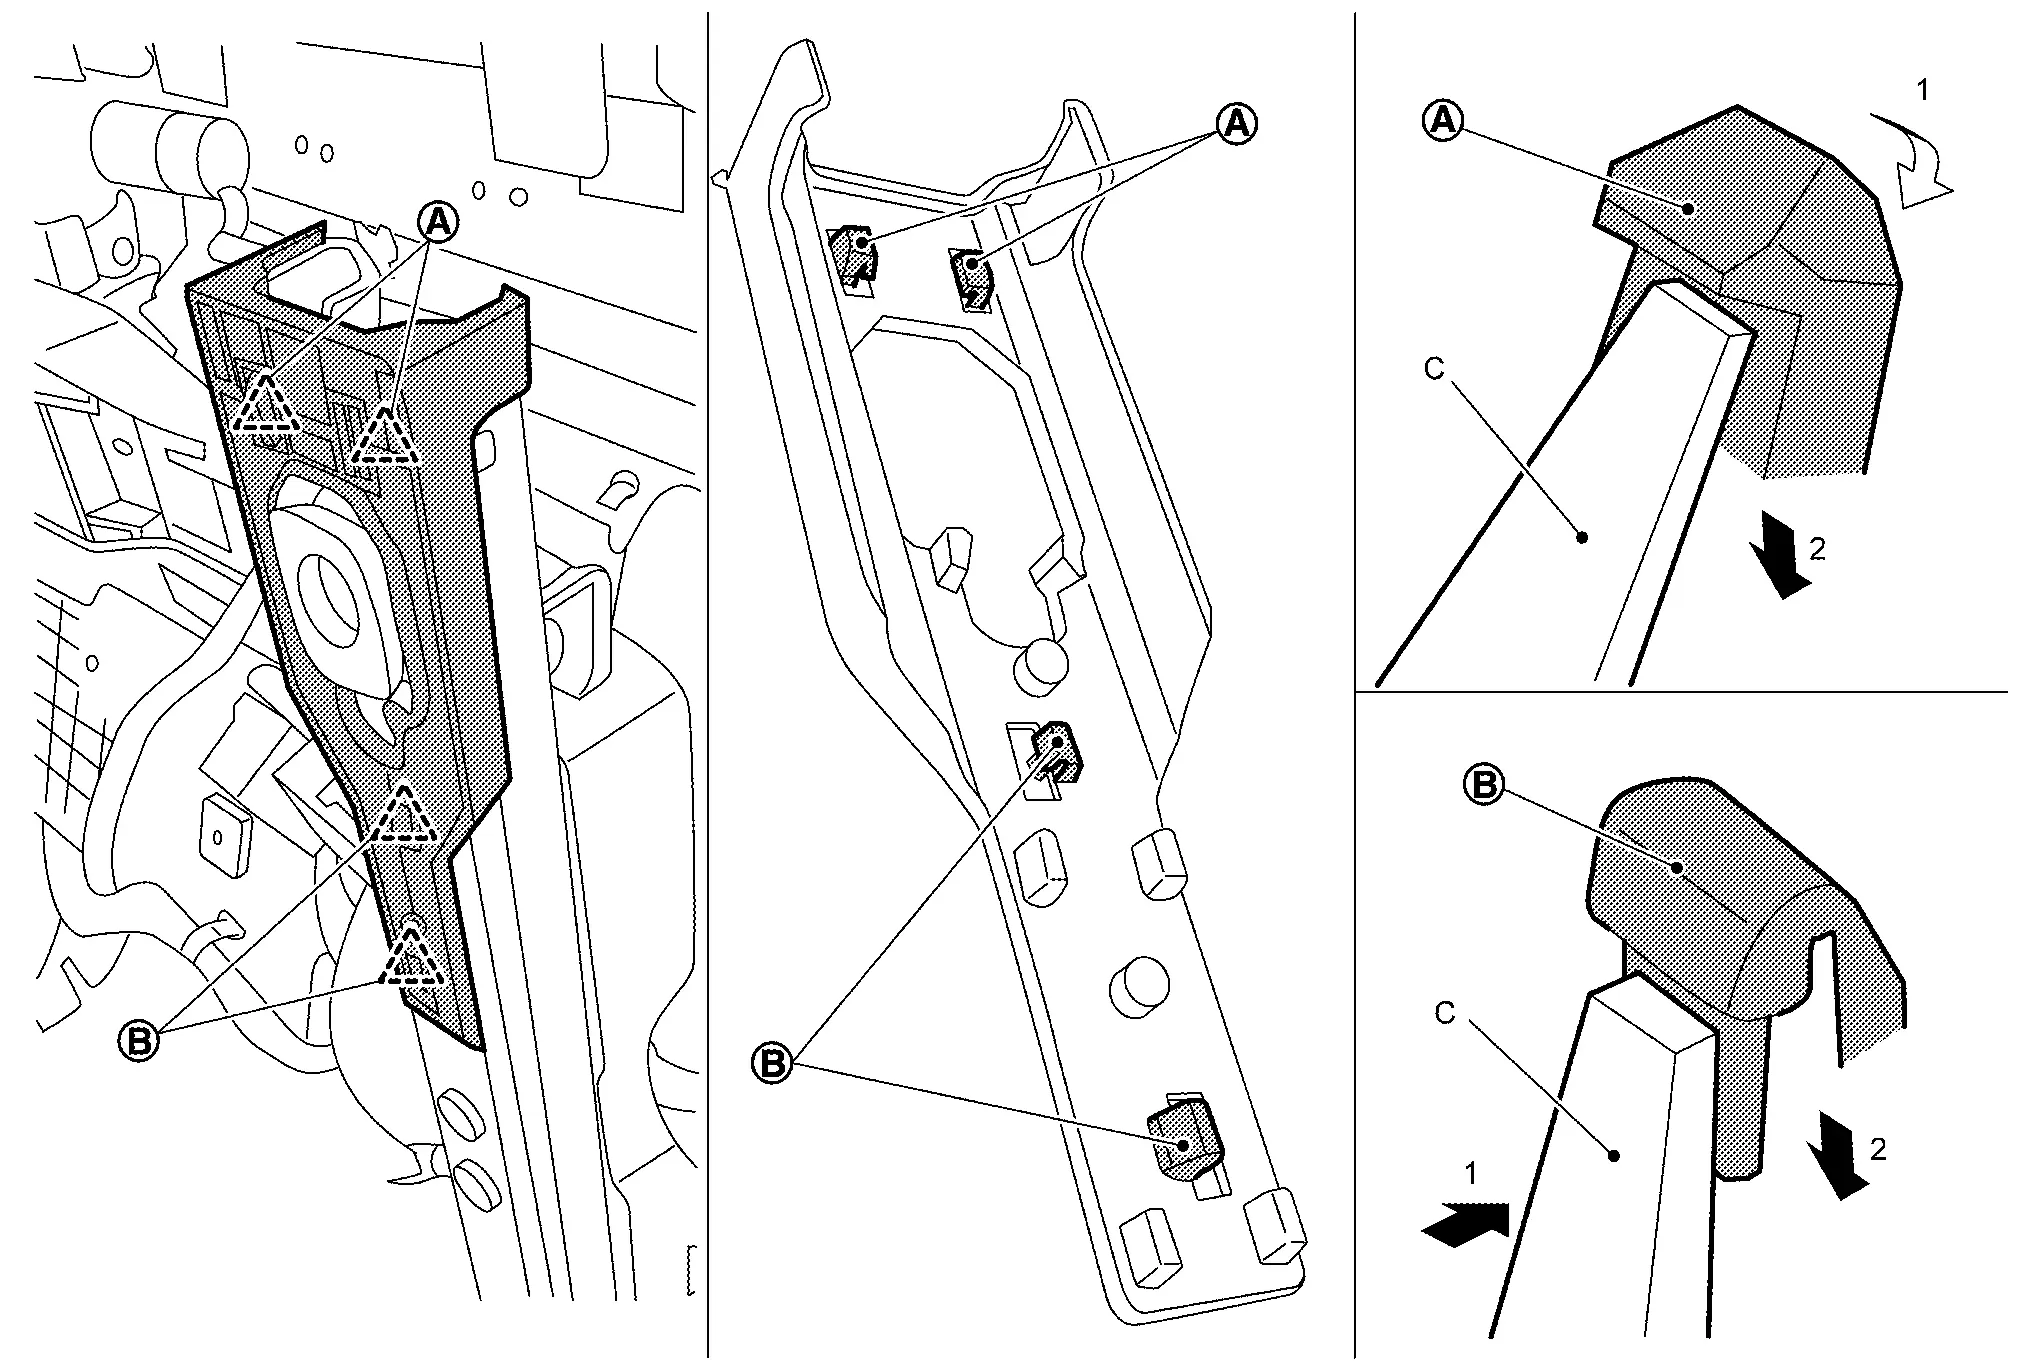
: Pawl -
Rear side
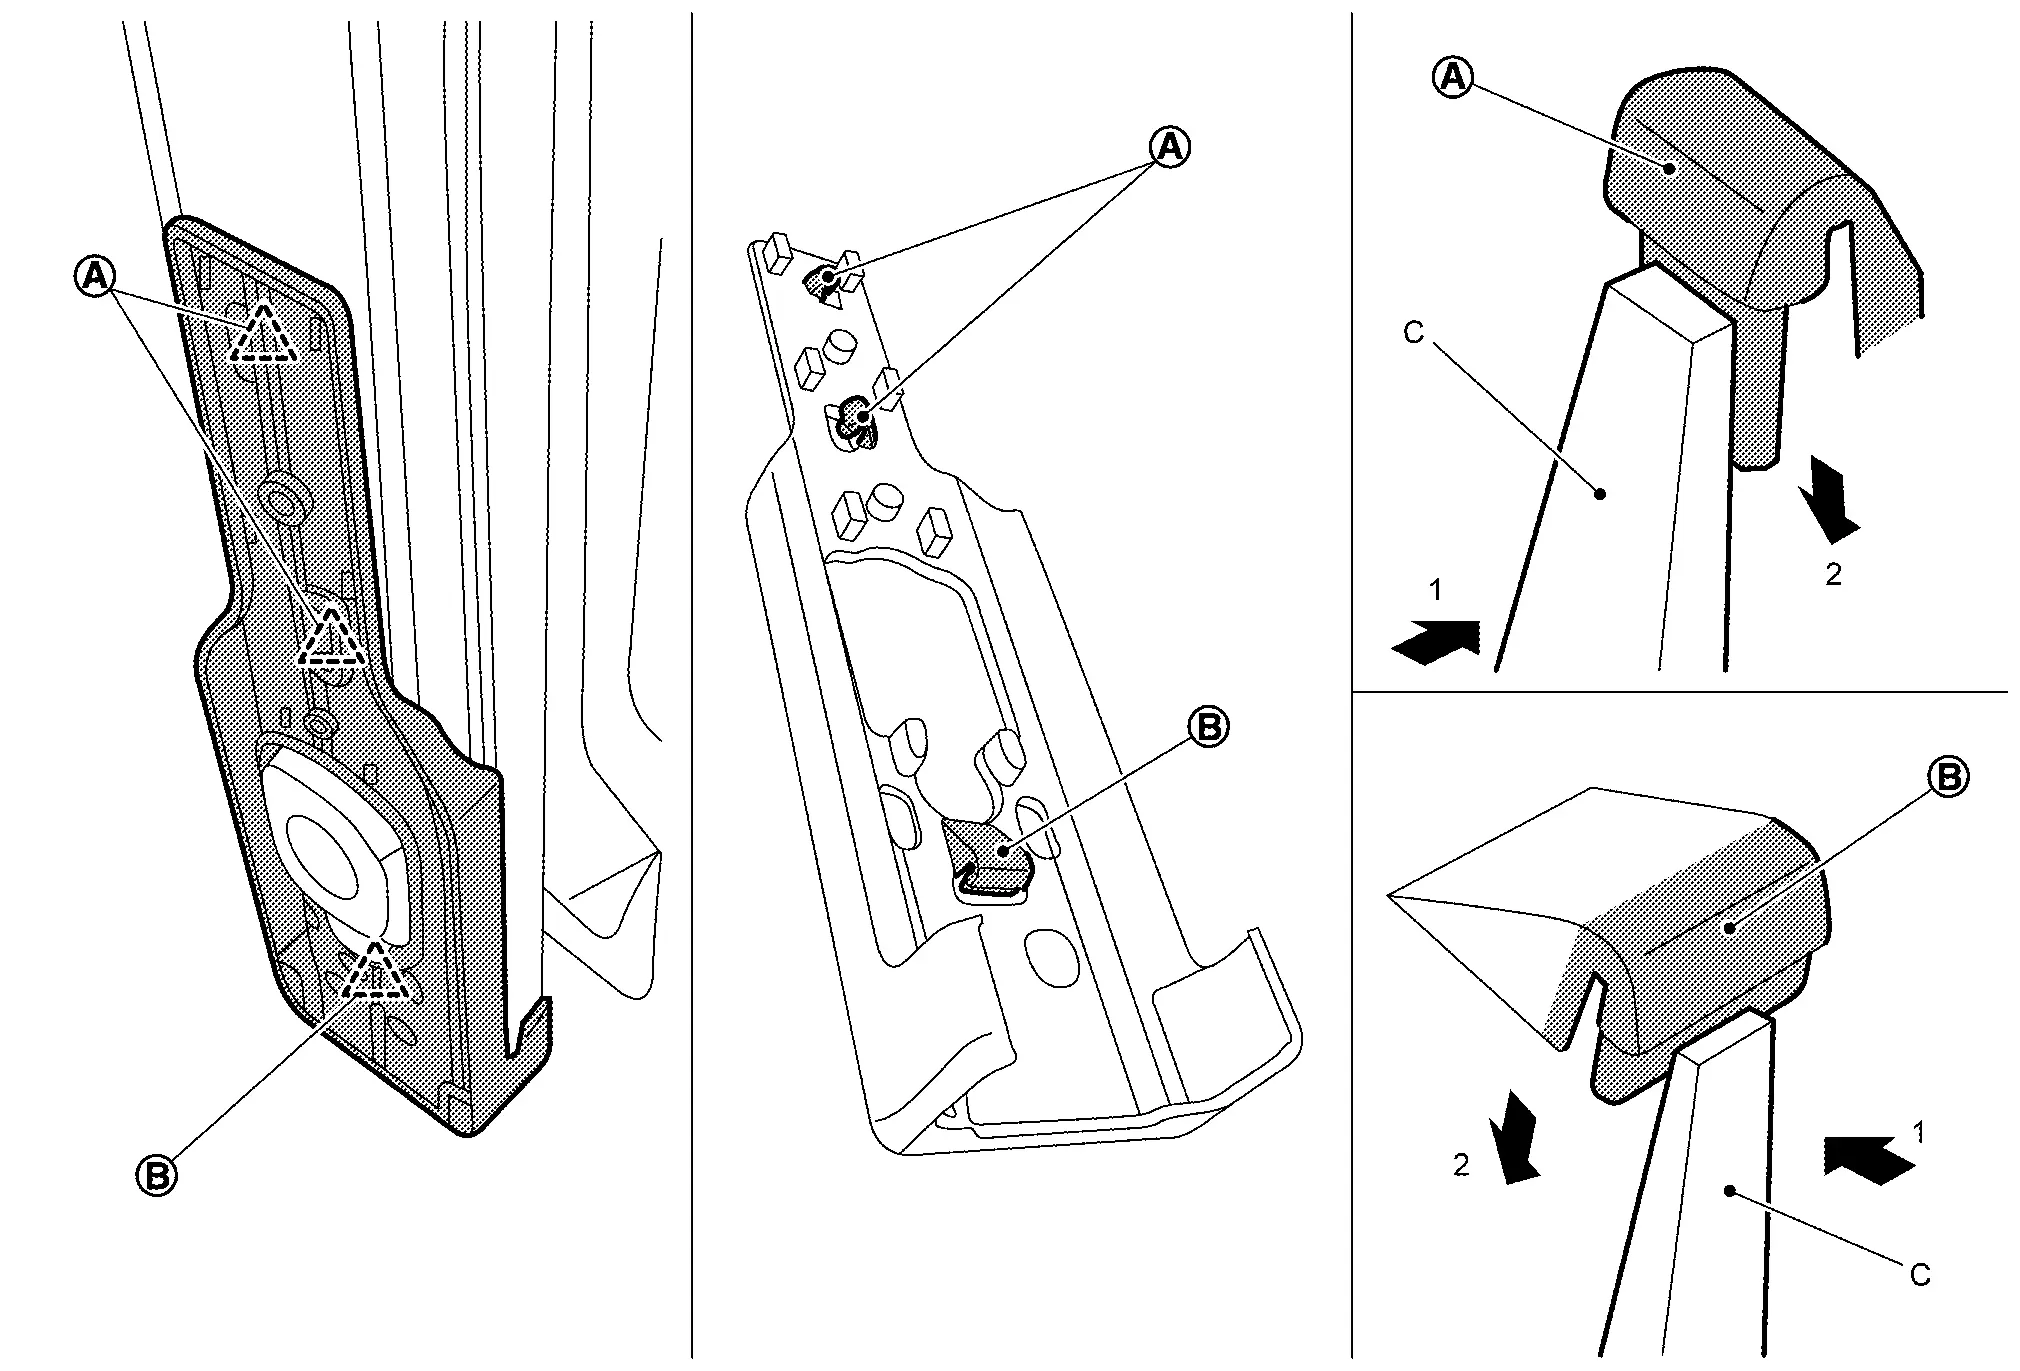
: Pawl
ASSEMBLY
Assemble is reverse order of disassemble.
Other materials:
Type a. Preparation. Preparation
Preparation
Commercial Service Tools
Tool name Description
Variable resistor
Check fuel gauge indication position
Power tool
Loosening screws
...
System Description. System (automatic Back Door System)
System Description
SYSTEM DIAGRAMThe
automatic back door system performs the automatic open/close operation
of the back door by operating the automatic back door switch, automatic
back door close switch, automatic back door lock and close switch, back
door opener switch, hands free sensor, ...
C1220-54 Incomplete Air Bleeding
DTC Description
DTC DETECTION LOGIC DTC
CONSULT screen terms
(Trouble diagnosis content) DTC detecting condition
C1220-54
INCOMP AIR BLEEDING
(Incomplete air bleeding)
Diagnosis condition
Ignition switch: ON
Signal
—
Threshold
Air bleeding of electro-hydraulic co ...