Nissan Rogue (T33) 2021-Present OwnerŌĆÖs Manual & User Guide: Jacking up the vehicle and removing the damaged tire
WARNING
- Never go under the vehicle when it is supported only by a jack. Use safety stands if you need to work underneath.
- Use only the vehicleŌĆÖs supplied jack when lifting your Nissan. It is designed for this vehicle only.
- Use only the specified jack-up points. Do not lift the vehicle at any other location.
- Do not raise the vehicle higher than necessary.
- Never place blocks or objects under the jack.
- Do not start or run the engine while the vehicle is raised on the jack.
- No passengers should remain in the vehicle while it is on the jack.
Carefully follow the label on the jack and these instructions.
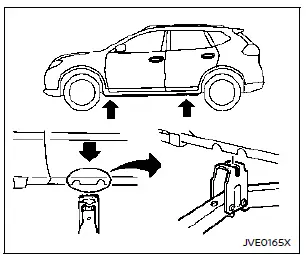
Jack-up point
1. Position the jack under the jack-up point so that the top of the jack aligns with the two notches. Ensure the jack head groove fits properly between the notches.
The jack must be on firm, level ground.
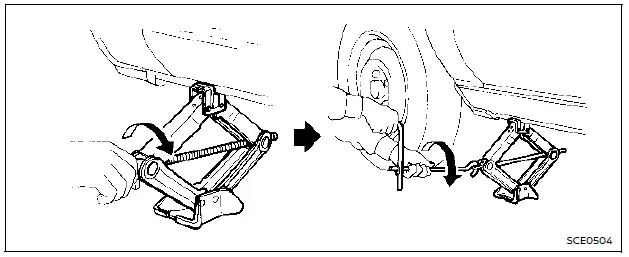
2. Loosen each wheel nut 1ŌĆō2 turns using the wheel nut wrench. Do not fully remove the nuts yet.
3. Holding the jack lever and rod securely with both hands, raise the vehicle until the tire clears the ground.
Then remove the wheel nuts completely and take off the tire.
Installing the spare tire
The spare tire is designed for emergency use.
1. Clean any mud or dirt from the mounting surface between the wheel and the hub.
2. Carefully place the spare tire onto the hub and tighten the wheel nuts by hand until they are finger tight.
Make sure all wheel nuts sit flat against the wheel surface.
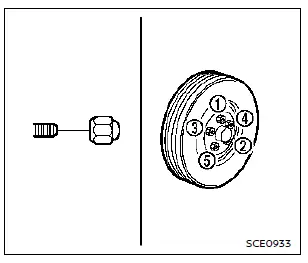
3. Using the wheel nut wrench, tighten the nuts alternately and evenly in the order shown (1, 2, 3, 4, 5). Repeat the tightening sequence more than two times until all nuts are snug.
4. Lower the vehicle slowly until the tire just touches the ground. Then use the wheel nut wrench to fully tighten the wheel nuts securely, again following the illustrated tightening order.
Lower the vehicle completely.
WARNING
- Incorrect or improperly tightened wheel nuts can cause the wheel to become loose or fall off, leading to an accident.
- Do not apply oil or grease to the wheel studs or nuts. Lubricants can cause the nuts to loosen.
- Retighten the wheel nuts after driving 600 miles (1,000 km), including after replacing a flat tire.
- Tighten the wheel nuts to the specified torque as soon as possible using a torque wrench.
Wheel nut tightening torque: 80 ft-lb (108 N┬Ęm)
The wheel nuts must always remain tightened to the specified torque. It is recommended to check and tighten them to specification at each lubrication interval.
- Adjust the tire pressure to the recommended COLD pressure.
COLD pressure:
When the vehicle has been parked for at least 3 hours or driven less than 1 mile (1.6 km).
The recommended COLD tire pressures are listed on the Tire and Loading Information label located on the driver-side center pillar.
Stowing the damaged tire and tools
1. Securely store the jack, tools, and damaged tire in the designated storage area.
2. Reinstall the luggage board(s) and cover.
3. Close the liftgate.
WARNING
- Always ensure that the spare tire and jacking equipment are securely stored after use. Loose items can become dangerous projectiles during sudden stops or accidents.
- The spare tire is intended for emergency use only.
 Changing a flat tire
Basic information
If you experience a flat tire, follow the procedure below to safely replace it.
Stopping the vehicle
1. Safely move your vehicle off the roadway and away from traffic.
2. Turn on th ...
 Jump starting
To start your engine using a booster battery, carefully follow the instructions and precautions below.
WARNING
Incorrect jump starting can cause a battery explosion, leading to severe injury or ...
Other materials:
P1715 input speed sensor
Description
ECM receives input speed sensor signal from TCM through CAN communication
line. ECM uses this signal for
engine control.
DTC Description
DTC DETECTION LOGIC
DTC No.
CONSULT screen terms
(Trouble diagnosis content)
DTC detecting conditio
P1715
IN PULY SP ...
Rear window and outside mirror (if so equipped) defroster switch
To defrost the rear window glass and outside
mirrors (if so equipped), start the engine and
push the rear window defroster switch on. The
rear window defroster indicator light on the
switch comes on. Push the switch again to turn
the defroster off.
The rear window defroster automatically ...
P0037, P0038 HO2S2 heater
DTC Description
DTC DETECTION LOGIC
DTC No.
CONSULT screen terms
(Trouble diagnosis content)
DTC detecting condition
P0037
HO2S2 HTR (B1)
(HO2S heater control circuit low bank 1
sensor 2)
The current amperage in the heated oxygen sensor 2 heater circuit is
...
