Nissan Rogue (T33) 2021-Present Ownerâs Manual & User Guide: Automatic air conditioner (models with rear control)
Basic information
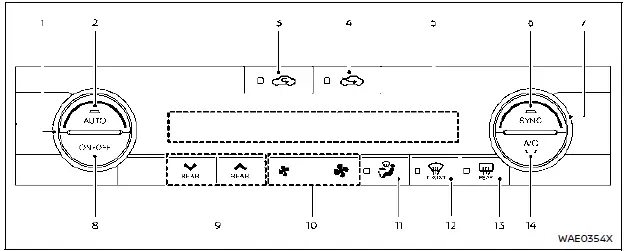
- Temperature control dial (driver's side)
- AUTO button
 Air recirculation button
 Outside air button
- Display screen
- SYNC button
- Temperature control dial (passenger's side)
- ON·OFF button
- Rear temperature control buttons
 Fan speed buttons
 Air flow button
 Front defroster button
 Rear window defroster button
- A/C button
Automatic operation
Cooling and/or dehumidified heating (AUTO):
This mode keeps the cabin of the Nissan Rogue at the selected temperature automatically. Fan speed and air distribution adjust depending on interior and exterior conditions.
1. Press AUTO (indicator ON).
2. Set the desired temperature using the appropriate control dial.
- If SYNC is OFF, driver and passenger temperatures can be adjusted separately.
Light mist from vents in humid climates is normal and not a malfunction.
Heating (A/C OFF):
This mode provides heating without activating the air conditioner.
1. Press AUTO.
2. Press A/C to turn it OFF.
3. Set the desired temperature on either side.
- Independent temperature settings apply when SYNC is OFF.
- Fan speed and airflow remain automatic for stable cabin comfort.
NOTE:
- Do not select a temperature lower than the outside temperatureâthis may affect system performance.
- Avoid this mode if the windows begin to fog.
Dehumidified defrosting or defogging:
1. Press  .
.
2. Set the desired temperature.
- For the fastest ice removal, use
 to increase fan speed to MAX.
 - Return to AUTO once the windshield is clear.
- When
 is pressed, the A/C activates automatically if outside temperatures are above freezing, and recirculation turns OFF to improve defogging.
Manual operation
Fan speed control:
Use  to increase or decrease fan speed manually.
Air intake control:
- Press
 to activate recirculation (indicator ON).
 - Press
 to draw in outside air (indicator ON).
 - Hold either button to activate AUTO intake controlâindicator blinks, then the system alternates between intake modes automatically.
Air flow control:
Press  to select:
 â Center/side vents
 â Center/side & foot outlets
 â Foot & partial defrost
 â Defroster & foot outlets
Synchronize temperature settings:
Press SYNC (indicator ON) to unify temperature control for driver, passenger, and rear zones.
Adjusting either the passenger dial or rear temperature buttons cancels SYNC for that zone, while adjusting both will turn SYNC OFF completely.
To turn the system off:
Press ON·OFF.
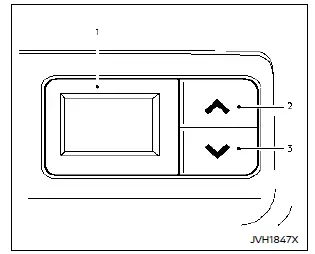
- Rear temperature display
- Rear temperature increase button
- Rear temperature decrease button
Rear temperature control (if equipped)
Rear passengers can adjust their temperature using the controls located on the back of the center console. This ensures that all occupants of the Nissan Rogue remain comfortable regardless of climate conditions.
Remote engine start with intelligent climate control
When remote start is activated, the Nissan Rogue automatically chooses heating or cooling depending on cabin and exterior temperatures. Buttons and display remain inactive until the ignition is switched ON. In cold weather, the system may automatically activate the heated steering wheel (if equipped) and rear defroster for improved comfort.
Other materials:
Brake system
Braking precautions
Basic information
The brake system uses two independent
hydraulic circuits. If one circuit fails,
braking at two wheels will still be available.
Vacuum assisted brakes
The brake booster enhances braking force
using engine vacuum. If the engine stops,
you can still brake by press ...
Enregistreurs de donnÃĐes d'ÃĐvÃĐnements
(EDR)
Informations de base
Ce vÃĐhicule Nissan Rogue est ÃĐquipÃĐ d'un enregistreur de donnÃĐes d'ÃĐvÃĐnements (EDR).
L'objectif principal de l'EDR est d'enregistrer, dans certaines situations d'accidents
ou de quasi-accidents â par exemple en cas de dÃĐploiement d'un airbag ou d'impact
avec un ob ...
PrÃĐsentation gÃĐnÃĐrale
ProPILOT Assist est un systÃĻme avancÃĐ d'assistance à la conduite conçu pour offrir un confort accru au volant du Nissan Rogue lors des dÃĐplacements sur les voies rapides à accÃĻs limitÃĐ. Il nâest pas destinÃĐ Ã une utilisation en milieu urbain ou sur des routes secondaires. Ce systÃĻme a p ...