Nissan Rogue Service Manual: Side air bag (satellite) sensor
Exploded View
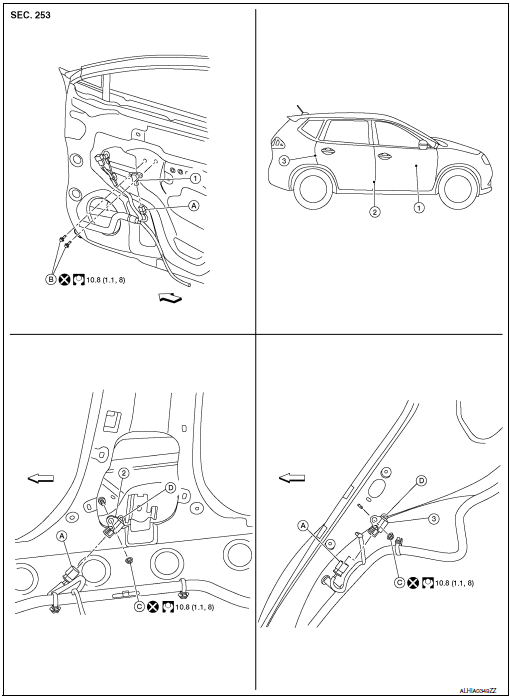
- Front door satellite sensor
- Front side air bag satellite sensor
- Rear side satellite sensor
- Satellite sensor harness connector
- Bolt
- Nut
- Pawl
 Front
Front
NOTE: RH side shown, LH side similar.
Removal and Installation
WARNING:
- Before servicing the SRS, turn ignition switch OFF, disconnect both battery terminals then wait at least three minutes.
- Do not use air tools or electric tools for servicing.
FRONT SIDE AIR BAG SATELLITE SENSOR
Removal
- Disconnect negative and positive battery terminals, then wait at least three minutes. Refer to PG-77, "Removal and Installation".
- Place aside the front seat belt retractor.
- Remove the front side air bag satellite sensor nut.
CAUTION: Do not reuse the front side air bag satellite sensor nut.
- Disconnect the harness connector from the front side air bag satellite sensor and remove.
CAUTION:
- Replace the front side air bag satellite sensor if it has been dropped or sustained an impact.
- Do not strike the front side air bag satellite sensor.
Installation
Installation is in the reverse order of removal.
- Position the front side air bag satellite sensor using the pawl before tightening the nut to specification.
CAUTION:
- Do not reuse the front side air bag satellite sensor nut.
- Do not damage the harness connector during installation.
- After installation is complete, check that no system malfunction is detected causing the air bag warning lamp to illuminate.
- If a malfunction is indicated by the air bag warning lamp after repair or replacement of the malfunctioning parts, perform the SRS final check. Refer to SRC-18, "Trouble Diagnosis with CONSULT".
REAR SIDE AIR BAG SATELLITE SENSOR
Removal
- Disconnect negative and positive battery terminals, then wait at least three minutes. Refer to PG-77, "Removal and Installation".
- Remove the luggage side lower finisher. Refer to INT-34, "LUGGAGE SIDE LOWER FINISHER : Removal and Installation - With Third Row Seat" (WITH THIRD ROW SEAT), INT-34, "LUGGAGE SIDE LOWER FINISHER : Removal and Installation - With Third Row Seat" (WITHOUT THIRD ROW SEAT).
- Remove the rear side air bag satellite sensor bolt.
CAUTION: Do not reuse the rear side air bag satellite sensor bolt.
- Disconnect the harness connector from the rear side air bag satellite sensor and remove.
CAUTION:
- Replace the rear side air bag satellite sensor if it has been dropped or sustained an impact.
- Do not strike the rear side air bag satellite sensor.
Installation Installation is in the reverse order of removal.
- Position the rear side air bag satellite sensor using the pawl before tightening the bolt to specification.
CAUTION:
- Do not reuse the rear side air bag satellite sensor bolt.
- Do not damage the harness connector during installation.
- After installation is complete, check that no system malfunction is detected causing the air bag warning lamp to illuminate.
- If a malfunction is indicated by the air bag warning lamp after repair or replacement of the malfunctioning parts, perform the SRS final check. Refer to SRC-18, "Trouble Diagnosis with CONSULT".
FRONT DOOR SATELLITE SENSOR
Removal
- Disconnect negative and positive battery terminals, then wait at least three minutes. Refer to PG-77, "Removal and Installation".
- Remove the front door finisher. Refer to INT-15, "Removal and Installation".
- Partially remove front door vapor barrier.
- Remove the front door satellite sensor bolts.
CAUTION: Do not reuse the front door satellite sensor bolts.
- Disconnect the harness connector from the front door satellite sensor and remove.
CAUTION:
- Replace the front door satellite sensor if it has been dropped or sustained an impact.
- Do not strike the front door satellite sensor.
Installation
Installation is in the reverse order of removal.
CAUTION:
- Do not reuse the front door satellite sensor bolts.
- Do not damage the harness connector during installation.
- After installation is complete, check that no system malfunction is detected causing the air bag warning lamp to illuminate.
- If a malfunction is indicated by the air bag warning lamp after repair or replacement of the malfunctioning parts, perform the SRS final check. Refer to SRC-18, "Trouble Diagnosis with CONSULT".
 Crash zone sensor
Exploded View
Crash zone sensor
Crash zone sensor harness
connector
Bracket
Removal and Installation
WARNING:
Before servicing the SRS, turn ignition switc ...
 Air bag diagnosis sensor unit
Exploded View
Diagnosis sensor unit
Front
Removal and Installation
WARNING:
Before servicing the SRS, turn ignition switch OFF, disconnect
both battery terminals then wait ...
Other materials:
FM/AM radio with compact disc (CD) player
(if so equipped)
FM/AM radio with compact disc (CD) player
CD eject button
CD button
Display screen
CD insert slot
SEEK button
SCAN button
TRACK button
BACK button
iPod MENU button
TUNE/FOLDER knob, ENTER/SETTING
button
Sta ...
Inspection and adjustment
ADDITIONAL SERVICE WHEN REPLACING CONTROL UNIT
ADDITIONAL SERVICE WHEN REPLACING CONTROL UNIT : Description
When replacing the occupant classification system control unit, perform
zero point reset procedure. Refer to
SRC-42, "ZERO POINT RESET : Special Repair Requirement".
When ...
Water hose
Exploded View
Water outlet
Hose clamp
Water hose A
Clip
CVT oil warmer
Transaxle assembly
Water hose B
Heater thermostat
Water hose C
: Always replace after every
disassembly.
: N·m (kg-m, ft-lb)
Removal and Installation
REMOVAL
WARNING:
Do not remove the rad ...
