Nissan Rogue Service Manual: Air bag diagnosis sensor unit
Exploded View
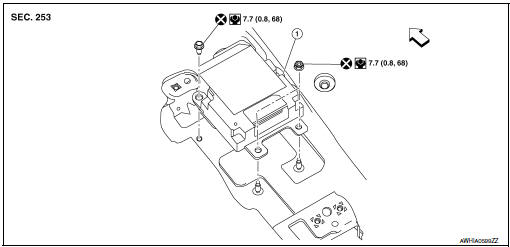
- Diagnosis sensor unit
 Front
Front
Removal and Installation
WARNING:
- Before servicing the SRS, turn ignition switch OFF, disconnect both battery terminals then wait at least three minutes.
- Before disconnecting the air bag diagnosis sensor unit harness connectors, be sure to disconnect each harness connector of the side curtain air bag modules, front seat belt pre-tensioner, and front side air bag module, to prevent accidental air bag deployment by static electricity and seat belt pretensioner operation.
- Do not use the air tools or electric tools for servicing.
- When replacing the air bag diagnosis sensor unit, always check with the parts department for the latest parts information. Installing an incorrect air bag diagnosis sensor unit may or may not cause the air bag warning lamp to illuminate and may cause incorrect deployment of the supplemental air bags and seat belt pre-tensioners in a collision resulting in serious personal injury or death.
REMOVAL
- Always check the air bag diagnosis sensor unit ECU discriminated number (identification number) or part number using CONSULT.
- Disconnect negative and positive battery terminals, then wait at least three minutes. Refer to PG-77, "Removal and Installation".
- Remove center console assembly. Refer to IP-18, "Removal and Installation".
- Disconnect the harness connectors for the following SRS components: SR-19, "Removal and Installation" (side curtain air bag modules), SR-28, "Removal and Installation" (front seat belt pre-tensioner) and SR- 17, "Removal and Installation" (front side air bag module).
- Disconnect the harness connectors from the diagnosis sensor unit.
- Remove bolt and nuts, then remove the air bag diagnosis sensor unit.
CAUTION:
- Do not reuse the air bag diagnosis sensor unit bolts.
- Replace the air bag diagnosis sensor unit if any SRS air bag has been deployed or if any front seat belt pre-tensioner has been deployed.
- Replace the air bag diagnosis sensor unit if it has been dropped or sustained an impact.
- Do not strike the air bag diagnosis sensor unit.
INSTALLATION
Install air bag diagnosis sensor unit in the reverse order of removal.
CAUTION:
- Do not reuse the air bag diagnosis sensor unit bolts.
- The air bag diagnosis sensor unit must always be installed with
the label arrow mark "
 "
pointing
toward the front of the vehicle for proper operation.
"
pointing
toward the front of the vehicle for proper operation. - Do not damage the air bag diagnosis sensor unit harness connectors during installation.
- After installation is complete, check that no system malfunction is detected causing the air bag warning lamp to illuminate.
- If a malfunction is indicated by the air bag warning lamp after repair or replacement of the malfunctioning parts, perform the SRS final check. Refer to SRC-18, "Trouble Diagnosis with CONSULT".
- After replacing the air bag diagnosis sensor unit, confirm using CONSULT that the ECU discriminated number (identification number) or part number of the new replacement air bag diagnosis sensor unit matches the ECU discriminated number (identification number) or part number of the replaced (old) air bag diagnosis sensor unit.
NOTE: If the ECU discriminated number or part number of the new replacement air bag diagnosis sensor unit differs from the ECU discriminated number or part number of the replaced air bag diagnosis sensor unit, reconfirm the parts information and verify that the correct air bag diagnosis sensor unit was installed.
Front seat belt pre-tensioner
Removal and Installation
The front seat belt has two pre-tensioners. One pre-tensioner is part of the seat belt retractor and the other is a lap belt pre-tensioner. For removal and installation refer to SB-8, "SEAT BELT RETRACTOR : Removal and Installation" (seat belt retractor) and SB-8, "Exploded View" (lap belt pretensioner).
Front seat belt buckle switch
Removal and Installation
The front seat belt buckle switch is part of the front seat belt buckle. For removal and installation of the front seat belt buckle, refer to SB-11, "FRONT SEAT BELT BUCKLE : Removal and Installation".
 Side air bag (satellite) sensor
Exploded View
Front door satellite sensor
Front side air bag satellite sensor
Rear side satellite sensor
Satellite sensor harness connector
Bolt
Nut
Pawl ...
 Occupant classification system control unit
Removal and Installation
OCCUPANT CLASSIFICATION SYSTEM CONTROL UNIT
WARNING:
Before servicing the SRS, turn ignition switch OFF, disconnect
both battery terminals then wait at
least ...
Other materials:
Precaution
Precaution for Supplemental Restraint System (SRS) "AIR BAG" and "SEAT
BELT
PRE-TENSIONER"
The Supplemental Restraint System such as “AIR BAG” and “SEAT BELT PRE-TENSIONER”,
used along
with a front seat belt, helps to reduce the risk or severity of injury to the
...
Both doors mirror defogger don’t operate but rear window defogger operates
Diagnosis Procedure
Regarding Wiring Diagram information, refer to DEF-12, "Wiring Diagram".
1. CHECK DOOR MIRROR DEFOGGER FUSE
Check if the following fuse in fuse block (J/B) is blown.
Is the inspection result normal?
YES >> GO TO 2.
NO >> Replace the blown fuse af ...
U1000 CAN COMM CIRCUIT
Description
CAN (Controller Area Network) is a serial communication line for real time
application. It is an on-vehicle multiplex
communication line with high data communication speed and excellent error
detection ability. Many electronic
control units are equipped onto a vehicle, and each co ...
