Nissan Rogue (T33) 2021-Present Service Manual: Restraints :: Seat Belt Control System
Precaution :: Precautions
Precaution for Supplemental Restraint System (SRS) "AIR BAG" and "SEAT BELT PRE-TENSIONER"
The Supplemental Restraint System such as âAIR BAGâ and âSEAT BELT PRE-TENSIONERâ, used along with a front seat belt, helps to reduce the risk or severity of injury to the driver and front passenger for certain types of collisions.
Information necessary to service the system safely is included in the âSRS AIR BAGâ and âSEAT BELTâ sections of this Service Manual.
WARNING:
Always observe the following items for preventing accidental activation:
-
To avoid rendering the SRS inoperative, which could increase the risk of personal injury or death in the event of a collision that would result in air bag inflation, it is recommended that all maintenance and repair be performed by an authorized NISSAN/INFINITI dealer.
-
Improper repair, including incorrect removal and installation of the SRS, can lead to personal injury caused by unintentional activation of the system. For removal of Spiral Cable and Air Bag Module, see âSRS AIR BAGâ.
-
Never use electrical test equipment on any circuit related to the SRS unless instructed to in this Service Manual. SRS wiring harnesses can be identified by yellow and/or orange harnesses or harness connectors.
PRECAUTIONS WHEN USING POWER TOOLS (AIR OR ELECTRIC) AND HAMMERS
WARNING:
Always observe the following items for preventing accidental activation:
-
When working near the Air Bag Diagnosis Sensor Unit or other Air Bag System sensors with the ignition/power switch ON or engine running, never use air or electric power tools or strike near the sensor(s) with a hammer. Heavy vibration could activate the sensor(s) and deploy the air bag(s), possibly causing serious injury.
-
When using air or electric power tools or hammers, always switch the ignition/power switch OFF, disconnect the 12V battery or batteries, and wait at least 3 minutes before performing any service.
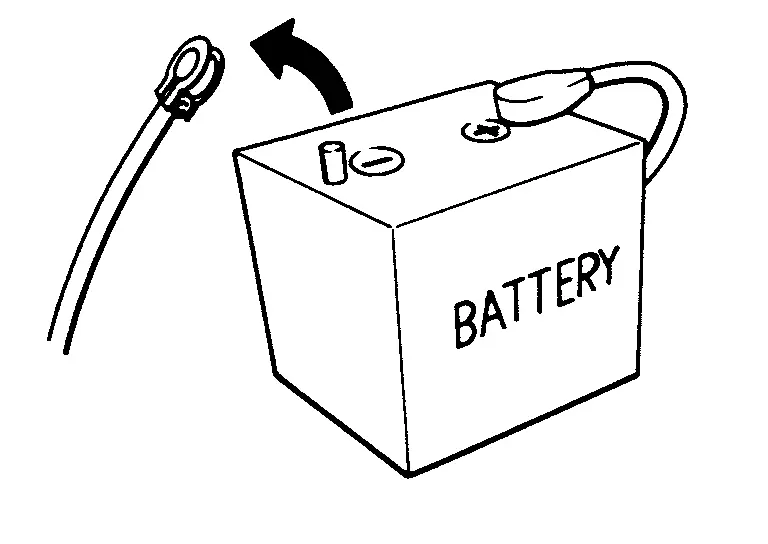
Precautions for Removing Battery Terminal
-
With the adoption of Auto ACC function, ACC power is automatically supplied by operating the Intelligent Key or remote keyless entry or by opening/closing the driver side door. In addition, ACC power is supplied even after the ignition switch is in the OFF position, i.e. ACC power is supplied for a certain fixed time.
-
When disconnecting the 12V battery terminal, place the ignition switch in the OFF position before disconnecting the 12V battery terminal, observing âHow to disconnect 12V battery terminalâ described below.
 NOTE:
NOTE:
Some ECUs operate for a certain fixed time even after ignition switch is in the OFF position and ignition power supply is stopped. If the battery terminal is disconnected before ECU stops, accidental DTC detection or ECU data damage may occur.
-
For Nissan Ariya vehicles with the 2-batteries, be sure to connect the main battery and the sub battery before placing the ignition switch in the ON position.
NOTE:
If the ignition switch is in the ON position with any one of the terminals of main battery and sub battery disconnected, then DTC may be detected.
-
After installing the 12V battery, always check "Self Diagnosis Result" of all ECUs and erase DTC.
NOTE:
The removal of 12V battery may cause a DTC detection error.
HOW TO DISCONNECT 12V BATTERY TERMINAL
Disconnect 12V battery terminal according to instruction described below.
-
Open the hood.
-
Place the ignition switch in the ON position.
-
Place the ignition switch in the OFF position with the driver side door opened.
-
Get out of the Nissan Ariya vehicle and close the driver side door.
-
Wait at least 3 minutes.
CAUTION:
While waiting, never operate the Nissan Ariya vehicle such as locking, opening, and closing doors. Violation of this caution results in the activation of ACC power supply according to the Auto ACC function.
-
Remove 12V battery terminal.
CAUTION:
After installing 12V battery, always check self-diagnosis results of all ECUs and erase DTC.
System Description :: Component Parts. Seat Belt Warning System
Seat Belt Warning System
Component Parts Location
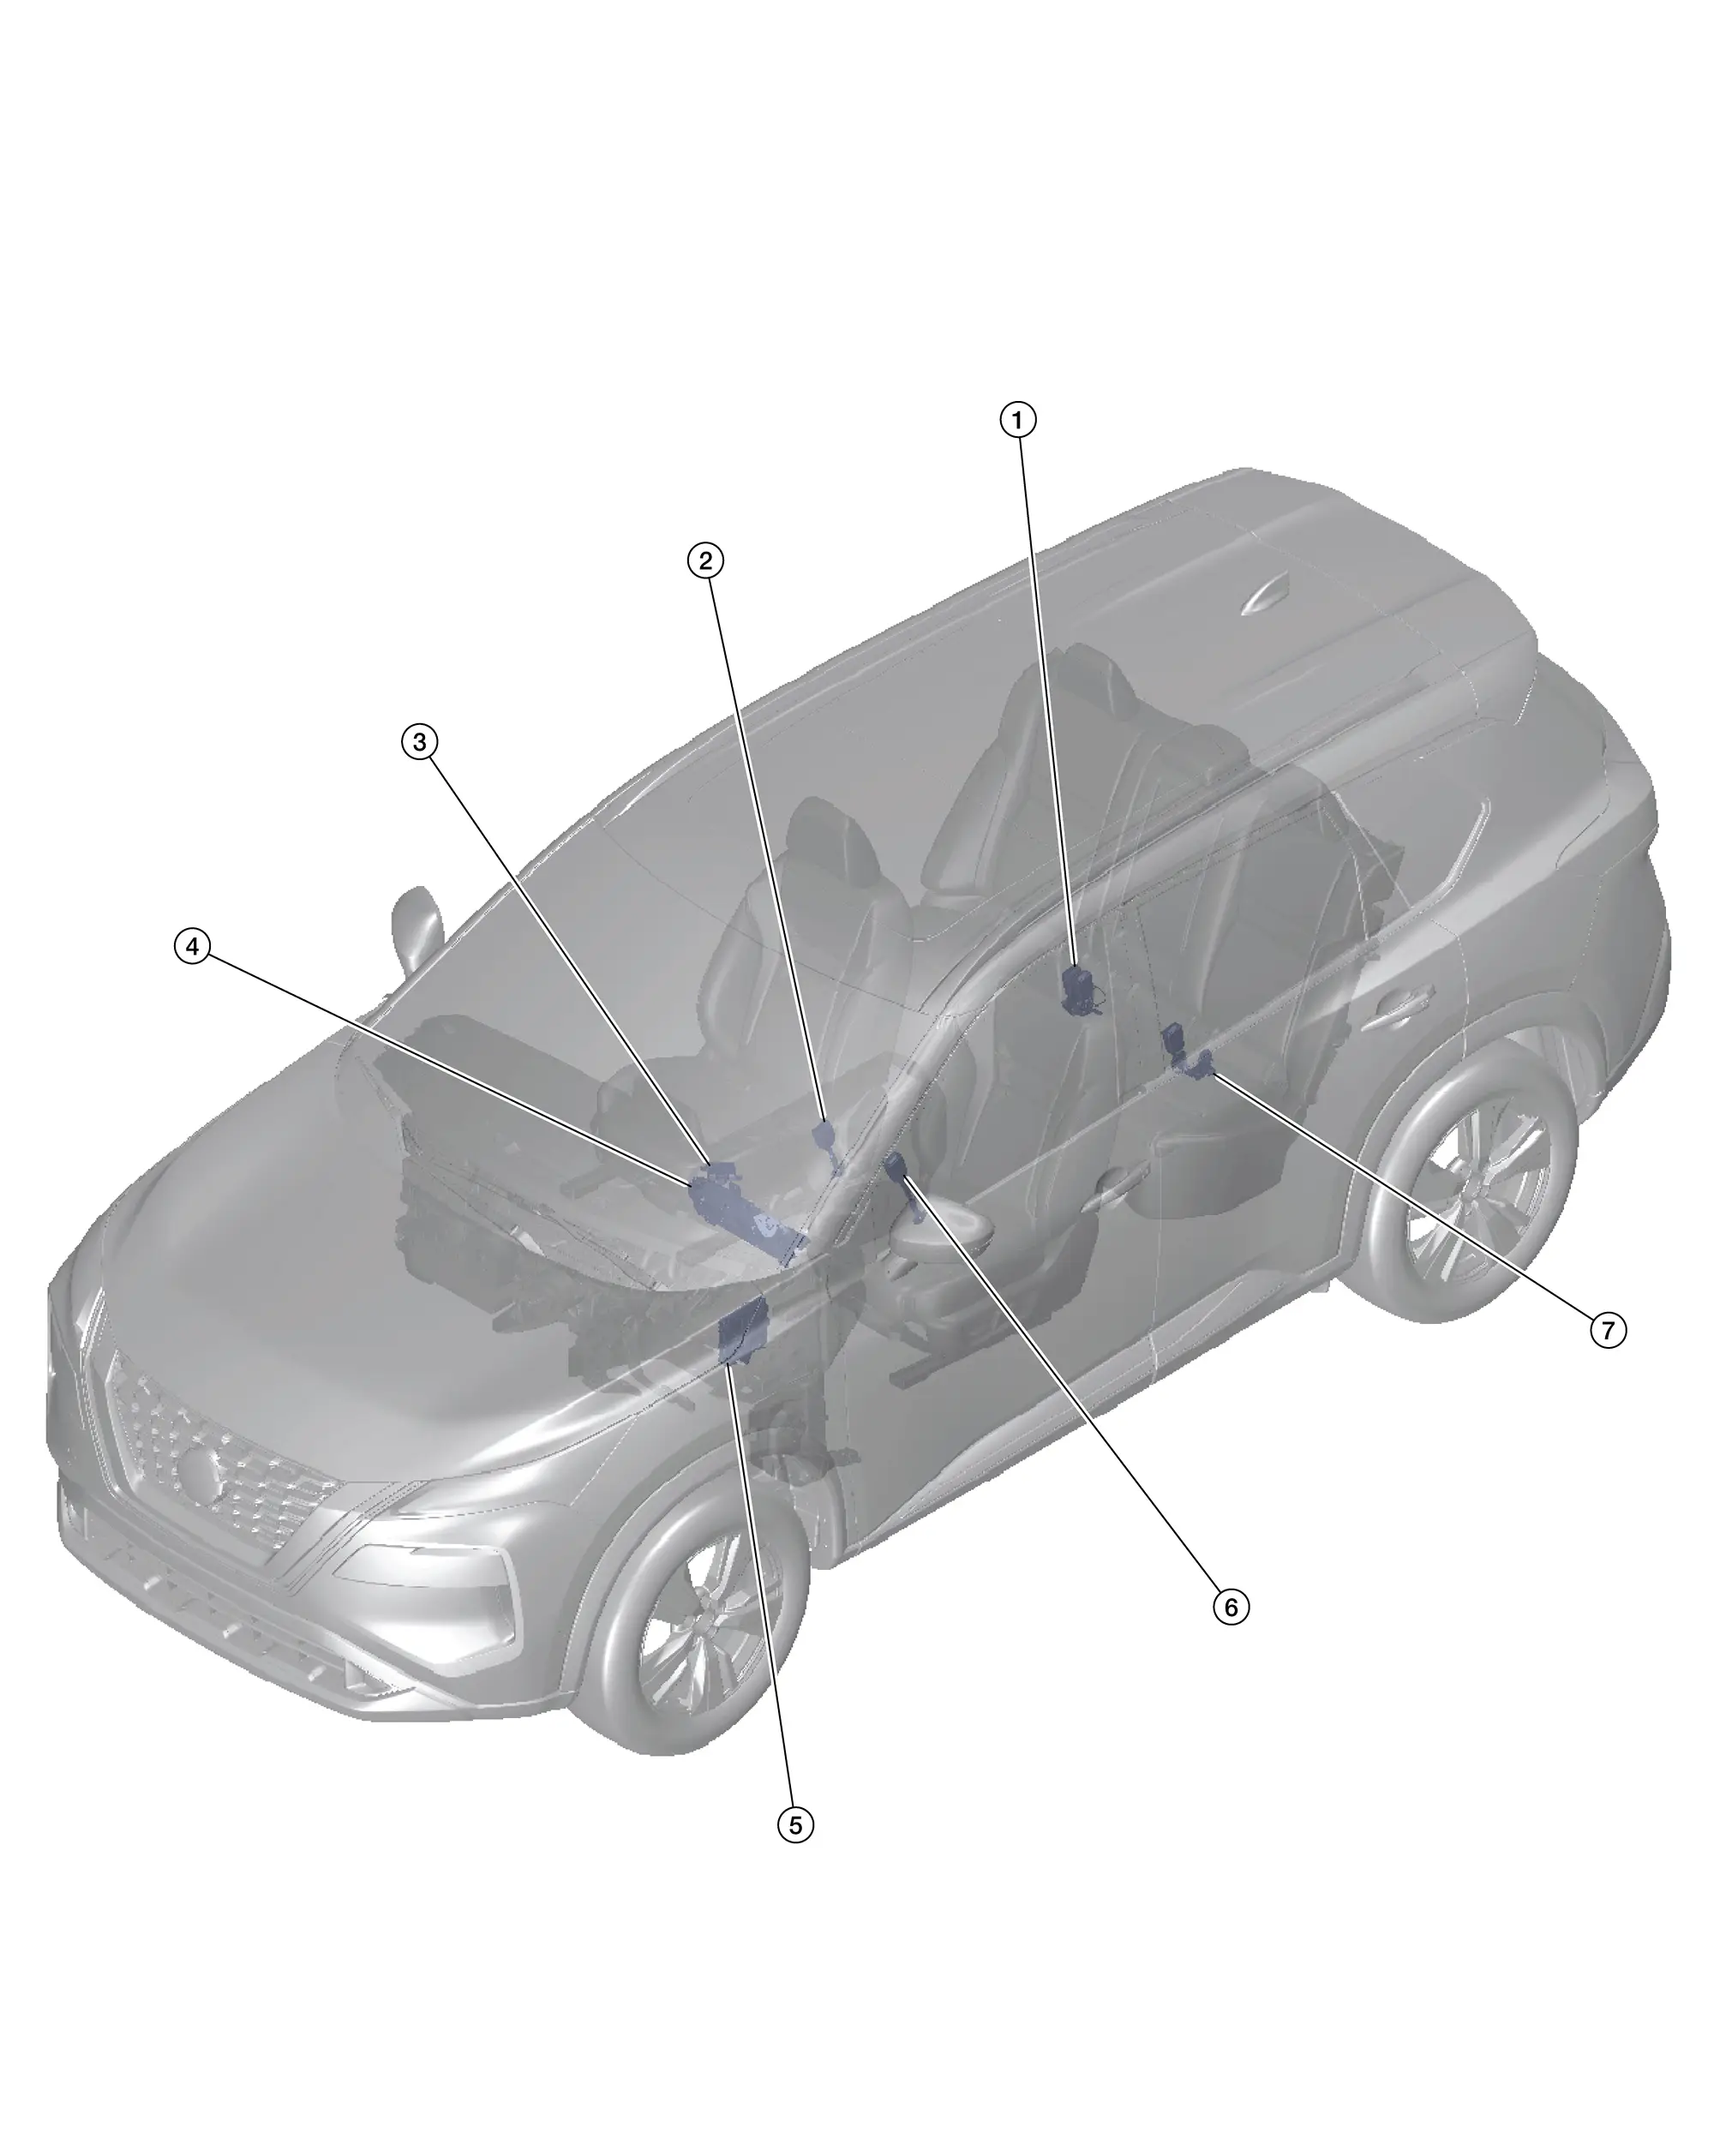
| No. | Component | Function |
|---|---|---|
| 1. | Rear seat belt buckle switch RH & CTR | Refer to Seat Belt Buckle Switch. |
| Front seat belt buckle switch RH | ||
| 2. | ||
| 3. | Occupant detection system control unit | Refer to Component Parts Location for detailed component location. |
| 4. | Combination meter | Refer to Component Parts Location (Type A) or Component Parts Location (Type B) for detailed component location. |
| 5. | BCM (Body Control Module) | Refer to Component Parts Location for detailed component location. |
| 6. | Front seat belt buckle switch LH | Refer to Seat Belt Buckle Switch. |
| 7. | Rear seat belt buckle switch LH | Refer to Seat Belt Buckle Switch. |
Seat Belt Buckle Switch
COMPONENT FUNCTION WITHIN SYSTEM
-
Transmits seat belt buckle switch (front LH) signal to BCM.
-
Transmits seat belt buckle switch (front RH and rear) signal to air bag diagnosis sensor unit.
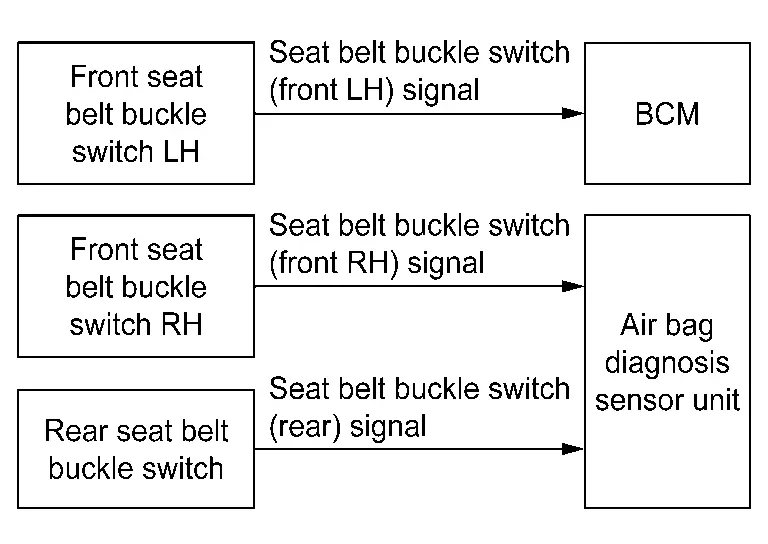
INDIVIDUAL COMPONENT FUNCTION
Detects seat belt status.
-
Front
-
Rear
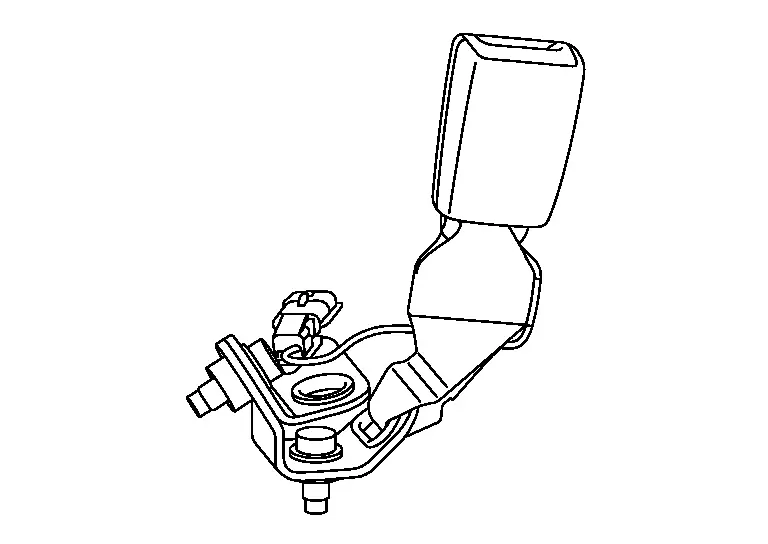
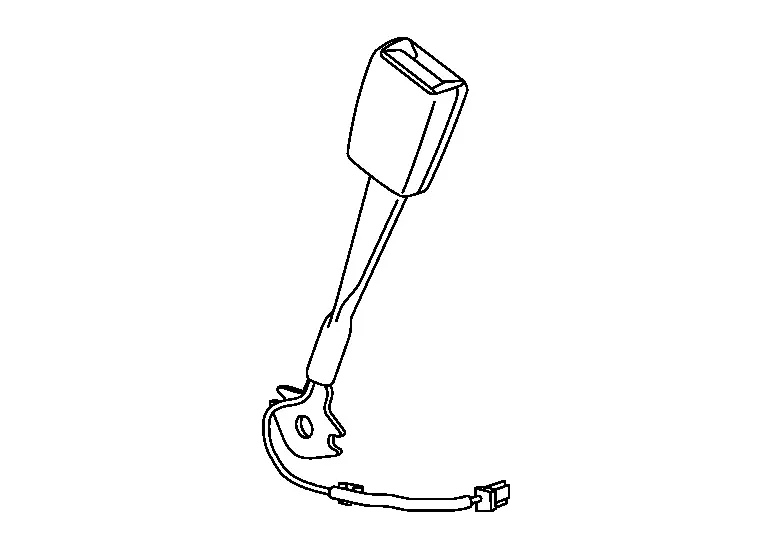
COMPONENT PARTS LOCATION
-
The seat belt buckle switch is installed in the seat belt buckle.
-
For details, refer to Component Parts Location.
System Description :: System
Seat Belt Warning Lamp Control System
System Description
SYSTEM DIAGRAM
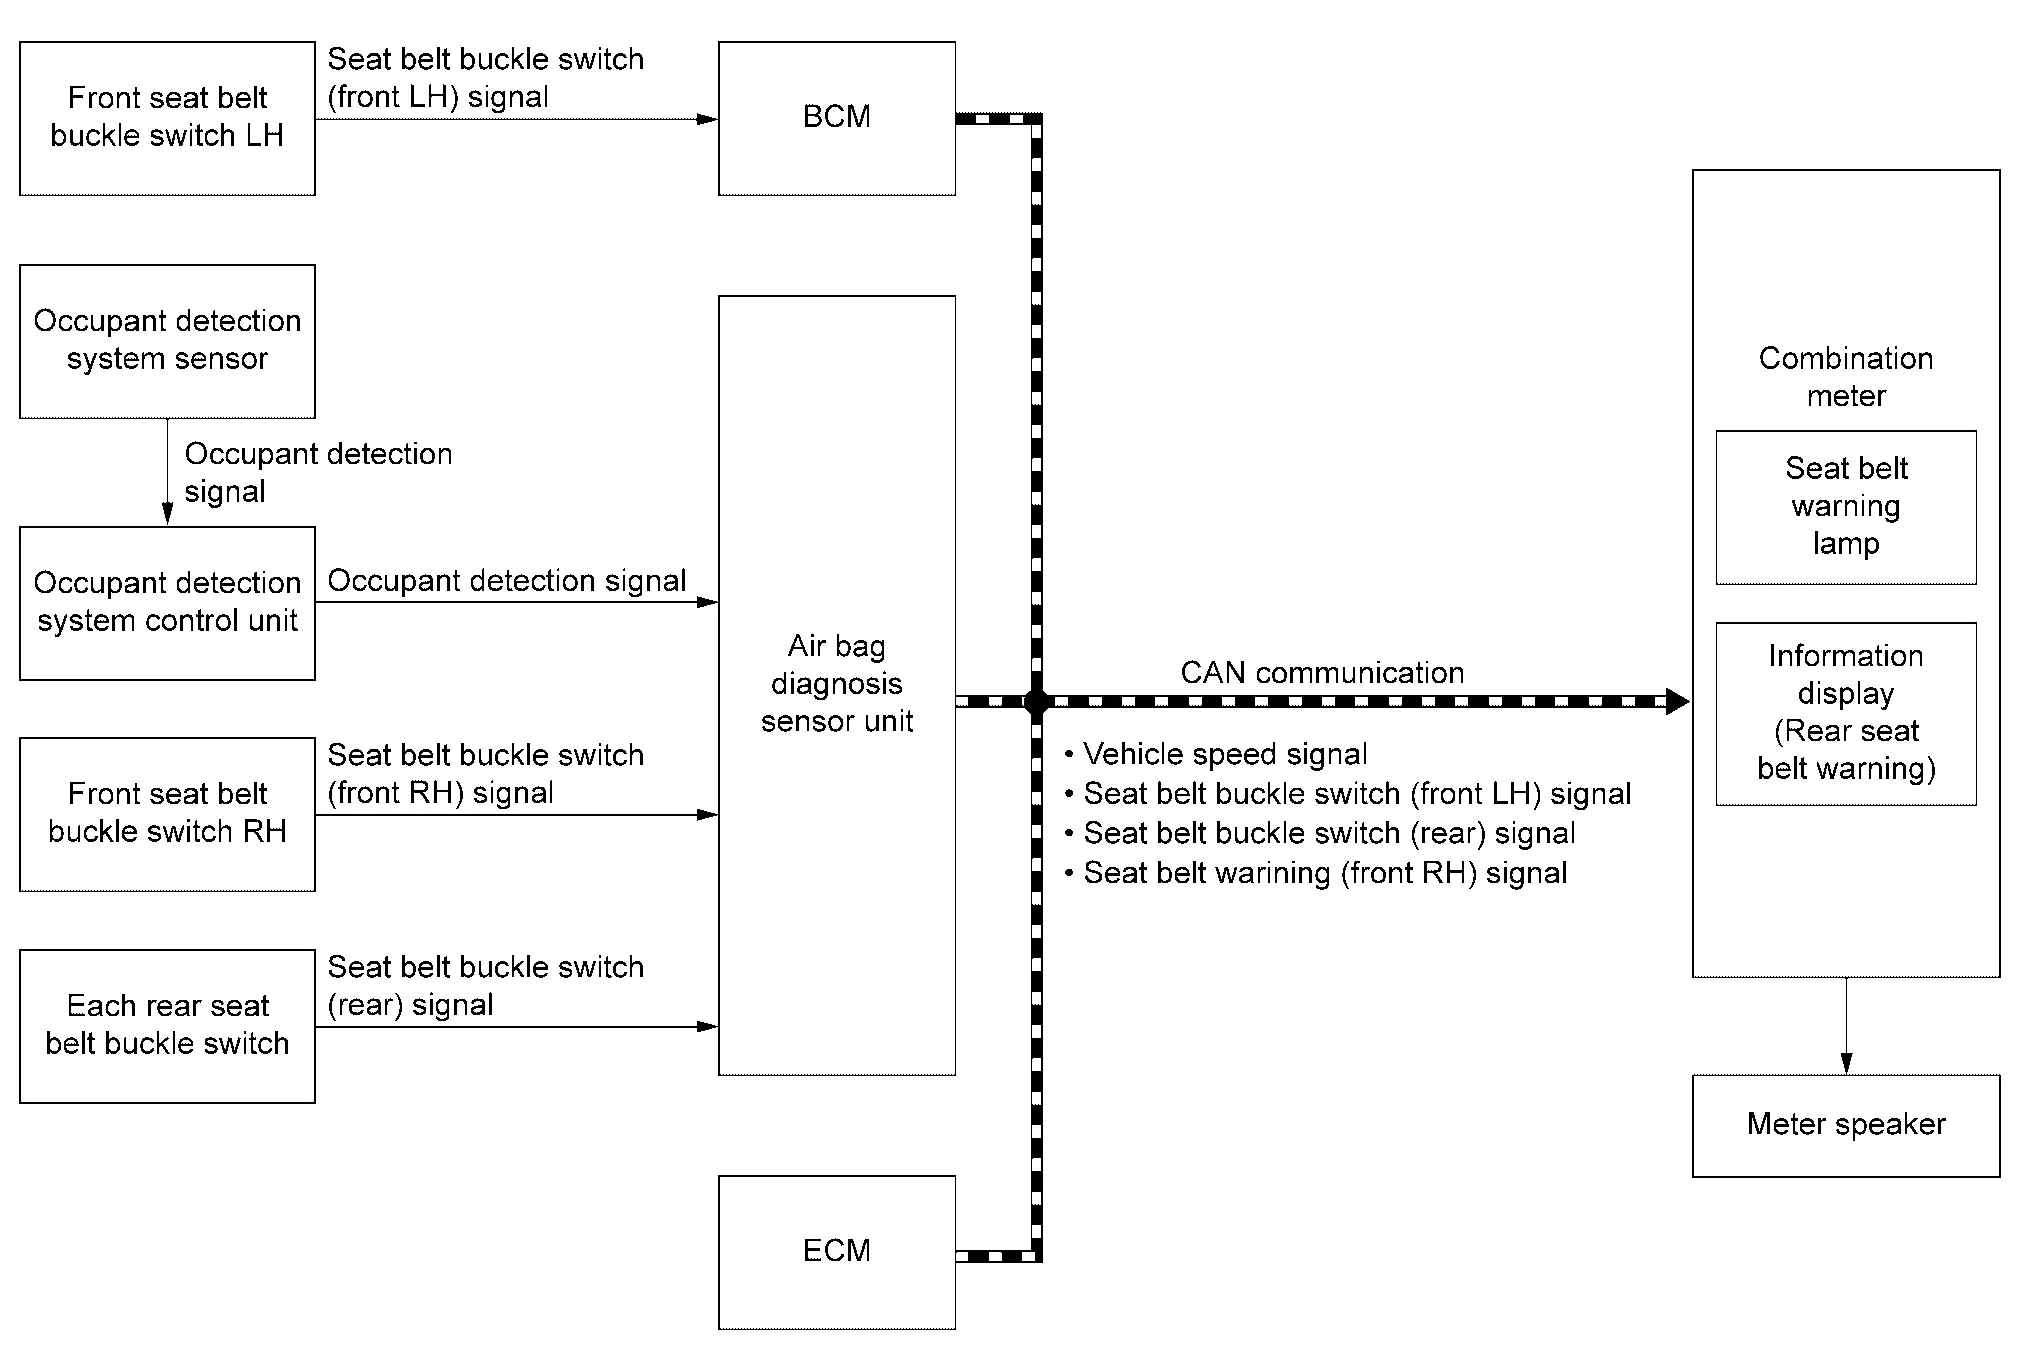
INPUT SIGNAL AND OUTPUT SIGNAL
Major signal transmission between each unit via communication lines is shown in the following table:
| Component | Function |
|---|---|
| Front seat belt buckle switch (LH/RH) | Refer to Seat Belt Buckle Switch. |
| Rear seat belt buckle switch | |
| Occupant detection system control unit | Occupant detection system control unit transmits the occupant detection signal to air bag diagnosis sensor unit. |
| Occupant detection system sensor | Detecting whether a person sits in the seat or not. |
| Air bag diagnosis sensor unit |
|
| Combination meter |
|
| ECM | ECM transmits the Nissan Ariya vehicle speed signal to combination meter via CAN communication. |
| BCM | BCM transmits the seat belt buckle switch signal to combination meter via CAN communication. |
| Meter speaker | Operates when signal is received from combination meter. |
SEAT BELT WARNING LAMP OPERATION
Seat belt warning lamp on combination meter turns ON during a period when ignition switch is ON until seat belts are fastened. Seat belt warning lamp turns OFF when seat belt is fastened. Seat belt warning lamp turns ON again when seat belt is unfastened.
SEAT BELT WARNING CHIME OPERATION
Front
-
Seat belt warning chime sounds for approximately 6 seconds when the ignition switch ON and seat belts are not fastened.
-
Seat belt warning chime sounds for approximately 95 seconds when the Nissan Ariya vehicle speed is 9.3 MPH (15 km/h) or more when any occupied seat and seat belt is unfastened.
Rear
Rear seat belt warning chime sounds one time when rear seat belt warning display is turned ON due to the change of any rear seat belt buckle switch status from fastened to unfastened and Nissan Ariya vehicle speed is 9.3 MPH (15 km/h) or more.
Rear Seat Belt Warning
System Description
DESIGN/PURPOSE
Rear seat belt warning warns the driver that rear seat belt is not fastened.
| Symbol | Message |
|---|---|
|
|
â |

SYNCHRONIZATION WITH MASTER WARNING LAMP
No applicable
SYSTEM DIAGRAM
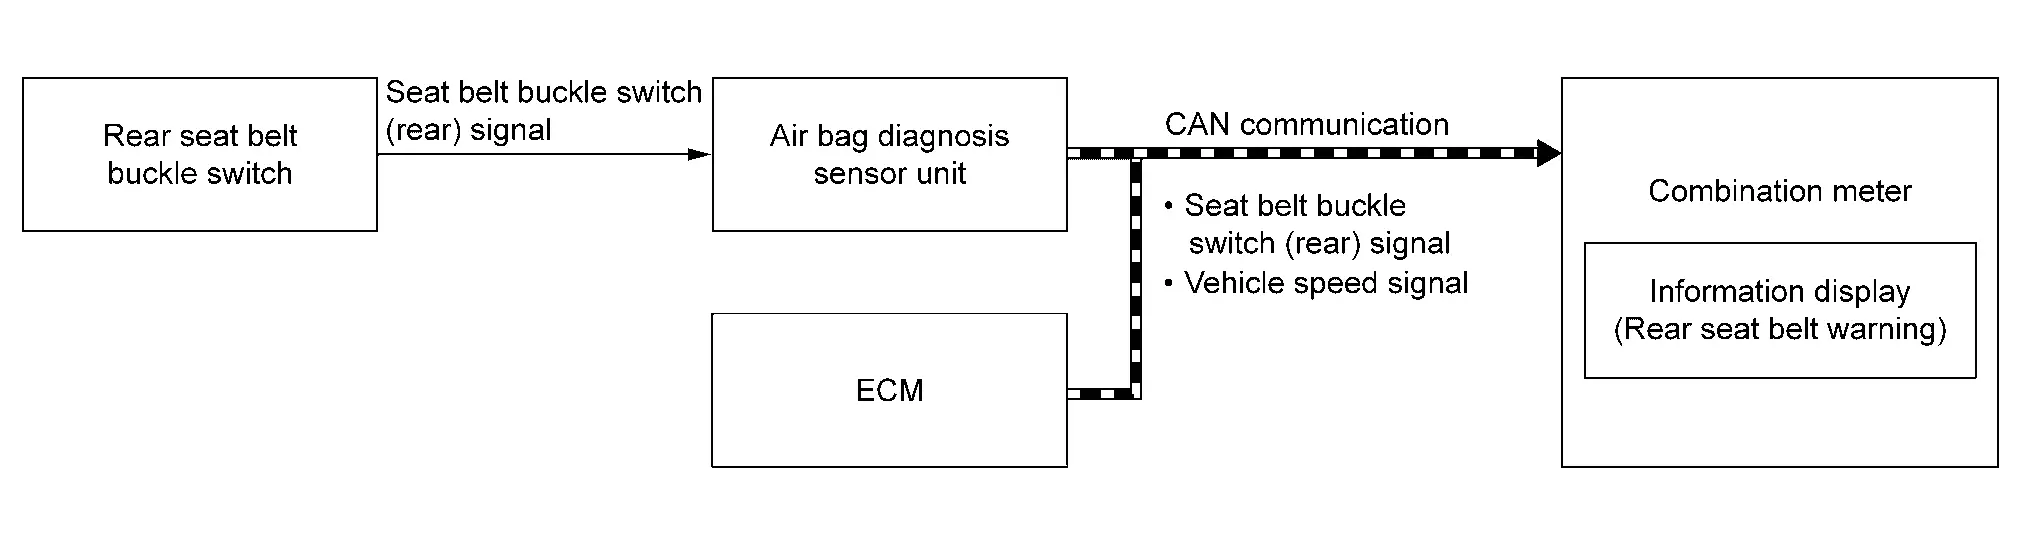
SIGNAL PATH
-
When combination meter detects ignition switch ON, rear seat belt warning displays.
-
When combination meter judges according to received rear seat belt buckle switch signal that a rear seat belt is not fastened.
WARNING OPERATION CONDITION
When all of the following conditions are satisfied.
-
Ignition switch is ON and start up display finished.
-
Any rear seat belt buckle switch: OFF â ON (rear seat belt fastened â not fastened)
WARNING CANCEL CONDITION
When any of the following conditions are satisfied.
-
When the all rear seat belt is fastened.
-
When rear seat belt warning lamp turns ON for more than 35 seconds.
-
Pressed steering switch.
-
Ignition switch OFF.
REAR SEAT BELT WARNING CHIME OPERATION
Rear seat belt warning chime sounds one time when rear seat belt warning display is turned ON due to the change of any rear seat belt buckle switch status from fastened to unfastened and Nissan Ariya vehicle speed is 9.3 MPH (15 km/h) or more.
Warning/indicator/chime List
Warning Lamp/Indicator Lamp/Information display
| Item | Design | Reference |
|---|---|---|
| Seat belt warning lamp |  |
For layout, refer to Design. |
| For function, refer to Seat Belt Warning Lamp (7 inch information display models) or Seat Belt Warning Lamp (full TFT meter models). |
| Item | Reference |
|---|---|
| Rear seat belt warning | Refer to System Description. |
Warning Chime
| Item | Reference |
|---|---|
| Seat belt warning | Refer to Seat Belt Warning. |
Wiring Diagram :: Seat Belt Warning System - With Type a Meter
Wiring Diagram
Refer to Wiring Diagram.
Wiring Diagram :: Seat Belt Warning System - With Type B Meter
Wiring Diagram
Refer to Wiring Diagram.
Basic Inspection :: Diagnosis and Repair Work Flow
Work Flow
OVERALL SEQUENCE
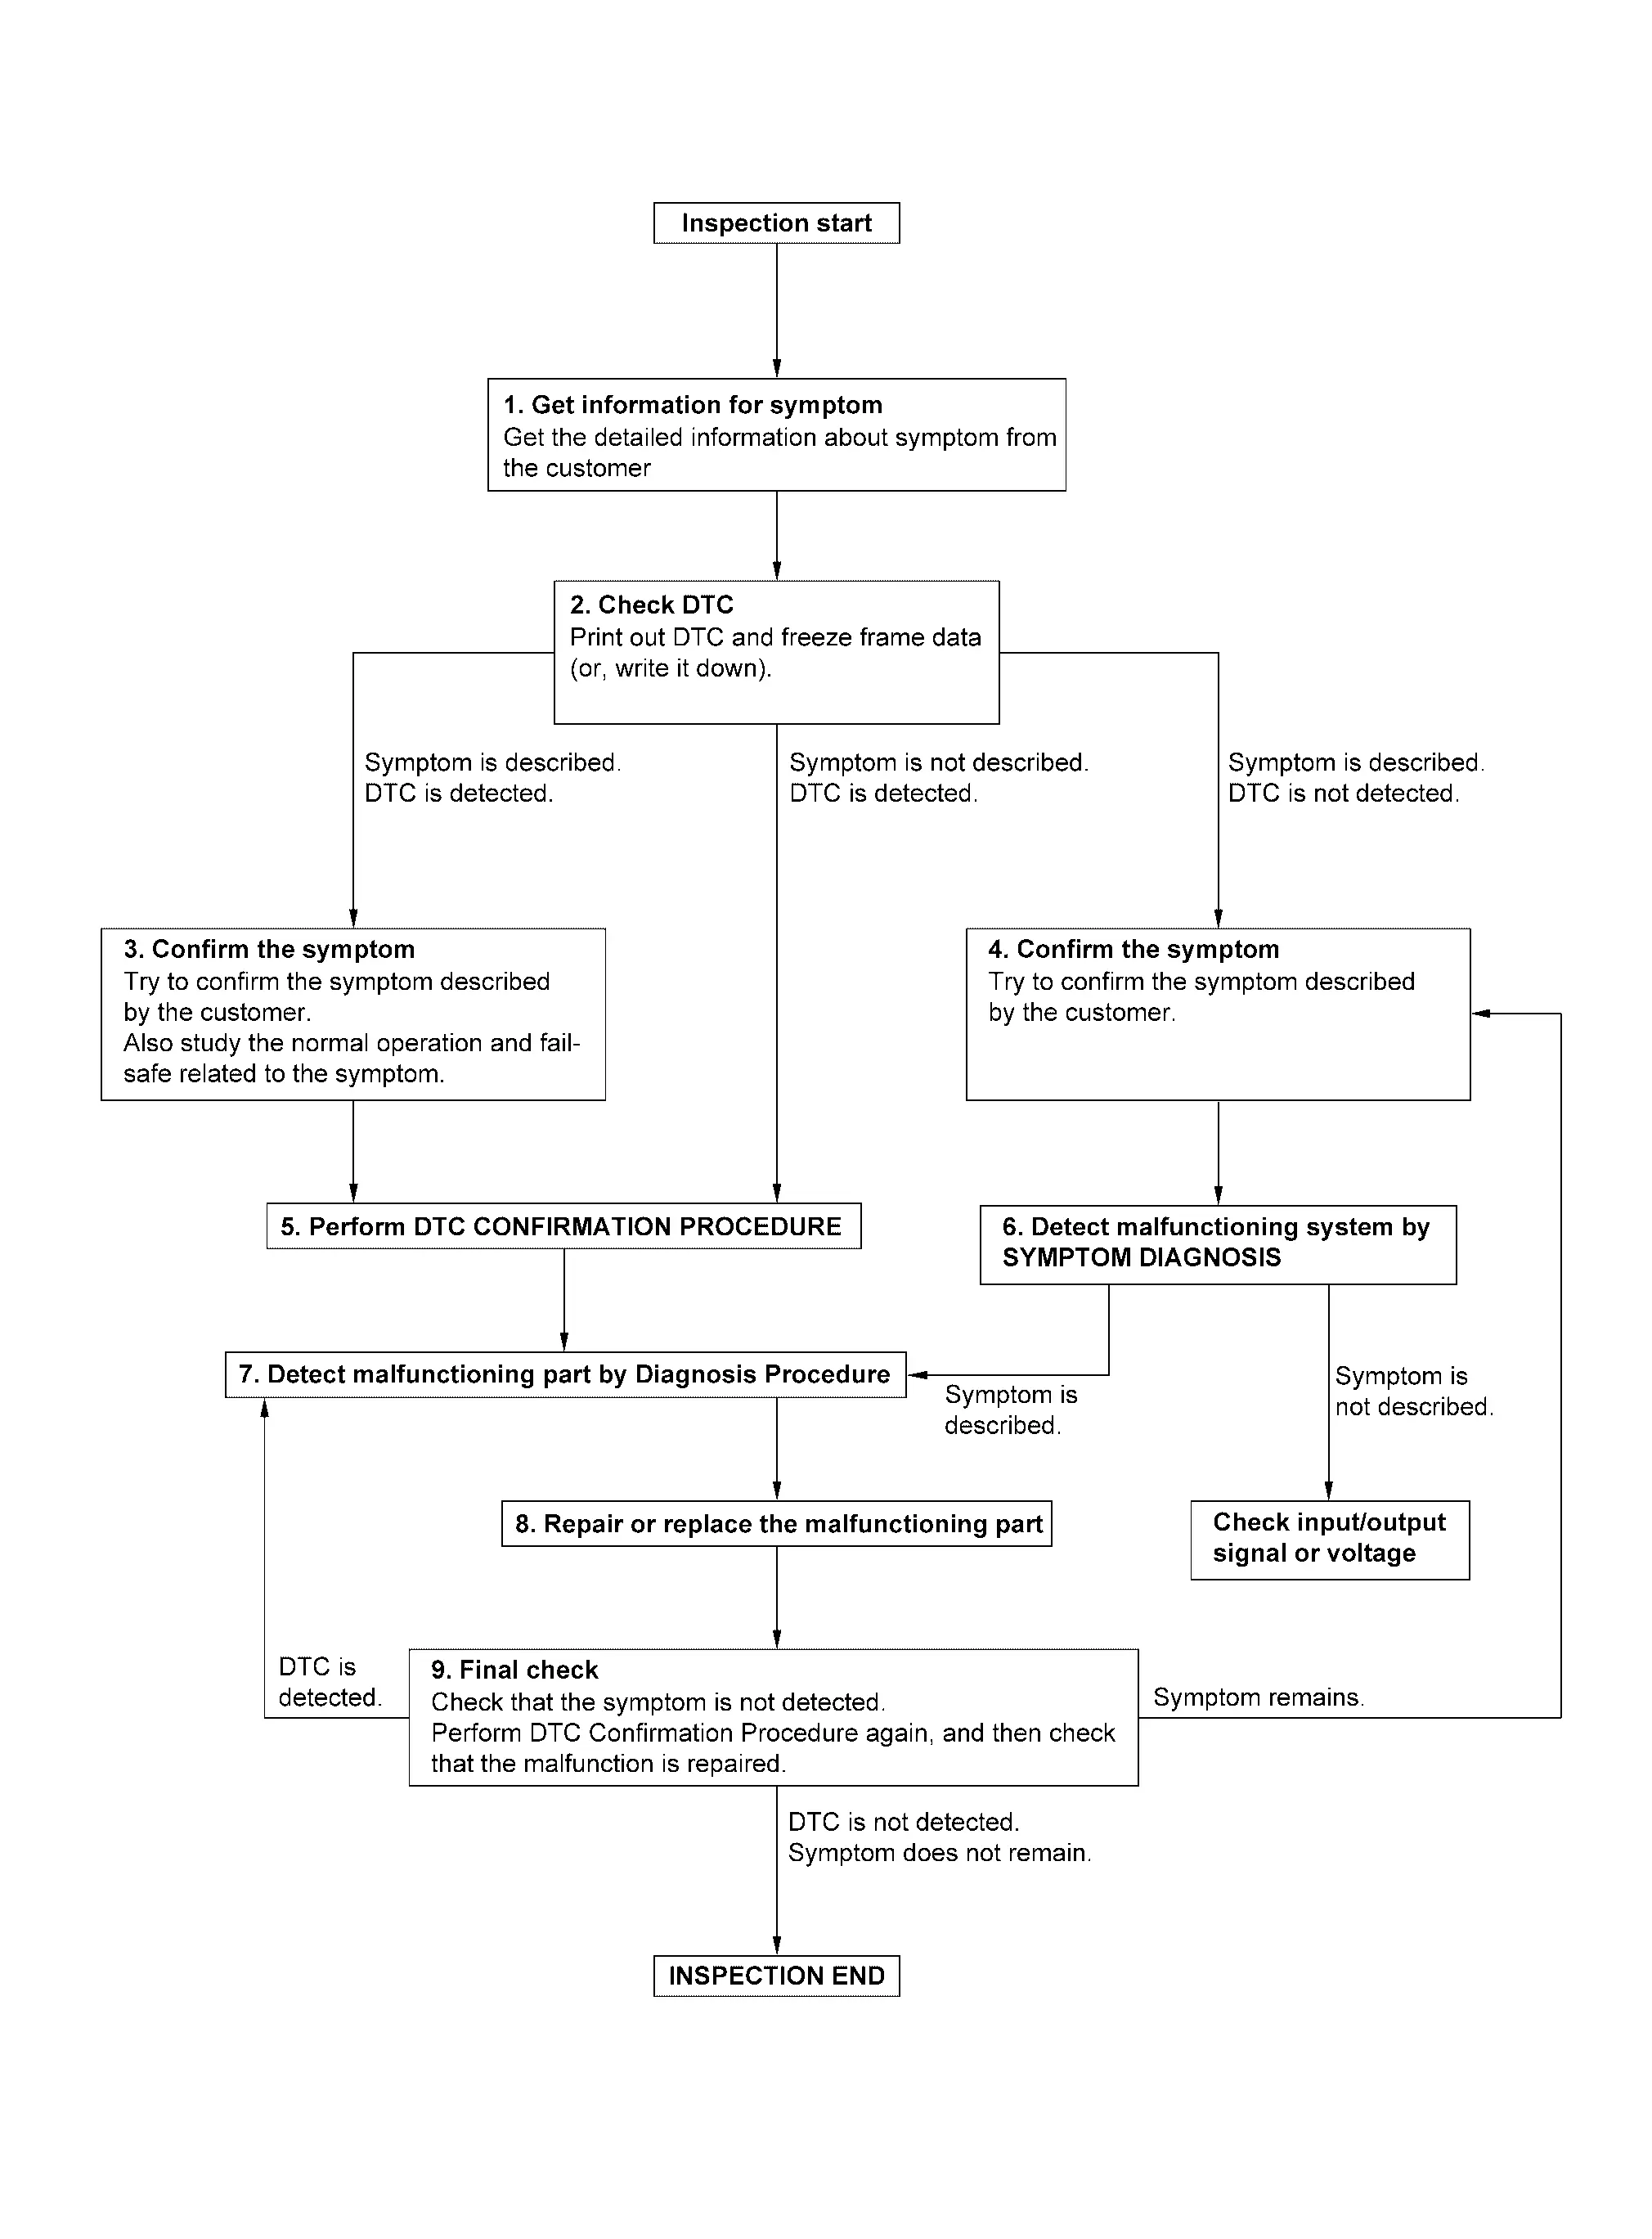
DETAILED FLOW
GET INFORMATION FOR SYMPTOM
-
Get detailed information from the customer about the symptom (the condition and the environment when the incident/malfunction occurs).
-
Check operation condition of the function that is malfunctioning.
>>
GO TO 2.
CHECK DTC
 CONSULT
-
Check DTC.
-
Perform the following procedure if DTC is detected.
-
Record DTC and freeze frame data (Print them out)
-
Erase DTC.
-
Study the relationship between the cause detected by DTC and the symptom described by the customer.
-
Are any symptoms described and any DTC detected?
Symptom is described, DTC is detected>>GO TO 3.
Symptom is described, DTC is not detected>>GO TO 4.
Symptom is not described, DTC is detected>>GO TO 5.
CONFIRM THE SYMPTOM
Try to confirm the symptom described by the customer.
Also study the normal operation and fail-safe related to the symptom.
Verify relation between the symptom and the condition when the symptom is detected.
>>
GO TO 5.
CONFIRM THE SYMPTOM
Try to confirm the symptom described by the customer.
Verify relation between the symptom and the condition when the symptom is detected.
>>
GO TO 6.
PERFORM DTC CONFIRMATION PROCEDURE
Perform DTC CONFIRMATION PROCEDURE for the detected DTC, and then check that DTC is detected again. At this time, always connect CONSULT to the Nissan Ariya vehicle, and check self diagnosis result in real time.
If two or more DTCs are detected, refer to DTC INSPECTION PRIORITY CHART, and determine trouble diagnosis order.
NOTE:
-
Freeze frame data is useful if the DTC is not detected.
-
Perform Component Function Check if DTC CONFIRMATION PROCEDURE is not included on Service Manual. This simplified check procedure is an effective alternative though DTC cannot be detected during this check.
If the result of Component Function Check is NG, it is the same as the detection of DTC by DTC CONFIRMATION PROCEDURE.
Is DTC detected?
YES>>GO TO 7.
NO>>Check according to Intermittent Incident.
DETECT MALFUNCTIONING SYSTEM BY SYMPTOM DIAGNOSIS
CONSULT
Detect malfunctioning system according to SYMPTOM DIAGNOSIS based on the confirmed symptom in step 4, and determine the trouble diagnosis order based on possible causes and symptom.
Is the symptom described?
YES>>GO TO 7.
NO>>Monitor input data from related sensors or check voltage of related module terminals.
DETECT MALFUNCTIONING PART BY DIAGNOSIS PROCEDURE
Inspect according to Diagnosis Procedure of the system.
Is malfunctioning part detected?
YES>>GO TO 8.
NO>>Check according to Intermittent Incident.
REPAIR OR REPLACE THE MALFUNCTIONING PART
-
Repair or replace the malfunctioning part.
-
Reconnect parts or connectors disconnected during Diagnosis Procedure again after repair and replacement.
-
Check DTC. If DTC is detected, erase it.
>>
GO TO 9.
FINAL CHECK
When DTC is detected in step 2, perform DTC CONFIRMATION PROCEDURE again, and then check that the malfunction is repaired securely.
When symptom is described by the customer, refer to confirmed symptom in step 3 or 4, and check that the symptom is not detected.
Is DTC detected and does symptom remain?
YES-1>>DTC is detected: GO TO 7.
YES-2>>Symptom remains: GO TO 4.
NO>>Before returning the Nissan Ariya vehicle to the customer, always erase DTC.
Dtc/circuit Diagnosis :: B2f60-55 Seat Belt Buckle Sw (dr)
DTC Description
DTC DETECTION LOGIC
| DTC No. |
CONSULT screen terms (Trouble diagnosis content) | DTC detecting condition | |
|---|---|---|---|
| B2F60-55 |
Seat belt buckle switch (driver side) [Seat belt buckle switch (driver side)] |
Diagnosis condition | Ignition switch ON |
| Signal (terminal) | â | ||
| Threshold | Configuration of the BCM is not completed | ||
| Diagnosis delay time | 1 second or less | ||
POSSIBLE CAUSE
BCM is not configured
FAIL-SAFE
â
DTC CONFIRMATION PROCEDURE
CHECK SELF DIAGNOSIS RESULT
CONSULT
-
Ignition switch ON.
-
Check âSelf diagnosis resultâ mode of âBCMâ.
Is DTC detected?
YES>>Refer to DTC Diagnosis Procedure.
NO-1>>To check malfunction symptom before repair: Refer to Intermittent Incident.
NO-2>>Confirmation after repair: Inspection End
DTC Diagnosis Procedure
BCM CONFIGURATION
Perform configuration. Refer to Work Procedure.
Is the DTC detected?
YES>>GO TO 2.
NO>>Inspection End
REPLACE BCM
Replace BCM. Refer to Removal and Installation.
>>
Inspection End
Dtc/circuit Diagnosis :: Front Seat Belt Buckle Switch Lh
Component Function Check
CHECK FUNCTION
CONSULT
-
Ignition switch ON.
-
Select âSeat belt switch (driver)â in âData monitorâ mode of "BCM".
-
Check that the function operates normally according to the following conditions.
Monitor item Condition Status Seat belt switch (driver) Front seat belt LH Unfastened Off Fastened On
Is the inspection result normal?
YES>>Front seat belt buckle switch LH is OK.
NO>>Refer to Diagnosis Procedure.
Diagnosis Procedure
CHECK SEAT BELT BUCKLE SWITCH INPUT SIGNAL
-
Ignition switch ON.
-
Check voltage between front seat belt buckle switch LH harness connector and ground.
With manual seat (+) (â) Condition Voltage
(Approx.)Front seat belt buckle switch LH Connector Terminal B71 4 Ground Front seat belt LH Unfastened 0 V Fastened Battery voltage With power seat (+) (â) Condition Voltage
(Approx.)Front seat belt buckle switch LH Connector Terminal B203 1 Ground Front seat belt LH Unfastened 0 V Fastened Battery voltage
Is the inspection result normal?
YES>>GO TO 3.
NO>>GO TO 2.
CHECK SEAT BELT BUCKLE SWITCH CIRCUIT
-
Ignition switch OFF.
-
Disconnect front seat belt buckle switch LH connector and BCM connector.
-
Check continuity between front seat belt buckle switch LH harness connector and BCM harness connector.
With manual seat Front seat belt buckle switch LH BCM Continuity Connector Terminal Connector Terminal B71 4 M18 17 Yes With power seat Front seat belt buckle switch LH BCM Continuity Connector Terminal Connector Terminal B203 1 M18 17 Yes -
Check continuity between BCM harness connector and ground.
BCM â Continuity Connector Terminal M18 17 Ground No
Is the inspection result normal?
YES>>Replace BCM. Refer to Removal and Installation.
NO>>Repair or replace harness.
CHECK SEAT BELT BUCKLE SWITCH GROUND CIRCUIT
-
Ignition switch OFF.
-
Disconnect front seat belt buckle switch LH connector.
-
Check continuity between front seat belt buckle switch LH harness connector and ground.
With manual seat Front seat belt buckle switch LH â Continuity Connector Terminal B71 3 Ground Yes With power seat Front seat belt buckle switch LH â Continuity Connector Terminal B203 2 Ground Yes
Is the inspection result normal?
YES>>GO TO 4.
NO>>Repair or replace harness.
CHECK SEAT BELT BUCKLE SWITCH LH
Check seat belt buckle switch LH. Refer to Component Inspection.
Is the inspection result normal?
YES>>INSPECTION END
NO>>Replace front seat belt buckle LH. Refer to Removal and Installation.
Component Inspection
CHECK SEAT BELT BUCKLE SWITCH
-
Ignition switch OFF.
-
Disconnect front seat belt buckle switch LH connector.
-
Check continuity of front seat belt buckle switch LH terminals.
With power seat Front seat belt buckle switch LH Condition Continuity Terminals 1 2 When front seat belt LH is unfastened Yes When front seat belt LH is fastened No With manual seat Front seat belt buckle switch LH Condition Continuity Terminals 3 4 When front seat belt LH is unfastened Yes When front seat belt LH is fastened No
Is the inspection result normal?
YES>>INSPECTION END
NO>>Replace front seat belt buckle LH. Refer to Removal and Installation.
Dtc/circuit Diagnosis :: Rear Seat Belt Buckle Switch
Diagnosis Procedure
CHECK REAR SEAT BELT BUCKLE SWITCH GROUND CIRCUIT
-
Ignition switch OFF.
-
Disconnect rear seat belt buckle switch connector.
-
Check the continuity between rear seat belt buckle switch harness connector and ground.
Rear seat belt buckle switch â Continuity Connector Terminal LH B86 4 Ground Yes Center B96 2 RH 4
Is the inspection result normal?
YES>>GO TO 2
NO>>Repair or replace harness.
CHECK REAR SEAT BELT BUCKLE SWITCH
Check rear seat belt buckle switch. Refer to Component Inspection.
Is the inspection result normal?
YES>>Inspection End
NO>>Replace rear seat belt buckle. Refer to Removal and Installation.
Component Inspection
CHECK REAR SEAT BELT BUCKLE SWITCH
-
Ignition switch OFF.
-
Disconnect rear seat belt buckle switch connector.
-
Check continuity between rear seat belt buckle switch connector.
Rear seat belt buckle switch Condition Continuity Connector Terminals LH B86 3 4 Rear seat belt (LH) is unfastened Yes Rear seat belt (LH) is fastened No Center B96 1 2 Rear seat belt (center) is unfastened Yes Rear seat belt (center) is fastened No RH 3 4 Rear seat belt (RH) is unfastened Yes Rear seat belt (RH) is fastened No
Is the inspection result normal?
YES>>Inspection End
NO>>Replace rear seat belt buckle. Refer to Removal and Installation.
Symptom Diagnosis :: Seat Belt Warning Lamp Does Not Illuminate
Diagnosis Procedure
CHECK DTC OF âAIR BAG DIAGNOSIS SENSOR UNITâ
CONSULT
Check DTC in âSelf diagnosis resultâ mode of âAir Bagâ.
Is DTC detected?
YES>>Perform the trouble diagnosis related to the detected DTC. Refer to DTCâIndex.
NO>>GO TO 2.
CHECK DTC OF âBCMâ
CONSULT
Check DTC in âSelf diagnosis resultâ mode of âBCMâ.
Is DTC detected?
YES>>Perform the trouble diagnosis related to the detected DTC. Refer to DTC Index.
NO>>GO TO 3.
CHECK DTC OF âCOMBINATION METERâ
CONSULT
Check DTC in âSelf diagnosis resultâ mode of âM&Aâ.
Is DTC detected?
YES>>Perform the trouble diagnosis related to the detected DTC. Refer to DTC Index.
NO>>GO TO 4.
CHECK HARNESS CONNECTOR
Check the harness connector for disconnection, looseness or damage.
Is the inspection result normal?
YES>>GO TO 5.
NO-1>>Damage: Replace malfunctioning parts.
NO-2>>Disconnection or looseness: Securely lock the connector.
CHECK WIRING HARNESS
Check the wiring harness externals.
Is the inspection result normal?
YES>>GO TO 6.
NO>>Replace malfunctioning parts.
CHECK FRONT SEAT BELT BUCKLE SWITCH LH
Check the front seat belt buckle switch LH. Refer to Component Function Check.
Is the inspection result normal?
YES>>GO TO 7.
NO>>Repair or replace the malfunctioning parts.
REPLACE AIR BAG DIAGNOSIS SENSOR UNIT
Replace air bag diagnosis sensor unit. Refer to Removal and Installation.
Is the inspection result normal?
YES>>Inspection End
NO>>GO TO 8.
REPLACE BCM
Replace BCM. Refer to Removal and Installation.
Is the inspection result normal?
YES>>Inspection End
NO>>GO TO 9.
REPLACE COMBINATION METER
Replace combination meter. Refer to Removal and Installation.
Is the inspection result normal?
YES>>Inspection End
NO>>GO TO 10.
CHECK INTERMITTENT INCIDENT
Refer to Intermittent Incident.
>>
Inspection End
Symptom Diagnosis :: Seat Belt Warning Lamp Does Not Turn Off
Diagnosis Procedure
CHECK DTC OF âAIR BAG DIAGNOSIS SENSOR UNITâ
CONSULT
Check DTC in âSelf diagnosis resultâ mode of âAir Bagâ.
Is DTC detected?
YES>>Perform the trouble diagnosis related to the detected DTC. Refer to DTCâIndex.
NO>>GO TO 2.
CHECK DTC OF âBCMâ
CONSULT
Check DTC in âSelf diagnosis resultâ mode of âBCMâ.
Is DTC detected?
YES>>Perform the trouble diagnosis related to the detected DTC. Refer to DTC Index.
NO>>GO TO 3.
CHECK DTC OF âCOMBINATION METERâ
CONSULT
Check DTC in âSelf diagnosis resultâ mode of âM&Aâ.
Is DTC detected?
YES>>Perform the trouble diagnosis related to the detected DTC. Refer to DTC Index.
NO>>GO TO 4.
CHECK HARNESS CONNECTOR
Check the harness connector for disconnection, looseness or damage.
Is the inspection result normal?
YES>>GO TO 5.
NO-1>>Damage: Replace malfunctioning parts.
NO-2>>Disconnection or looseness: Securely lock the connector.
CHECK WIRING HARNESS
Check the wiring harness externals.
Is the inspection result normal?
YES>>GO TO 6.
NO>>Replace malfunctioning parts.
CHECK FRONT SEAT BELT BUCKLE SWITCH LH
Check the front seat belt buckle switch LH. Refer to Component Function Check.
Is the inspection result normal?
YES>>GO TO 7.
NO>>Repair or replace the malfunctioning parts.
REPLACE AIR BAG DIAGNOSIS SENSOR UNIT
Replace air bag diagnosis sensor unit. Refer to Removal and Installation.
Is the inspection result normal?
YES>>Inspection End
NO>>GO TO 8.
REPLACE BCM
Replace BCM. Refer to Removal and Installation.
Is the inspection result normal?
YES>>Inspection End
NO>>GO TO 9.
REPLACE COMBINATION METER
Replace combination meter. Refer to Removal and Installation.
Is the inspection result normal?
YES>>Inspection End
NO>>GO TO 10.
CHECK INTERMITTENT INCIDENT
Refer to Intermittent Incident.
>>
Inspection End
Symptom Diagnosis :: Rear Seat Belt Warning Does Not Operate
Diagnosis Procedure
CHECK DTC OF âAIR BAG DIAGNOSIS SENSOR UNITâ
CONSULT
Check DTC in âSelf diagnosis resultâ mode of âAir Bagâ.
Is DTC detected?
YES>>Perform the trouble diagnosis related to the detected DTC. Refer to DTCâIndex.
NO>>GO TO 2.
CHECK DTC OF âCOMBINATION METERâ
CONSULT
Check DTC in âSelf diagnosis resultâ mode of âM&Aâ.
Is DTC detected?
YES>>Perform the trouble diagnosis related to the detected DTC. Refer to DTC Index.
NO>>GO TO 3.
CHECK HARNESS CONNECTOR
Check the harness connector for disconnection, looseness or damage.
Is the inspection result normal?
YES>>GO TO 4.
NO-1>>Damage: Replace malfunctioning parts.
NO-2>>Disconnection or looseness: Securely lock the connector.
CHECK WIRING HARNESS
Check the wiring harness externals.
Is the inspection result normal?
YES>>GO TO 5.
NO>>Replace malfunctioning parts.
CHECK REAR SEAT BELT BUCKLE SWITCH
Check the applicable rear seat belt buckle switch. Refer to Diagnosis Procedure.
Is the inspection result normal?
YES>>GO TO 6.
NO>>Replace the applicable rear seat belt buckle switch.
REPLACE AIR BAG DIAGNOSIS SENSOR UNIT
Replace air bag diagnosis sensor unit. Refer to Removal and Installation.
Is the inspection result normal?
YES>>Inspection End
NO>>GO TO 7.
REPLACE COMBINATION METER
Replace combination meter. Refer to Removal and Installation.
Is the inspection result normal?
YES>>Inspection End
NO>>GO TO 8.
CHECK INTERMITTENT INCIDENT
Refer to Intermittent Incident.
>>
Inspection End
Other materials:
Power Supply and Ground Circuit
A/c Amp.
Diagnosis Procedure
CHECK A/C AMP. GROUND CIRCUIT FOR OPEN
Ignition switch OFF.
Disconnect A/C amp. connector.
Check continuity between A/C amp. harness connector and ground.
A/C amp. (â) Continuity
Connector Terminal
M55
58
Ground
Yes
Is t ...
Removal and Installation. Rear Disc Brake
Brake Pad
Exploded View
Torque member
Inner shim
Pad retainer
Inner pad
Outer pad
Pad wear sensor
Outer shim
Outer shim cover
Cylinder body
: Nissan Ariya Vehicle front
: N·m (kg-m, ft-lb)
...
SiÃĻges arriÃĻre
Les siÃĻges arriÃĻre du Nissan Rogue sont conçus pour accueillir les passagers avec un bon niveau de confort, tout en offrant une modularitÃĐ utile pour le transport de bagages. Avant toute manipulation (inclinaison ou rabattement), vÃĐrifiez que la zone est dÃĐgagÃĐe.
Inclinaison (si le vÃĐhicu ...