Nissan Rogue (T33) 2021-Present Service Manual: Removal and Installation :: Air Bag Diagnosis Sensor Unit
Exploded View
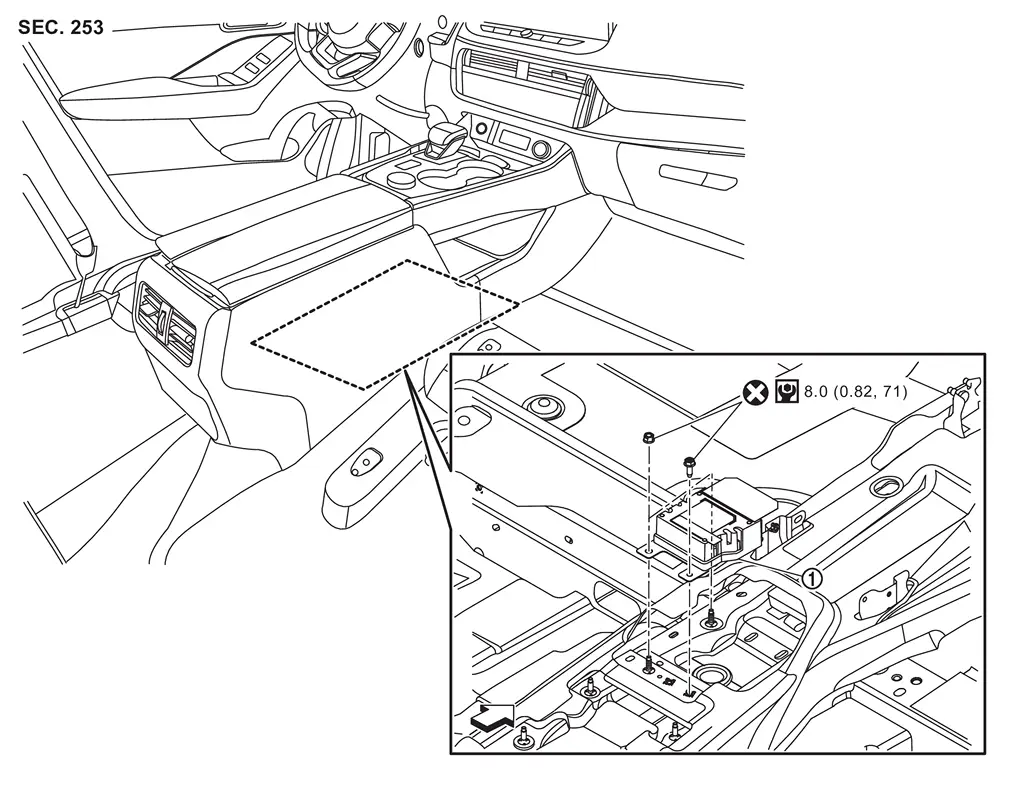
| 1. | Air bag diagnosis sensor unit | — | — | — | — |
| : Nissan Ariya Vehicle front | |||||
 |
: Always replace after every disassembly. | ||||
 |
: N·m (kg-m, in-lb) | ||||
Removal and Installation
WARNING:
Always observe the following items for preventing accidental activation.
-
Before servicing, place the ignition switch in the OFF position, disconnect battery negative terminal and wait for 3 minutes or more (discharges electricity held in the additional power supply circuit of the air bag diagnosis sensor unit).
-
Before disconnecting the air bag sensor unit harness connector, be sure to disconnect each harness connector of the air bag modules, seat belt pre-tensioners and lap pre-tensioner to prevent air bag deployment by static electricity and seat belt pre-tensioner operation.
-
Never use air tools or electric tools for servicing (prevents the air bag diagnosis sensor unit from activating unexpectedly due to vibration).
REMOVAL
Disconnect connector of all air bag modules, seat belt pre-tensioners and lap pre-tensioner.
Remove center console assembly. Refer to Removal and Installation.
Disconnect air bag diagnosis sensor unit harness connectors.
Remove air bag diagnosis sensor unit mounting bolt and nuts, and then remove air bag diagnosis sensor unit.
CAUTION:
-
To prevent damage to the air bag diagnosis sensor unit, never impact it
-
Replace air bag diagnosis sensor unit if it is dropped or sustains an impact.
-
Replace air bag diagnosis sensor unit of deployed driver air bag module, deployed passenger air bag module, deployed driver knee air bag module, deployed passenger knee air bag module, deployed front side air bag module, deployed front center air bag module, deployed rear side air bag module, deployed curtain air bag module, deployed seat belt pre-tensioner or deployed lap pre-tensioner.
INSTALLATION
Note the following items, and then install in the reverse order of removal.
CAUTION:
-
Never reuse mounting bolt and nuts after removal, replace with new one.
-
Never damage the harness while installing.
-
Be sure to perform ADDITIONAL SERVICE WHEN REPLACING AIR BAG DIAGNOSIS UNIT when replacing air bag diagnosis sensor unit. Or not doing so, air bag diagnosis sensor unit control function does not operate normally. Refer to Description.
-
After installation is completed, perform self-diagnosis using CONSULT or air bag warning lamp, if the system is normal and ″PAST″ of ″Self Diagnostic Result″ is indicated, always perform ″ERASE″ of ″Self Diagnostic Result″ using CONSULT. Refer to Work Flow.
-
After the work is completed, check that no system malfunction is detected by air bag warning lamp.
Other materials:
Dtc/circuit Diagnosis. U2176-87 Can Comm Err (ccm/st Angle Sensor)
DTC Description
DESCRIPTIONCAN (Controller Area Network) is a serial
communication line for real time applications. It is an on-Nissan Ariya
vehicle multiplex communication line with high data communication speed
and excellent error detection ability. Modern Nissan Ariya vehicle is
equipped ...
Meter/m&a (combination Meter)
B2202-11 Fuel Sender
DTC Description
DTC DETECTION LOGIC DTC No.
CONSULT screen terms
(Trouble diagnosis content) DTC detected condition
B2202-11
Fuel level sensor
(Fuel level sensor)
Diagnosis condition
When ignition switch is ON.
Signal (terminal)
Fuel level sensor si ...
Precaution. Precautions
Precaution for Supplemental Restraint System (SRS) "AIR BAG" and "SEAT BELT PRE-TENSIONER"
The Supplemental Restraint System such as “AIR BAG” and “SEAT BELT
PRE-TENSIONER”, used along with a front seat belt, helps to reduce the
risk or severity of injury to the driver and front passeng ...