Nissan Rogue (T33) 2021-Present Ownerâs Manual & User Guide: Power outlets
Basic information
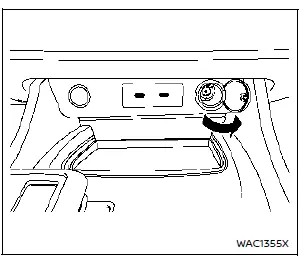
Instrument panel

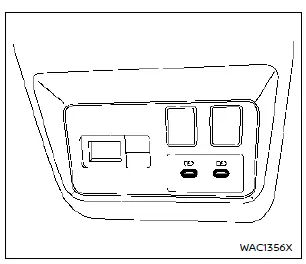
Luggage area (if so equipped)
The Nissan Rogue is equipped with power outlets located in the lower part of the instrument panel and, on some models, in the luggage area. These outlets allow you to power small electronic accessories while on the road.
CAUTION
- The outlet and plug may become hot during or immediately after use.
- Do not plug in accessories that exceed 12 volts or 120W (10A). Avoid using double adapters or multiple accessories at the same time.
- Use the power outlet only when the engine is running to prevent draining the Nissan Rogue battery.
- Avoid using the outlet when major electrical components such as the headlights, rear window defroster, or air conditioner are operating.
- Always push the plug in fully. Poor contact may cause the plug to overheat.
- Turn the connected electrical device OFF before inserting or removing the plug.
- Keep the outlet cap closed when not in use, and avoid letting water or liquid come into contact with the outlet.
USB (Universal Serial Bus) charging connector
The USB charging connector in the Nissan Rogue is located on the back of the center console box, providing convenient access for rear passengers.
This USB connector is designed solely for charging external devices.
Insert a USB device into the connector to begin charging.
Charging starts automatically, with a maximum output of 5 volts, 15W, and up to 3A.
Your device will continue to charge as long as the ignition switch is in the ON position.
Some mobile devices may not charge depending on their specifications.
CAUTION
- Do not force a USB device into the connector. Inserting a device at an angle or upside down may cause connector damage. Ensure correct alignment when plugging in.
- Do not use reversible USB cables, as they may damage the connector.
Wireless charger
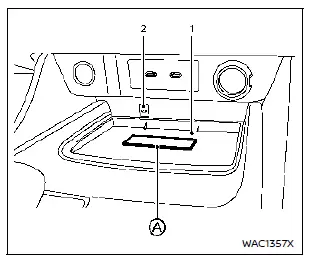
- Charging pad
- Indicator
The wireless charger is located at the front of the center console. Place your smartphone on the charging pad to begin wireless charging automatically.
The smartphone will charge continuously while the ignition switch is in the ON position.
WARNING
- Never place metallic objects, such as coins, between the wireless charger and your smartphone.
- Users with pacemakers or other implanted medical devices should consult the device manufacturer before using the wireless charger.
- Do not place cloth or fabric over the smartphone during charging.
- Do not charge a smartphone when it is wet.
- Do not place metallic items, small objects, or an Intelligent Key on the charging pad during charging.
CAUTION
- Do not place RFID, NFC, or credit cards between the charger and the smartphone. Data could be corrupted.
- Keep the charging pad clean; do not allow dust or dirt to accumulate.
- Avoid striking the charging pad surface.
- Do not spill liquids on the charging pad.
- Avoid using grease, oil, or alcohol when cleaning the charging pad.
Wireless charger Indicator
The indicator  illuminates orange when charging begins.
When charging is complete, the indicator turns green.
If a malfunction occurs or charging stops, the indicator will blink orange for 8 seconds and then turn off.
Operation of the wireless charger
To ensure optimal charging, position the smartphone properly on the pad with the screen facing upward. Place it centered over the âQiâ logo for best performance. Because receiver locations vary by device, slight adjustments may be needed.
Remove cases or accessories that may interfere with charging.
NOTE:
- Only Qi-compatible smartphones can be charged wirelessly.
- Charging may not be possible depending on the device type; refer to your smartphone manual.
- Devices too large for the pad cannot be charged.
- Devices smaller than 5.2 Ã 2.6 in (132 Ã 65 mm) may not charge unless centered properly.
- Do not place magnetic cards, credit cards, or recording media near the charging pad; data may be damaged.
- The charging pad can be used as storage when not charging a device.
- If the smartphone moves during charging, reposition it over the âQiâ logo.
- Turn off smartphone vibration mode to prevent movement.
- If the device or charger becomes warm during use, charging may pause. Allow cooling before resuming.
- Radio interference may interrupt charging; reposition the device if needed.
- Charging will stop when the Intelligent Key is being searched for.
- Wireless charging will not begin if a USB cable is connected. Even if the indicator shows orange or blinks, charging will not occur.
- Depending on device type, the indicator may stay orange even after charging completes.
- Placing only metal objects or the Intelligent Key on the pad may cause the indicator to illuminate briefly, but charging will not start.
FCC Notice:
For USA:
This device complies with Part 15 of the FCC Rules. Operation is subject to the conditions that the device does not cause harmful interference and accepts any interference received.
NOTE:
Unauthorized changes may void the userâs right to operate the equipment.
For Canada:
This device contains licence-exempt transmitters/receivers that comply with ISED RSS requirements. Operation is subject to the conditions that the device does not cause interference and accepts any interference received.
Other materials:
Informations de base et protocoles de sÃĐcuritÃĐ
AVERTISSEMENTS IMPORTANTS
VÃĐrifiez systÃĐmatiquement que le hayon de votre Nissan Rogue est bien verrouillÃĐ avant tout trajet. Une ouverture inopinÃĐe pourrait entraÃŪner la chute de chargement sur la chaussÃĐe.
Ne conduisez jamais votre Nissan Rogue avec le hayon ouvert ou entrouvert. ...
Feux
Informations de base
Spot de lecture avant
Ãclairage de miroir de courtoisie (si ÃĐquipÃĐ)
Plafonnier (si ÃĐquipÃĐ)
Clignotant latÃĐral (si ÃĐquipÃĐ)
Ãclairage individuel arriÃĻre (si ÃĐquipÃĐ)
Phare â feu de route
Phare â feu de croisement
Feu de stationnement avant / ...
Event Data Recorders (EDR)
Basic information
This vehicle is equipped with an Event Data Recorder (EDR). Its primary purpose is to record data in certain crash or near crash-like situationsâsuch as striking an obstacle or deploying the air bagsâto help engineers understand how the vehicle systems performed. Vehicles like ...