Nissan Rogue Service Manual: Oil filter
Removal and Installation
REMOVAL
- Remove fender protector side cover (RH). Refer to EXT-28, "FENDER PROTECTOR : Exploded View".
- Drain engine oil. Refer to LU-8, "Draining".
- Remove oil filter using suitable tool (A)..
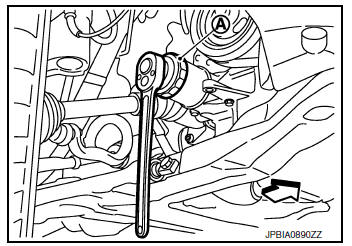
 : Front
WARNING: Be careful not to burn yourself, as engine oil may be hot.
CAUTION:
- When removing, prepare a shop cloth to absorb any engine oil leaks or spills.
- Do allow engine oil to adhere to drive belt.
- Completely wipe off any engine oil that adheres to engine and vehicle.
- Oil filter is provided with relief valve. Use genuine NISSAN oil filter or equivalent.
INSTALLATION
- Remove foreign materials adhering to oil filter installation surface.
- Apply new engine oil to the oil seal contact surface of new oil filter.
- Screw oil filter manually until it touches the installation surface, then tighten it by 2/3 turn (A). Or tighten to the specification.
Oil filter:
 : 17.7 N·m (1.8 kg-m, 13 ft-lb)
Inspection
INSPECTION AFTER INSTALLATION
- Check the engine oil level. Refer to LU-7, "Inspection".
- Start the engine, and check that there is are no leaks of engine oil.
- Stop the engine and wait for at least 5 minutes.
- Check the engine oil level, and adjust the level (if necessary). Refer to LU-7, "Inspection".
 Engine oil
Inspection
ENGINE OIL LEVEL
NOTE:
Before starting engine, put vehicle horizontally and check the engine oil level.
If engine is already started, stop
it and allow 5 minutes before checking.
...

Other materials:
B0096 front side air bag satellite sensor RH
Description
DTC B0096 FRONT SATELLITE SENSOR RH
The front side air bag satellite sensor RH is wired to the air bag diagnosis
sensor unit. The air bag diagnosis
sensor unit will monitor the front side air bag satellite sensor RH for internal
failures and its circuits for communication
errors. ...
Basic inspection
DIAGNOSIS AND REPAIR WORK FLOW
Work Flow
DETAILED FLOW
1.INTERVIEW FROM THE CUSTOMER
Clarify customer complaints before inspection. First of all, perform an
interview utilizing DAS-202, "Diagnostic
Work Sheet" and reproduce the symptom as well as fully understand it. Ask
customer ...
Basic inspection
DIAGNOSIS AND REPAIR WORKFLOW
Work Flow
WORK FLOW
DETAILED FLOW
1. REVIEW CUSTOMER COMPLAINT
Review customer complaint. Try to obtain detailed information about the
conditions when the symptom occurs.
>> GO TO 2.
2. VERIFY THE SYMPTOM
Verify the symptom by performing an operation ...
