Nissan Rogue Owners Manual: Exterior and interior lights
| Item | Wattage (W) | Bulb No. | |
| Headlight assembly* | |||
| High | 65 | H9 | |
| Low | 55 | H11 | |
| Park | 5 | W5W | |
| Turn | 28/8 | 7444 | |
| Sidemarker | 5 | WY5W | |
| Front fog lights (if so equipped) | 55 | H11 | |
| Daytime running lights | ŌĆö | ŌĆö | |
| Map light (if so equipped)* | ŌĆö | ŌĆö | |
| Personal lights | 8 | P1Y | |
| Courtesy light* | ŌĆö | ŌĆö | |
| Vanity mirror light | 1.8 | AL1X | |
| Cargo light | ŌĆö | ŌĆö | |
| High-mounted stop light* | ŌĆö | ŌĆö | |
| Rear combination light | |||
| Tail/Stop* | 5/21 | 7443 | |
| Turn | 21 | WY21W | |
| Rear sidemarker | 5 | W5W | |
| Backup (reversing)* | 16 | W16W | |
| License plate light* | 5 | W5W | |
* See a NISSAN dealer for replacement. Always check with the Parts Department at a NISSAN dealer for the latest parts information.
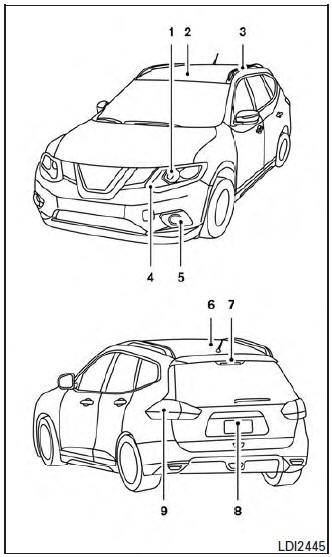
- Headlight assembly
- Map light (if so equipped)
- Personal light
- Daytime running light
- Fog light (if so equipped)
- Cargo light
- Courtesy light
- High mounted stoplight
- License plate light
- Rear combination light
Replacement procedures
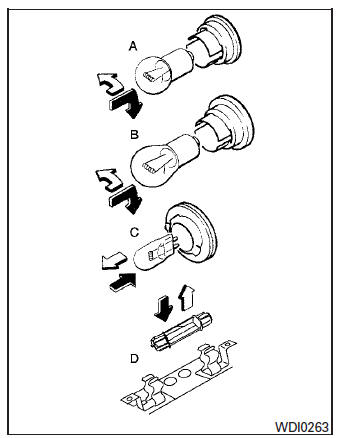
All other lights are either type A, B, C or D. When replacing a bulb, first remove the lens, lamp and/or cover.
 Indicates bulb removal
 Indicates bulb installation
Personal lights (if so equipped)
Use a cloth and a suitable tool 1 to protect the housing.
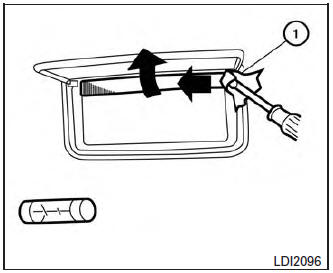
Vanity mirror
Use a cloth 1 and suitable tool to protect the housing.
Cargo light
Use a cloth 1 to protect the housing.
 Lights
Headlights
Replacing the halogen headlight bulb
(if so equipped)
The headlight is a semi-sealed beam type which
uses a replaceable headlight (halogen) bulb. Because
the headlight assembly must be ...
 Wheels and tires
If you have a flat tire, refer to ŌĆ£Flat tireŌĆØ in
the ŌĆ£In case of emergencyŌĆØ section of this
manual for additional information. ...
Other materials:
P2096, P2097 A/F sensor 1
DTC Description
DTC DETECTION LOGIC
DTC No.
CONSULT screen terms
(Trouble diagnosis content)
DTC detecting condition
P2096
POST CATALYST FUEL TRIM SYS B1
(Post catalyst fuel trim system too lean bank
1)
The output voltage computed by ECM from the A/F sensor 1 s ...
Stall test
Work Procedure
INSPECTION
Check the engine oil level. Replenish if necessary. Refer to LU-7,
"Inspection".
Check for leak of the CVT fluid. Refer to TM-190, "Inspection".
Drive for about 10 minutes to warm up the vehicle so that the CVT
fluid temp ...
Brake fluid
Inspection
BRAKE FLUID LEVEL
Make sure that the brake fluid level in the reservoir tank is
between
the MAX and MIN lines.
Visually check around the reservoir tank for brake fluid leakage.
If the brake fluid level is excessively low, check the brake
system
for lea ...
