Nissan Rogue Service Manual: EVAP canister vent control valve
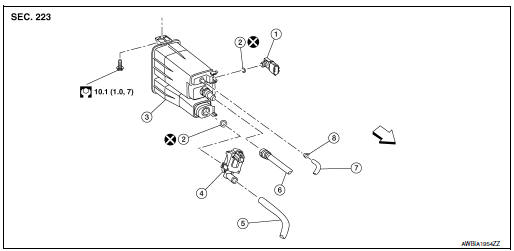
Exploded View

- EVAP control system pressure sensor
- O-ring
- EVAP canister
- EVAP canister vent control valve
- EVAP canister vent control valve hose
- EVAP vent line
- EVAP canister purge hose
- Clamp
 Front
Front
Removal and Installation
NOTE: The EVAP canister vent control valve can be removed without removing the EVAP canister.
REMOVAL
- Disconnect EVAP canister vent control valve hose from EVAP canister vent control valve.
- Disconnect EVAP canister vent control valve harness connector.
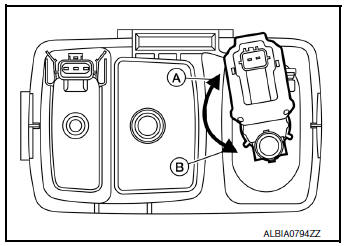
- Turn EVAP canister vent control valve counterclockwise.

(A) : Lock
(B) : Unlock
- Remove the EVAP canister vent control valve and O-ring.
INSTALLATION
Installation is in the reverse order of removal.
CAUTION: Do not reuse O-ring.
 EVAP canister
Exploded View
EVAP control system pressure sensor
O-ring
EVAP canister
EVAP canister vent control valve
EVAP canister vent control valve hose
EVAP vent line
EVAP canister ...
 EVAP control system pressure sensor
Exploded View
EVAP control system pressure sensor
O-ring
EVAP canister
EVAP canister vent control valve
EVAP canister vent control valve hose
EVAP vent line
E ...
Other materials:
Using the system
Initialization
When the ignition switch is in the ON position,
NISSAN Voice Recognition is initialized, which
takes a few seconds. When completed, the system
is ready to accept voice commands. If
the button is pressed before the
initialization
completes, the system will announce: “Voice
...
C1109 power and ground system
DTC Logic
DTC DETECTION LOGIC
DTC
Display Item
Malfunction detected condition
Possible causes
C1109
BATTERY VOLTAGE
[ABNORMAL]
When ignition voltage is 10 V or less.
When ignition voltage is 16 V or more.
Harness or connector ...
Symptom diagnosis
COMBINATION SWITCH SYSTEM SYMPTOMS
Symptom Table
Perform the data monitor of CONSULT to check for any malfunctioning
item.
Check the malfunction combinations.
Identify the malfunctioning part from the agreed combination and repair
or replace the part.
NORMAL OPERA ...
