Nissan Rogue Service Manual: Unit disassembly and assembly
FRONT COMBINATION LAMP
Exploded View
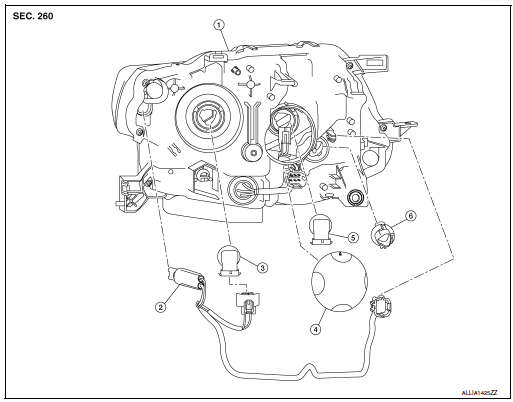
- Front combination lamp
- Parking (side marker) lamp bulb socket
- Headlamp (low beam) bulb
- Plastic cover
- Headlamp (high beam) bulb
- Turn signal lamp bulb socket
Disassembly and Assembly
DISASSEMBLY
- Remove front combination lamp. Refer to EXL-119, "Removal and Installation".
- Rotate the headlamp (low beam) bulb counterclockwise and remove.
- Disconnect the harness connector from headlamp (low beam) bulb.
- Remove plastic cover.
- Rotate the headlamp (high beam) bulb counterclockwise and remove.
- Disconnect the harness connector from headlamp (high beam) bulb.
- Rotate the parking (side marker) lamp bulb socket counterclockwise and remove.
- Remove the parking (side marker) lamp bulb from the bulb socket.
- Rotate the turn signal lamp bulb socket counterclockwise and remove.
- Remove the turn signal lamp bulb from the bulb socket.
ASSEMBLY
Assembly is in the reverse order of disassembly.
REAR COMBINATION LAMP
Exploded View
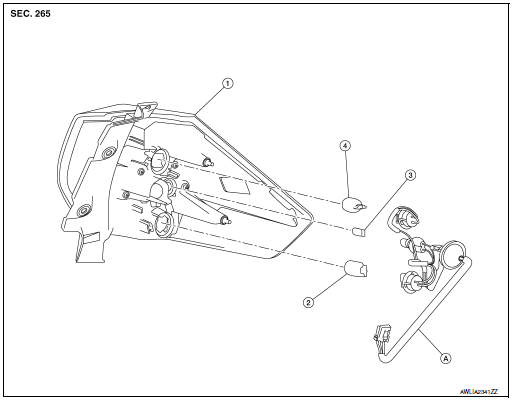
- Rear combination lamp
- Turn signal lamp bulb
- Tail lamp bulb
- Stop lamp bulb
- Rear combination lamp harness
Disassembly and Assembly
DISASSEMBLY
- Remove rear combination lamp. Refer to EXL-127, "Removal and Installation".
- Rotate the stop lamp bulb socket counterclockwise and remove.
- Remove the stop lamp bulb from the bulb socket.
- Rotate the tail lamp bulb socket counterclockwise and remove.
- Remove the tail lamp bulb from the bulb socket.
- Rotate the turn signal lamp bulb socket counterclockwise and remove.
- Remove the turn signal lamp bulb from bulb socket.
ASSEMBLY
Assembly is in the reverse order of disassembly.
CAUTION: After installing, be sure to install the bulb sockets securely to ensure watertightness.
 Removal and installation
FRONT COMBINATION LAMP
Exploded View
Front fender
Front combination lamp
Clip
Removal and Installation
REMOVAL
Remove front bumper fascia. Refer to EXT-17, "Removal an ...
 Service data and specifications (SDS)
Bulb Specifications
*: Always check with the Parts Department for the latest parts info. ...
Other materials:
System description
VENTILATION SYSTEM
System Description
OUTLINE
Automatic A/C
The ventilation system is controlled by the A/C switch assembly. For details
of the automatic air conditioner
system, refer to HAC-10, "System Description".
Manual A/C
The ventilation system is controlled by the front air ...
P2014, P2016, P2017, P2018 intake manifold runner control
valve position sensor
DTC Description
DTC DETECTION LOGIC
DTC No.
CONSULT screen terms
(Trouble diagnosis content)
DTC detecting condition
P2014
IN/MANIFOLD RUNNER POS SEN B1
(Intake manifold runner position sensor/
switch circuit bank 1)
An excessively low voltage from the sensor i ...
Hood
Hood
Pull the hood lock release handle 1 located
below the instrument panel until the hood
springs up slightly.
Locate the lever 2 in between the hood and
grille and push the lever sideways with your
fingertips.
Raise the hood 3 .
Remove the support rod 4 and in ...
