Nissan Rogue Service Manual: Rear suspension ARM
Exploded View
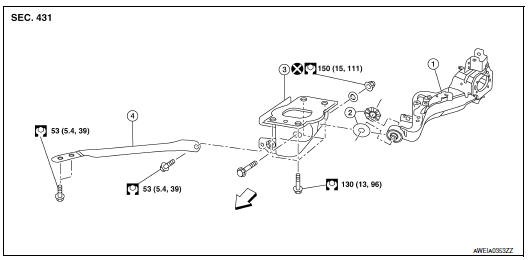
- Rear suspension arm
- Rubber washer (LH/RH)
- Rear suspension arm bracket
- Rear suspension arm stay
 Front
Front
Removal and Installation
REMOVAL
- Remove the wheel hub and bearing. Refer to RAX-16, "Removal and Installation".
- Remove the coil spring. RSU-10, "Removal and Installation - AWD".
- Separate the brake tube and hose from the rear suspension arm. BR-24, "REAR : Exploded View".
- Remove the nut, bolt, rubber washer (LH/RH), and rear suspension arm.
- Inspect the components. Refer to RSU-14, "Inspection".
INSTALLATION
Installation is in the reverse order of removal.
- Align the matching marks made during removal when reusing the disc brake rotor.
- After installation, perform the air bleeding. Refer to BR-16, "Bleeding Brake System".
- Perform final tightening of rear suspension member at its installation position under unladen conditions with tires on level ground.
- Perform the inspection after installation. Refer to RSU-16, "Inspection".
Inspection
INSPECTION AFTER REMOVAL
Visual Inspection
Check rear suspension arm and bushing for deformation, cracks or damage. Replace it if necessary.
INSPECTION AFTER INSTALLATION
- Adjust parking brake operation (stroke). Refer to PB-4, "Inspection and Adjustment".
- Check wheel alignment. Refer to RSU-6, "Inspection".
 Rear shock absorber
Exploded View
Rear suspension member
Upper seat
Coil spring
Lower seat
Rubber washer (LH/RH)
Rear suspension arm
Rear shock absorber
Front
Removal and Installation
REMOVAL ...
 Lower link
Exploded View
Rear suspension member
Lower link
Lower link deflector
Rubber washer (LH/RH)
Rear suspension arm
Front
Removal and Installation
REMOVAL
Remove wheel a ...
Other materials:
Power window retained power operation does not operate
properly
Diagnosis Procedure
1.CHECK DOOR SWITCH
Check door switch.
Refer to DLK-149, "Component Function Check" (with Intelligent Key system) or
DLK-319,
"Component Function Check" (without Intelligent Key system).
Is the inspection result normal?
YES >> GO TO 2.
NO ...
Making a call
To make a call from a phone connected to the
vehicle’s Bluetooth® Hands-Free Phone System:
Press the button.
The system will prompt you for a command.
Say “Call”.
Select one of the available voice commands
to continue:
“(a name)” – Speak the n ...
Wiring diagram
DRIVER ASSISTANCE SYSTEMS
Wiring Diagram
...
