Nissan Rogue Service Manual: Water pump
Exploded View
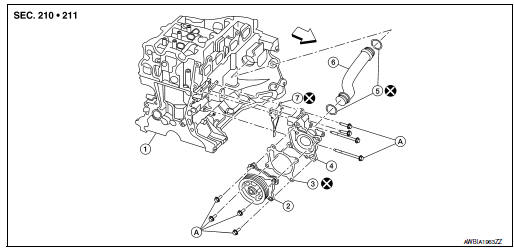
- Cylinder block
- Water pump
- Water pump gasket
- Water pump housing
- O-ring
- Water pipe
- Water pump housing gasket
- Refer to INSTALLATION
Removal and Installation
REMOVAL
- Drain engine coolant. Refer to CO-8, "Draining".
WARNING: Do not remove the radiator cap when the engine is hot. Serious burns could occur from high pressure coolant escaping from the radiator.
CAUTION:
- Perform this step when the engine is cold.
- Do not spill engine coolant on the drive belt.
- Remove the generator. Rafer to CHG-20, "Removal and Installation".
- Remove water pump.
- Engine coolant will leak from the cylinder block.
CAUTION:
- Handle water pump vane so that it does not contact any other parts.
- Water pump cannot be disassembled and should be replaced as a unit.
INSTALLATION
- Tighten water pump bolts in sequence to specification.
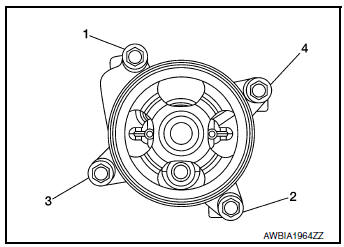
25 N·m (2.6 kg-m, 18 ft-lb)
- Tighten water pump housing bolts in sequence to specification.
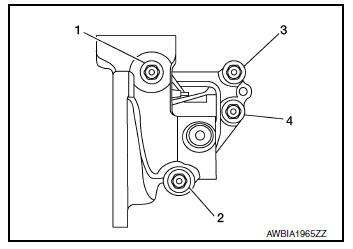
25 N·m (2.6 kg-m, 18 ft-lb)
Installation of remaining components is in the reverse order of removal.
- After installation, refill coolant and check for leaks. Refer to CO-9, "Refilling" and CO-8, "Inspection".
CAUTION:
- Do not spill coolant in engine compartment. Use a shop cloth to absorb coolant.
- Do not reuse water pump gasket.
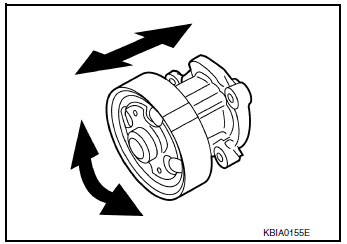
Inspection
М
- Check visually that there is no significant dirt or rusting on water pump body and vane.
- Check that there is no looseness in vane shaft, and that it turns smoothly when rotated by hand.
- Replace water pump, if necessary.
INSPECTION AFTER INSTALLATION
- Check for leakage of engine coolant using the radiator cap tester adapter (commercial service tool) and the radiator cap tester (commercial service tool). Refer to CO-8, "Inspection".
- Start and warm up engine. Check visually that there is no leakage of engine coolant.
 Cooling fan
Exploded View
Fan shroud
Fan motor (LH)
Fan motor (RH)
Cooling fan (RH)
Cooling fan (LH)
Front
Removal and Installation
REMOVAL
WARNING:
Do not remove the radia ...
 Thermostat and water control
valve
Thermostat and water control
valve
Exploded View
Water inlet
Thermostat
Rubber ring
To radiator hose (lower)
NOTE:
When removing components such as hoses, tubes/lines, etc., cap or plug opening ...
Other materials:
Removal and installation
EXHAUST SYSTEM
Exploded View
Exhaust diffuser
Muffler assembly
Mounting rubber
Mounting rubber
Mounting rubber
Ring gasket
Front exhaust tube
Mounting rubber
Exhaust gasket
Oxygen sensor 2
Center exhaust tube
Catalyst shroud
...
Preparation
Special Service Tool
The actual shape of the tools may differ from those illustrated here.
Tool number
(TechMate No.)
Tool name
Description
—
(J-39570)
Chassis Ear
Locating the noise
—
(J-46534)
Trim Tool Set
Removing ...
The low washer fluid warning continues displaying, or
does not display
Description
The warning is still displayed even after washer fluid is added.
The warning is not displayed even though the washer tank is empty.
Diagnosis Procedure
1.CHECK WASHER FLUID LEVEL SWITCH SIGNAL CIRCUIT
Check the washer fluid level switch signal circuit. Refer to MWI-71,
" ...
