Nissan Rogue Service Manual: Unit disassembly and assembly
TORQUE CONVERTER AND CONVERTER HOUSING OIL SEAL
Exploded View
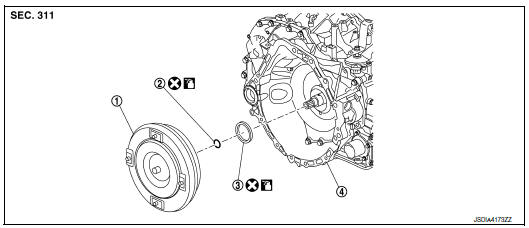
- Torque converter
- O-ring
- Converter housing oil seal
- Transaxle assembly
 : Always replace after every
disassembly.
: Always replace after every
disassembly.
 : Apply CVT fluid
Disassembly
- Remove transaxle assembly. Refer to TM-220, "Removal and Installation".
- Remove torque converter from transaxle assembly.
CAUTION: Never damage the bushing on the inside of torque converter sleeve when removing torque converter.
- Remove O-ring from input shaft.
- Remove converter housing oil seal using a suitable tool.
CAUTION: Be careful not to scratch converter housing.
Assembly
Note the followings and assembly is in the reverse order of disassembly.
CAUTION:
- Never reuse O-ring.
- Never reuse converter housing oil seal.
- Apply CVT fluid to O-ring.
- Apply CVT fluid to converter housing oil seal.
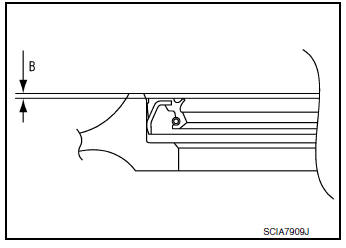
Drive converter housing oil seal 1 evenly using a drift (A) (commercial service tool) so that converter housing oil seal protrudes by the dimension (B) respectively.
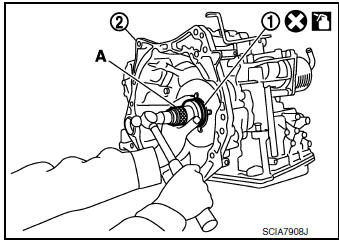

2: Transaxle assembly
Dimension (B) : 1.0 ± 0.5 mm (0.039 ± 0.020 in)
NOTE: Converter housing oil seal pulling direction is used as the reference.
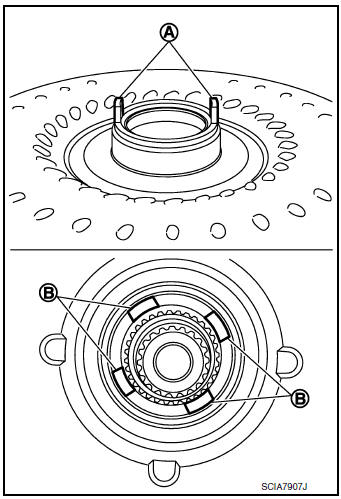
- Attach the pawl of the torque converter to the drive sprocket hole on the transaxle assembly side.
CAUTION:
- Rotate the torque converter for installing torque converter.
- Never damage the bushing inside the torque converter sleeve when installing the converter housing oil seal.
Inspection
INSPECTION AFTER INSTALLATION
- After inserting a torque converter to the CVT, check dimension (A) with in the reference value limit.
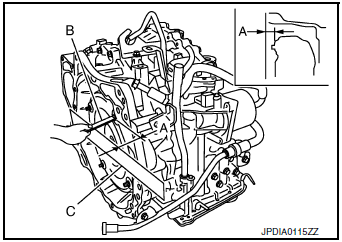
B : Scale
C : Straightedge
Dimension (A) : Refer to TM-226, "Torque Converter".
 Unit removal and installation
TRANSAXLE ASSEMBLY
Exploded View
Transaxle assembly
O-ring
CVT fluid charging pipe
CVT fluid charging pipe cap
For the tightening torque, refer to TM-220, "Removal an ...
 Service data and specifications (SDS)
General Specification
CAUTION:
Use only Genuine NISSAN CVT Fluid NS-3. Never mix with other
fluid.
Using CVT fluid other than Genuine NISSAN CVT Fluid NS-3 will
deteriorat ...
Other materials:
Basic inspection
DIAGNOSIS AND REPAIR WORKFLOW
Work Flow
OVERALL SEQUENCE
DETAILED FLOW
1.INTERVIEW CUSTOMER
Interview the customer to obtain as much information as possible about the
conditions and environment under
which the malfunction occurred.
>> GO TO 2.
2.SYMPTOM CHECK
Verify symptoms.
...
P0776 pressure control solenoid B
DTC Description
DTC DETECTION LOGIC
DTC
CONSULT screen terms
(Trouble diagnosis content
DTC detection condition
P0776
PC SOLENOID B
(Pressure Control Solenoid “B” Performance/
Stuck Off)
When any of 1 or 2 is satisfied and this state is maintained for 10
...
BSW system operation
BSW system operation
The BSW system operates above approximately
20 MPH (32 km/h).
When the camera unit detects vehicles in the
detection zone, the Blind Spot indicator light
located inside the outside mirrors will illuminate. If
the turn signal is then activated, the system
chimes (twi ...
