Nissan Rogue Service Manual: Rear suspension ARM
Exploded View
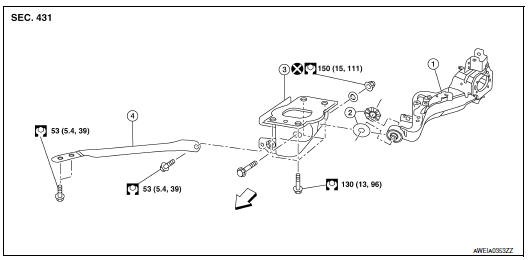
- Rear suspension arm
- Rubber washer (LH/RH)
- Rear suspension arm bracket
- Rear suspension arm stay
 Front
Front
Removal and Installation
REMOVAL
- Remove the wheel hub and bearing. Refer to RAX-16, "Removal and Installation".
- Remove the coil spring. RSU-10, "Removal and Installation - AWD".
- Separate the brake tube and hose from the rear suspension arm. BR-24, "REAR : Exploded View".
- Remove the nut, bolt, rubber washer (LH/RH), and rear suspension arm.
- Inspect the components. Refer to RSU-14, "Inspection".
INSTALLATION
Installation is in the reverse order of removal.
- Align the matching marks made during removal when reusing the disc brake rotor.
- After installation, perform the air bleeding. Refer to BR-16, "Bleeding Brake System".
- Perform final tightening of rear suspension member at its installation position under unladen conditions with tires on level ground.
- Perform the inspection after installation. Refer to RSU-16, "Inspection".
Inspection
INSPECTION AFTER REMOVAL
Visual Inspection
Check rear suspension arm and bushing for deformation, cracks or damage. Replace it if necessary.
INSPECTION AFTER INSTALLATION
- Adjust parking brake operation (stroke). Refer to PB-4, "Inspection and Adjustment".
- Check wheel alignment. Refer to RSU-6, "Inspection".
 Rear shock absorber
Exploded View
Rear suspension member
Upper seat
Coil spring
Lower seat
Rubber washer (LH/RH)
Rear suspension arm
Rear shock absorber
Front
Removal and Installation
REMOVAL ...
 Lower link
Exploded View
Rear suspension member
Lower link
Lower link deflector
Rubber washer (LH/RH)
Rear suspension arm
Front
Removal and Installation
REMOVAL
Remove wheel a ...
Other materials:
Unit disassembly and assembly
FRONT COMBINATION LAMP
Exploded View
Front combination lamp
Parking (side marker) lamp bulb socket
Headlamp (low beam) bulb
Plastic cover
Headlamp (high beam) bulb
Turn signal lamp bulb socket
Disassembly and Assembly
DISASSEMBLY
Remove front combinat ...
Repairing material
Foam Repair
During factory body assembly, foam insulators are installed in certain body
panels and locations around the
vehicle. Use the following procedure(s) to replace any factory-installed foam
insulators.
URETHANE FOAM APPLICATIONS
Use commercially available Urethane foam for sealant (f ...
Diagnosis system (BCM) (without intelligent key system)
COMMON ITEM
COMMON ITEM : CONSULT Function (BCM - COMMON ITEM)
APPLICATION ITEM
CONSULT performs the following functions via CAN communication with BCM.
Direct Diagnostic Mode
Description
Ecu Identification
The BCM part number is displayed.
Self Diagnostic ...
