Nissan Rogue Owners Manual: NISSAN Intelligent KeyÂŽ (if so equipped)
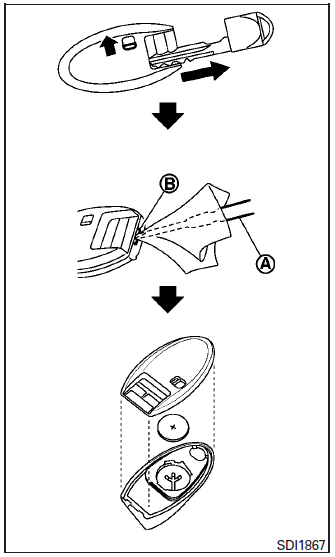
Replace the battery in the Intelligent Key as follows:
- Remove the mechanical key from the Intelligent Key.
- Insert a small screwdriver A into the slit B of the corner and twist it to separate the upper part from the lower part. Use a cloth to protect the casing.
- Replace the battery with a new one.
Recommended battery: CR2025 or equivalent.
- Do not touch the internal circuit and electric terminals as doing so could cause a malfunction.
- Hold the battery by the edges. Holding the battery across the contact points will seriously deplete the storage capacity.
- Make sure that the + side faces the bottom of the case.
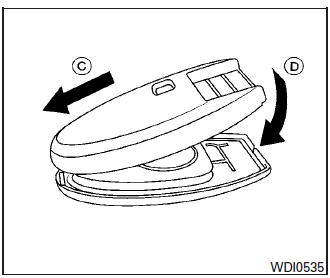
- Close the lid securely as illustrated C D .
- Operate the buttons to check the operation.
See a NISSAN dealer if you need assistance for replacement.
FCC Notice:
For USA: This device complies with Part 15 of the FCC Rules. Operation is subject to the following two conditions: (1) This device may not cause harmful interference, and (2) this device must accept any interference received, including interference that may cause undesired operation.
Note: Changes or modifications not expressly approved by the party responsible for compliance could void the userâs authority to operate the equipment.
For Canada: This device complies with Industry Canada licence-exempt RSS standard(s). Operation is subject to the following two conditions: (1) this device may not cause interference, and (2) this device must accept any interference, including interference that may cause undesired operation of the device.
 NISSAN Jackknife key (if so equipped)
Replace the battery in the jackknife key as follows:
Hold jackknife key button side up. Insert a
small screwdriver into the slit of the corner
and twist it to separate the upper part from
...
 Lights
Headlights
Replacing the halogen headlight bulb
(if so equipped)
The headlight is a semi-sealed beam type which
uses a replaceable headlight (halogen) bulb. Because
the headlight assembly must be ...
Other materials:
Precaution
Precaution for Supplemental Restraint System (SRS) "AIR BAG" and "SEAT
BELT
PRE-TENSIONER"
The Supplemental Restraint System such as âAIR BAGâ and âSEAT BELT PRE-TENSIONERâ,
used along
with a front seat belt, helps to reduce the risk or severity of injury to the
...
Refrigerant
Description
CONNECTION OF SERVICE TOOLS AND EQUIPMENT
Shut-off valve
A/C service valve
Recovery/recycling/recharging
equipment
Refrigerant container (HFC-134a)
Weight scale
Vacuum pump
Manifold gauge set
Preferred (best) method
Alternative method
&n ...
P0603, P062F ECM
DTC Description
DTC DETECTION LOGIC
DTC No.
CONSULT screen terms
(Trouble diagnosis content)
DTC detecting condition
P0603
ECM BACK UP/CIRCUIT
[Internal Control Module Keep Alive Memory
(KAM) Error]
ECM buck up system does not function properly.
P062F
...
