Nissan Rogue Owners Manual: USB (Universal Serial Bus) Connection Port (models without Navigation System) (if so equipped)
USB (Universal Serial Bus) Connection Port (models without Navigation System)
Connecting a device to the USB Connection Port
| WARNING Do not connect, disconnect, or operate the USB device while driving. Doing so can be a distraction. If distracted you could lose control of your vehicle and cause an accident or serious injury. |
CAUTION
|
Refer to your device manufacturer’s owner information regarding the proper use and care of the device.
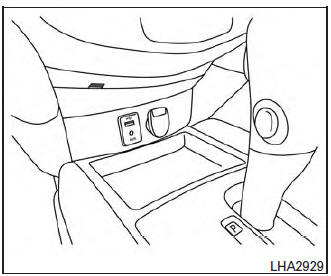
The USB connection port is located on the center console beneath the heater and air conditioner controls. Insert the USB device into the connection port.
When a compatible storage device is plugged into the connection port, compatible audio files on the storage device can be played through the vehicle’s audio system.
Audio file operation
MEDIA button
Place the ignition switch in the ON or ACC position and press the MEDIA button to switch to the USB input mode. If a CD is playing or another audio source is plugged in through the AUX IN jack located in the center console, the MEDIA button toggles between the three sources.
Play information
Information about the audio files being played can be displayed on the display screen of the vehicle’s audio system. Depending on how the audio files are encoded, information such as Folder, Song and Artist will be displayed.
The track number and number of total tracks in the folder are displayed on the screen as well.
 SEEK•CAT/TRACK
(Reverse or Fast Forward)
button
SEEK•CAT/TRACK
(Reverse or Fast Forward)
button
Press and hold the  or
or
 SEEK•CAT/TRACK buttons for 1.5 seconds
while an audio file on the USB device is playing to
reverse or fast forward the track being played.
SEEK•CAT/TRACK buttons for 1.5 seconds
while an audio file on the USB device is playing to
reverse or fast forward the track being played.
The track plays at an increased speed while reversing or fast forwarding. When the button is released, the audio file returns to normal play speed.
 SEEK/CAT and
TRACK
buttons
SEEK/CAT and
TRACK
buttons
Press the SEEK/CAT button  while
an audio
file on the USB device is playing to return to
the beginning of the current track. Press the
SEEK/CAT button
while
an audio
file on the USB device is playing to return to
the beginning of the current track. Press the
SEEK/CAT button  several times to
skip
backward several tracks.
several times to
skip
backward several tracks.
Press the TRACK button  while an
audio
file on the USB device is playing to advance one
track. Press the TRACK button
while an
audio
file on the USB device is playing to advance one
track. Press the TRACK button  several
times to skip forward several tracks. If the last
track in a folder on the USB device is skipped, the
first track of the next folder is played.
several
times to skip forward several tracks. If the last
track in a folder on the USB device is skipped, the
first track of the next folder is played.
RDM (random) button
When the RDM (random) button is pressed while an audio file on the USB device is playing, the play pattern can be changed as follows:
All Random → 1 Folder Random → OFF
All Random: all tracks on the USB device will be played randomly.
1 Folder Random: all tracks in the current folder will be played randomly.
OFF: No random play pattern is applied. The indicator on the display will turn off.
The current play pattern of the USB device is displayed on the screen unless no pattern is applied.
RPT (repeat) button
When the RPT (repeat) button is pressed while an audio file on the USB device is playing, the play pattern can be changed as follows:
1 Folder Repeat → 1 Track Repeat → OFF
1 Track Repeat: the current track will be repeated.
1 Folder Repeat: the current folder will be repeated.
OFF: No repeat play pattern is applied. The indicator on the display will turn off.
The current play pattern of the USB device is displayed on the screen unless no pattern is applied.
TUNE/SCROLL knob
If there are multiple folders with audio files on the USB device, turn the TUNE/SCROLL knob to change folders. Turn the knob to the left to skip back a folder. Turn the knob to the right to skip ahead a folder. If there is only one folder of audio files on the USB device, turning the TUNE/SCROLL knob in either direction will return to the first track on the USB device.
TUNE/FOLDER knob
If there are multiple folders with audio files on the USB device, turn the TUNE/FOLDER knob to change folders. Turn the knob to the left to skip back a folder. Turn the knob to the right to skip ahead a folder. If there is only one folder of audio files on the USB device, turning the TUNE/FOLDER knob in either direction will return to the first track on the USB device.
 FM/AM/SAT radio with compact disc (CD) player (Type B) (if so equipped)
FM/AM/SAT radio with compact disc (CD) player (Type B)
FM-AM button
CD eject button
CD insert slot
Backward seek button
button
Forward seek button
...
 USB (Universal Serial Bus) Connection Port (models with Navigation System)
(if so equipped)
USB (Universal Serial Bus) Connection Port (models with Navigation System)
(if so equipped)
USB (Universal Serial Bus) Connection Port (models with Navigation System)
Connecting a device to the USB
Connection Port
WARNINGDo not connect, disconnect, or operate the
USB devi ...
Other materials:
Starting the engine (models with NISSAN
Intelligent Key® system)
Apply the parking brake.
Move the shift lever to P (Park) or N (Neutral).
P (Park) is recommended.
The starter is designed not to operate if
the shift lever is in any of the driving
positions.
Push the ignition switch to the ON position.
Depress the brake pedal and pus ...
P1715 input speed sensor
Description
ECM receives input speed sensor signal from TCM through CAN communication
line. ECM uses this signal for
engine control.
DTC Description
DTC DETECTION LOGIC
DTC No.
CONSULT screen terms
(Trouble diagnosis content)
DTC detecting conditio
P1715
IN PULY SP ...
Instrument panel
Vent
Headlight/fog light (if so equipped)/turn signal switch
Meters, gauges, warning/indicator
lights and Vehicle Information Display
Windshield wiper/washer switch and rear window wiper/washer switch
/Ignition switch (if so equipped)
Push-button ...
