Nissan Rogue Owners Manual: FM/AM/SAT radio with compact disc (CD) player (Type B) (if so equipped)
FM/AM/SAT radio with compact disc (CD) player (Type B)
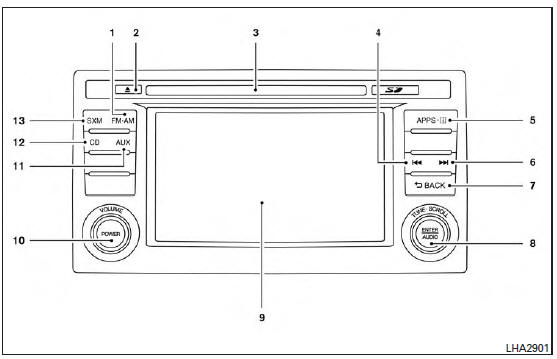
- FM-AM button
-
 CD eject button
 - CD insert slot
-
 Backward seek button
 -
 button
 -
 Forward seek button
 -
 BACK button
 - TUNE/SCROLL knob, ENTER/AUDIO button
- Display screen
- POWER button/ VOLUME control knob
- AUX button
- CD button
- SXM button*
The [  ] button launches the
Smartphone
Integration Mode. For additional information, refer
to ŌĆ£NissanConnectSM with Mobile AppsŌĆØ in
this section.
] button launches the
Smartphone
Integration Mode. For additional information, refer
to ŌĆ£NissanConnectSM with Mobile AppsŌĆØ in
this section.
*No satellite radio reception is available when the SXM button is pressed to access satellite radio stations unless optional satellite receiver and antenna are installed and an SiriusXM® Satellite Radio service subscription is active. Satellite radio is not available in Alaska, Hawaii and Guam.
For additional information, refer to ŌĆ£Audio operation precautionsŌĆØ regarding all operation precautions in this section.
Audio main operation
ON-OFF button / VOL (volume) control knob
Place the ignition switch in the ACC or ON position and press the ON-OFF button while the system is off to call up the mode (radio, CD, AUX, Bluetooth® audio, USB or iPod®) that was playing immediately before the system was turned off.
To turn the system off, press the ON-OFF button.
Turn the VOL (volume) control knob to adjust the volume.
This vehicle may be equipped with Speed Sensitive Volume. When this feature is active, the audio volume changes as the driving speed changes.
Audio settings
- Press the [ ] button.
- Touch the ŌĆ£SettingsŌĆØ key.
- Touch the ŌĆ£AudioŌĆØ key.
Use the touch-screen to adjust the following items to the desired setting:
| Audio | ||
| Bass | Adjusts the bass to the desired level. | |
| Treble | Adjusts the treble to the desired level. | |
| Balance | Adjusts the balance to the desired level. Balance adjusts the sound level between the left and right speakers | |
| Fade | Adjusts the fade to the desired level. Fade adjusts the sound level between the front and rear speakers. | |
| Speed Sensitive Vol. | Adjusts the speed sensitive volume function, which increases the volume of the audio system as the speed of the vehicle increases. Set to ŌĆ£OFFŌĆØ to disable the feature. The higher the setting, the more the volume increases in relation to vehicle speed. | |
| AUX Volume Level/AUX Lev | Controls the volume level of incoming sound when an auxiliary device is connected to the system. Available options are Low (Quiet), Medium, and High (Loud). | |
Bass, treble, balance and fade can also be adjusted by pressing the ENTER/AUDIO control knob and turning it to select the item to adjust. When the desired item is shown on the display, turn the tuning to adjust and then press the ENTER/AUDIO button until the display returns to the main audio screen. If the button is not pressed for approximately 10 seconds, the radio or CD display will automatically reappea
SXM settings
To view the SXM settings:
- Press the [
 ] button.
 - Touch the ŌĆ£SettingsŌĆØ key.
- Touch the ŌĆ£SXMŌĆØ key.
The signal strength, activation status and other information are displayed on the screen.
FM/AM/SAT radio operation
FM┬ĘAM button
Press the FM┬ĘAM button to change the band as follows:
AM ŌåÆ FM1 ŌåÆ FM2 ŌåÆ AM
If another audio source is playing when the FM┬ĘAM button is pressed, the audio source playing will automatically be turned off and the last radio station played will begin playing.
The FM stereo indicator (STEREO) is shown on the screen during FM stereo reception. When the stereo broadcast signal is weak, the radio automatically changes from stereo to monaural reception.
SXM band select
Pressing the SXM button will change the band as follows:
SXM1* ŌåÆ SXM2* ŌåÆ SXM3*ŌåÆ SXM1* (satellite, if so equipped)
When the SXM button is pressed while the ignition switch is in the ACC or ON position, the radio will come on at the last station played.
The last station played will also come on when the POWER button is pressed.
*When the SXM button is pressed, the satellite radio mode will be skipped unless an optional satellite receiver and antenna are installed and a SiriusXM® Satellite Radio service subscription is active. Satellite radio is not available in Alaska, Hawaii and Guam.
If a compact disc is playing when the SXM button is pressed, the compact disc will automatically be turned off and the last radio station played will come on.
While the radio is in SXM mode, the operation can be controlled through the touch-screen.
Touch the ŌĆ£ChannelsŌĆØ key to display a list of channels. Touch a channel displayed on the list to change to that channel. Touch the ŌĆ£CategoriesŌĆØ key to display a list of categories. Touch a category displayed on the list to display options within that category.
Tuning with the touch-screen
When in AM or FM mode, the radio can be tuned using the touch-screen. To bring up the visual tuner, touch the ŌĆ£TuneŌĆØ key on the lower right corner of the screen. A screen appears with a bar running from low frequencies on the left to high frequencies on the right. Touch the screen at the location of the frequency you wish to tune and the station will change to that frequency. To return to the regular radio display screen, touch the ŌĆ£OKŌĆØ key.
Tuning with the TUNE/SCROLL knob
The radio can also be manually tuned using the TUNE/SCROLL knob. When in FM or AM mode, turn the TUNE/SCROLL knob to the left for lower frequencies or to the right for higher frequencies.
When in SXM mode, turn the TUNE/SCROLL knob to change the channel.
 SEEK tuning
When in FM or AM mode, press the  or
or  seek buttons to tune from low
to high or
high to low frequencies and to stop at the next
broadcasting station.
seek buttons to tune from low
to high or
high to low frequencies and to stop at the next
broadcasting station.
When in SXM mode, press the  or
or
 seek buttons to change the category.
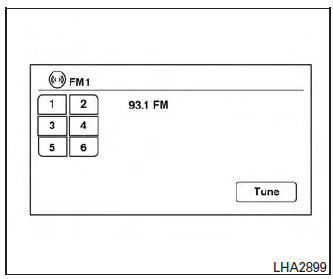
1 to 6 Station memory ope
Twelve stations can be set for the FM band (six for FM1, six for FM2) and six stations can be set for the AM band. Eighteen stations can be set for the SXM band (six for SXM1, six for SXM2, six for SXM3).
- Choose the radio band AM, FM1 or FM2 using the FM┬ĘAM select button or choose the radio band SXM1, SXM2, SXM3 using the SXM button.
- Tune to the desired station using manual or seek tuning. Touch and hold any of the desired station memory keys (1 ŌĆō 6) until a beep sound is heard.
- The channel indicator will then come on and the sound will resume. Programming is now complete.
- Other keys can be set in the same manner.
If the battery cable is disconnected or if the fuse opens, the radio memory will be canceled. In that case, reset the desired stations.
Presets can also be selected by touching the desired preset number on the screen.
Smart Favorites Preset Setup (if so equipped):
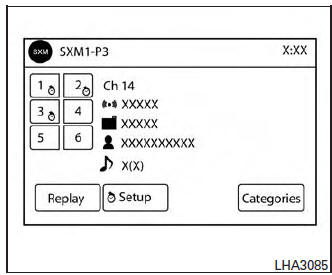
The Smart Favorites feature allows the user to designate presets, within the SXM1, SXM2 and SXM3 bands, as their Smart Favorites. When any of the Smart Favorite presets are selected, the current track on that station will play from the beginning of the song.
To program a Smart Favorite preset:
- Press the SXM button.
- Touch the ŌĆ£SetupŌĆØ key.
- Touch the ŌĆ£Tune StartŌĆØ key to activate (ON) or deactivate (OFF) Smart Favorites.
- Touch the ŌĆ£Add PresetŌĆØ key to select an available preset.
For additional information, refer to ŌĆ£1 to 6 station memory operationsŌĆØ in this section regarding preset memory options.
NOTE:
- Smart Favorites will start functioning only after the audio unit is turned on for a few minutes.
- Tune Start is supported for music channels only.
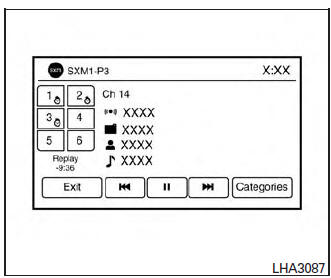
Replay Screen
The Replay Screen gives the user the ability to replay, skip, pause or rewind the currently aired track.
When the ŌĆ£ReplayŌĆØ key is pressed, the Replay Screen is prompted
REPLA
To replay a track from the
beginning, press the  seek button. The user can continue
to press the
seek button. The user can continue
to press the  seek
button to replay previous
songs, but can only go back as
far as the system permits. The
system will warn the user when
they cannot skip any further
back by displaying ŌĆ£At the EndŌĆØ
in the bottom left corner of the
screen
seek
button to replay previous
songs, but can only go back as
far as the system permits. The
system will warn the user when
they cannot skip any further
back by displaying ŌĆ£At the EndŌĆØ
in the bottom left corner of the
screen
SKIP
To skip a track, press the  track button. ŌĆ£LiveŌĆØ will appear
in the bottom left corner of the
screen indicating the difference
from play time to live
audio.
track button. ŌĆ£LiveŌĆØ will appear
in the bottom left corner of the
screen indicating the difference
from play time to live
audio.
PAUSE
To pause a track, press
the  pause button.
REWIND/ FAST FORWARD
To rewind/ fast forward a track,
hold the  or
or
 seek/
track button.
seek/
track button.
Compact disc (CD) player operation
If the radio is already operating, it automatically turns off and the compact disc begins to play.
CD button
When the CD button is pressed with the system off and the compact disc loaded, the system will turn on and the compact disc will start to play.
When the CD button is pressed with a compact disc loaded and the radio playing, the radio will automatically be turned off and the compact disc will start to play.
CD/MP3 display mode
|
Menu item |
||
| CD/MP3 | While listening to a CD or an MP3/WMA CD, certain text may be displayed (when a CD encoded with text is being used). Depending on how the CD or MP3/WMA CD is encoded, the text is displayed listing the artist, album and song title. There are other keys displayed on the screen when a CD is playing | |
| Random | Touch the ŌĆ£RandomŌĆØ key to apply a random play pattern to the CD. If an MP3 CD is playing, touching ŌĆ£RandomŌĆØ or alternates between Random Folder, and Random All. This text will appear on the display. To cancel Random mode, touch the ŌĆ£RandomŌĆØ key until the key is no longer highlighte | |
| Repeat | Touch the ŌĆ£RepeatŌĆØ key to apply a repeat play pattern to the CD. If an MP3 CD is playing, touching ŌĆ£RepeatŌĆØ alternates between repeating the current song and repeating the current folder. This text will appear on the display. To cancel Repeat mode, touch the ŌĆ£RepeatŌĆØ key until the key is no longer | |
| Browse | Touch the ŌĆ£BrowseŌĆØ key to display the titles on the CD in list format. Touch the title of a song in the list to begin playing that song. If an MP3 CD is playing, touching the ŌĆ£BrowseŌĆØ key will also list the folders on the disc. Follow the procedure for selecting a song with the touch-screen to choose a folde | |
 SEEK (Reverse
or Fast
Forward) button
SEEK (Reverse
or Fast
Forward) button
Press and hold the  or
or
 seek buttons
for 1.5 seconds while the compact disc is playing
to reverse or fast forward the track being played.
seek buttons
for 1.5 seconds while the compact disc is playing
to reverse or fast forward the track being played.
The compact disc plays at an increased speed while reversing or fast forwarding. When the button is released, the compact disc returns to normal play speed.
 SEEK buttons
Press the  seek button while a
CD or
MP3/WMA CD is playing to return to the beginning
of the current track. Press the
seek button while a
CD or
MP3/WMA CD is playing to return to the beginning
of the current track. Press the  seek
button several times to skip backward several
tracks.
seek
button several times to skip backward several
tracks.
Press the  seek button while a CD
or
MP3/WMA CD is playing to advance one track.
seek button while a CD
or
MP3/WMA CD is playing to advance one track.
Press the  seek button several
times to skip
forward several tracks. If the last track on a CD is
skipped, the first track on the disc is played. If the
last track in a folder of an MP3/WMA CD is
skipped, the first track of the next folder is played.
seek button several
times to skip
forward several tracks. If the last track on a CD is
skipped, the first track on the disc is played. If the
last track in a folder of an MP3/WMA CD is
skipped, the first track of the next folder is played.
AUX button
The AUX IN audio input jack accepts any standard analog audio input such as from a portable cassette tape/CD player, MP3 player or a laptop computer. Press the AUX button to play a compatible device plugged into the AUX IN jack.
 CD EJECT
button
CD EJECT
button
When the  CD EJECT button is
pressed
with a compact disc loaded, the compact disc
will eject and the last source will be played.
CD EJECT button is
pressed
with a compact disc loaded, the compact disc
will eject and the last source will be played.
If the disc is not removed within 10 seconds, the disc will reload.
Additional features
For additional information, refer to ŌĆ£iPod┬« player operation with Navigation SystemŌĆØ regarding the iPod┬« player available with this system in this section.
For additional information, refer to ŌĆ£USB (Universal Serial Bus) Connection Port (models with Navigation System)ŌĆØ regarding the USB (Universal Serial Bus) Connection Port available with this system in this section.
For additional information, refer to ŌĆ£Bluetooth┬« streaming audio with Navigation SystemŌĆØ regarding the Bluetooth┬« audio interface available with this system in this section.
 FM/AM/SAT radio with compact disc (CD) player (Type A) (if so equipped)
FM/AM/SAT radio with compact disc (CD) player (Type A)
CD eject button
XM button*
Display screen
CD insert slot
SEEK button
SCAN button
CAT b ...
 USB (Universal Serial Bus) Connection Port (models without Navigation
System)
(if so equipped)
USB (Universal Serial Bus) Connection Port (models without Navigation
System)
(if so equipped)
USB (Universal Serial Bus) Connection Port (models without Navigation System)
Connecting a device to the USB
Connection Port
WARNINGDo not connect, disconnect, or operate the
USB devi ...
Other materials:
Rear wiper arm
Exploded View
Rear wiper motor
Rear wiper arm
Rear wiper blade
Rear wiper arm cover
Seal
Removal and Installation
REMOVAL
Check that the rear wiper is in the auto stop position.
Remove the rear wiper arm cover.
Remove the rear wiper arm nut from ...
Fuel pump
Description
Sensor
Input signal to ECM
ECM Function
Actuator
Crankshaft position sensor (POS)
Camshaft position sensor (PHASE)
Engine speed*
Fuel pump control
Fuel pump relay↓
Fuel pump
Battery
Battery voltage*
*: ECM determines the st ...
Hill Descent Control System (if so equipped)
Hill Descent Control System
WARNING
Never rely solely on the hill descent
control system to control vehicle speed
when driving on steep downhill grades.
Always drive carefully and attentively
when using the hill descent control system
and decelerate the vehi ...
