Nissan Rogue Service Manual: Front disc brake
BRAKE PAD (1 PISTON TYPE)
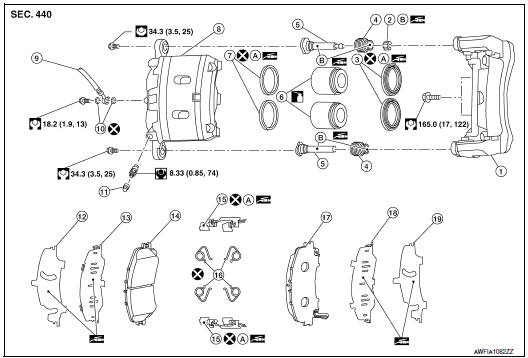
BRAKE PAD (1 PISTON TYPE) : Exploded View
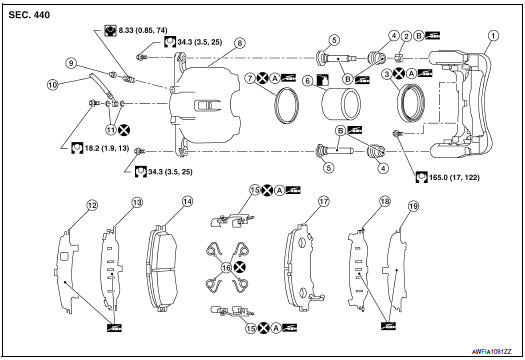
- Torque member
- Bushing
- Piston boot
- Slide pin boot
- Slide pin
- Piston
- Piston seal
- Brake caliper body
- Bleeder cap
- Brake hose
- Copper sealing washers
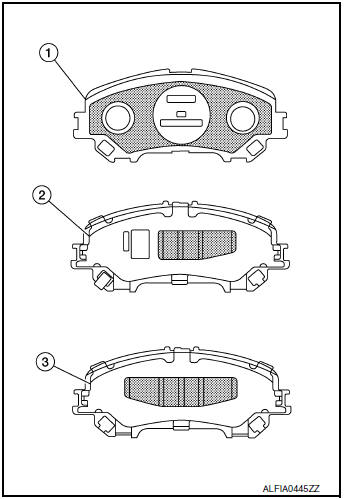
- Inner shim cover
- Inner shim
- Inner pad
- Pad retainer
- Anti-rattle clip
- Outer pad
- Outer shim
- Outer shim cover
- Molykote AS-880N
- Niglube Rx-2
 : Apply brake fluid.
BRAKE PAD (1 PISTON TYPE) : Removal and Installation
REMOVAL
WARNING:
Clean dust on brake caliper and brake pad with a vacuum dust collector to minimize the hazards of airborne particles or other material.
CAUTION:
- Do not depress the brake pedal while removing the brake pads because the pistons may pop out.
- It is not necessary to remove bolts on torque member and brake hose except for disassembly or replacement of brake caliper. For brake pad removal, hang brake caliper with a wire so as not to stretch brake hose.
- If brake fluid or grease adheres to the brake caliper or disc brake rotor, quickly wipe it off.
- Partially drain brake fluid. Refer to BR-16, "Drain and Refill".
- Remove the front wheels and tires using power tool.
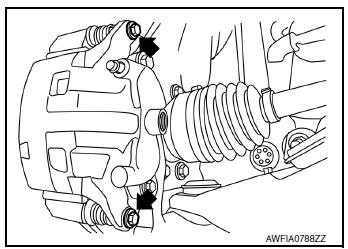
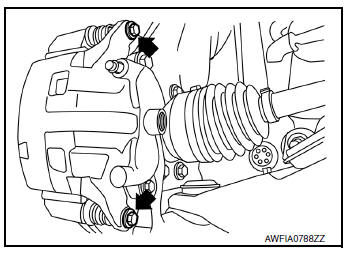
- Remove sliding pin bolts.
- Remove the front brake caliper from the torque member. Leaving brake hose attached, reposition the brake caliper aside with wire.
- Remove the brake pads, shims, shim covers, pad retainers, and anti-rattle clips from the torque member.
CAUTION:
- Do not reuse the pad retainers and anti-rattle clips.
- Do not damage the piston boot.
- Do not drop the brake pads, shims, or the shim covers.
- Note the position of components during removal to aid with installation.
- Compress the front caliper piston.
INSTALLATION
- Install the new pad retainers and anti-rattle clips to the torque member.
CAUTION:
- Do not reuse the pad retainers and anti-rattle clips.
- Do not deform the pad retainers.
- Verify that the pad retainers are secured properly to the torque member.
- Apply Rubber grease or equivalent to the mating faces between the brake pads and pad retainers. Refer to BR-33, "BRAKE PAD (1 PISTON TYPE) : Exploded View".
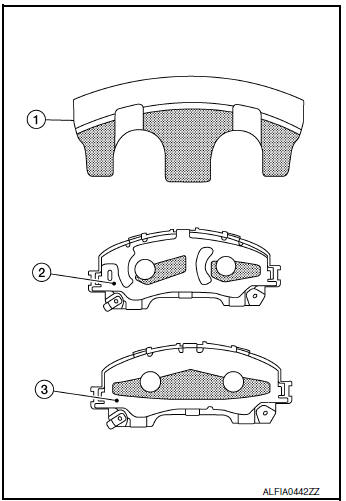
- Apply Molykote AS-880N grease or equivalent to the mating
faces between the brake pads, shims and shim covers, and
install them to the brake pad. Refer to BR-33, "BRAKE PAD (1
PISTON TYPE) : Exploded View".
CAUTION: When installing new brake pads, replace the shims and shim covers.
- Install the brake pads to the torque member.
- Using a suitable tool, press the pistons into the brake caliper.
CAUTION: Do not damage the piston boot.
- Install the brake caliper to the torque member.
- Install the sliding pin bolts and tighten to specification. Refer to BR-33, "BRAKE PAD (1 PISTON TYPE) : Exploded View".
- Depress the brake pedal several times and verify that drag does not exist.
- Install the front wheels and tires. Refer to WT-60, "Removal and Installation".
- Check brake fluid level and refill as necessary. Refer to BR-8, "Inspection".
BRAKE CALIPER ASSEMBLY (1 PISTON TYPE)
BRAKE CALIPER ASSEMBLY (1 PISTON TYPE) : Exploded View

- Torque member
- Bushing
- Piston boot
- Slide pin boot
- Slide pin
- Piston
- Piston seal
- Brake caliper body
- Bleeder cap
- Brake hose
- Copper sealing washers
- Inner shim cover
- Inner shim
- Inner pad
- Pad retainer
- Anti-rattle clip
- Outer pad
- Outer shim
- Outer shim cover
- Molykote AS-880N
- Niglube Rx-2
 : Apply brake fluid.
BRAKE CALIPER ASSEMBLY (1 PISTON TYPE) : Removal and Installation
WARNING: Clean dust on brake caliper and brake pad with a vacuum dust collector to minimize the hazard of airborne particles or other materials.
CAUTION:
- Do not depress the brake pedal.
- Do not spill or splash brake fluid on painted areas; it may cause paint damage. If brake fluid is splashed on painted areas, wash it away with water immediately.
- Do not bend, twist or pull the brake hoses and piping.
- Do not reuse drained brake fluid.
NOTE: When removing components such as hoses, tubes/lines, etc., cap or plug openings to prevent fluid from spilling.
REMOVAL
- Remove front wheels and tires using power tool.
- Secure the disc brake rotor using wheel nuts.
- Remove union bolt, copper sealing washers, and disconnect brake hose
from brake caliper. Discard the
copper sealing washers.
CAUTION: Do not reuse copper sealing washers.
- Remove sliding pin bolts and the brake caliper.
CAUTION: Do not drop brake pads or caliper.
INSTALLATION
- Position the brake caliper to torque member and install the sliding pin bolts. Tighten to specification.
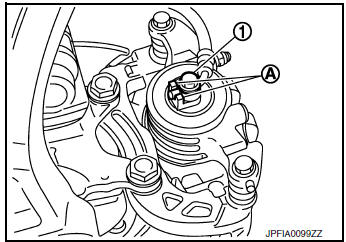
- Assemble the union bolt (1) and the copper washers to the
brake hose and install it as an assembly to the brake caliper.
Align the brake hose pin to the projection (A) by aligning it with the brake caliper hole, and tighten the union bolt (1) to the specified torque.
CAUTION: Do not reuse copper sealing washers.
- Refill with new brake fluid and perform the air bleeding. Refer to BR-16, "Bleeding Brake System".
CAUTION:
- Do not reuse drained brake fluid.
- Do not spill or splash brake fluid on the disc brake rotor.
- Check the front disc brakes for drag.
- Install the front wheels and tires. Refer to WT-60, "Removal and Installation".
BRAKE PAD (2 PISTON TYPE)
BRAKE PAD (2 PISTON TYPE) : Exploded View
- Torque member
- Bushing
- Piston boot
- Slide pin boot
- Slide pin
- Piston
- Piston seal
- Brake caliper body
- Bleeder cap
- Brake hose
- Copper sealing washers
- Inner shim cover
- Inner shim 1
- Inner pad
- Pad retainer
- Anti-rattle clip
- Outer pad
- Outer shim
- Outer shim cover
- Molykote AS-880N
- Niglube Rx-2
 : Apply brake fluid.
BRAKE PAD (2 PISTON TYPE) : Removal and Installation
REMOVAL
WARNING: Clean dust on brake caliper and brake pad with a vacuum dust collector to minimize the hazards of airborne particles or other material.
CAUTION:
- Do not depress the brake pedal while removing the brake pads because the pistons may pop out.
- It is not necessary to remove bolts on torque member and brake hose except for disassembly or replacement of brake caliper. For brake pad removal, hang brake caliper with a wire so as not to stretch brake hose.
- If brake fluid or grease adheres to the brake caliper or disc brake rotor, quickly wipe it off.
- Partially drain brake fluid. Refer to BR-16, "Drain and Refill".
- Remove the front wheels and tires using power tool.
- Remove sliding pin bolts.
- Remove the brake caliper from the torque member. Leaving brake hose attached, reposition the brake caliper aside with wire.
- Remove the brake pads, shims, shim covers, pad retainers, and anti-rattle clips from the torque member.
CAUTION:
- Do not reuse the pad retainers and anti-rattle clips.
- Do not damage the piston boot.
- Do not drop the brake pads, shims, or the shim covers.
- Note the position of components during removal to aid with installation.
- Compress the front caliper pistons.
INSTALLATION
- Install the new pad retainers and anti-rattle clips to the torque member.
CAUTION:
- Do not reuse the pad retainers and anti-rattle clips.
- Do not deform the pad retainers.
- Verify that the pad retainers are secured properly to the torque member.
- Apply Rubber grease or equivalent to the mating faces between the brake pads and pad retainers. Refer to BR-37, "BRAKE PAD (2 PISTON TYPE) : Exploded View".
- Apply Molykote AS-880N grease or equivalent to the mating
faces between the brake pads, shims and shim covers, and
install them to the brake pad. Refer to BR-37, "BRAKE PAD (2
PISTON TYPE) : Exploded View".
CAUTION: When installing new brake pads, replace the shims and shim covers.
- Install the brake pads to the torque member.
- Using a suitable tool, press the pistons into the brake caliper.
CAUTION: Do not damage the piston boot.
- Install the brake caliper to the torque member.
- Install the sliding pin bolts and tighten to specification. Refer to BR-37, "BRAKE PAD (2 PISTON TYPE) : Exploded View".
- Depress the brake pedal several times and verify that drag does not exist.
- Install the front wheels and tires. Refer to WT-60, "Removal and Installation".
- Check brake fluid level and refill as necessary. Refer to BR-8, "Inspection".
BRAKE CALIPER ASSEMBLY (2 PISTON TYPE)
BRAKE CALIPER ASSEMBLY (2 PISTON TYPE) : Exploded View

- Torque member
- Bushing
- Piston boot
- Slide pin boot
- Slide pin
- Piston
- Piston seal
- Brake caliper body
- Bleeder cap
- Brake hose
- Copper sealing washers
- Inner shim cover
- Inner shim
- Inner pad
- Pad retainer
- Anti-rattle clip
- Outer pad
- Outer shim
- Outer shim cover
- Molykote AS-880N
- Niglube Rx-2
 : Apply brake fluid
BRAKE CALIPER ASSEMBLY (2 PISTON TYPE) : Removal and Installation
WARNING: Clean dust on brake caliper and brake pad with a vacuum dust collector to minimize the hazard of airborne particles or other materials.
CAUTION:
- Do not depress the brake pedal.
- Do not spill or splash brake fluid on painted areas; it may cause paint damage. If brake fluid is splashed on painted areas, wash it away with water immediately.
- Do not bend, twist or pull the brake hoses and piping.
- Do not reuse drained brake fluid.
NOTE: When removing components such as hoses, tubes/lines, etc., cap or plug openings to prevent fluid from spilling.
REMOVAL
- Remove front wheels and tires using power tool.
- Secure the disc brake rotor using wheel nuts.
- Remove union bolt, copper sealing washers, and disconnect brake hose
from brake caliper. Discard the
copper sealing washers.
CAUTION: Do not reuse copper sealing washers.
- Remove sliding pin bolts and the brake caliper.
CAUTION: Do not drop brake pads or caliper.
INSTALLATION
- Position the brake caliper to torque member and install the sliding pin bolts. Tighten to specification.
- Assemble the union bolt (1) and the copper washers to the
brake hose and install it as an assembly to the brake caliper.
Align the brake hose pin to the projection (A) by aligning it with the brake caliper hole, and tighten the union bolt (1) to the specified torque.
CAUTION: Do not reuse copper sealing washers.
- Refill with new brake fluid and perform the air bleeding. Refer to BR-16, "Bleeding Brake System".
CAUTION:
- Do not reuse drained brake fluid.
- Do not spill or splash brake fluid on the disc brake rotor.
- Check the front disc brakes for drag.
- Install the front wheels and tires. Refer to WT-60, "Removal and Installation".

 Vacuum lines
Exploded View
Clamp
Vacuum hose
Vacuum tube
Clip
Vacuum hose
To intake manifold
To brake booster
Paint mark
Stamp indicating engine direction
Removal an ...
 Rear disc brake
BRAKE PAD
BRAKE PAD : Exploded View
Sliding pin bolt
Sliding pin bushing
Cylinder body
Inner shim cover
Inner shim
Inner pad
Pad retainer
Torque member
Outer pad
Outer ...
Other materials:
Towing load/specification
TOWING LOAD/SPECIFICATION CHART
U.S. and Canada
Maximum Towing Capacity*1
1,100lb.
(500 kg)
Maximum Tongue Load
110 lb.
(50 kg)
Maximum Gross Combined Weight Rating
5,291 lb.
(2,400 kg)
*1: The towing capacity ...
P0606 ECM
DTC Description
DTC DETECTION LOGIC
DTC No.
CONSULT screen terms
(Trouble diagnosis content)
DTC detecting condition
P0606
CONTROL MODULE
(Control module processor)
Malfunction in ECM processor
POSSIBLE CAUSE
ECM
FAIL-SAFE
Not applicable
DTC CONFIRMATION ...
Main power supply and ground circuit
Diagnosis Procedure
1.CHECK TCM POWER CIRCUIT (PART 1)
Turn ignition switch OFF.
Disconnect TCM connector.
Check voltage between TCM harness connector terminals and ground.
Is the inspection result normal?
YES >> GO TO 2.
NO >> GO TO 4.
2.CHECK TCM ...
