Nissan Rogue Service Manual: Body side trim
Exploded View
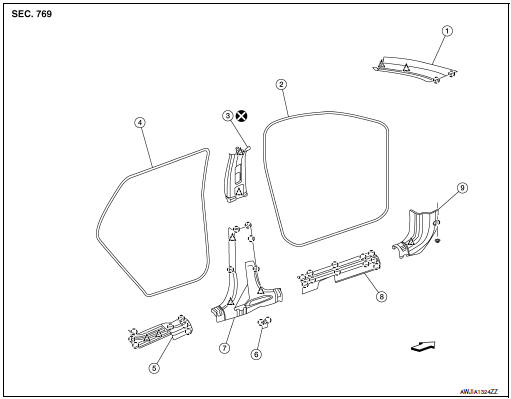
- Front pillar finisher
- Front body side welt
- Center pillar upper finisher
- Rear body side welt
- Rear kicking plate
- Seat belt cover
- Center pillar lower finisher
- Front kicking plate
- Dash side finisher
 Pawl
Pawl
 Clip
Clip
 Front
Front
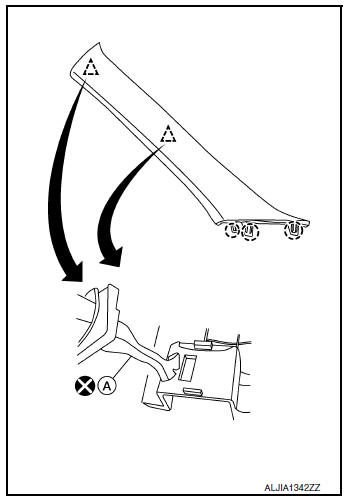
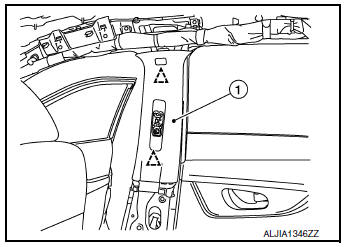
FRONT PILLAR FINISHER
FRONT PILLAR FINISHER : Removal and Installation
REMOVAL
- Partially remove front door welt (front edge).
- Release the front pillar finisher pawls using a suitable tool.: Pawl
- Cut and discard front pillar finisher tether clip (A).
CAUTION: Do not reuse tether clip. Replace with new part after removal.
- Remove the remaining piece of tether clips (A) using a suitable tool and remove front pillar finisher.
INSTALLATION
Installation is in the reverse order of removal.
CAUTION:
- Do not reuse tether clip. Replace with new part after removal.
- Make sure that the location of the airbag and tether clip do not block body panel holes before installing front pillar finisher.
- Make sure to install tether clip to front pillar finisher by inserting clip end and rotating 90 degrees in either direction, before installing front pillar finisher.
- When installing tether clip to front pillar finisher, be sure to install by aligning to the cutout.
- Front pillar finisher is re-usable.
- New tether clip should be used from service parts, ordered separately.
- When installing front pillar finisher, check that tether clip and pawls are securely placed into correct body panel holes.
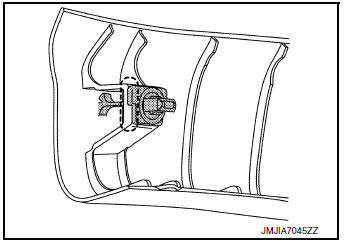
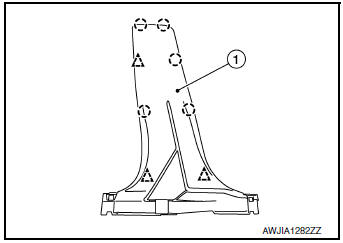
CENTER PILLAR UPPER FINISHER
CENTER PILLAR UPPER FINISHER : Removal and Installation
REMOVAL
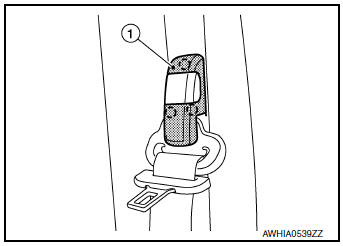
- Remove center pillar lower finisher. Refer to INT-22, "CENTER PILLAR LOWER FINISHER : Removal and Installation".
- Release pawls, using a suitable tool and remove the seat belt
height adjuster finisher (1).: Pawl
- Remove front D-ring anchor bolt.
CAUTION: Before removing D-ring anchor bolt note the positions of washers and spacers for correct installation.
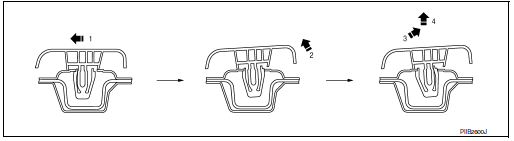
- Release center pillar upper finisher clips using a suitable tool as shown.
- Release center pillar upper finisher (1) clips using a suitable
tool
and remove. Clip
CAUTION:
- Do not reuse center pillar upper finisher.
- Do not bend the sheet metal when removing the center pillar upper finisher from the sheet metal.
- When releasing molded in clip, follow the steps as shown to prevent finisher or clip damage.
INSTALLATION
Installation is in the reverse order of removal.
CAUTION:
- Do not reuse center pillar upper finisher. Replace with new part for installation.
- Visually check sheet metal around clip and pawl locations to confirm no deformation from removal of center pillar upper finisher. Repair sheet metal if necessary.
- When installing center pillar upper finisher, check that the clips are securely placed in body panel holes.
CENTER PILLAR LOWER FINISHER
CENTER PILLAR LOWER FINISHER : Removal and Installation
REMOVAL
- Move front seat to the full forward position.
- Remove front kicking plate. Refer to INT-23, "KICKING PLATE : Removal and Installation - Front Kicking Plate".
- Remove rear kicking plate. Refer to INT-24, "KICKING PLATE : Removal and Installation - Rear Kicking Plate".
- Release center pillar lower finisher clips and pawls using a suitable tool, then remove the center pillar lower finisher (1).
: Clip
: Pawl
INSTALLATION
Installation is in the reverse order of removal.
CAUTION:
- Visually check the clips for deformation and damage during installation. Replace with new ones if necessary.
- When installing center pillar lower finisher, check that clips and pawls are securely placed in body panel holes.
BODY SIDE WELT
BODY SIDE WELT : Removal and Installation - Front Door Welt
REMOVAL
- Remove the front kicking plate. Refer to INT-23, "KICKING PLATE : Removal and Installation - Front Kicking Plate".
- Remove the front body side welt.
INSTALLATION
Installation is in the reverse order of removal.
BODY SIDE WELT : Removal and Installation - Rear Door Welt
REMOVAL
- Remove the rear kicking plate. Refer to INT-24, "KICKING PLATE : Removal and Installation - Rear Kicking Plate".
- Remove the rear body side welt.
INSTALLATION
Installation is in the reverse order of removal.
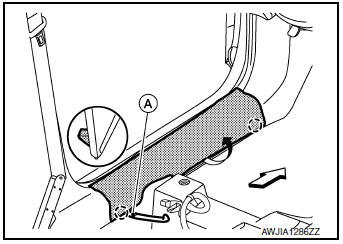
KICKING PLATE
KICKING PLATE : Removal and Installation - Front Kicking Plate
REMOVAL
- Release the front and rear pawls by rotating the front kicking
plate.: Pawl
 : Front
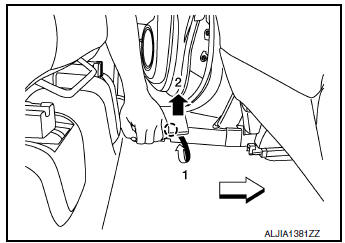
 - Lift front edge of front kicking plate and release the remaining pawls using suitable tool (A) and remove.
INSTALLATION
Installation is in the reverse order of removal.
CAUTION:
- Visually check the clips and pawls for deformation and damage during installation. Replace with new ones if necessary.
- When installing front kicking plate, check that the floor trim does not cover harness protector slots.
- When installing front kicking plate, check that the clips and pawls are securely placed in body panel holes.
KICKING PLATE : Removal and Installation - Rear Kicking Plate
REMOVAL
- Release front inside pawl of rear kicking plate as shown, then lift front end of rear kicking plate to release pawls and remove.
: Pawl
: Front
INSTALLATION
Installation is in the reverse order of removal.
CAUTION:
- Visually check the clips and pawls for deformation and damage during installation. Replace with new ones if necessary.
- When installing rear kicking plate, check that the clips and pawls are securely placed in body panel holes.
DASH SIDE FINISHER
DASH SIDE FINISHER : Removal and Installation
REMOVAL
- Remove front kicking plate. Refer to INT-23, "KICKING PLATE : Removal and Installation - Front Kicking Plate".
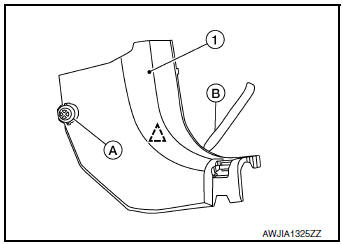
- Remove nut (A) then insert suitable tool (B) to release clip, then
remove dash side finisher.
: Clip
INSTALLATION
Installation is in the reverse order of removal.
CAUTION:
- Visually check the clips for deformation and damage during installation. Replace with new ones if necessary.
- When installing dash side finisher, make sure insulation does not cover stud bolt.
- When installing dash side finisher, check that the clips are securely placed in body panel holes.
 Rear door finisher
Exploded View
Rear door
Rear power window switch finisher
Rear door screw cover
Rear door inside handle finisher
Rear door finisher
Tether clip
Tether ...
 Floor trim
Exploded View
Rear floor trim (with third row
seat)
Rear floor trim (without third
row seat)
Floor trim hook
Front floor trim
Front floor spacer (RH)
Front floor sp ...
Other materials:
ECU diagnosis information
A/C AUTO AMP.
Reference Value
VALUES ON THE DIAGNOSIS TOOL
TERMINAL LAYOUT
PHYSICAL VALUES
DTC Inspection Priority Chart
If some DTCs are displayed at the same time, perform inspections one by one
based on the following priority
chart.
Priority
Det ...
Off-road recovery
If the right side or left side wheels unintentionally
leave the road surface, maintain control of the
vehicle by following the procedure below. Please
note that this procedure is only a general guide.
The vehicle must be driven as appropriate based
on the conditions of the vehicle, road and t ...
Symptom diagnosis
PUSH-BUTTON IGNITION SWITCH DOES NOT OPERATE
Description
Check that vehicle Operating Conditions are as listed in ŌĆ£Conditions of
VehicleŌĆØ below before starting Diagnosis
Procedure. Make sure to check each symptom in Diagnosis Procedure.
NOTE:
The engine start function, door lock functio ...
