Nissan Rogue Owners Manual: Flexible seating
WARNING
|
For vehicles not equipped with 3rd row seating
Folding the 2nd row bench seat
To fold the 2nd row bench seat flat for maximum cargo hauling:
- Make sure that the head
restraints/headrests are lowered. For maximum
cargo hauling, remove the center head
restraint/headrest. To remove the head
restraints/headrests, push and hold the lock
knob while moving the head
restraint/headrest in an upward direction.
Store the head restraints/headrests properly so they are not loose in the vehicle.
For vehicles equipped with 3rd row seating
- Stow the 2nd row seat belts in the seat belt hooks found on the sides of the vehicle.
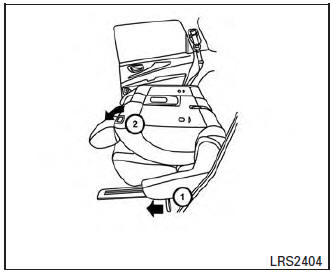
- For vehicles equipped with 3rd row seating, pull the strap 1 on the lower side of the outboard seats and lift up on the recline lever 2 located on the top of the outboard seats to fold the seatbacks flat. For vehicles not equipped with 3rd row seating, lift up on the recline lever 2 on the top of the outboard seats to fold the seatbacks flat.
- To return the 2nd row bench seats to a seating position, push up on the seatback until it latches in place.
Folding the 3rd row seats (If so equipped)
Folding the 3rd row seats (If so equipped)
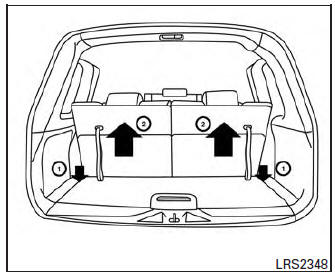
To fold the 3rd row seats flat for maximum cargo capacity:
- Make sure the head restraints/headrests are all the way down.
- Pull the strap 1 to release the seat.
- Once released, push the seatback forward 2 .
To return the 3rd row seats to a seating position:
- Use the pull straps 1 to raise each seatback.
Pull back until the seatback latches into position. Make sure to properly raise each seatback to an upright and secured position.
| WARNING When the seat is returned to the normal seating position, the head restraints/headrests must be returned to the upright position to properly protect vehicle occupants. |
One touch walk-in function (if so equipped)
One touch walk-in function (if so equipped)
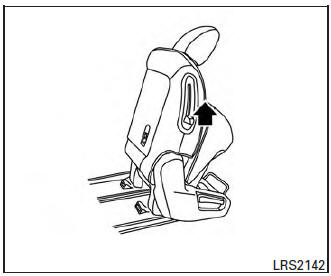
The 3rd row can be accessed from outside the vehicle by using the seatback release lever located on the 2nd row seatback. If a child safety seat is installed on the passenger’s side of the 2nd row seat, the 3rd row can be accessed without removing the child safety seat.
Multi-mode
| WARNING When returning the seat to its original position, confirm that the seat and seatback are locked properly. |
CAUTION
|
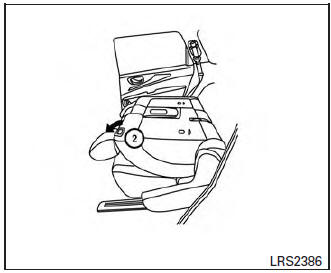
To enter the 3rd row from outside the vehicle, lift up on the seatback lever located on the upper outboard side of the seatback on the 2nd row bench seat. This will release the back of the seat and fold up the seat cushion. This will also release the seat tracks so you will be able to slide the seat forward or backward.
Slide the entire seat forward for access to the 3rd row.
To return the seat to a locked position, push the upper seatback rearward until the seatback and tracks are locked. Push the seat cushion down.
Child seat access mode
The passenger’s side of the 2nd row seat can be slid forward for easy entry or exit from the 3rd row bench seat without a child safety seat being removed.
To enter the 3rd row from outside the vehicle, lift up on the seatback lever located on the upper outboard side of the seatback on the 2nd row bench seat. This will release the seatback. Then tilt the seat and release the tracks so you will be able to slide the seat forward or backward.
Slide the entire seat forward for access to the rear seats.
To return the seat to a locked position, push the upper seatback rearward until the seatback and track are locked.
WARNING
|
CAUTION
|
Exiting the 3rd row
To exit the 3rd row from either seating position, lift the upper seatback release lever to the uppermost position. This will release the back of the seat, then fold the seat cushion up and release the tracks.
Slide the entire seat forward.
To return the seat to a locked position, push the upper seatback rearward until the seatback and track are locked.
| WARNING When returning the seat to its original position, confirm that the seat and seatback are locked properly. |
| CAUTION Be careful not to pinch your hand or foot or bump your head when operating the walk-in seat. |
 2nd row bench seat adjustment
Outboard seats
Forward and backward
Pull the center of the bar 1 up and hold it while
you slide the seat forward or backward to the
desired position. Release the bar to lock the seat
in posit ...
 Head restraints/Headrests
WARNINGHead restraints/headrests supplement
the other vehicle safety systems. They may
provide additional protection against injury
in certain rear end collisions. Adjustable
head r ...
Other materials:
Basic inspection
DIAGNOSIS AND REPAIR WORK FLOW
Work Flow
OVERALL SEQUENCE
DETAILED FLOW
1.GET INFORMATION FOR SYMPTOM
Get detailed information from the customer about the symptom (the
condition and the environment when
the incident/malfunction occurs).
Check operation condition of the ...
Wiring diagram
ENGINE START FUNCTION
Wiring Diagram
NISSAN VEHICLE IMMOBILIZER SYSTEM-NATS
Wiring Diagram
VEHICLE SECURITY SYSTEM
Wiring Diagram
...
B1431 seat belt pre-tensioner
DTC Logic
DTC DETECTION LOGIC
CONSULT name
DTC
DTC detecting condition
Repair order
FRONT PRE-TEN RH CIRCUIT
[OPEN]
B1431
RH seat belt pre-tensioner circuit is open.
Refer to SRC-61, "Diagnosis Procedure"
FRONT PRE-TEN RH CIRC ...
