Nissan Rogue Service Manual: Door outside lower molding
Exploded View
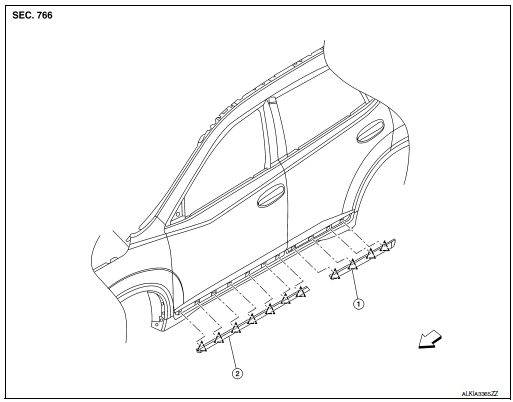
- Rear door outside lower molding
- Front door outside lower molding
 Clip
Clip
 Front
Front
Removal and Installation
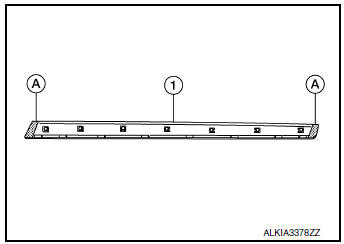
FRONT DOOR OUTSIDE LOWER MOLDING
Removal
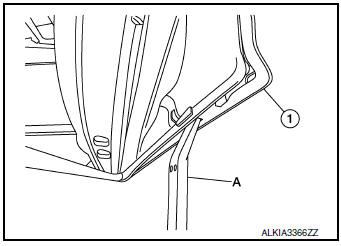
- Using a suitable tool (A) release clips from front door outside lower molding (1) starting at the rear and working forward.
CAUTION:
- Release the clips slowly and carefully.
- Do not pull the front door outside lower molding.

- Remove the front door outside lower molding.
Installation
Installation is in the reverse order of removal.
CAUTION:
- Do not reuse double-sided tape, always replace with new tape.
- When installing, visually check the front door outside lower molding and clips, replace with new clips if they have been damaged.
- When installing front door outside lower molding, make sure clips are attached to the molding. Make sure old clips have all been removed from door.
NOTE: Install new double-sided tape (A) to front door outside lower molding as shown.
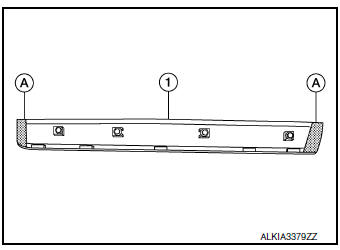
REAR DOOR OUTSIDE LOWER MOLDING
Removal
- Using a suitable tool (A) release clips from rear door outside lower molding (1) starting at the rear and working forward.
CAUTION:
- Release the clips slowly and carefully.
- Do not pull the front door outside lower molding.
- Remove the rear door outside lower molding.
Installation
Installation is in the reverse order of removal.
CAUTION:
- Do not reuse double-sided tape, always replace with new tape.
- When installing, visually check the front door outside lower molding and clips, replace with new clips if they have been damaged.
- When installing front door outside lower molding, make sure clips are attached to the molding. Make sure old clips have all been removed from door.
NOTE: Install new double-sided tape (A) to front door outside lower molding as shown.
 Roof rack
Exploded View
Roof rack rear bolt cover
Roof rack front bolt cover
Roof rack
Roof side molding
Back door hinge cover
Metal Clip
Pawl
Removal and Installation
RE ...
 Rear spoiler
Removal and Installation
The rear spoiler is part of the back door assembly. Refer to DLK-248, "BACK
DOOR ASSEMBLY : Removal
and Installation" (WITH INTELLIGENT KEY SYSTEM) or DLK-365, & ...
Other materials:
Recommended fluids/lubricants and capacities
The following are approximate capacities. The actual refill capacities may
be slightly different. When refilling, follow the procedure
described in the “Maintenance and do-it-yourself” section to determine the
proper refill capacity.
Capacity (Approximate)
Recommended F ...
Symptom diagnosis
INTERIOR LIGHTING SYSTEM SYMPTOMS
Symptom Table
CAUTION:
Perform the self-diagnosis with CONSULT before the symptom diagnosis. Perform
the trouble diagnosis
if any DTC is detected.
Symptom
Possible cause
Inspection item
All the following lamps do not turn ON. ...
Component parts
Component Parts Location
Rear luggage area (RH)
Front headliner area
Engine compartment (LH)
Left side of instrument panel (view
with finish panel removed)
Instrument panel (LH)
No.
Part
Description
1
Back door lock assembly (ba ...
