Nissan Rogue Service Manual: Compressor
Exploded View
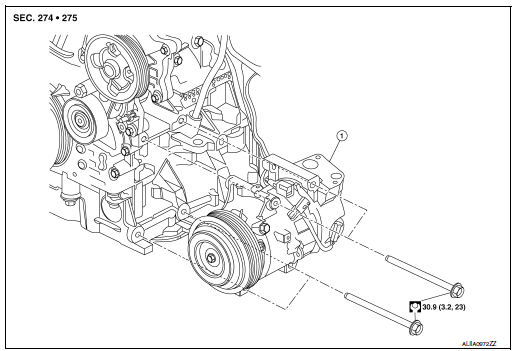
- Compressor
Removal and Installation
REMOVAL
- Discharge the refrigerant. Refer to HA-23, "Recycle Refrigerant".
- Remove the engine under cover. Refer to EXT-37, "ENGINE UNDER COVER : Removal and Installation".
- Release the drive belt from the compressor. Refer to EM-13,
"Removal and Installation".
NOTE: Complete removal of the drive belt is not necessary.
- Partially remove the front fender protector (RH). Refer to EXT-28, "FENDER PROTECTOR : Removal and Installation".
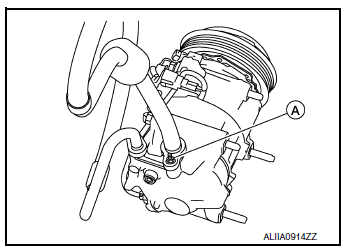
- Remove the nut (A) that retains the low-pressure flexible hose to
the compressor.
CAUTION: Cap or wrap the joint of the pipe with suitable material such as vinyl tape to avoid the entry of air.
- Remove the bolt (A) that retains the high-pressure flexible hose (2) to the compressor (1).
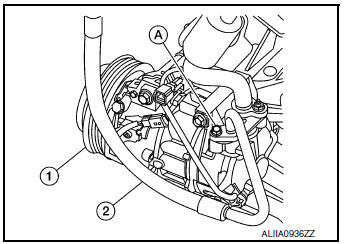
- Disconnect the harness connectors from the compressor.
- Remove bolts and compressor.
INSTALLATION
Installation is in the reverse order of removal.
CAUTION:
- Tighten nut/bolt to specification. Refer to HA-32, "Exploded View".
- Do not reuse O-rings.
- Apply A/C oil to new O-rings for installation.
- After charging refrigerant, check for leaks. Refer to HA-21, "Leak Test".
- After installation, check the tension of the drive belt. Refer to EM-13, "Checking".

 Cooler pipe and hose
Exploded View
Condenser
High-pressure flexible hose
Low-pressure flexible hose
Low-pressure pipe
Heating and cooling unit assembly
High-pressure pipe
Compressor
...
Other materials:
Rear window defogger relay
Description
Power is supplied to the rear window defogger with BCM control.
Component Function Check
1. CHECK REAR WINDOW DEFOGGER RELAY POWER SUPPLY CIRCUIT
Check that an operation noise of rear window defogger relay [located in fuse
block (J/B)] can be heard when
turning the rear window def ...
Wiring diagram
AUTOMATIC AIR CONDITIONING SYSTEM
Wiring Diagram
...
System description
DESCRIPTION
Engine Lubrication System
Camshaft (INT)
Chain tensioner
Main gallery
Oil pan
Oil cooler
Balancer unit
Oil pan oil gallery
Oil filter (with relief valve)
Oil Strainer
Oil pump
Timing chain and balancer unit timing
chain ...
