Nissan Rogue Service Manual: Battery
Exploded View
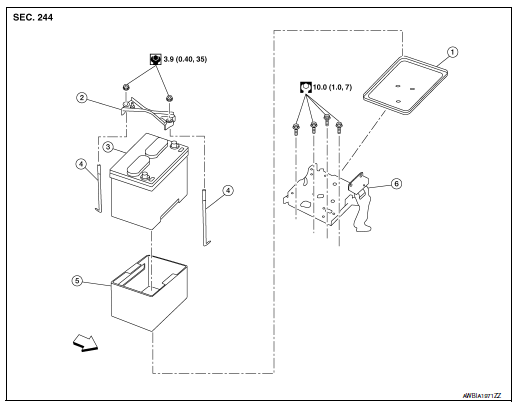
- Battery tray liner
- Battery frame
- Battery
- Battery rod
- Battery cover
- Battery tray
 Front
Front
Removal and Installation (Battery)
REMOVAL
- Pull back cover of battery positive terminal.
- Loosen the battery terminal nuts and disconnect the battery
negative and positive terminals.
CAUTION: To prevent damage to the parts, disconnect the battery negative terminal first.
- Remove battery frame nuts, battery frame and battery rods.
- Remove battery cover and battery.
INSTALLATION
Installation is in the reverse order of removal.
CAUTION:
- Make sure battery tray liner is clean prior to installing new battery.
- To prevent damage to the parts, connect the battery positive terminal first.
- Make sure battery cables are tightly clamped to battery terminals for good contact.
- Check battery terminal for poor connection caused by corrosion.
WARNING: Do not allow battery fluid to come into contact with skin, eyes, fabrics, or painted surfaces. After touching a battery, never touch or rub your eyes until you have thoroughly washed your hands. If acid contacts eyes, skin or clothing, immediately flush with water for 15 minutes and seek medical attention.
Failure to do this may cause personal injury or damage to clothing or the painted surfaces.
Battery terminal nut : 5.0 N·m (0.51 kg-m, 44 in-lb)
Reset electronic systems as necessary. Refer to .PG-72, "ADDITIONAL SERVICE WHEN REMOVING BATTERY NEGATIVE TERMINAL : Special Repair Requirement"
Removal and Installation (Battery Tray)
REMOVAL
- Remove battery. Refer to PG-75, "Removal and Installation (Battery)".
- Remove air cleaner and air duct. Refer to EM-24, "Removal and Installation".
- Disconnect harness connector from TCM.
- Remove wiring harness retainers.
- Disconnect harness connectors from ECM.
- Remove battery tray. Refer to PG-75, "Exploded View"
- Remove TCM bracket from battery tray (if necessary).
- Remove ECM bracket from battery tray (if necessary).
INSTALLATION
Installation is in the reverse order of removal.
Reset electronic systems as necessary. Refer to PG-72, "ADDITIONAL SERVICE WHEN REMOVING BATTERY NEGATIVE TERMINAL : Special Repair Requirement".

 Battery terminal with fusible link
Exploded View
Cover
Fusible link box (battery)
Positive cable
Battery
Harness connector
Front
Removal and Installation
REMOVAL
Loosen battery terminal n ...
Other materials:
U0155 lost communication (IPC)
DTC Description
DTC DETECTION LOGIC
DTC
CONSULT screen terms
(Trouble diagnosis content)
DTC detection condition
U0155
LOST COMM (IPC)
[Lost Communication With Instrument Panel
Cluster (IPC) Control Module]
When the ignition switch is ON, TCM is unable to recei ...
Periodic maintenance
FRONT SUSPENSION ASSEMBLY
Inspection
COMPONENT
Check the conditions (looseness, backlash) of each component. Verify the
component conditions (wear, damage)
are normal.
Ball Joint Axial End Play
Set front wheels in a straight-ahead position.
Move axle side of transverse link, ...
P0461 fuel level sensor
DTC Description
DTC DETECTION LOGIC
Driving long distances naturally affect fuel gauge level.
This diagnosis detects the fuel gauge malfunction of the gauge not moving even
after a long distance has
been driven.
DTC No.
CONSULT screen terms
(Trouble diagnosis content)
DTC de ...
