Nissan Rogue Service Manual: Precaution
PRECAUTIONS
Precaution for Supplemental Restraint System (SRS) "AIR BAG" and "SEAT BELT PRE-TENSIONER"
The Supplemental Restraint System such as “AIR BAG” and “SEAT BELT PRE-TENSIONER”, used along with a front seat belt, helps to reduce the risk or severity of injury to the driver and front passenger for certain types of collision. Information necessary to service the system safely is included in the SR and SB section of this Service Manual.
WARNING:
- To avoid rendering the SRS inoperative, which could increase the risk of personal injury or death in the event of a collision which would result in air bag inflation, all maintenance must be performed by an authorized NISSAN/INFINITI dealer.
- Improper maintenance, including incorrect removal and installation of the SRS, can lead to personal injury caused by unintentional activation of the system. For removal of Spiral Cable and Air Bag Module, see the SR section.
- Do not use electrical test equipment on any circuit related to the SRS unless instructed to in this Service Manual. SRS wiring harnesses can be identified by yellow and/or orange harnesses or harness connectors.
PRECAUTIONS WHEN USING POWER TOOLS (AIR OR ELECTRIC) AND HAMMERS
WARNING:
- When working near the Airbag Diagnosis Sensor Unit or other Airbag System sensors with the Ignition ON or engine running, DO NOT use air or electric power tools or strike near the sensor(s) with a hammer. Heavy vibration could activate the sensor(s) and deploy the air bag(s), possibly causing serious injury.
- When using air or electric power tools or hammers, always switch the Ignition OFF, disconnect the battery and wait at least three minutes before performing any service.
General Precaution
WARNING: When replacing fuel line parts, be sure to observe the following.
- Put a “CAUTION: FLAMMABLE” sign in the work area.
- Be sure to work in a well ventilated area and have a CO2 fire extinguisher.
- Do not smoke while working on the fuel system. Keep open flames and sparks away from the work area.
CAUTION:
- Before removing fuel line parts, carry out the following procedures:
- Put drained fuel in an explosion-proof container and put the lid on securely. Keep the container in safe area.
- Release fuel pressure from the fuel lines. Refer to EC-144, "Work Procedure".
- Disconnect the battery ground cable.
- Always replace O-rings and clamps with new ones.
- Do not kink or twist tubes when they are being installed.
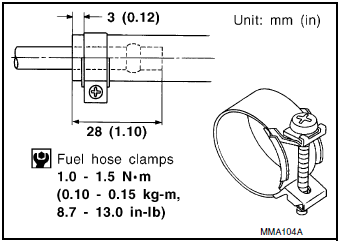
- Do not tighten hose clamps excessively to avoid damaging hoses.
Tighten high-pressure rubber hose clamp so that clamp end is 3 mm (0.12 in) from hose end.
Tightening torque specifications are the same for all rubber hose clamps.
Ensure that screw does not contact adjacent parts.

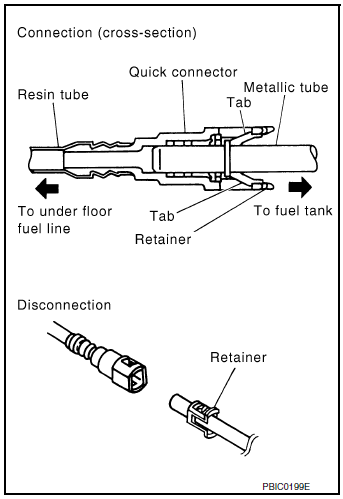
- After connecting the fuel tube quick connectors, make sure
the quick connectors are secure.
Check that the connector and resin tube do not contact any adjacent parts.
- a) Apply fuel pressure to the fuel system by turning the ignition switch to ON (without starting the engine). Then check for fuel leaks at the fuel tube connections.
- b) Start the engine and rev the engine, then check for fuel leaks at the fuel tube connections.
- After installing the tubes, run the engine and check for fuel leaks at the connections.
- Use only a Genuine NISSAN fuel filler cap as a replacement. If an incorrect fuel filler cap is used, the MIL may come on.
- For servicing “Evaporative Emission System” parts, refer to EC-53, "EVAPORATIVE EMISSION SYSTEM : System Description".

 Fuel System
...
 Preparation
Special Service Tool
The actual shape of the tools may differ from those illustrated here
Tool number
(TechMate No.)
Tool name
Description
KV101207S0
( — )
Unified f ...
Other materials:
Symptom diagnosis
SQUEAK AND RATTLE TROUBLE DIAGNOSES
Work Flow
CUSTOMER INTERVIEW
Interview the customer if possible, to determine the conditions that exist
when the noise occurs. Use the Diagnostic
Worksheet during the interview to document the facts and conditions when the
noise occurs and any
custome ...
General maintenance
During the normal day-to-day operation of the
vehicle, general maintenance should be performed
regularly as prescribed in this section. If
you detect any unusual sounds, vibrations or
smells, be sure to check for the cause or have a
NISSAN dealer do it promptly. In addition, you
should notify ...
Removal and installation
NATS ANTENNA AMP.
Removal and Installation
REMOVAL
Remove the steering column covers. Refer to IP-17, "Removal and
Installation".
Disconnect the harness connector from the NATS antenna amp.
Release pawls and remove NATS antenna amp. (1) from the
ignition sw ...
