Nissan Rogue Owners Manual: Instrument brightness control
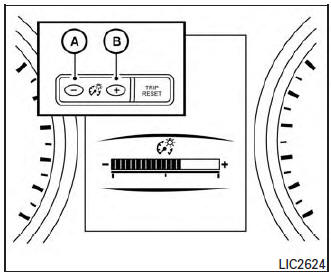
Instrument brightness control
Push the “-” button A to decrease the brightness of instrument panel lights when driving at night.
Push the “+” button B to increase the brightness of instrument panel lights when driving at night.
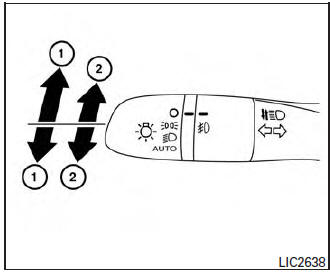
Turn signal switch
Turn signal
- Move the lever up or down to signal the turning direction. When the turn is completed, the turn signal cancels automatically.
Lane change signal
- To signal a lane change, move the lever up or down to the point where the indicator light begins to flash, but the lever does not latch.
The turn signal will flash three times automatically.
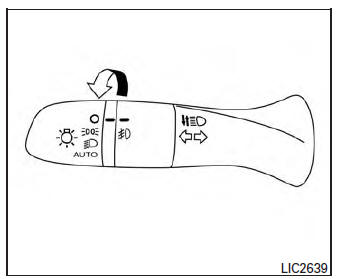
Fog light switch (if so equipped)
To turn the fog lights on, turn the headlight switch
to the  position, then turn the fog
light
switch to the
position, then turn the fog
light
switch to the  position.
To turn the fog lights on with the headlight switch in
the AUTO position, the headlights must be on, then
turn the fog light switch to the  position.
To turn the fog lights off, turn the fog light switch to the OFF position.
The headlights must be on and the low beams selected for the fog lights to operate. The fog lights automatically turn off when the high beam headlights are selected
 Daytime running light system
The daytime running lights automatically illuminate
when the engine is started with the parking
brake released. The daytime running lights operate
with the headlight switch in the OFF position
or ...
 Horn
Horn
To sound the horn, push near the horn icon on the
steering wheel.
WARNINGDo not disassemble the horn. Doing so
could affect proper operation of the
supplemental front air bag system. ...
Other materials:
Diagnosis and repair workflow
Work Flow
OVERALL SEQUENCE
DETAILED FLOW
1. OBTAIN INFORMATION ABOUT SYMPTOM
Interview the customer to obtain as much information as possible about the
conditions and environment under
which the malfunction occurred.
>> GO TO 2.
2. CONFIRM CONCERN
Check the malfunction on the veh ...
System
SRS AIR BAG SYSTEM
SRS AIR BAG SYSTEM : System Description
SYSTEM DIAGRAM
DESCRIPTION
The air bag deploys if the air bag diagnosis sensor unit is
activated while the ignition switch is in the ON or
START position.
The collision modes for which supplemental restraint sys ...
Location of plastic parts
Precautions for Plastics
CAUTION:
When repairing and painting a portion of the body adjacent to
plastic parts, consider their characteristics (influence of heat
and solvent) and remove them if necessary or take suitable measures to
protect them.
Plastic parts should be ...
