Nissan Rogue Service Manual: Basic inspection
DIAGNOSIS AND REPAIR WORKFLOW
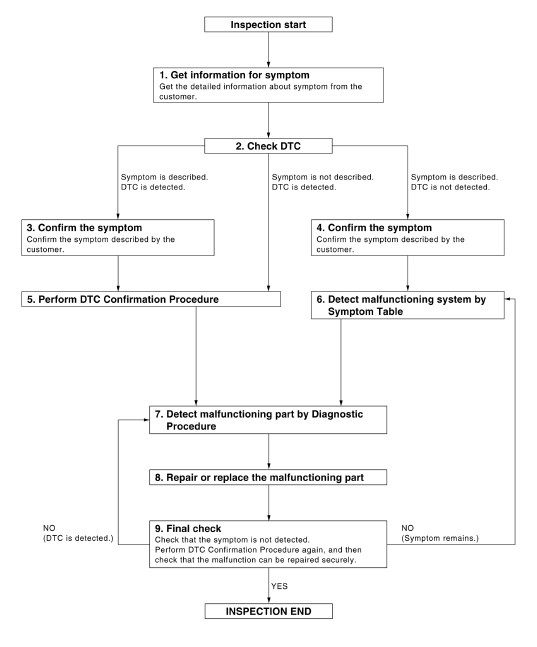
Work Flow
OVERALL SEQUENCE
DETAILED FLOW
1.GET INFORMATION FOR SYMPTOM
Get the detailed information from the customer about the symptom (the condition and the environment when the incident/malfunction occurred).
>> GO TO 2.
2.CHECK DTC
- Check DTC for BCM.
- Perform the following procedure if DTC is displayed.
- Erase DTC.
- Study the relationship between the cause detected by DTC and the symptom described by the customer.
- Check related service bulletins for information.
Is any symptom described and any DTC detected? Symptom is described, DTC is displayed>>GO TO 3.
Symptom is described, DTC is not displayed>>GO TO 4.
Symptom is not described, DTC is displayed>>GO TO 5.
3.CONFIRM THE SYMPTOM
Confirm the symptom described by the customer.
Connect CONSULT to the vehicle in “Data Monitor” mode and check real-time diagnosis results.
Verify relation between the symptom and the condition when the symptom is detected.
>> GO TO 5.
4.CONFIRM THE SYMPTOM
Confirm the symptom described by the customer.
Connect CONSULT to the vehicle in “Data Monitor ” mode and check real-time diagnosis results.
Verify relation between the symptom and the condition when the symptom is detected.
>> GO TO 6.
5.PERFORM DTC CONFIRMATION PROCEDURE
Perform DTC Confirmation Procedure for the displayed DTC, and then check that DTC is detected again.
If two or more DTCs are detected, refer to BCS-107, "DTC Inspection Priority Chart" (BCM) and determine trouble diagnosis order.
Is DTC detected? YES >> GO TO 7.
NO >> Refer to GI-41, "Intermittent Incident".
6.DETECT MALFUNCTIONING SYSTEM BY SYMPTOM TABLE
Detect malfunctioning system according to Symptom Table based on the confirmed symptom in step 4.
>> GO TO 7.
7.DETECT MALFUNCTIONING PART BY DIAGNOSTIC PROCEDURE Inspect according to Diagnostic Procedure of the system.
NOTE: The Diagnostic Procedure is described based on open circuit inspection. A short circuit inspection is also required for the circuit check in the Diagnostic Procedure.
>> GO TO 8.
8.REPAIR OR REPLACE THE MALFUNCTIONING PART
- Repair or replace the malfunctioning part.
- Reconnect parts or connectors disconnected during Diagnostic Procedure again after repair and replacement.
- Check DTC. If DTC is displayed, erase it.
>> GO TO 9.
9.FINAL CHECK
When DTC was detected in step 8, perform DTC Confirmation Procedure or Component Function Check again, and then check that the malfunctions have been fully repaired.
When symptom was described by the customer, refer to the confirmed symptom in step 3 or 4, and check that the symptom is not detected.
Does the symptom reappear? YES (DTC is detected)>>GO TO 7.
YES (Symptom remains)>>GO TO 6.
NO >> Inspection End.
INSPECTION AND ADJUSTMENT
ADDITIONAL SERVICE WHEN REPLACING CONTROL UNIT
ADDITIONAL SERVICE WHEN REPLACING CONTROL UNIT : Special Repair Requirement
Refer to the CONSULT Immobilizer mode and follow the on-screen instructions.
ECM RE-COMMUNICATING FUNCTION
ECM RE-COMMUNICATING FUNCTION : Description
Performing following procedure can automatically perform re-communication of ECM and BCM, but only when the ECM has been replaced with a new one (*1).
*1: New one means an ECM which has never been energized on-board.
(In this step, initialization procedure by CONSULT is not necessary)
NOTE:
- When registering new Key IDs or replacing the ECM that is not brand new, refer to CONSULT Immobilizer mode and follow the on-screen instructions.
- If multiple keys are attached to the key holder, separate them before work.
- Distinguish keys with unregistered key ID from those with registered ID.
ECM RE-COMMUNICATING FUNCTION : Special Repair Requir
1.PERFORM ECM RE-COMMUNICATING FUNCTION
- Install ECM.
- Using a registered key (*2), turn ignition switch to “ON”.
*2: To perform this step, use the key that has been used before performing ECM replacement.
- Maintain ignition switch in “ON” position for at least 5 seconds.
- Turn ignition switch to “OFF”.
- Start engine.
Can engine be started? YES >> Procedure is completed.
NO >> Initialize control unit. Refer to CONSULT Immobilizer mode and follow the on-screen instructions.
KEYFOB ID REGISTRATION
Description
Perform the following procedure after BCM is replaced or when new keyfob ID is registered
Work Procedure
1.STEP 1
Insert the first key into the ignition cylinder.
>> GO TO 2.
2.STEP 2
Turn ON the ignition switch.
>> GO TO 3.
3.STEP 3
Check that the security indicator flashes 5 times after the ignition is turned ON.
>> GO TO 4.
4.STEP 4
Turn the ignition switch OFF for a minimum of 3 seconds.
>> GO TO 5.
5.STEP 5
The first key has been registered.
>> GO TO 6.
6.STEP 6
Remove the first key and insert the next key to be registered.
>> GO TO 7.
7.STEP 7
Repeat steps 2,3 and 4 for each additional key.
>> Registration End.
 Wiring diagram
NVIS
Wiring Diagram
VEHICLE SECURITY SYSTEM
Wiring Diagram
...
 DTC/circuit diagnosis
P1610 LOCK MODE
Description
ECM forcibly switches to the mode that inhibits engine start, when engine
start operation is performed 5 times
or more while communication between ECM and BCM is not n ...
Other materials:
Rear window defogger switch
WITH MANUAL A/C
WITH MANUAL A/C : Description
The rear window defogger is operated by pressing the rear window
defogger switch ON.
The indicator lamp in the rear window defogger switch illuminates
while the rear window defogger is ON.
WITH MANUAL A/C : Component Function Check
...
Auto operation does not operate but manual operate normally
(driver side)
Diagnosis Procedure
1.PERFORM INITIALIZATION PROCEDURE
Initialization procedure is executed and operation is confirmed.
Refer to PWC-27, "ADDITIONAL SERVICE WHEN REMOVING BATTERY NEGATIVE TERMINAL :
Special
Repair Requirement".
Is the inspection result normal?
YES >> Insp ...
Parking brake switch signal circuit
Description
Transmits the parking brake switch signal to the combination meter.
Component Function Check
1.COMBINATION METER INPUT SIGNAL
Start engine.
Check "PKB SW" in "Data Monitor" while applying and releasing the
parking brake.
Is the inspectio ...
