Nissan Rogue Owners Manual: Rear-facing child restraint installation using LATCH
For additional information, refer to all Warnings and Cautions in the ŌĆ£Child SafetyŌĆØ and ŌĆ£Child RestraintŌĆØ sections before installing a child restraint.
NISSAN does not recommend the use of the lower anchors if the combined weight of the child and the child restraint exceeds 65 lbs (29.5 kg). If the combined weight of the child and the child restraint is greater than 65 lbs (29.5 kg), use the vehicleŌĆÖs seat belt (not the lower anchors) to install the child restraint. Be sure to follow the child restraint manufacturerŌĆÖs instructions for installation.
Follow these steps to install a rear-facing child restraint in the 2nd row seats using the LATCH system:
- Position the child restraint on the seat. Always follow the child restraint manufacturerŌĆÖs instructions.
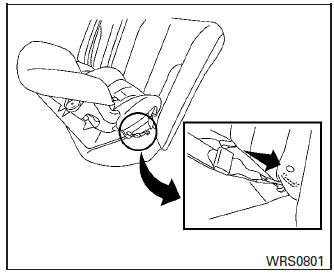
Rear-facing webbing-mounted ŌĆō step 2
- Secure the child restraint anchor attachments to the LATCH lower anchors. Check to make sure the LATCH attachment is properly attached to the lower anchors.
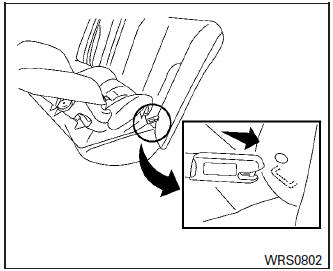
Rear-facing rigid-mounted ŌĆō step 2
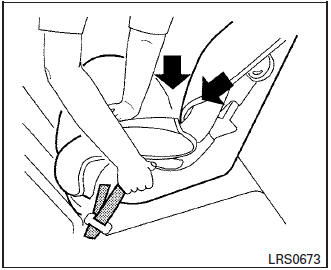
Rear-facing ŌĆō step 3
- For child restraints that are equipped with
webbing-mounted attachments, remove any
additional slack from the anchor attachments.
Press downward and rearward firmly in the center of the child restraint with your hand to compress the vehicle seat cushion and seatback while tightening the webbing of the anchor attachments.
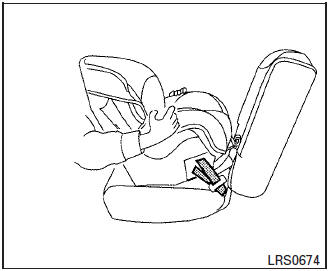
Rear-facing ŌĆō step 4
- After attaching the child restraint, test it before you place the child in it. Push it from side to side while holding the child restraint near the LATCH attachment path. The child restraint should not move more than 1 inch (25 mm), from side to side. Try to tug it forward and check to see if the LATCH attachment holds the restraint in place. If the restraint is not secure, tighten the LATCH attachment as necessary, or put the restraint in another seat and test it again. You may need to try a different child restraint or try installing by using the vehicle seat belt (if applicable). Not all child restraints fit in all types of vehicles.
- Check to make sure the child restraint is properly secured prior to each use. If the child restraint is loose, repeat steps 2 through 4.
 LATCH (Lower Anchors and Tethers for CHildren) System
LATCH system lower anchor locations - bench seat
Your vehicle is equipped with special anchor
points that are used with LATCH system compatible
child restraints. This system may also be
referr ...
 Rear-facing child restraint installation using the seat belts
Rear-facing child restraint installation using the seat belts
WARNINGThe three-point seat belt with Automatic
Locking Retractor (ALR) must be used
when installing a child restraint. ...
Other materials:
Passenger compartment
CAUTIONNever use a fuse of a higher or lower
amperage rating than specified on the
fuse box cover. This could damage the
electrical system or cause a fire.
If any electrical equipment does not operate,
check for an open fuse.
NOTE:
The fuse box is located on the driver ...
P0524 engine oil pressure
DTC Description
DTC DETECTION LOGIC
DTC No.
CONSULT screen terms
(Trouble diagnosis content)
DTC detecting condition
P0524
ENGINE OIL PRESSURE
(Engine oil pressure too low)
An EOP sensor signal voltage applied to ECM remains lower than the
specified
value c ...
Windshield wiper blades
Cleaning
If your windshield is not clear after using the
windshield-washer or if a wiper blade chatters
when running, wax or other material may be on
the blade or windshield.
Clean the outside of the windshield with a washer
solution or a mild detergent. Your windshield is
clean if beads d ...
